
Why This Chocolate Marshmallow Delight Is a Game-Changer
I still remember the first time I made this Chocolate Marshmallow Delight for my family. It was one of those lazy Sunday afternoons when everyone craved something sweet but comforting. The moment they took their first bite, the room went silent—except for the occasional “wow.” That’s the magic of this cake. With layers of rich chocolate, fluffy marshmallow filling, and a whipped cream topping, it’s like a Ding Dong got an upgrade. Whether you’re a seasoned baker or just starting out, this recipe is simple, fun, and oh-so-delicious.
The Sweet History Behind This Cake
This cake draws inspiration from the classic Ding Dong snack, which has been a favorite since the 1960s. Those little chocolate-covered cakes with creamy fillings hold a special place in many hearts, including mine. I grew up sneaking them into my lunchbox, so creating a homemade version felt like paying homage to my childhood. Over the years, I’ve tweaked this recipe to make it even more decadent. It’s not just a dessert—it’s a trip down memory lane with a gourmet twist.
Why You’ll Love This Recipe
What makes this Chocolate Marshmallow Delight stand out? First, it’s incredibly easy to make. You don’t need to be a professional baker to pull this off. Second, the flavors are unbeatable. The combination of chocolate, marshmallow, and whipped cream creates a symphony of sweetness that’s hard to resist. Finally, it’s versatile. Whether you’re serving it at a birthday party or enjoying a slice with your coffee, this cake fits every occasion.
Perfect Occasions to Prepare This Recipe
This cake is perfect for celebrations, potlucks, or even a cozy night in. Imagine bringing it to a holiday gathering—its glossy chocolate ganache topping will catch everyone’s eye. It’s also great for birthdays, especially if you have a chocoholic in your life. And let’s not forget those random days when you just want to treat yourself. Trust me, this cake never disappoints.
Ingredients
- 1 box chocolate cake mix plus ingredients listed on the box (typically eggs, oil, and water)
- 1 cup heavy cream
- ½ cup powdered sugar
- 1 tsp vanilla extract
- 1 cup semi-sweet chocolate chips
- 2 tbsp butter
- 1 cup marshmallow fluff
- 1 tbsp cornstarch
- ¼ cup water
Substitution Options
If you’re looking to switch things up, here are some ideas:
- Swap the semi-sweet chocolate chips for dark or milk chocolate chips based on your preference.
- Use coconut cream instead of heavy cream for a dairy-free option.
- Replace marshmallow fluff with homemade marshmallow creme if you’re feeling adventurous.
Step 1: Preparing the Cake Base
Start by preheating your oven as directed on the cake mix box. While the oven heats up, grab a large mixing bowl and combine the cake mix with eggs, oil, and water. Mix until smooth—it should look like rich, velvety chocolate batter. Pour the batter into a greased round cake pan, spreading it evenly. Pop it in the oven and let the aroma of baking chocolate fill your kitchen. Pro tip: Grease the pan generously to ensure the cake comes out clean.
Step 2: Making the Marshmallow Filling
In a separate bowl, whisk together marshmallow fluff, cornstarch, and ¼ cup of water. Keep whisking until the mixture is smooth and glossy. This step is crucial because the cornstarch helps stabilize the filling, giving it a firmer texture. Think of it as the glue that holds all the deliciousness together. Chef’s tip: If the mixture feels too thick, add a teaspoon of water at a time until it reaches the right consistency.
Step 3: Whipping the Cream
Now for the fun part—whipping the cream! In another bowl, combine heavy cream, powdered sugar, and vanilla extract. Use a hand mixer or stand mixer to whip it until stiff peaks form. The cream should be light, airy, and slightly sweet. Picture clouds of fluffy goodness ready to crown your cake. Pro tip: Chill your mixing bowl and beaters beforehand for faster whipping.
Step 4: Assembling the Layers
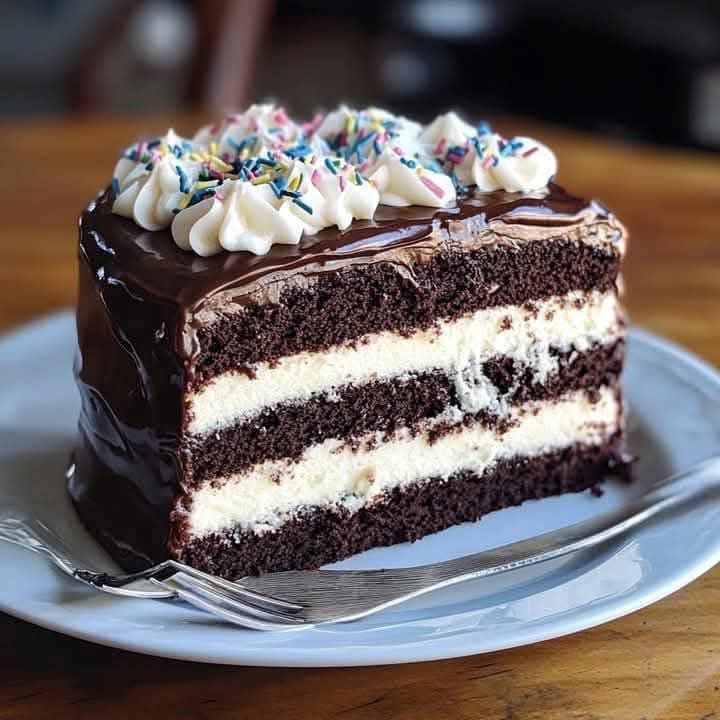
Once the cake has cooled completely, use a serrated knife to cut it horizontally into two layers. Spread the marshmallow filling evenly over the bottom layer, then top it with the whipped cream mixture. Carefully place the second cake layer on top. Take your time with this step—it’s like building a delicious skyscraper. The contrast between the soft filling and the firm cake layers is pure magic.
Step 5: Creating the Chocolate Ganache
Melt the butter in a small saucepan over low heat. Add the chocolate chips and stir until smooth and fully melted. The ganache should be shiny and pourable, like liquid silk. Pour it over the top layer of the cake, letting it drip down the sides for that picture-perfect finish. Pro tip: Let the ganache cool slightly before pouring to prevent it from soaking into the cake.
Timing
Here’s a quick breakdown of the timing:
- Prep time: 20 minutes
- Cooking time: 30 minutes
- Resting time: 1 hour (for cooling and setting)
- Total time: 2 hours
Chef’s Secret
For an extra touch of elegance, sprinkle a pinch of sea salt on the chocolate ganache before it sets. The salt enhances the chocolate’s flavor and adds a sophisticated twist. Your guests won’t know what hit them!
Extra Info
Did you know that marshmallows were originally made from the root of the marshmallow plant? While modern versions skip the plant entirely, they still bring that same gooey charm to desserts like this one. Fun fact: Marshmallow fluff was invented in Massachusetts in the early 1900s and remains a pantry staple for bakers everywhere.
Necessary Equipment
To make this cake, you’ll need:
- A round cake pan
- A hand mixer or stand mixer
- A serrated knife for slicing the cake
- A small saucepan for melting chocolate
- A spatula for spreading fillings
Storage
This cake is best enjoyed fresh, but if you have leftovers, store them properly. Cover the cake with plastic wrap or transfer slices to an airtight container. Keep it in the refrigerator for up to three days. The cold temperature helps the ganache firm up, making each slice easier to cut.
When reheating, let the cake sit at room temperature for about 15 minutes before serving. This allows the flavors to shine and the textures to soften. Avoid microwaving, as it can melt the ganache and ruin the presentation.
If you want to freeze the cake, wrap it tightly in plastic wrap and aluminum foil. It can last up to two months in the freezer. Thaw it overnight in the fridge before serving.
Tips and Advice
Here are a few tips to take your cake to the next level:
- Use high-quality chocolate chips for the ganache—they make a noticeable difference.
- Chill the assembled cake for 15 minutes before adding the ganache to prevent melting.
- Experiment with flavored extracts like almond or peppermint for a unique twist.
Presentation Tips
To make your cake Instagram-worthy, try these ideas:
- Garnish with chocolate shavings or sprinkles for added flair.
- Serve slices on colorful plates to highlight the cake’s beauty.
- Add a dollop of whipped cream and a cherry on top for a retro diner vibe.
Healthier Alternative Recipes
Want to lighten things up? Here are six variations:
- Gluten-Free Version: Use a gluten-free cake mix and ensure all other ingredients are certified gluten-free.
- Dairy-Free Option: Swap butter for vegan margarine and use coconut cream instead of heavy cream.
- Low-Sugar Recipe: Opt for a sugar-free cake mix and use stevia-sweetened chocolate chips.
- Fruit-Infused Twist: Add a layer of fresh raspberries or strawberries for a tangy contrast.
- Protein-Packed Cake: Mix protein powder into the cake batter for a muscle-building treat.
- Vegan Delight: Replace eggs with flax eggs and use plant-based substitutes for cream and butter.
Common Mistakes to Avoid
Mistake 1: Rushing the Cooling Process
One of the biggest mistakes is trying to assemble the cake while it’s still warm. Warm cake layers can cause the fillings to slide around, ruining the structure. Always let the cake cool completely before adding any toppings. Pro tip: Place the cake in the fridge for 10 minutes to speed up the process.
Mistake 2: Overmixing the Whipped Cream
Overmixing whipped cream can turn it grainy or even curdle. Stop whipping as soon as you see stiff peaks form. If you’re unsure, err on the side of caution—it’s better to have slightly softer cream than overworked clumps.
Mistake 3: Skipping the Cornstarch
Some people skip the cornstarch in the marshmallow filling, thinking it’s unnecessary. But trust me, it’s what gives the filling its perfect texture. Without it, the filling may become too runny and messy.
FAQ
Can I use a different type of cake mix?
Absolutely! While chocolate is traditional, you can experiment with vanilla or even red velvet for a fun twist. Just keep in mind that the flavor profile will change slightly.
How do I prevent the ganache from cracking?
Cracking happens when the ganache cools too quickly. To avoid this, let it cool slightly before pouring and ensure your kitchen isn’t too cold. A gentle touch goes a long way.
Can I make this cake ahead of time?
Yes, you can prepare the cake a day in advance. Store it in the fridge and let it come to room temperature before serving. This actually enhances the flavors!
What if I don’t have a round cake pan?
No problem! You can use a square or rectangular pan instead. The shape might differ, but the taste will remain heavenly.
Is this cake kid-friendly?
Definitely! Kids love the combination of chocolate and marshmallow. Plus, they’ll enjoy helping you assemble it.
Can I double the recipe?
Of course! Doubling the recipe works perfectly if you’re feeding a larger crowd. Just make sure you have enough pans and fridge space.
How do I fix lumpy ganache?
If your ganache turns lumpy, microwave it in short bursts, stirring in between. This usually smooths it out. Alternatively, strain it through a fine mesh sieve.
Can I use homemade marshmallow fluff?
Yes, homemade fluff works beautifully. Just make sure it’s thick enough to hold its shape when spread.
What’s the best way to cut the cake?
Use a sharp knife dipped in hot water for clean slices. Wipe the blade between cuts to maintain neat edges.
Can I freeze the ganache separately?
Yes, freezing ganache is fine. Store it in an airtight container and thaw it in the fridge before using.
Final Thoughts
This Chocolate Marshmallow Delight is more than just a cake—it’s a celebration of flavors, textures, and memories. Whether you’re baking it for a special occasion or simply to satisfy your sweet tooth, it’s guaranteed to impress. So grab your apron, gather your ingredients, and get ready to create something truly magical. Happy baking! #lovealletherecipes #dessert #cake
Equipment
- Round cake pan
- Hand mixer or stand mixer
- Serrated knife
- Small saucepan
- Spatula
Ingredients
- 1 box chocolate cake mix
- 1 cup heavy cream
- ½ cup powdered sugar
- 1 tsp vanilla extract
- 1 cup semi-sweet chocolate chips
- 2 tbsp butter
- 1 cup marshmallow fluff
- 1 tbsp cornstarch
- ¼ cup water
Instructions
- Preheat the oven as directed on the cake mix box.
- In a large mixing bowl, combine the cake mix with eggs, oil, and water. Mix until smooth.
- Pour the batter into a greased round cake pan and spread it evenly.
- Bake according to the package instructions until done. Let cool completely.
- In a separate bowl, whisk together marshmallow fluff, cornstarch, and ¼ cup of water until smooth.
- In another bowl, combine heavy cream, powdered sugar, and vanilla extract. Whip until stiff peaks form.
- Slice the cooled cake horizontally into two layers.
- Spread the marshmallow filling evenly over the bottom layer, then top with the whipped cream mixture.
- Place the second cake layer on top.
- Melt butter in a small saucepan over low heat, then add chocolate chips and stir until smooth.
- Pour the ganache over the top layer of the cake, letting it drip down the sides.
Notes
Nutrition

Hi, I’m Olivia Parker, the founder of BakingSecret.com and a lifelong lover of all things sweet and homemade. I grew up in a small town in Oregon, where the smell of fresh cookies in my family’s kitchen sparked my passion for baking. Over the years, I turned that passion into a mission: to help home bakers feel confident, inspired, and creative.
After studying food science and working in several artisan bakeries across the U.S., I decided to create a space where everyone from beginners to seasoned bakers can find reliable recipes, expert tips, and a warm, welcoming community. BakingSecret.com is my way of sharing the magic of baking with the world. When I’m not testing new recipes, you’ll find me exploring farmers’ markets, collecting vintage cookbooks, or perfecting my sourdough technique.