
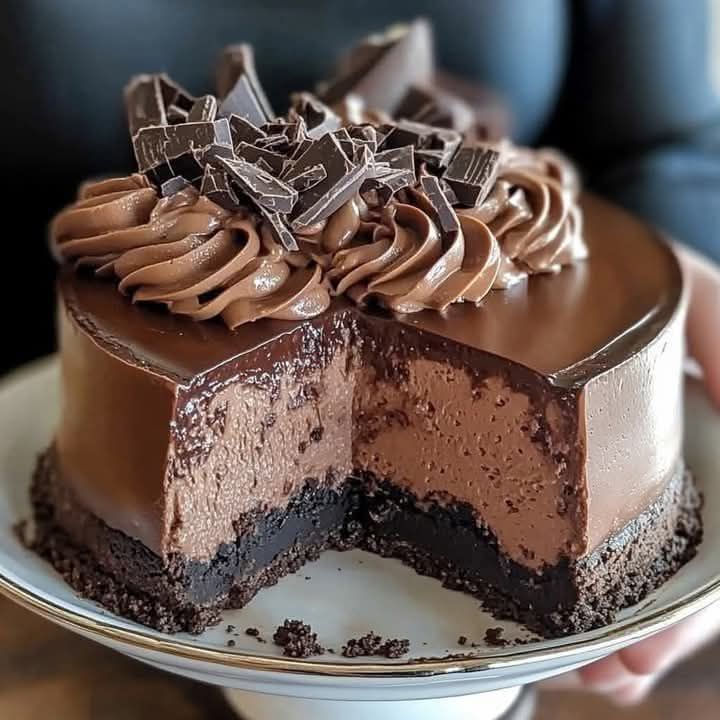
The Ultimate Classic Chocolate Cake Recipe You’ll Bake Again and Again
Is there anything more comforting than the smell of a chocolate cake baking in the oven? It has this magical way of making a house feel like a home. I perfected this particular recipe after what I lovingly call “The Great Birthday Cake Disaster of ’18” – let’s just say a sunken cake taught me more than any cookbook ever could. This version? It’s my family’s absolute favorite, a guaranteed crowd-pleaser that’s surprisingly simple. Today, I’m sharing all my secrets so you can create your own Classic Chocolate Delight.
A Slice of History: The Story of Our Classic Chocolate Delight
Chocolate cake has been warming hearts worldwide for centuries, but the moist, tender version we love today is a distinctly American creation. It really took off when baking soda and cocoa powder became pantry staples. My take, this Classic Chocolate Cake, blends tradition with a modern twist – using both butter for flavor and oil for that unbeatable, moist texture my kids adore. It’s the cake my grandma would have baked if she’d had my fancy mixer!
Why You’ll Fall in Love With This Chocolate Cake
This isn’t just another cake recipe. This one is special. First, it’s incredibly moist and stays that way for days. The flavor is deep and rich, but not overly sweet. Best of all, it’s straightforward. No fancy techniques here, just good, honest baking. Whether you’re a new baker or a seasoned pro, this recipe is your new best friend for creating moments of pure, chocolatey joy.
Perfect Occasions for Your Chocolate Creation
This cake is your secret weapon for so many celebrations! It’s a birthday classic, of course. But it’s also perfect for potlucks, where it always disappears first. Bake it for a cozy Sunday dinner to show your family some love, or bring it to a friend who needs a pick-me-up. It shouts “I care” in the most delicious way possible.
Gathering Your Ingredients for the Classic Chocolate Delight
Let’s round up the team! Using simple, quality ingredients is the key here.
For the Cake:
- 1 3/4 cups all-purpose flour
- 3/4 cup unsweetened cocoa powder
- 1 1/2 teaspoons baking powder
- 1 1/2 teaspoons baking soda
- 1 1/2 teaspoons salt
- 1 cup granulated sugar
- 3/4 cup packed light brown sugar
- 1/2 cup unsalted butter, at room temperature
- 1/2 cup vegetable oil
- 2 eggs
- 2 egg yolks
- 1 cup buttermilk
- 2 teaspoons vanilla extract
- 1 cup boiling water
For the Chocolate Frosting:
- 6 ounces semisweet chocolate, chopped
- 1/2 cup unsalted butter, at room temperature
- 1 1/2 cups powdered sugar
- 1/4 cup heavy cream
- 1 teaspoon vanilla extract
No-Stress Substitution Options
Out of something? No panic! Here are easy swaps:
- Buttermilk: Mix 1 cup milk with 1 tablespoon lemon juice or vinegar. Let it sit for 5 minutes.
- Cocoa Powder: Use natural or Dutch-processed; both work wonderfully here.
- Vegetable Oil: Canola, sunflower, or even melted coconut oil are fine substitutes.
- All-purpose flour: For a slightly denser texture, you can use cake flour. We do not recommend gluten-free blends for this specific recipe.
Let’s Bake! Your Step-by-Step Guide
Follow these simple steps to chocolate heaven. I’ll guide you through every part.
Step 1: Preheat & Prepare Your Pans
The very first thing you should do is turn your oven to 350°F (175°C). This gives it plenty of time to reach the perfect temperature. While it heats, grab your two 9-inch round cake pans. Grease them generously with butter or baking spray, then dust with a little flour, tapping out the excess. This is your insurance policy for perfect, un-stuck cake layers. Line the bottoms with a circle of parchment paper for extra safety!
Step 2: Combine Your Dry Ingredients
In a medium bowl, take your whisk and combine the flour, cocoa powder, baking powder, baking soda, and salt. Whisking does two important jobs: it blends everything evenly and gently aerates the mixture. You’ll see the cocoa’s deep brown color mix with the white flour, creating a beautiful, chocolaty powder. Set this bowl aside for its grand entrance later. Pro tip: For an extra tender cake, you can sift these ingredients together instead of whisking.
Step 3: Cream the Butter and Sugars
In a large bowl, use an electric mixer to beat the softened butter, granulated sugar, and brown sugar. Beat it for a good 3-4 minutes, until it becomes noticeably lighter in color and wonderfully fluffy. This step incorporates air, which is crucial for a good rise. Then, add the eggs and egg yolks one at a time, beating well after each. Finally, mix in the vanilla extract. Your mixture should be smooth, pale, and creamy.
Step 4: Alternately Add Dry Mix and Buttermilk
Now, we combine everything. With your mixer on low speed, add about one-third of your flour mixture to the butter bowl. Mix just until it disappears. Next, pour in half of the buttermilk. Continue alternating, finishing with the last portion of flour. Mix only until the last streaks of flour vanish. The batter will be thick and luxurious at this point. Overmixing is the enemy of a tender cake!
Step 5: The Magic of Boiling Water
This is the secret step! Carefully pour in the cup of boiling water. The batter will immediately become very thin and liquid. Don’t worry! This is exactly what we want. The hot water “blooms” the cocoa powder, intensifying its flavor, and creates an incredibly moist crumb. Stir by hand with a spatula until the batter is silky smooth and uniform in color.
Step 6: Bake to Perfection
Evenly divide the thin batter between your prepared pans. They will be quite full. Gently tap the pans on the counter to release any big air bubbles. Slide them into your preheated oven and bake for 25 to 30 minutes. You’ll know it’s done when the tops spring back lightly to the touch, and a toothpick inserted into the center comes out with just a few moist crumbs, not wet batter. The smell will be incredible!
Step 7: Cool the Cake Layers
Patience is key here! Let the cakes cool in their pans on a wire rack for exactly 10 minutes. This allows them to set just enough. Then, run a knife around the edges, place a rack on top, and flip. The cakes should release beautifully. Peel off the parchment paper circles and let them cool completely on the racks before you even think about frosting. A warm cake will melt your frosting into a puddle.
Step 8: Make the Silky Chocolate Frosting
While the cakes cool, make the frosting. Create a double boiler by placing a heatproof bowl over a saucepan with an inch of simmering water (don’t let the bowl touch the water). Melt the chopped chocolate and butter together, stirring until it’s a glossy, smooth pool. Remove it from the heat and let it cool for about 10 minutes – it should be warm, not hot. Then, beat in the powdered sugar, heavy cream, and vanilla until the frosting is smooth, spreadable, and dreamy.
Step 9: Assemble Your Masterpiece
Time for the fun part! Place one cake layer on your serving plate. Spread a generous amount of frosting over the top. Carefully add the second layer. Use the remaining frosting to cover the top and sides of the cake. Don’t aim for bakery-perfect if you’re a beginner – a rustic, swoopy look is totally charming and delicious. Chef’s tip: For extra clean slices, dip your knife in hot water and wipe it dry between cuts.
How Much Time Do You Need?
| Prep Time: | 20 minutes |
| Bake Time: | 30 minutes |
| Cooling Time: | 1 hour |
| Frosting/Decorating: | 20 minutes |
| Total Time: | Approximately 2 hours 10 minutes |
Chef’s Secret: The Room Temperature Rule
My biggest secret? Room temperature ingredients! Cold butter doesn’t cream well, and cold eggs can cause the batter to curdle. Take your butter, eggs, and buttermilk out of the fridge about an hour before you start. This simple step ensures a smooth, emulsified batter that bakes up evenly and yields the best texture. It’s a game-changer, trust me.
Extra Info: Why Cocoa is a Superstar
That unsweetened cocoa powder isn’t just for flavor. It’s packed with antioxidants! The Dutch-processed kind is treated to neutralize acidity, giving a mellower, darker chocolate flavor, while natural cocoa is brighter and more acidic. This recipe works beautifully with either, so use what you love. For a deeper dive into the quality of your ingredients, you can check out a nutrition analysis database to see the makeup of different cocoa powders.
Necessary Equipment
- Two 9-inch round cake pans
- Mixing bowls (medium and large)
- Electric hand mixer or stand mixer
- Whisk and spatula
- Measuring cups and spoons
- Wire cooling racks
- Saucepan for double boiler
How to Store Your Classic Chocolate Cake
Once frosted, your cake is best stored covered at room temperature for up to 2 days. I use a cake carrier or a large bowl turned upside down over it. The frosting acts as a seal to keep the cake moist. If your kitchen is very warm, you can refrigerate it.
For longer storage, you can refrigerate the frosted cake for up to 5 days. Let it sit at room temperature for about an hour before serving to allow the frosting to soften and the flavors to shine.
You can also freeze this cake! Wrap unfrosted, cooled cake layers tightly in plastic wrap and then aluminum foil. They will keep for up to 3 months. Thaw overnight in the fridge and frost as usual.
Common Mistakes to Avoid
Mistake 1: Measuring Flour Incorrectly
This is the #1 reason cakes turn out dry or dense. Scooping flour directly from the bag packs it down, adding too much. Instead, spoon the flour lightly into your measuring cup and level it off with the flat edge of a knife. For ultimate accuracy, a kitchen scale is your best friend. A little care here makes a huge difference in texture.
Mistake 2: Overmixing the Batter
Once you add the flour, gluten development begins. Mixing too much creates a tough, chewy cake. Once the wet and dry ingredients are combined, stop mixing as soon as you see no more dry flour streaks. It’s okay if the batter looks a little lumpy before you add the water – those lumps will smooth out. A light hand equals a tender crumb.
Mistake 3: Opening the Oven Door Too Early
We’ve all done it – peeked to see how the cake is rising. But that rush of cold air can cause the center to fall. Resist the urge for at least the first 20 minutes of bake time. Trust your oven light and the timer. Your patience will be rewarded with a beautifully domed cake.
Mistake 4: Frosting a Warm Cake
It’s tempting to assemble your creation right away. But if the cake layers are even slightly warm, the frosting will melt, slide right off, and soak into the cake. Let the layers cool completely on a wire rack. This can take a full hour. Use this time to make your frosting for a perfect, stable finish.
More Tips & Tricks for Success
- For super flat cake layers, use bake-even strips (wet fabric strips wrapped around the cake pans).
- If you don’t have buttermilk, the milk + acid substitute works perfectly – don’t skip it!
- A crumb coat (a thin layer of frosting) before the final coat traps loose crumbs for a cleaner look.
- Toast chopped nuts (like walnuts or pecans) and press them onto the sides of the frosted cake for easy, elegant decoration.
Presentation Tips to Wow Your Guests
Make your cake look as good as it tastes!
- Dust the top with cocoa powder or powdered sugar using a small sieve.
- Arrange fresh berries like raspberries or strawberries around the top edge.
- Create chocolate shavings with a vegetable peeler and pile them in the center.
- Pipe rosettes or shells of extra frosting around the base or top using a star tip.
- Serve each slice with a dollop of fresh whipped cream or a scoop of vanilla ice cream.
Healthier & Fun Variations of the Classic Chocolate Delight
Love this recipe? Try these tasty twists!
- Gluten-Free Chocolate Cake: Substitute the all-purpose flour with a 1-to-1 gluten-free baking blend. Be sure your cocoa powder is certified gluten-free.
- Vegan Chocolate Cake: Replace the eggs with flax eggs, use plant-based milk + vinegar for the buttermilk, and use vegan butter and oil. Frost with a dairy-free chocolate ganache.
- Chocolate Cupcakes: This batter makes amazing cupcakes! Line muffin tins and fill cups 2/3 full. Bake for 18-22 minutes. Perfect for portion control (or not!).
- Chocolate Peanut Butter Cake: Add a layer of creamy peanut butter between the cake layers before frosting. Swirl peanut butter into the chocolate frosting for a marbled effect.
- Chocolate Orange Cake: Add the zest of one orange to the batter and a tablespoon of orange liqueur or juice to the frosting for a bright, citrusy note.
- Mexican Chocolate Cake: Add 1 teaspoon of cinnamon and a tiny pinch of cayenne pepper to the dry ingredients for a warm, slightly spicy kick.
If you adored this layer cake, you might also enjoy exploring other showstopping desserts on my site. For instance, the creamy, dreamy layers in this Banana Pudding Cheesecake offer a totally different but equally delightful experience. Or, for another chocolate-and-nut combo, the swirls in this Peanut Butter Cup Cake Roll are simply irresistible. You can find even more inspiration in my complete collection of cake and cupcake recipes, where the possibilities are endless.
Frequently Asked Questions
Can I make this chocolate cake in a different pan?
Absolutely! This versatile batter works in a 9×13 inch rectangular pan. Just bake it for about 35-40 minutes. You can also make a stunning bundt cake – grease and flour your bundt pan very thoroughly, and bake for 45-55 minutes. For cupcakes, fill lined tins 2/3 full and bake for 18-22 minutes. Always do the toothpick test in the center to check for doneness, no matter the pan shape.
Why did my cake sink in the middle?
A sunken cake usually means it needed more bake time, or the oven door was opened too early letting in cold air. It can also happen if there’s too much leavener (baking soda/powder) or if the batter was over-mixed after the flour was added. Make sure your oven is fully preheated, set a timer, and try not to open the door until near the end of the suggested bake time. An oven thermometer can help ensure your oven temp is accurate.
Can I frost this cake with something other than chocolate frosting?
Of course! This Classic Chocolate Delight is a fantastic base for so many frostings. A classic vanilla buttercream provides a beautiful contrast. A cream cheese frosting is tangy and rich. For something lighter, try sweetened whipped cream or a dusting of powdered sugar. A salted caramel drizzle over the top would also be heavenly. Choose what makes you happy!
My frosting turned out grainy. What went wrong?
A grainy frosting is often due to the powdered sugar not dissolving completely. Make sure your melted chocolate-butter mixture has cooled slightly (it should be warm, not hot) before adding the sugar. Sifting your powdered sugar first can also help. Beat the frosting for a full 2-3 minutes on medium speed to ensure everything is perfectly smooth and creamy.
How can I tell if my baking powder and soda are still good?
Old leaveners lose their power and can lead to flat cakes. To test baking powder, mix 1/2 teaspoon with 1/4 cup hot water. It should bubble vigorously immediately. For baking soda, mix 1/2 teaspoon with a few drops of vinegar or lemon juice. It should fizz strongly. If not, it’s time for a fresh box. I replace mine every 6 months to be safe.
What’s the best way to get the cakes out of the pans?
Preparation is key! Always grease AND flour your pans (or use a baking spray with flour). Let the cakes cool in the pan for exactly 10 minutes – this allows them to contract slightly and pull away from the sides. Then, run a thin knife or offset spatula around the edge, place a cooling rack on top, and confidently flip. A gentle tap should release them. The parchment paper circle on the bottom is your ultimate safety net.
Can I make this cake ahead of time?
Yes, it’s a great make-ahead dessert! The unfrosted cake layers can be wrapped tightly in plastic wrap and stored at room temperature for a day, or frozen for up to 3 months. You can also make the frosting a day ahead, store it covered in the fridge, and let it come to room temperature, then re-whip it before using. Assemble the cake the day you plan to serve it for the freshest taste and texture.
Do I have to use both granulated and brown sugar?
The brown sugar adds moisture and a subtle molasses flavor that deepens the chocolate taste. If you must substitute, you can use all granulated sugar, but the cake will be slightly less moist and complex. For the best results, I really recommend using the mix. If you’re out of brown sugar, you can make a DIY version by mixing 3/4 cup granulated sugar with 1 tablespoon of molasses.
Is boiling water really necessary?
Yes, in this recipe it is! The boiling water does something special. It “blooms” the cocoa powder, releasing its full flavor potential. It also helps dissolve the sugars and creates a very thin batter that results in an exceptionally moist and tender cake. Don’t skip it – just be careful when stirring it in.
My cake is very crumbly when I cut it. How can I fix this?
Crumbly cake is often a sign of over-baking or slightly too much flour. Ensure you’re measuring your flour correctly (spoon and level!). Also, make sure you’re not baking the cake for too long – it’s done when a few moist crumbs cling to the toothpick, not when it’s completely dry. Letting the cake rest for a few hours after frosting also helps the layers settle and makes for cleaner slices.
Your Turn to Create a Sweet Memory
Baking this Classic Chocolate Cake is about so much more than following a recipe. It’s about creating a moment, sharing something made with your own hands, and filling your home with that unforgettable chocolate aroma. It has seen me through birthdays, bad days, and just-because Tuesdays. I truly hope it becomes a cherished recipe in your home too. Don’t be afraid to get a little messy, lick the spoon, and enjoy the process. Now, go preheat that oven and get baking—you’ve got this!
Equipment
- Deux moules à gâteau ronds de 9 pouces
- Grand bol
- Fouet
- Spatule
- Papier sulfurisé
Ingredients
- 1 3/4 tasse farine tout usage
- 3/4 tasse cacao en poudre
- 1 1/2 cuillère à café poudre à lever
- 1 1/2 cuillère à café bicarbonate de soude
- 1 1/2 cuillère à café sel
- 1 tasse sucre granulé
- 3/4 tasse sucre brun clair compacté
- 1/2 tasse beurre non salé, à température ambiante
- 1/2 tasse huile végétale
- 2 œufs
- 2 jaunes d'œufs
- 1 tasse babeurre
- 2 cuillère à café extrait de vanille
- 1 tasse eau bouillante
Instructions
- Préchauffez le four à 175°C et préparez deux moules à gâteau de 9 pouces en les graissant et en les farinant.
- Dans un bol, combinez la farine, le cacao en poudre, la poudre à lever, le bicarbonate de soude et le sel; fouettez ensemble.
- Dans un grand bol, crémez le beurre, le sucre granulé et le sucre brun avec un batteur électrique pendant 3-4 minutes jusqu'à ce que le mélange soit léger et crémeux.
- Ajoutez les œufs et les jaunes un à un, en battant bien après chaque ajout, puis incorporez l'extrait de vanille.
- Ajoutez progressivement un tiers du mélange sec à la préparation de beurre, suivi de la moitié du babeurre; répétez, en terminant par le mélange sec.
- Incorporez délicatement l'eau bouillante jusqu'à obtenir une pâte lisse et homogène.
- Divisez la pâte uniformément entre les moules préparés et faites cuire pendant 25 à 30 minutes ou jusqu'à ce qu'un cure-dent en ressorte avec des miettes humides.
- Laissez refroidir les gâteaux dans les moules pendant 10 minutes, puis retirez-les des moules et laissez-les refroidir complètement sur des grilles.
- Pour le glaçage, faites fondre le chocolat et le beurre dans un bain-marie jusqu'à obtenir un mélange lisse, puis laissez refroidir légèrement avant d'incorporer le sucre en poudre, la crème et la vanille.
- Gélez les couches de gâteau refroidies, en les empilant avec du glaçage entre elles et en recouvrant le dessus et les côtés.
Notes
Nutrition

Hi, I’m Olivia Parker, the founder of BakingSecret.com and a lifelong lover of all things sweet and homemade. I grew up in a small town in Oregon, where the smell of fresh cookies in my family’s kitchen sparked my passion for baking. Over the years, I turned that passion into a mission: to help home bakers feel confident, inspired, and creative.
After studying food science and working in several artisan bakeries across the U.S., I decided to create a space where everyone from beginners to seasoned bakers can find reliable recipes, expert tips, and a warm, welcoming community. BakingSecret.com is my way of sharing the magic of baking with the world. When I’m not testing new recipes, you’ll find me exploring farmers’ markets, collecting vintage cookbooks, or perfecting my sourdough technique.