
The Triple Chocolate Mousse Cake: My Ultimate Celebration Showstopper
You know that feeling when you want a dessert that feels truly special? Something elegant, indulgent, and guaranteed to get “wows” from everyone at the table? Well, my friends, this is it. My Triple Chocolate Mousse Cake is my go-to secret weapon for birthdays, anniversaries, or just beating the Tuesday blues. It looks like it came from a fancy patisserie, but I promise, it’s all about simple steps and a whole lot of chocolate love.
A Slice of Sweet History
While mousse itself has roots in French cuisine, this layered cake is a modern twist that celebrates chocolate in all its glorious forms. I first fell in love with a version at a small cafe years ago and spent months testing in my kitchen to get the balance just right. The trick is using dark, milk, and white chocolate separately—it creates a stunning visual and a taste adventure that goes from deep and intense to sweet and creamy in every single bite. It’s a dessert that feels both classic and completely show-stopping.
Why You’ll Adore This Chocolate Mousse Cake
Beyond being incredibly pretty, this cake is a dream to make. There’s no oven involved! The magic happens in your fridge. It’s also incredibly versatile. Need a gluten-free dessert? Just use gluten-free cookies for the base. It’s light yet rich, sophisticated yet approachable. Every time I serve it, someone asks for the recipe, and I just smile and say, “It’s easier than you think!”
When to Whip Up This Decadent Dessert
This cake is perfect for those moments that call for a little extra sparkle. Think Valentine’s Day, Mother’s Day, or a fancy dinner party dessert. I’ve even made mini versions in glasses for a holiday potluck—they were the first thing to disappear! It’s also my favorite “just because” treat when I want to spoil my family.
Gathering Your Chocolate Mousse Ingredients
Quality matters here, especially with the chocolate. Using good chocolate means a smoother, more flavorful mousse. Here’s what you’ll need for this triple-layered wonder.
- For the Base: 1 cup chocolate cookie crumbs, 2 tbsp unsalted butter (melted).
- For the Dark Chocolate Mousse: 1 cup heavy cream, 200g dark chocolate (chopped), 2 tbsp sugar.
- For the Milk Chocolate Mousse: 1 cup heavy cream, 200g milk chocolate (chopped), 2 tbsp sugar.
- For the White Chocolate Mousse: 1 cup heavy cream, 200g white chocolate (chopped), 2 tbsp sugar.
- For Garnish: Chocolate shavings (use all three types for a gorgeous look!).
Easy Ingredient Swaps
Don’t stress if you’re missing something! Here are some simple swaps:
- Cookie Crumbs: Graham crackers or digestive biscuits work perfectly.
- Heavy Cream: For a lighter version, you can use whipping cream, but the mousse will be a bit less stable.
- Chocolate Chips: In a pinch, high-quality chocolate chips can be used instead of baking chocolate bars.
- Springform Pan: A deep pie dish or a loaf pan lined with parchment paper can work, though releasing the cake is trickier.
Creating Your Triple Chocolate Masterpiece
Step 1: Preparing the Crumbly Base
Start by combining your chocolate cookie crumbs with that melted, golden butter. Mix it until it looks like dark, damp sand. Press this mixture firmly into the bottom of your springform pan. I use the bottom of a glass to get it really smooth and even. Pop this in the fridge to chill. This base gives our cloud-like mousse something delicious to sit on and adds a wonderful textural crunch.
Step 2: Crafting the Dark Chocolate Layer
Now for the first layer of luxury! Chop your dark chocolate and place it in a bowl. Heat your cream until it’s steaming hot but not boiling—you should see small bubbles forming around the edge. Pour the hot cream over the dark chocolate and let it sit for a minute. Then, stir slowly until it transforms into a silky, glossy pool of pure chocolate. Let it cool for about 10 minutes, then fold in the sugar. Pour this over your chilled base and smooth the top. Back into the fridge it goes to set. Pro tip: Letting this layer chill for 20-30 minutes before adding the next one keeps those beautiful lines sharp.
Step 3: Building the Milk Chocolate Mousse
Repeat the exact same process with the milk chocolate. The aroma will be sweeter and creamier. Once your dark layer has firmed up a bit, gently pour the milk chocolate mousse over it. Use a spatula to spread it carefully so you don’t disturb the layer below. The contrast between the deep dark and the golden milk chocolate is already stunning. Refrigerate again for another 20-30 minutes.
Step 4: Topping It Off with White Chocolate
White chocolate can be a little delicate, so heat your cream just as carefully. Pour it over the chopped white chocolate and stir gently until completely smooth. This layer will be the sweetest and creamiest crown for our cake. Pour it over the set milk chocolate layer and give the pan a gentle tap on the counter to remove any air bubbles. Now, the hard part: patience! Let the entire cake chill for at least 4 hours, but overnight is truly best for perfect, clean slices.
Step 5: The Grand Reveal and Garnish
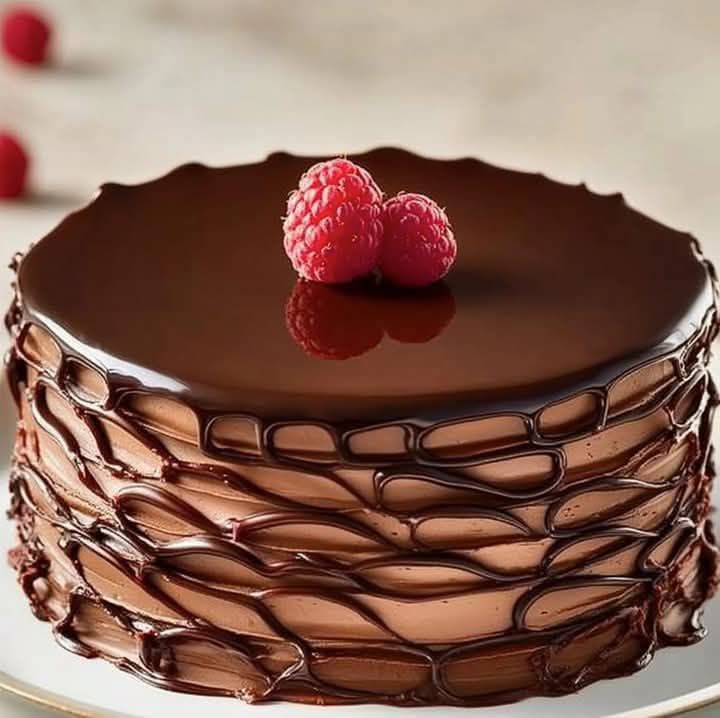
The moment of truth! Run a thin, warm knife around the edge of the springform pan to loosen the cake. Unlatch the ring and lift it away. I like to use a vegetable peeler on a block of chocolate to make beautiful, delicate shavings. Sprinkle them generously over the top. For a real “wow,” use a mix of dark, milk, and white chocolate shavings. Chef’s tip: Dip your knife in hot water and wipe it dry between each slice for magazine-worthy, clean cuts.
Your Timeline to Dessert Bliss
- Prep Time: A fun and easy 30 minutes.
- Chill Time: The crucial 4+ hours (overnight is king!).
- Total Time: About 4.5 hours, mostly hands-off.
- Servings: 8 generous slices of pure happiness.
My Secret for Flawless Layers
The absolute key to this cake is temperature control. Make sure each mousse layer has cooled to room temperature before pouring it onto the chilled layer below. If the mousse is too warm, it will melt the layer underneath and you’ll get a muddy blend instead of those gorgeous, distinct stripes.
A Chocolate Lover’s Fun Fact
Did you know that white chocolate isn’t technically chocolate in the same way? It contains cocoa butter, sugar, and milk, but no cocoa solids. That’s why it has that different flavor and melting quality. Using all three “chocolates” gives you a complete spectrum of flavors from the complex cocoa solids to the rich, buttery sweetness.
Kitchen Tools You’ll Need
- A 9-inch springform pan (non-negotiable for easy release!)
- Mixing bowls (I use three for the three mousses)
- A small saucepan for heating cream
- A spatula and a whisk
- An electric mixer or a strong arm for whipping (optional, for garnish)
Storing Your Chocolate Mousse Cake
Once your cake is set, it needs to stay chilled. Keep it covered in the refrigerator for up to 4 days. I place a toothpick in each corner of the cake and drape plastic wrap over them so the wrap doesn’t touch and mar the beautiful top.
Can you freeze it? Absolutely! Wrap the whole cake or individual slices tightly in plastic wrap, then in foil. Freeze for up to a month. Thaw overnight in the fridge before serving. The texture holds up surprisingly well.
For serving, always take it out of the fridge just 10-15 minutes before slicing. This allows the mousse to soften slightly for that perfect, melt-in-your-mouth texture.
Tips for Mousse Cake Success
- Chop Chocolate Evenly: Uniform pieces melt at the same rate for a super smooth mousse.
- Don’t Boil the Cream: Scalded cream can affect the texture. Just heat it until steaming.
- Fold Gently: When adding sugar to the chocolate-cream mixture, fold it in gently to keep the mousse light and airy.
- Patience is a Virtue: Don’t rush the chilling times. Each layer needs to set properly.
Presentation Ideas to Impress
- Serve with a dollop of freshly whipped cream and a single raspberry on the side.
- Drizzle each plate with a little caramel or raspberry sauce for a pop of color and flavor.
- For a party, make individual portions in elegant glasses, layering the mousse as you go.
- Add a sprinkle of flaky sea salt on top to elevate the chocolate flavors even more.
Healthier & Fun Variations to Try
Love this recipe? Mix it up! Here are six delicious spins on the classic.
- Berry Swirl Mousse Cake: Add a layer of raspberry or strawberry coulis between the chocolate mousses for a fruity, tart contrast.
- Mint Chocolate Version: Add a few drops of peppermint extract to the dark chocolate layer for a refreshing twist.
- Orange Zest Infusion: Stir fresh orange zest into the dark or milk chocolate mousse for a sophisticated chocolate-orange flavor.
- Mocha Mousse Cake: Dissolve a tablespoon of instant espresso powder into the hot cream for the dark chocolate layer for a coffee kick.
- Vegan Chocolate Mousse Cake: Use coconut cream and vegan dark, milk, and white chocolate. The base can be made with vegan cookies and coconut oil.
- Nutty Crunch Addition: Press a layer of finely chopped toasted hazelnuts or almonds into the buttered base before adding the crumbs for extra texture.
Speaking of classic desserts, if you love creamy, nostalgic pies, you absolutely must try my Old Fashioned Banana Cream Pie. It’s a family favorite! And for the ultimate pure chocolate fix, this intensely rich French Chocolate Cake is a five-ingredient wonder. If you’re a peanut butter fanatic, this Reeses Peanut Butter Cup Cheesecake will blow your mind. For something lighter but equally elegant, a Mascarpone Log with fresh fruit is a beautiful choice.
Common Mistakes to Avoid
Mistake 1: Rushing the Chilling Process
This is the biggest culprit for a messy cake. If you add the next mousse layer before the one below has set, they will blend together. You’ll lose those beautiful, clean layers. Your cake might taste fine, but it won’t have that stunning striped look. To avoid this, follow the chill times in the recipe. If your kitchen is warm, give it an extra 10-15 minutes. The wait is worth it!
Mistake 2: Overheating the Cream
If you bring the cream to a rolling boil, you risk scalding it. This can give it a slightly cooked taste and can also cause the chocolate to “seize” or become grainy when you mix them. The goal is to heat the cream until it’s just hot enough to melt the chocolate. Look for small bubbles around the edges of the pan and a bit of steam. Remove it from the heat as soon as you see that.
Mistake 3: Using Low-Quality Chocolate
Since chocolate is the star of this show, its quality makes a huge difference. Baking chips or low-quality bars often contain stabilizers that can affect the smoothness and flavor of your mousse. For the best texture and rich taste, use good-quality chocolate bars meant for baking or eating. The flavor will be deeper, and the mousse will set with a lovely, silky mouthfeel.
Mistake 4: Not Tapping Out Air Bubbles
After you pour each mousse layer, tiny air bubbles can get trapped, leaving little holes on the surface once it sets. This is purely a cosmetic issue, but for that flawless finish, it’s easy to fix. Simply lift your pan an inch or two off the counter and gently drop it a few times after each pour. This helps the mousse settle and brings bubbles to the surface to pop.
Remember, gentle heat is key in many desserts, much like the slow, moist heat used in braising meats, which tenderizes tough cuts perfectly. Controlling temperature ensures the best texture in all your cooking.
Frequently Asked Questions
Can I make this cake ahead of time?
Absolutely, and I highly recommend it! This cake is the perfect make-ahead dessert. Prepare it completely the day before you need it. Let it chill overnight in the refrigerator. This not only makes planning easy but also allows the flavors to meld beautifully and gives the mousse ample time to set up firmly. Simply garnish with chocolate shavings an hour or two before serving. It keeps its texture and taste wonderfully for 3-4 days in the fridge.
Why did my white chocolate mousse turn out grainy?
White chocolate is very sensitive to heat and can “seize” or become grainy if it gets too hot or if even a tiny drop of water gets into it. Make sure your bowl and utensils are completely dry. When heating the cream for the white chocolate, be extra careful not to overheat it. Also, ensure your white chocolate is finely and evenly chopped so it melts quickly and smoothly with the warm cream. If it does seize, you can sometimes rescue it by whisking in an extra tablespoon of warm cream until smooth.
Can I use all one type of chocolate?
You can, but you’ll miss out on the signature triple-layered effect and the play of flavors. If you want a single-flavor cake, simply triple the ingredients for your chosen chocolate (dark, milk, or white) and make three batches of the same mousse. Pour and chill in stages as directed. It will still be a delicious, decadent chocolate mousse cake, just with a uniform color and taste instead of the striking layers.
Is there a substitute for heavy cream?
Heavy cream (with at least 36% milk fat) is essential for creating a stable, rich mousse that holds its shape. Lower-fat alternatives like half-and-half or whole milk will not whip or set properly. For a dairy-free version, full-fat coconut cream (the thick part from a can of coconut milk) can work with dairy-free chocolates, though the flavor will have a slight coconut note.
My layers aren’t separating cleanly. What happened?
This usually points to one of two issues. First, the bottom layer wasn’t chilled long enough before adding the next. Each layer needs at least 20-30 minutes in the fridge to form a “skin.” Second, the mousse for the next layer might have been too warm when poured. Let your chocolate-cream mixture cool to room temperature—it should be thick but still pourable—before layering it on the chilled mousse below.
Can I freeze individual slices?
Yes, freezing slices is a great idea! Wrap each slice tightly in plastic wrap, then place them in a single layer in a freezer-safe container or bag. They will keep for about a month. Thaw overnight in the refrigerator. This is perfect for having a personal treat ready whenever a chocolate craving strikes. The texture holds up remarkably well after thawing.
What’s the best way to cut this cake cleanly?
A warm, clean knife is your best friend. Fill a tall glass with very hot water. For each slice, dip a sharp, thin-bladed knife into the hot water, wipe it completely dry with a clean towel, and then make your cut in one smooth, gentle motion. Wipe the blade clean, reheat, and dry it for the next slice. This prevents the mousse from sticking to the knife and gives you those perfect, restaurant-quality slices.
Can I add alcohol to the mousse?
You can, for an adult twist! Add 1-2 tablespoons of your favorite liqueur to the chocolate-cream mixture after it has melted and cooled slightly. Grand Marnier or Cointreau pairs beautifully with dark chocolate. Irish cream is lovely with milk chocolate. For white chocolate, a raspberry liqueur or even a little Chambord can be delicious. Just note that adding too much liquid can affect the mousse’s ability to set firmly.
Why is my mousse layer too thin or too thick?
This often comes down to the size of your pan. This recipe is designed for a standard 9-inch springform pan. If your pan is larger, the layers will spread out and be thinner. If it’s smaller, they will be thicker and may require longer chilling times to set through. Also, ensure you’re using the correct cup measurements for the cream—a liquid measuring cup for the cream and dry cups for the crumbs.
Can I make this without a springform pan?
It’s challenging but possible. You can use a deep-dish pie plate or a regular cake pan lined with parchment paper with long “handles” over the sides. The removal will just be trickier. Once set, you’d need to carefully lift the entire cake out using the parchment paper. A springform pan is a worthwhile investment for this type of dessert and for many other fancy cakes and cupcakes you might want to try later.
Ready to Be the Dessert Hero?
So there you have it! My beloved Triple Chocolate Mousse Cake. It might look like you spent all day in a professional kitchen, but really, it’s just about taking it one simple, creamy layer at a time. The result is pure magic—a dessert that’s as fun to make as it is to eat. I can’t wait for you to try it and see those happy, impressed faces around your table. Now, go grab that chocolate and get started! Your celebration—big or small—deserves this kind of sweet ending.
Equipment
- Moule à charnière de 9 pouces
- Bols de mélange
- Casserole
- Spatule
- Fouet électrique (facultatif)
Ingredients
- 1 tasse miettes de biscuits au chocolat
- 2 càs beurre non salé (fondu)
- 1 tasse crème épaisse
- 200 g chocolat noir (haché)
- 2 càs sucre
- 200 g chocolat au lait (haché)
- 200 g chocolat blanc (haché)
- q.s. copeaux de chocolat pour la garniture
Instructions
- Combinez les miettes de biscuits au chocolat avec le beurre fondu jusqu'à obtenir une texture sableuse. Pressez fermement au fond d'un moule à charnière et réfrigérez.
- Hachez le chocolat noir et placez-le dans un bol. Chauffez la crème jusqu'à ce qu'elle soit fumante et versez-la sur le chocolat. Laissez reposer, puis remuez jusqu'à obtenir une texture lisse, incorporez le sucre, puis versez sur la base réfrigérée. Réfrigérez pour que ça prenne.
- Répétez le processus avec le chocolat au lait : hachez, chauffez la crème, versez dessus, remuez jusqu'à obtenir une texture lisse, puis versez sur la couche de chocolat noir. Réfrigérez à nouveau.
- Préparez la mousse au chocolat blanc en chauffant la crème, en la versant sur le chocolat blanc, puis en remuant jusqu'à obtenir une texture lisse. Versez sur la couche de chocolat au lait et réfrigérez pendant au moins 4 heures.
- Passez un couteau chaud autour du bord du moule à charnière pour libérer le gâteau, puis décorez avec des copeaux de chocolat.
Notes
Nutrition

Hi, I’m Olivia Parker, the founder of BakingSecret.com and a lifelong lover of all things sweet and homemade. I grew up in a small town in Oregon, where the smell of fresh cookies in my family’s kitchen sparked my passion for baking. Over the years, I turned that passion into a mission: to help home bakers feel confident, inspired, and creative.
After studying food science and working in several artisan bakeries across the U.S., I decided to create a space where everyone from beginners to seasoned bakers can find reliable recipes, expert tips, and a warm, welcoming community. BakingSecret.com is my way of sharing the magic of baking with the world. When I’m not testing new recipes, you’ll find me exploring farmers’ markets, collecting vintage cookbooks, or perfecting my sourdough technique.