
Mango Ice Cream Cake: Your New Favorite Frozen Delight
Is there anything better than the first sweet, juicy bite of a ripe mango? Now, imagine that sunshiney flavor transformed into a creamy, dreamy, no-bake ice cream cake. I created this Mango Ice Cream Delight last summer for a friend’s pool party, and let me tell you, it disappeared faster than kids splashing into the water! It’s the perfect marriage of a juicy, fruity sorbet and a rich, decadent ice cream cake, all without ever turning on your oven. This dessert isn’t just a recipe; it’s a guaranteed way to become the most popular person at any gathering.
The Story Behind This Frozen Treat
My love for mango desserts started on a trip years ago, where I had the most incredible mango sticky rice. I wanted to capture that same tropical joy in a frozen, shareable format. Ice cream cakes have always been a family favorite (who didn’t love those boxed ones as a kid?), but I wanted to make one from scratch that felt gourmet and fresh. This recipe is my happy blend of that nostalgic frozen treat and the bright, sophisticated flavor of fresh mangoes. It’s a modern take on a classic, using simple ingredients like rusks soaked in tangy mango juice to create a surprisingly delightful texture.
Why You’ll Fall in Love With This Mango Ice Cream Cake
First, it’s incredibly easy! No fancy baking skills required. Second, it’s endlessly customizable. Don’t have mango ice cream? Use more vanilla and extra fruit purée. The layers of soft, juice-soaked rusks are a magical textural surprise—they stay tender, never soggy. Lastly, it’s a stunning centerpiece. When you decorate it with those vibrant fresh fruits, it looks like a masterpiece from a fancy bakery, but it came straight from your freezer.
Perfect Occasions for This Ice Cream Cake
This cake is your secret weapon for so many events! It’s a showstopper at summer birthday parties, Fourth of July barbecues, and baby showers. It’s light enough for a refreshing finish to a spicy meal but indulgent enough for a celebration. I also love making it just because—sometimes a Tuesday needs a little Mango Ice Cream Delight to brighten it up!
What You’ll Need for Your Mango Ice Cream Delight
Gathering your ingredients is half the fun. Here’s everything you need for this tropical escape:
- 1.5 cups mango juice
- 20 rusks (like zwieback toast or plain biscotti)
- 2 cups vanilla ice cream, slightly softened
- 1 cup fresh mango cubes
- 2 cups mango ice cream, slightly softened
- For garnish: Fresh mango slices, blueberries, strawberries, passionfruit purée
No Worries! Handy Ingredient Substitutions
Don’t stress if you’re missing something. This recipe is wonderfully flexible!
- Mango Juice: Peach or apricot nectar works beautifully. You can even blend fresh mango with a little water.
- Rusks: Use ladyfingers (savoiardi), graham crackers, or plain sponge cake slices.
- Vanilla Ice Cream: Coconut ice cream adds an amazing tropical twist.
- Fresh Mango: Frozen mango chunks, thawed and patted dry, are a perfect year-round substitute.
- Passionfruit Purée: A drizzle of raspberry coulis or even store-bought caramel sauce is delicious.
Step-by-Step Guide to Frozen Paradise
Let’s build this beautiful cake together. Follow these simple steps for guaranteed success.
Step 1: Prepare the Pan
Take your 6-inch springform pan and line the bottom with a round of baking paper. This little trick is a lifesaver! It ensures your beautiful cake will release smoothly without sticking. Give the sides of the pan a quick, light greasing with a neutral oil or cooking spray. Now you have a perfect little mold ready to hold all that deliciousness.
Step 2: Soak and Arrange the Rusk Base
Pour your glorious, sunshine-colored mango juice into a shallow bowl. Working quickly, dip each rusk into the juice for just 2-3 seconds per side. You want them to be moist and pliable, not falling apart. Lay them snugly in the bottom of your prepared pan. Break a few rusks into pieces to fill any gaps. This creates a solid, even foundation that will soak up the creaminess from the layers above. Pro tip: Set a timer for the soaking—it prevents over-saturation.
Step 3: Create the Vanilla & Mango Cube Layer
Scoop your vanilla ice cream into a medium bowl. Let it sit for 5-10 minutes until it’s soft enough to stir easily with a spatula. Gently fold in those bright, sweet mango cubes. The contrast of the creamy white ice cream and the jewel-like orange fruit is just beautiful. Now, spread this mixture evenly over your rusk base. An offset spatula works wonders here for getting a smooth, professional-looking layer.
Step 4: Add the Second Rusk Layer
Just like you did for the base, dip more rusks in the mango juice. Carefully place them in a single layer right on top of the vanilla-mango mixture. This middle rusk layer is the secret to that wonderful cake-like texture. It separates the two ice cream flavors and adds a delightful, soft bite. Press them down gently so they’re even.
Step 5: Spread on the Mango Ice Cream
Time for the star of the show! Soften your mango ice cream in a bowl just like you did with the vanilla. Then, lovingly spread it over the second rusk layer. Try to make this top layer as smooth and level as you can—it will be the canvas for your gorgeous fruit garnish later. The aroma is pure tropical vacation.
Step 6: The Big Freeze
Cover the top of the pan tightly with plastic wrap. This is crucial to prevent ice crystals from forming. Now, place your creation in the freezer and let it set completely. Overnight is ideal. This long freeze ensures every layer firms up perfectly, making it easy to slice later. Patience is key here—trust me, it’s worth the wait!
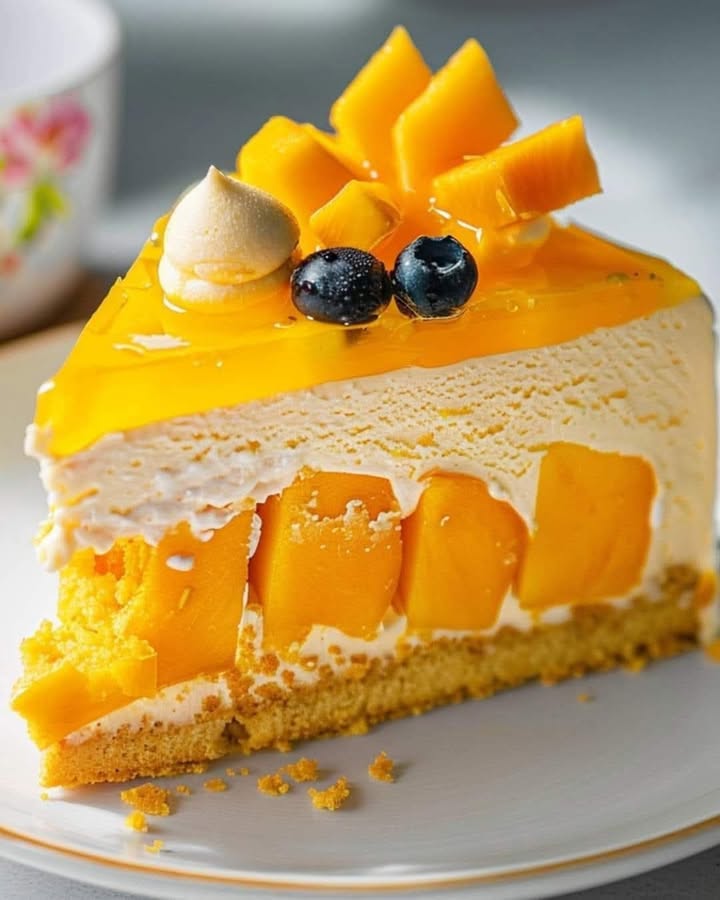
Step 7: Garnish, Slice, and Revel in the Praise
The fun part! Take the cake out of the freezer about 10 minutes before serving. Run a warm knife around the edge, then release the springform ring. Peel off the baking paper. Now, let your inner artist shine. Arrange slices of fresh mango, plump blueberries, and halved strawberries on top. Drizzle everything with brilliant, tangy passionfruit purée. Slice with a hot knife for clean cuts, serve immediately, and get ready for the “oohs” and “aahs.”
| Activity | Time |
|---|---|
| Preparation | 25 minutes |
| Freezing | 8 hours (overnight) |
| Total Time | 8 hours 25 minutes |
Chef’s Secret
For an extra “wow” factor, try toasting your rusks lightly in the oven before soaking them. This deepens their flavor and helps them hold their structure even better against the juicy soak. It adds a subtle, almost caramel-like note that pairs amazingly with the mango.
Extra Scoop: The Magic of Mango
Did you know the mango is known as the “king of fruits” in many parts of the world? Beyond its incredible taste, it’s packed with vitamins A and C. Using ripe, in-season mangoes in your cubes and garnish doesn’t just improve flavor; it turns this dessert into a tiny nutrient boost disguised as pure indulgence.
Gather Your Tools
You don’t need fancy equipment! A 6-inch springform pan is the only specialty item. You’ll also want:
- Mixing bowls
- Offset spatula or butter knife
- Shallow dish for soaking
- Plastic wrap
- A good knife for prepping your fruit—good knife skills make the prep work safe, fast, and enjoyable.
Storing Your Mango Masterpiece
Once assembled and frozen solid, your cake is a dream to store. Keep it tightly wrapped in the springform pan or, once fully set, you can carefully transfer it to an airtight container. It will live happily in your freezer for up to two weeks.
If you have leftovers (a rare event in my house!), cover the cut edges with plastic wrap pressed directly onto the ice cream. This prevents freezer burn and keeps the texture perfect. You can pop individual slices into sealed bags for a quick sweet treat anytime.
Remember, this cake is meant to be served frozen. Letting it sit out for a brief 10-minute “rest” before slicing makes it easier to cut, but you don’t want it to fully thaw and become soupy.
Tips for the Best Mango Ice Cream Cake Ever
- Use quality ice cream: Since it’s the main ingredient, a good, creamy brand makes a huge difference.
- Work fast with softened ice cream: It should be spreadable, not melted. If it gets too runny, pop it back in the freezer for a few minutes.
- Get creative with garnishes: Toasted coconut flakes, chopped pistachios, or a sprinkle of lime zest add fantastic color and crunch.
- For a neat presentation, garnish right before serving so your fruits stay bright and fresh-looking.
Presentation Ideas to Impress Your Guests
- Serve each slice on a chilled plate with an extra drizzle of sauce.
- Add a small scoop of sorbet on the side for a double-fruit experience.
- Use edible flowers alongside the berries for a truly Instagram-worthy moment.
- For a dinner party, pre-slice the cake in the kitchen and plate individually for a elegant, restaurant-style finish.
Love This? Try These Healthier Twists!
This recipe is a fantastic base for experimentation. Here are six delicious variations to try:
- Dairy-Free Delight: Use full-fat coconut milk ice cream and vegan rusks. The coconut complements the mango perfectly.
- Sugar-Conscious Version: Opt for no-sugar-added mango juice and a naturally sweetened vanilla ice cream. The ripe fruit provides plenty of sweetness.
- Berry Blast Cake: Swap mango juice for mixed berry juice and use vanilla ice cream with folded-in raspberries and blueberries.
- Tropical Piña Colada: Use coconut ice cream, pineapple juice for soaking, and garnish with toasted coconut and a maraschino cherry.
- Choco-Mango Surprise: Add a layer of dark chocolate shavings between the vanilla and mango ice cream layers for a rich contrast.
- Mini Individual Cakes: Make them in a muffin tin with linersto create personal-sized treats perfect for portion control and parties.
If you’re looking for more fantastic desserts that don’t require an oven, you’ll find a treasure trove of ideas in our collection of easy no-bake recipes. It’s where I get so much of my summer inspiration!
Common Mistakes to Avoid
Avoiding these simple pitfalls will ensure your cake turns out perfect every single time.
Mistake 1: Soggy, Mushy Rusk Layers
This happens when the rusks are soaked for too long. They absorb too much liquid and turn to mush, losing their ability to provide structure. To avoid it, think “dip and flip,” not “soak and sink.” Two to three seconds per side is all you need. The rusks should feel moist but still hold their shape firmly when you lift them.
Mistake 2: Rock-Hard, Impossible-to-Slice Cake
Serving the cake straight from the deep freeze is a common error. The layers are too solid, leading to messy, crumbling slices or a bent knife! The simple fix is to let the cake temper on the counter for 8-10 minutes before you try to cut it. This slight softening allows for clean, beautiful slices that show off all your gorgeous layers.
Mistake 3: Overly Soft Ice Cream That Melts While Assembling
If your ice cream is too soft when you spread it, it can melt and bleed into the rusk layers, making them soggy. It can also cause the layers to mix. Always soften your ice cream just until it’s spreadable—like thick peanut butter. If it starts to look soupy, stop and refreeze it for 10-15 minutes before continuing.
Mistake 4: Skipping the Springform Pan
Trying to build and remove this cake from a regular cake pan is a recipe for disaster. You’ll likely damage the layers trying to get it out. The springform pan is non-negotiable for this recipe. The removable sides make demolding effortless and stress-free. It’s an investment you’ll use for many desserts, like a classic Reeses Peanut Butter Cheesecake or an elegant Triple Chocolate Mousse Cake.
Your Mango Ice Cream Cake Questions, Answered
Can I make this cake ahead of time?
Absolutely! In fact, I highly recommend it. This cake needs a full overnight freeze to set properly. You can easily make it 2-3 days before your event. Just keep it tightly wrapped in the freezer. Add the fresh fruit garnish right before serving so it doesn’t get frosty or mushy. This make-ahead aspect makes it a fantastic, stress-free dessert for entertaining.
What can I use instead of rusks?
Rusks are my favorite, but you have great options. Ladyfingers (the dry, crunchy kind used for tiramisu) are a perfect substitute. Plain sponge cake slices or even slightly stale pound cake work too. For a different flavor, try graham crackers—they’ll add a hint of honey. Just remember the soak-and-assemble method remains the same, regardless of your base choice.
My cake is too sweet. How can I adjust that?
The sweetness level depends heavily on your ingredients. To reduce it, use a mango juice with no added sugar or one that’s labeled “light.” Choose a vanilla ice cream that’s not overly sweet. The passionfruit purée garnish is also key—its natural tartness beautifully balances the sweetness of the cake. You can also add a squeeze of fresh lime juice to your mango cubes for a bright, acidic punch.
Can I use frozen mangoes?
Yes, frozen mango is a fantastic, convenient option, especially when fresh mangoes are out of season. Thaw the chunks completely in a strainer over a bowl to drain off any excess liquid. Pat them very dry with a paper towel before folding them into the ice cream. This prevents extra water from forming ice crystals in your cake.
How do I get those perfect, clean slices?
The secret is a hot, dry knife. Run a sharp chef’s knife under very hot water for 10 seconds. Wipe it completely dry with a towel. Make a smooth, confident cut straight down—don’t saw back and forth. Wipe the knife clean and reheat it for each slice. This method works wonders for any frozen dessert, much like the technique used for a rich French Chocolate Cake.
Is there a way to make this without an ice cream maker?
You don’t need an ice cream maker at all for this recipe! We’re using store-bought ice cream, which is softened and then re-frozen in the cake form. The “maker” here is your freezer. This makes the recipe incredibly accessible. The only churning required is the gentle folding of fruit into your softened ice cream.
Can I add alcohol to this recipe?
For an adult-only version, you can! Replace a tablespoon or two of the mango juice with a complementary liquor like mango rum, Malibu (coconut rum), or even a splash of orange liqueur like Grand Marnier. Add it to the soaking juice. Be careful not to add too much, as alcohol doesn’t freeze solid and can make the rusks overly wet.
Why did my cake develop ice crystals on top?
Ice crystals form when the cake isn’t wrapped tightly enough, allowing air to sneak in and moisture to escape and re-freeze. The fix is simple: always press a layer of plastic wrap directly onto the surface of the ice cream layer before putting on the lid or placing it in the freezer. This creates an airtight seal and protects the texture.
Can I double this recipe?
You sure can! Simply double all the ingredients and use a 9-inch springform pan instead of a 6-inch. The assembly steps stay exactly the same. Just be aware the freezing time might need to be a bit longer—allow a solid 10-12 hours for a larger cake to set fully through the center.
What other fruits work well in this format?
This recipe is a template for endless fruit ice cream cakes! Try strawberry juice with strawberry ice cream and fresh berries. Or peach juice with peach ice cream and sliced peaches. For a mixed berry version, use a blend. The method is identical. It’s as versatile as other layered desserts, such as a fluffy Mascarpone Cream Log.
Ready for a Taste of Sunshine?
So there you have it—your guide to creating the most joyful, flavorful, and impressive no-bake dessert of the summer. This Mango Ice Cream Cake is more than just a recipe; it’s a little edible vacation. It brings people together, spreads smiles, and celebrates the simple, glorious flavor of ripe fruit. I can’t wait for you to try it, make it your own, and share it with the people you love. Now, go grab those mangoes and get freezing! Your new signature dessert awaits.
Equipment
- Moule à charnière de 6 pouces
- Bols de mélange
- Spatule offset ou couteau à beurre
- Plat peu profond pour tremper
- Film plastique
Ingredients
- 1,5 tasse jus de mangue
- 20 rusks (comme du zwieback ou biscotti nature)
- 2 tasses crème glacée à la vanille, légèrement ramollie
- 1 tasse cubes de mangue frais
- 2 tasses crème glacée à la mangue, légèrement ramollie
- q.s. morceaux de mangue frais pour garnir
- q.s. myrtilles
- q.s. fraises
- q.s. purée de fruit de la passion
Instructions
- Préparez un moule à charnière de 6 pouces en tapissant le fond de papier sulfurisé et en graissant légèrement les côtés.
- Versez le jus de mangue dans un plat peu profond et trempez chaque rusk pendant 2-3 secondes de chaque côté, puis disposez-les au fond du moule.
- Ramollissez la crème glacée à la vanille dans un bol moyen pendant 5-10 minutes, puis incorporez les cubes de mangue et étalez uniformément sur la base de rusk.
- Trempez d'autres rusks dans le jus de mangue et disposez-les sur le mélange vanille-mangue, en appuyant doucement.
- Ramollissez la crème glacée à la mangue et étalez-la sur la deuxième couche de rusk, en lissant le dessus.
- Couvrez le moule hermétiquement avec du film plastique et mettez au congélateur toute la nuit pour prendre.
- Avant de servir, passez un couteau chaud autour du bord du gâteau, libérez le cercle du moule, et décorez avec des fruits frais et de la purée de fruit de la passion.
Notes
Nutrition

Hi, I’m Olivia Parker, the founder of BakingSecret.com and a lifelong lover of all things sweet and homemade. I grew up in a small town in Oregon, where the smell of fresh cookies in my family’s kitchen sparked my passion for baking. Over the years, I turned that passion into a mission: to help home bakers feel confident, inspired, and creative.
After studying food science and working in several artisan bakeries across the U.S., I decided to create a space where everyone from beginners to seasoned bakers can find reliable recipes, expert tips, and a warm, welcoming community. BakingSecret.com is my way of sharing the magic of baking with the world. When I’m not testing new recipes, you’ll find me exploring farmers’ markets, collecting vintage cookbooks, or perfecting my sourdough technique.