
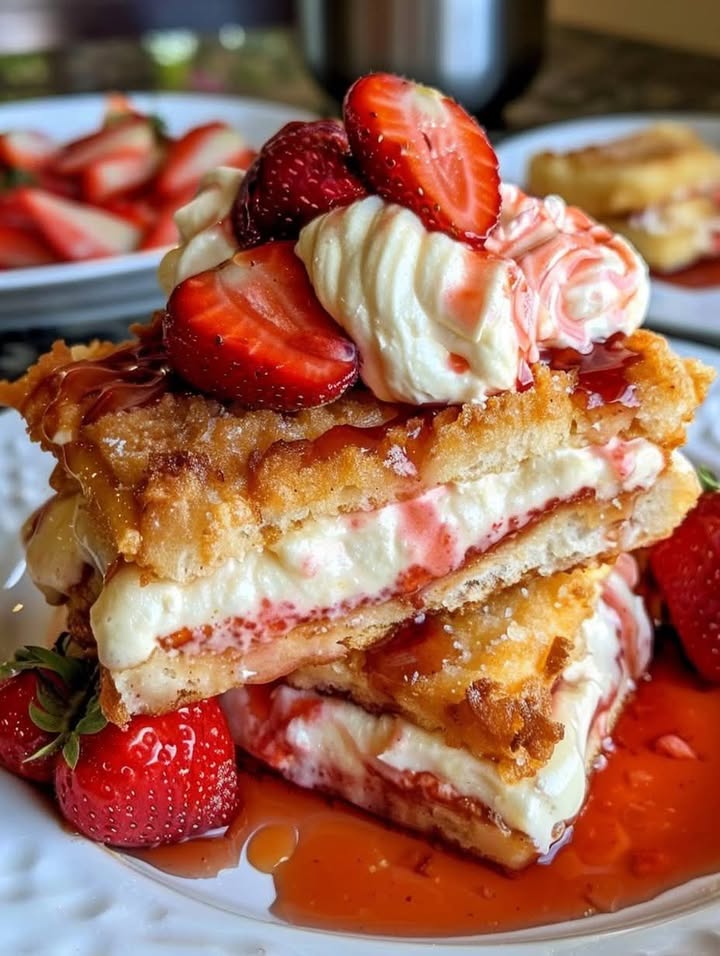
You know those mornings when you just want something magical? The kind that makes everyone pause, mid-chew, and say, “Wow, what is this?” That’s the power of a truly great breakfast treat. For me, that magic comes in the form of Fried Strawberry Cheesecake Sandwiches. Imagine sweet, creamy cheesecake filling and juicy strawberries hugged by buttery, cinnamon-spiced French toast. It’s like your favorite diner dessert decided to crash the brunch party, and I am completely here for it. This recipe is my not-so-secret weapon for turning an ordinary weekend into a special occasion. Let’s make some kitchen magic together.
From Picnic Treat to Family Tradition
I first had the idea for these sandwiches on a lazy summer afternoon. I was craving something decadent but didn’t want to turn on the oven. I had leftover cream cheese, some day-old bread, and a pint of beautiful strawberries. A little bit of playful experimentation later, and a new family favorite was born. While it reminds me of classic fried pies or indulgent cheesecake, the format is pure comfort. It’s a modern twist on the simple strawberry sandwich, elevated with a warm, custardy crunch. Every time I make them, the kitchen fills with the most incredible smell of cinnamon, vanilla, and toasting bread. It’s a scent that shouts “home” and “celebration” all at once.
Why You’ll Love These Fried Cheesecake Sandwiches
Oh, where do I begin? First, the texture is everything. You get the crisp, golden exterior giving way to the soft, eggy bread and the luscious, cool filling. Then there’s the flavor—tangy cream cheese, sweet berries, and a hint of warm spice. It’s a perfect balance. Best of all, it’s incredibly simple. You don’t need any fancy skills or equipment. If you can make a sandwich and scramble an egg, you’re already a pro. It’s also wonderfully versatile. I’ve served these for fancy brunches, quick after-school snacks, and even as a fun dessert. They always disappear in minutes, which is the best compliment any cook can get.
Perfect Occasions for Strawberry Cheesecake Sandwiches
This recipe is your new secret weapon for making moments feel special. It’s perfect for:
- Weekend Brunches: Impress your family or guests without hours of work.
- Mother’s Day or Valentine’s Day: A sweet, heart-shaped treat (just use a cookie cutter!).
- Sleepover Breakfasts: The kids will think you’re the coolest.
- Potlucks and Picnics: They travel well and are always a conversation starter.
- Just Because: Sometimes, a Tuesday afternoon deserves a little fried cheesecake joy.
Gathering Your Ingredients
Here’s what you’ll need to create this masterpiece. I promise, it’s all simple stuff!
- 8 slices of white bread: Classic sandwich bread works perfectly. Brioche or challah will make it extra rich.
- 1 cup cream cheese, softened: Full-fat for the best, creamiest texture.
- 1/4 cup powdered sugar: Sweetens the filling beautifully without grittiness.
- 1 teaspoon vanilla extract: The flavor backbone. Use the good stuff!
- 1 cup sliced strawberries: Fresh is best for that bright, juicy pop.
- 2 eggs: Our binding agent for the golden crust.
- 1/4 cup milk: Thins the egg mixture for perfect coverage.
- 1/2 teaspoon cinnamon & 1/4 teaspoon nutmeg: The warm, cozy spice duo.
- 1/4 cup granulated sugar: A little sweetness in the egg wash.
- Butter, for frying: For that irresistible, rich, buttery flavor and crisp edges.
Ingredient Substitution Options
No worries if you’re missing something! Cooking should be fun, not stressful.
- Bread: Use brioche, Texas toast, or even croissants for a different twist.
- Cream Cheese: Mascarpone makes an incredibly rich, Italian-style filling.
- Strawberries: Swap for raspberries, blueberries, or a thin layer of high-quality jam.
- Spices: A pinch of cardamom or a splash of almond extract can be lovely changes.
- Frying Fat: A mix of butter and a neutral oil (like avocado oil) can prevent burning.
How to Make Fried Strawberry Cheesecake Sandwiches
Let’s get cooking! Follow these steps for perfect sandwiches every time.
Step 1: Make the Dreamy Filling
In a medium bowl, place your softened cream cheese. Using a hand mixer or a good strong whisk, beat it until it’s smooth and fluffy. This might take a minute or two. Add in the powdered sugar and vanilla extract. Keep mixing until everything is completely combined into a sweet, cloud-like spread. You’ll see the color lighten and the texture become perfectly spreadable. Set this bowl aside while you prep the berries. Pro tip: Let your cream cheese sit on the counter for 30 minutes before starting. Room-temperature cheese blends seamlessly, leaving no lumps behind.
Step 2: Assemble the Sandwiches
Lay out your 8 slices of bread on a clean cutting board. Using a butter knife or an offset spatula, generously spread the cream cheese mixture on 4 of the slices. You want a nice, thick layer—this is the “cheesecake” heart of the sandwich. Now, artfully arrange your sliced strawberries over the cream cheese. Try to keep them in a single layer so the sandwich seals properly. Gently press the remaining 4 slices of bread on top to create 4 beautiful, stuffed sandwiches. Give the edges a little pinch to help seal in all that goodness.
Step 3: Create the Custard Bath
Grab a shallow dish—a pie plate or a wide soup bowl works great. Crack in the two eggs and pour in the milk. Add the granulated sugar, cinnamon, and nutmeg. Now, whisk it all together with vigor! You want the eggs fully broken down and the spices completely integrated into a smooth, speckled, golden liquid. This mixture is what will transform your plain bread into a glorious, custardy French toast jacket. It should be thin enough to coat easily. Chef’s tip: For an extra luxurious texture, strain the custard through a fine-mesh sieve to remove any stringy bits of egg white.
Step 4: Heat the Skillet
Place a large non-stick or cast-iron skillet over medium heat. Add a generous pat of butter—about a tablespoon. Let the butter melt and begin to foam slightly. You should hear a gentle sizzle. The pan is ready when a drop of water flicked into it dances and evaporates quickly. This initial butter will flavor the first batch. You’ll add more butter for subsequent batches to prevent sticking and ensure that beautiful golden-brown color on every sandwich.
Step 5: The Dip and Soak
Take one assembled sandwich and carefully place it into the custard bath. Let it soak for about 10-15 seconds, then use a fork or tongs to flip it over. Soak the other side for another 10-15 seconds. You want the bread to be fully saturated but not so soggy that it falls apart. It should feel heavy and lovingly soaked through. Lift it up, let any excess custard drip off for a second, and then it’s ready for the pan. Repeat with the remaining sandwiches.
Step 6: Fry to Golden Perfection
Place your custard-soaked sandwiches directly into the preheated, buttery skillet. Don’t crowd the pan—cook 2 at a time if needed. Let them cook, undisturbed, for 2-3 minutes. Peek underneath to see if it’s turned a deep, golden brown. When it is, carefully flip it with a spatula. Cook the other side for another 2-3 minutes until equally gorgeous. The sandwich should feel firm to the touch, and you might see little bits of cheesy filling peeking out, caramelizing deliciously. Transfer to a wire rack or a plate lined with a paper towel.
Step 7: Rest and Serve Warm
This is the hardest step—waiting! Let the fried cheesecake sandwiches cool for just 2-3 minutes. This allows the filling to set slightly so it doesn’t run out when you cut into it. The brief rest also makes the first bite safe and perfect. Slice them in half diagonally to show off the beautiful layers inside. Serve them warm, when the contrast between the hot, crisp exterior and the cool, creamy inside is at its most magical.
Step 8: Add the Final Touches
Presentation is part of the joy. A light dusting of powdered sugar over the top looks like a light snowfall. For a truly decadent touch, serve with a dollop of freshly whipped cream or a scoop of vanilla ice cream on the side. The melty ice cream pooling around the warm sandwich is a little slice of heaven. Fresh mint or a few extra strawberry slices make it look like it came from a fancy café.
Timing Breakdown
Prep Time: 15 minutes (softening cheese, slicing berries, making filling)
Cook Time: 10 minutes (2-3 minutes per side in batches)
Total Time: Approximately 25 minutes
Servings: 4 hearty sandwiches
Chef’s Secret for the Best Fried Cheesecake Sandwiches
My number one trick is all about the bread texture. For the absolute best structure that holds up to the custard soak without getting mushy, use bread that is a day or two old. Stale bread absorbs the egg mixture more evenly without dissolving. If you only have fresh bread, you can dry out the slices in a 300°F oven for 5-10 minutes before assembling. This creates the perfect canvas for a crispy outside and a tender, custardy inside.
A Little Extra Info
The combination of fruit and cheese, fried in bread, is a concept found in cultures worldwide. Think of Italian mozzarella in carrozza or French toast itself. This recipe is my sweet, Americanized homage to that tradition. It’s fascinating how simple ingredients—bread, cheese, fruit, eggs—can be transformed into something so extraordinary with just a little heat and care. For those looking to streamline their cooking process without sacrificing quality, exploring time-saving cooking techniques can be a game-changer for busy home chefs.
Necessary Equipment
- Mixing bowls (small and medium)
- Hand mixer or whisk
- Butter knife or offset spatula
- Shallow dish (for custard)
- Large non-stick or cast-iron skillet
- Spatula
- Wire rack or paper towel-lined plate
How to Store Your Leftovers
These sandwiches are truly best enjoyed fresh and warm. However, if you have leftovers (a rare occurrence in my house!), let them cool completely first. Place them in a single layer in an airtight container. You can separate layers with parchment paper if stacking is necessary. Store them in the refrigerator for up to 2 days.
To reheat, avoid the microwave, as it will make the bread soggy. Instead, warm them in a toaster oven or a regular oven preheated to 350°F for about 8-10 minutes. This will help restore some of the crispy texture. You can also re-crisp them in a dry skillet over medium-low heat for a few minutes per side.
I do not recommend freezing the fully assembled and cooked sandwiches. The cream cheese filling and strawberries don’t freeze and thaw well, becoming watery and separating. For a make-ahead option, you can prepare the cream cheese filling and store it covered in the fridge for 2 days. Assemble and fry the sandwiches fresh when you’re ready to serve.
My Best Tips for Success
- Dry Your Strawberries: After slicing, pat the strawberries gently with a paper towel. Removing excess moisture prevents the bread from getting soggy too quickly.
- Medium Heat is Key: Too high, and the outside burns before the egg cooks through. Too low, and the bread absorbs too much grease. A steady medium heat gives you that perfect, crispy golden-brown finish.
- Don’t Skimp on Butter: Add a fresh pat of butter to the pan for each new batch. This ensures even browning and prevents sticking, giving you that beautiful, buttery flavor in every bite.
- Press Gently: When frying, you can lightly press down on the sandwich with your spatula. This ensures even contact with the hot pan for uniform browning.
Presentation Inspiration
- Dust with powdered sugar using a fine-mesh sieve for a snowy, elegant look.
- Serve with small dipping bowls of strawberry compote, chocolate sauce, or maple syrup.
- Thread a few extra strawberry slices and mint leaves onto a cocktail skewer for a simple, stylish garnish on the plate.
- For a brunch board, cut sandwiches into smaller “fingers” or quarters for easy grabbing.
Delicious Recipe Variations to Try
Once you master the basic recipe, the world is your oyster! Here are six tasty spins:
- Blueberry Lemon: Use lemon curd mixed with the cream cheese and fresh blueberries.
- Apple Pie: Swap strawberries for thinly sliced, sautéed apples with a pinch of apple pie spice in the custard.
- Chocolate Hazelnut: Spread Nutella under the cream cheese and use chopped toasted hazelnuts.
- Peaches and Cream: Use thinly sliced ripe peaches and a dash of almond extract in the filling.
- PB & J Style: Layer a thin spread of peanut butter on the bread, then cream cheese, then your favorite jam.
- Pumpkin Spice: Mix a tablespoon of pumpkin purée and pumpkin pie spice into the cream cheese filling for a fall treat.
Other Desserts You Might Love
If these Fried Strawberry Cheesecake Sandwiches hit the spot, you’ll adore exploring other no-bake desserts. For a show-stopping centerpiece, try this elegant Mascarpone Flavor Log, which offers a sophisticated twist on creamy, fruity flavors. Chocolate lovers simply must experience the layers of bliss in a Triple Chocolate Mousse Cake. When mango season hits, this refreshing Mango Ice Cream Cake is pure paradise. And for the ultimate indulgence, my No-Bake Ferrero Rocher Cheesecake is always a crowd-pleaser. For even more inspiration, browse our full collection of delectable cheesecake recipes.
Common Mistakes to Avoid
Mistake 1: Using Cold Cream Cheese
This is the biggest culprit for lumpy filling. Straight-from-the-fridge cream cheese will never blend smoothly with the sugar and vanilla. You’ll end up with chunks of plain cream cheese in your sweet spread, creating an uneven texture and flavor. Always plan ahead and let the block sit on your counter for at least 30 minutes until it’s soft and pliable. If you’re in a pinch, you can microwave it for 10-15 seconds, but be careful not to melt it.
Mistake 2: Over-Soaking the Bread
It’s tempting to let the sandwich sit in the custard bath to ensure it’s coated, but too long is a disaster. Over-soaked bread becomes weak and will likely fall apart when you try to flip it in the pan. You’re left with a scrambled, soggy mess. Aim for a 10-15 second soak per side—just until the bread is thoroughly wet but still holds its shape. A good rule of thumb: if it feels like it’s about to fall apart in your hand, it’s been in too long.
Mistake 3: Cooking on Too High Heat
Impatience leads to burned outsides and raw, eggy insides. If your skillet is too hot, the sugar in the custard and bread will burn quickly, creating a bitter, dark crust while the egg inside hasn’t fully cooked. You want a gentle, steady sizzle, not a furious crackle. Maintain a medium heat. This gives the egg time to cook through and set, creating that perfect custardy layer, while allowing the exterior to develop a deep, even golden brown.
Mistake 4: Overfilling the Sandwiches
More filling seems like a good idea, but it leads to leaks. When you pack in too much cream cheese and too many strawberry slices, the filling oozes out the sides during frying. This causes messy spills in your pan and can burn, creating a bitter taste. It also prevents the edges of the sandwich from sealing properly. Be generous, but leave a clear 1/2-inch border around the edge of the bread to create a proper seal when you press the top slice on.
Frequently Asked Questions
Can I make these Fried Strawberry Cheesecake Sandwiches ahead of time?
You can prepare the components ahead to speed up morning assembly. The cream cheese filling can be made and stored in an airtight container in the refrigerator for up to 2 days. Slice your strawberries and store them separately. I do not recommend assembling the raw sandwiches more than an hour in advance, as the moisture from the berries will make the bread soggy. Your best bet is to have everything prepped and ready to quickly assemble, dip, and fry when you’re ready to eat for the best texture.
What’s the best type of bread to use?
Classic white sandwich bread is a reliable and delicious choice. For a richer, more decadent result, brioche or challah bread is fantastic. Their eggy, buttery composition pairs beautifully with the custard. Avoid breads with large holes or an overly porous texture, as they can fall apart during soaking. Slightly stale bread (1-2 days old) is actually ideal, as it soaks up the custard without disintegrating. Fresh bread works too, just handle it gently during the dipping process.
Can I use frozen strawberries instead of fresh?
I do not recommend using frozen strawberries directly in the filling. Frozen berries release a tremendous amount of water as they thaw, which will make your sandwich filling runny and cause the bread to become a soggy mess. If fresh strawberries are out of season, a better alternative is to use a high-quality strawberry jam or preserves. You could also thaw frozen strawberries completely, drain them very well, and pat them extremely dry with paper towels before using, but fresh is always preferred for the best texture and flavor.
How do I prevent the filling from leaking out while frying?
A good seal and proper heat control are key. First, press the edges of your assembled sandwich firmly with your fingers or the tines of a fork to seal the two slices together. When dipping, make sure the custard coats the entire edge, which helps “glue” it shut. Most importantly, don’t flip the sandwich too early. Let it cook fully on the first side until golden and set. This allows the egg on the bottom to cook into a firm “seal” before you disturb it. Flipping too soon is a common cause of blow-outs.
Can I bake these instead of frying them?
Yes, you can bake them for a slightly less rich, hands-off method. Preheat your oven to 375°F. Prepare the sandwiches as directed, dip them in the custard, and place them on a baking sheet lined with parchment paper or a silicone mat. Brush or spray the tops lightly with melted butter. Bake for about 10-12 minutes per side, flipping halfway through, until golden brown and cooked through. The result will be more like a French toast casserole texture—delicious, but without the distinct crisp, buttery crust of pan-frying.
Are there any dairy-free substitutions I can use?
Absolutely! For the cream cheese, use a high-quality, firm vegan cream cheese alternative. For the milk in the custard, any unsweetened plant-based milk like almond, oat, or soy milk will work well. Use a vegan butter or a neutral oil (like coconut or avocado oil) for frying. Just be aware that vegan cream cheeses can vary in texture and flavor, so the final result might be slightly different, but still very tasty.
What can I serve with these sandwiches?
These sandwiches are a star on their own, but they love company! Classic breakfast sides like crispy bacon or sausage links offer a lovely salty contrast. For a full sweet brunch spread, pair them with fresh fruit salad or a simple berry compote. For the ultimate indulgence, a scoop of vanilla ice cream or a dollop of whipped cream transforms them into a dessert. A drizzle of maple syrup, honey, or even a chocolate sauce never hurts either!
How can I tell when they are cooked through properly?
Visual cues and touch are your best guides. The outside should be a uniform, deep golden brown on both sides. The sandwich should feel firm to the touch, not soft or squishy in the center. If you gently press the middle with your spatula, it should offer some resistance. You can also use a food thermometer; the internal temperature of the custard-soaked bread should reach at least 160°F, indicating the eggs are safely cooked.
My cream cheese filling is too runny. What happened?
A runny filling usually points to two issues. First, your cream cheese may have been too warm or over-whipped, causing it to loosen. Second, the strawberries might have been very juicy. To fix it for next time, ensure your cream cheese is softened but still cool. Whip it just until smooth. Also, thoroughly pat your sliced strawberries dry with paper towels before adding them to the sandwich. If your filling is already runny, you can try chilling the assembled sandwiches in the freezer for 10-15 minutes before dipping and frying to help firm everything up.
Can I use an air fryer to make this recipe?
You can! The air fryer gives a great crisp texture with less oil. Preheat your air fryer to 370°F. Prepare the sandwiches as normal. Lightly spray or brush the basket with oil. Place the dipped sandwiches in the basket in a single layer (don’t overcrowd—cook in batches). Lightly spray the tops of the sandwiches with oil. Air fry for 6-8 minutes, flipping halfway through, until golden brown and crisp. Cooking time may vary based on your air fryer model, so keep an eye on them for the first batch.
A Sweet Send-Off
And there you have it—my foolproof guide to creating the most delicious Fried Strawberry Cheesecake Sandwiches. This recipe is more than just a list of steps; it’s a little packet of joy you get to make and share. It combines simple techniques with luxurious results, which is my favorite kind of cooking. The next time you see strawberries at their peak or simply need a pick-me-up, I hope you give this recipe a try. Gather your ingredients, fire up the stove, and get ready for the happy silence that falls over the table when everyone takes their first bite. Happy cooking
Equipment
- Mélangeur
- Fouet
- Couteau à beurre
- Plat peu profond
- Poêle à frire
Ingredients
- 8 tranches pain de mie brioche ou challah recommandée pour la richesse
- 1 tasse fromage à la crème ramolli
- 1/4 tasse sucre glace
- 1 cuillère à café extrait de vanille
- 1 tasse fraises tranchées
- 1/4 tasse lait
- 1/2 cuillère à café cannelle
- 1/4 cuillère à café muscade
- 1/4 tasse sucre cristallisé
- q.s. beurre pour la friture
Instructions
- Dans un bol moyen, battre le fromage à la crème ramolli jusqu'à ce qu'il soit lisse.
- Ajouter le sucre glace et l'extrait de vanille; mélanger jusqu'à ce que le tout soit bien combiné. Mettre de côté.
- Étendre le mélange de fromage à la crème sur 4 tranches de pain.
- Placer les fraises tranchées sur le fromage à la crème; couvrir avec les tranches de pain restantes pour former des sandwiches.
- Dans un plat peu profond, fouetter les œufs, le lait, le sucre cristallisé, la cannelle et la muscade jusqu'à ce que le mélange soit lisse.
- Préchauffer une poêle à feu moyen et faire fondre le beurre.
- Tremper chaque sandwich dans le mélange de custard, en trempant chaque côté pendant 10-15 secondes.
- Faire frire les sandwiches dans la poêle pendant 2-3 minutes de chaque côté jusqu'à ce qu'ils soient dorés.
- Laissez-les refroidir pendant 2-3 minutes, puis tranchez et servez.
Notes
Nutrition

Hi, I’m Olivia Parker, the founder of BakingSecret.com and a lifelong lover of all things sweet and homemade. I grew up in a small town in Oregon, where the smell of fresh cookies in my family’s kitchen sparked my passion for baking. Over the years, I turned that passion into a mission: to help home bakers feel confident, inspired, and creative.
After studying food science and working in several artisan bakeries across the U.S., I decided to create a space where everyone from beginners to seasoned bakers can find reliable recipes, expert tips, and a warm, welcoming community. BakingSecret.com is my way of sharing the magic of baking with the world. When I’m not testing new recipes, you’ll find me exploring farmers’ markets, collecting vintage cookbooks, or perfecting my sourdough technique.