
The Ultimate Indulgent Dessert to Make Everyone Smile
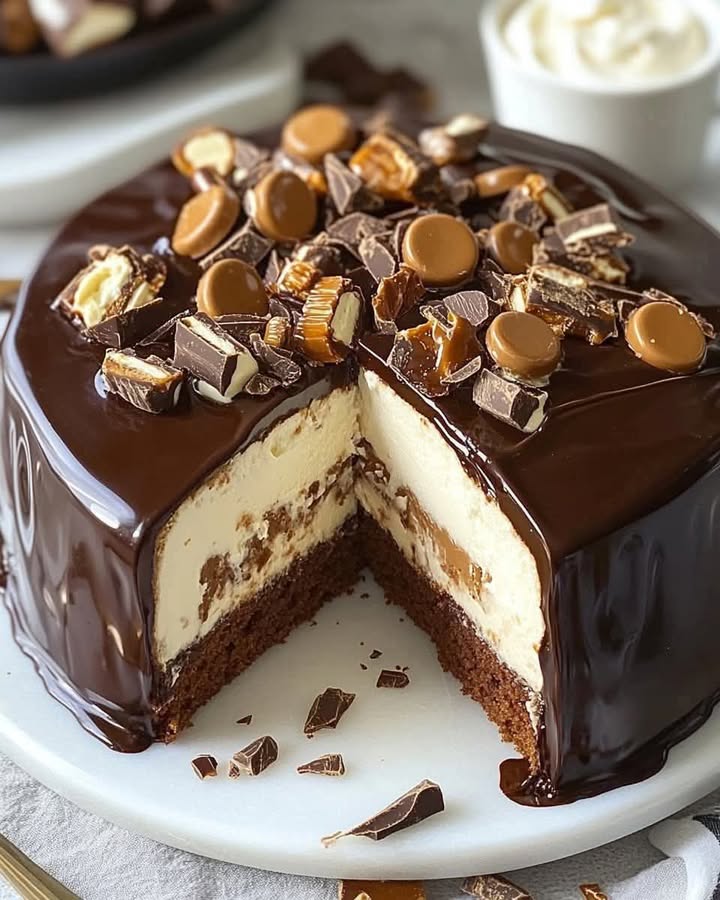
Okay, let’s be honest. Some days just call for chocolate cake. But other days? Those special, “I need a hug in dessert form” days? They call for this. Imagine: a moist, dark chocolate cake hugging a creamy, candy-packed cheesecake filling, all wrapped up in a silky chocolate ganache robe. I made this for my book club last month, and the silence that fell over the room was the best compliment I’ve ever received—followed by a chorus of “recipe, please!” So, here it is, my secret weapon for pure joy: a Decadent Cheesecake Chocolate Cake.
A Fun Twist on Two Classic Flavors
Chocolate cake and cheesecake are legends in their own right. The chocolate cake has been a staple of celebrations for centuries, while creamy cheesecake has roots tracing back to ancient Greece. This recipe is my playful, modern mash-up. It takes the best of both worlds and adds a bit of whimsy with chopped candy bars. Think of it as a party where your favorite cake and your favorite cheesecake finally met and decided to move in together. The result is a dessert that feels both familiar and excitingly new.
Why You’ll Absolutely Adore This Cake
Let me count the ways! First, the texture game is unbeatable. You get the soft crumb of the cake, the luscious cream cheese filling, and that snappy chocolate shell on top. Second, it’s a candy lover’s dream with Reese’s Pieces and Butterfinger bringing a fun, crunchy surprise. Finally, while it looks impressive like something from a bakery case, the steps are straightforward. You don’t need to be a pastry chef to create this showstopper. It’s designed to make you look like one!
When to Bake This Decadent Cheesecake Chocolate Cake
This cake isn’t just for birthdays (though it makes a fantastic one!). It’s perfect for potlucks where you want to be the hero, holiday gatherings like Thanksgiving or Christmas, or just a “Wednesday survived” celebration. It’s also a fantastic bake sale item that will disappear first. Basically, any time you want to make an occasion feel a little more special, this cake is your answer.
Gathering Your Ingredients
Here’s everything you’ll need to bring this masterpiece to life:
For the Chocolate Cake:
- 3/4 cup all-purpose flour
- 1/2 cup unsweetened cocoa powder
- 1 teaspoon baking powder
- 1/2 teaspoon baking soda
- 1/4 teaspoon salt
- 1/2 cup granulated sugar
- 2 large eggs
- 1/2 cup milk
- 1/4 cup vegetable oil
- 1 teaspoon vanilla extract
For the Cheesecake Filling:
- 8 oz cream cheese, softened
- 1/2 cup powdered sugar
- 1 teaspoon vanilla extract
- 1/4 cup Reese’s Pieces, chopped
- 1/4 cup Butterfinger candy bars, crushed
For the Chocolate Ganache:
- 1 cup semi-sweet chocolate chips
- 1/2 cup heavy cream
Handy Substitutions for Your Pantry
Out of something? No worries! Try these swaps:
- Milk: Buttermilk, almond milk, or even strong coffee work great.
- Cocoa Powder: Use Dutch-process for a deeper flavor, or regular works perfectly.
- Candy Bars: Use any chopped chocolate bar or nut you love. Snickers, chopped peanuts, or toffee bits are fantastic.
- Heavy Cream: For the ganache, full-fat coconut cream can be used for a dairy-free version.
Step-by-Step Baking Guide
Follow these simple steps for a perfect cake every time.
Step 1: Bake the Chocolate Cake
Start by preheating your oven to 350°F (175°C). Grease and flour an 8-inch round cake pan well. In a medium bowl, whisk together your dry ingredients: flour, cocoa powder, baking powder, baking soda, and salt. In a larger bowl, whisk the sugar, eggs, milk, oil, and vanilla until it’s smooth and looks like a rich, chocolaty soup. Gently fold the dry mix into the wet mix. Stop as soon as you see no more flour streaks. Pour this gorgeous, dark batter into your prepared pan and smooth the top. Bake for 25-30 minutes. Your kitchen will smell amazing. A toothpick in the center should come out clean. Pro tip: Let the cake cool completely in the pan before you try to remove it. This prevents it from breaking apart.
Step 2: Whip Up the Cheesecake Filling
While the cake cools, make the filling. Beat the softened cream cheese in a bowl until it’s super smooth and creamy. No lumps allowed! Add the powdered sugar and vanilla and beat again until it’s fluffy. Now for the fun part: gently fold in your chopped Reese’s Pieces and crushed Butterfinger. The bright orange and golden yellow pieces peeking through the white filling is so pretty. Set this aside while you get ready to assemble.
Step 3: Create the Silky Chocolate Ganache
This is the easy, magical part. Place your chocolate chips in a heatproof bowl. Heat the heavy cream in a saucepan until you see little bubbles forming around the edges—you don’t need a full boil. Pour the hot cream over the chocolate chips and let it sit for a full minute. This melts the chocolate gently. Then, stir slowly until it transforms into a single, glossy, and pourable chocolate river. Let it cool for about 10 minutes so it thickens slightly.
Step 4: Assemble Your Masterpiece
Time to build! Carefully run a knife around the edge of your cooled cake and turn it out. With a long serrated knife, slice it horizontally to make two even layers. This is easier if you score a line all around the side first. Place the bottom layer on your serving plate. Spread all that glorious cheesecake filling right on top, leaving a tiny border. Gently place the top cake layer over it. Finally, pour your slightly cooled ganache over the center of the top layer. Use a spatula to help it drip beautifully down the sides. Chef’s tip: For perfect drips, pour most ganache in the center and gently nudge it to the edges with your spatula.
Step 5: Serve and Savor
You can let the ganache set for a cleaner slice, or dive in right away for a wonderfully gooey experience. For a final touch, sprinkle a few extra candy crumbs on top. Slice with a sharp knife wiped clean between cuts for perfect, photo-ready pieces. Get ready for the oohs and aahs!
Time Commitment
This cake is a project of love, but it’s broken into simple stages.
Prep Time: 30 minutes
Cook Time: 30 minutes
Cooling/Assembly Time: 1 hour
Total Time: About 2 hours
My Secret for the Perfect Slice
For the cleanest slices that show off all those beautiful layers, dip your sharp knife in very hot water and wipe it dry before each cut. The heat glides right through the cold cheesecake filling and firm ganache, giving you a perfect, professional look.
A Sweet Fact About Chocolate
Did you know the cocoa bean is technically a seed from the fruit of the cacao tree? Those beans are fermented, dried, and roasted before becoming the cocoa powder we bake with. It’s a long journey from tree to cake, making this Decadent Cheesecake Chocolate Cake even more of a treasure!
Tools You’ll Need
- 8-inch round cake pan
- Mixing bowls (various sizes)
- Whisk and spatula
- Electric mixer (hand or stand)
- Serrated knife for splitting the cake
- Heatproof bowl for ganache
- Saucepan
How to Store Your Cake
Because of the creamy filling, this cake must be stored in the refrigerator. Cover it loosely with plastic wrap or place it in a cake carrier. It will keep beautifully for up to 4 days. The flavors actually blend and become even richer after a day.
You can also freeze this cake for longer storage. Wrap the whole cake or individual slices tightly in plastic wrap and then in foil. Freeze for up to 2 months. Thaw overnight in the fridge before serving.
Leave the cake at room temperature for no more than 2 hours while serving. This keeps the cheesecake filling safe and the cake at the perfect texture for eating.
Handy Tips for the Best Results
- Room Temperature is Key: Let your eggs, milk, and cream cheese sit out for 30 minutes before starting. This ensures a smooth, lump-free batter and filling.
- Don’t Overmix the Batter: Once you add flour, mix just until combined. Overmixing develops gluten and makes cake tough.
- Chill for Cleaner Slices: If you have time, let the assembled cake chill for an hour before slicing. This firms up the layers for a neat presentation.
Making It Look Fancy
Presentation is half the fun! Try these ideas:
– Dust the top with gold sprinkles or edible glitter before serving.
– Pipe little rosettes of extra whipped cream cheese around the base.
– Serve each slice on a plate drizzled with a little caramel sauce.
– Garnish with a whole mini Reese’s peanut butter cup on top of each slice.
Try These Other Amazing Cheesecake Recipes
If you loved the creamy filling in this cake, you’ll adore other creative cheesecake recipes. For a frozen, fruity treat, my Mango Ice Cream Cake is a summer must-make. Chocolate hazelnut lovers will go crazy for the easy No-Bake Ferrero Rocher Cheesecake. If you’re after a quick handheld dessert, you must try the fun Fried Strawberry Cheesecake Sandwiches. And for another stunning rolled dessert, the Chocolate Caramel Swiss Roll is pure elegance.
Common Mistakes to Avoid
Mistake 1: Using Cold Ingredients
Starting with cold cream cheese, eggs, or milk is a common pitfall. Cold cream cheese will never become smooth and will leave lumps in your filling. Cold ingredients also don’t blend well into cake batter, leading to a dense texture. Always plan ahead and pull your dairy and eggs from the fridge about 30-60 minutes before you begin baking. They should feel just slightly cool to the touch, not cold.
Mistake 2: Overbaking the Cake
It’s easy to leave the cake in “just a few more minutes” to be safe, but that leads to a dry cake. A chocolate cake continues to cook from residual heat after leaving the oven. The best test is to look for the edges pulling away from the pan and a toothpick inserted in the center that comes out with a few moist crumbs, not completely clean. Err on the side of slightly underdone—it will finish setting as it cools.
Mistake 3: Pouring Hot Ganache
If your ganache is too hot when you pour it, it will run right off the sides of the cake in a thin, messy layer and won’t coat nicely. It can also melt the cheesecake filling underneath. Let the ganache cool at room temperature for about 10 minutes after mixing. It should thicken to a ribbon-like consistency that coats the back of a spoon. This gives you that perfect, thick, drippy glaze.
Mistake 4: Slicing a Warm Cake
Impatience can ruin your beautiful layers. If you cut the cake before it has cooled completely or before the ganache has set, the layers will squish together and the filling will ooze out. The cheesecake filling needs time to firm up in the fridge. For the cleanest layers and best texture, give your assembled cake at least 30 minutes to an hour in the refrigerator before you slice into it.
Frequently Asked Questions
Can I make this cake ahead of time?
Absolutely! In fact, I recommend it. You can bake the chocolate cake layers up to a day in advance. Let them cool completely, wrap them tightly in plastic wrap, and store at room temperature. The cheesecake filling can also be made a day ahead and kept covered in the refrigerator. Assemble the whole cake the day you plan to serve it, or up to one day prior. The flavors meld together beautifully when it sits overnight in the fridge.
Can I use a different type of candy in the filling?
Yes, you can get creative here! The recipe is very forgiving. Chopped Snickers, Heath bars, peanut butter cups, or even just plain roasted peanuts would work wonderfully. If you’re not a fan of peanut butter candy, try chopped toffee bits or chocolate-covered pretzels for a sweet and salty crunch. Just keep the total amount to about 1/2 cup of add-ins so the filling still holds together.
My ganache is too thin/too thick. What did I do wrong?
This is a common issue and easy to fix. If your ganache is too thin and runny, it’s likely the cream was too hot or the ratio was off. Let it sit at room temperature to cool and thicken. You can also pop it in the fridge for 5-minute intervals, stirring in between, until it reaches the right consistency. If it’s too thick and clumpy, it may have gotten too cold or you may have used too much chocolate. Gently reheat it in the microwave for 10-second bursts, stirring well each time, until it becomes pourable again.
Can I freeze this Decadent Cheesecake Chocolate Cake?
You can freeze it, but with a few notes. It’s best to freeze the cake without the ganache topping. Wrap the cooled, assembled cake (with just the cheesecake layer) tightly in plastic wrap and then foil. Freeze for up to 2 months. Thaw overnight in the refrigerator. Make your ganache fresh the day you plan to serve it, and pour it over the thawed cake. This ensures your ganache stays glossy and sets perfectly.
Why did my cake sink in the middle?
A sunken cake is usually a sign of underbaking or too much leavening. Make sure your baking powder and soda are fresh and measured accurately. Don’t open the oven door during the first 20 minutes of baking, as a sudden temperature drop can cause the cake to collapse. Also, ensure your oven temperature is accurate with an oven thermometer. A properly baked cake should spring back when lightly pressed in the center.
How do I get my cake layers to split evenly?
Patience and the right tool are key. First, ensure the cake is completely cool. Use a long, serrated bread knife. Mark a guideline around the entire circumference of the cake at the midway point using toothpicks. Then, using a slow, gentle sawing motion, follow your guideline all the way around, rotating the cake as you go. Don’t try to cut through the middle in one go—let the sawing motion do the work.
Can I make cupcakes with this recipe?
You can definitely adapt it! Fill cupcake liners about halfway with the chocolate cake batter. Bake at 350°F for about 18-20 minutes. Let them cool completely. Use a cupcake corer or spoon to remove a small bit from the center of each. Fill with the cheesecake mixture, then replace a small piece of the cupcake top. Finish with a dollop of ganache instead of a full pour. This makes adorable, individual-sized treats!
Is there a way to make this recipe nut-free?
Yes, it’s very simple. Just omit the Butterfinger bars, which contain peanuts. Replace them with an equal amount (1/4 cup) of a nut-free candy, like chopped up chocolate-covered toffee bits, mini M&Ms (check labels), or just more Reese’s Pieces (which are peanut butter flavored but made in a peanut-free facility—always double-check the bag). You could also use crushed pretzels for a salty crunch.
What’s the best way to soften cream cheese quickly?
If you forgot to take your cream cheese out, don’t panic! Remove it from the foil wrapper and place it on a microwave-safe plate. Microwave it on 50% power (defrost setting) for 15-second intervals. Flip it over after each interval. Stop when it feels slightly soft but still holds its shape. Do not microwave it on full power, as it will start to cook and become grainy.
My cheesecake filling is runny. How can I thicken it?
A runny filling usually means the cream cheese was too warm or you added the candy pieces while they were warm. Make sure all your ingredients are cool. If the filling seems loose, just pop the whole bowl into the refrigerator for 20-30 minutes to firm up before spreading it on the cake. You can also try adding an extra tablespoon or two of powdered sugar, which helps absorb moisture and stabilize the filling.
Mastering the basics of cooking fundamentals, like properly creaming ingredients and understanding how heat affects them, is the key to avoiding these common issues and making desserts you’re proud of.
I hope this Decadent Cheesecake Chocolate Cake becomes a new favorite in your home like it is in mine. It’s the kind of dessert that creates happy memories around the table. For more incredible ideas that blend cake and cheesecake, explore all our creative cheesecake recipes for your next baking adventure.
Go Ahead, Treat Yourself and Your Loved Ones
Baking this cake is an act of love. It’s about creating something wonderfully indulgent to share. Sure, it’s a few steps, but each one is simple, and the final “wow” moment is so worth it. The combination of rich chocolate, tangy cream cheese, and crunchy candy is pure magic. So preheat that oven, put on some music, and get ready to bake a dessert that will have everyone asking for seconds. Happy baking!
Equipment
- Grand bol
- Fouet
- Spatule
- Plaque à pâtisserie
- Papier sulfurisé
Ingredients
- 3/4 tasse farine tout usage
- 1/2 tasse cacao en poudre non sucré
- 1 cuil. à café poudre à lever
- 1/2 cuil. à café bicarbonate de soude
- 1/4 cuil. à café sel
- 1/2 tasse sucre granulé
- 2 oeufs
- 1/2 tasse lait
- 1/4 tasse huile végétale
- 1 cuil. à café extrait de vanille
- 8 oz fromage à tartiner ramolli
- 1/2 tasse sucre glace
- 1 cuil. à café extrait de vanille
- 1/4 tasse Reese's Pieces hachés
- 1/4 tasse barres Butterfinger écrasées
- 1 tasse pépites de chocolat semi-sucrées
- 1/2 tasse crème épaisse
Instructions
- Préchauffez votre four à 175°C et graissez une plaque à pâtisserie de 8 pouces.
- Dans un grand bol, mélangez la farine, le cacao, la poudre à lever, le bicarbonate de soude et le sel.
- Dans un autre bol, battez le sucre, les œufs, le lait, l'huile et la vanille jusqu'à ce que le mélange soit homogène.
- Incorporez délicatement le mélange de farine dans le mélange humide jusqu'à ce qu'il n'y ait plus de traces de farine.
- Versez le mélange dans le moule préparé et lissez le dessus. Cuisez pendant 25-30 minutes ou jusqu'à ce qu'un couteau inséré en ressorte propre.
- Laissez le gâteau refroidir complètement avant de le retirer du moule.
- Battre le fromage à tartiner jusqu'à ce qu'il soit crémeux, puis ajouter le sucre glace et la vanille, puis battre jusqu'à ce que le mélange devienne léger et mousseux.
- Incorporez les Reese's Pieces hachés et les barres Butterfinger écrasées.
- Chauffez la crème jusqu'à ce qu'elle soit juste à ébullition, puis versez-la sur les pépites de chocolat. Laissez reposer une minute, puis mélangez jusqu'à l'obtention d'un mélange lisse.
- Laissez la ganache refroidir pendant environ 10 minutes pour qu'elle épaississe légèrement.
- Coupez le gâteau refroidi horizontalement pour créer deux couches.
- Placez la première couche sur un plat de service et étalez la garniture cheesecake par-dessus.
- Placez délicatement la deuxième couche par-dessus et versez la ganache par-dessus, laissant couler sur les côtés.
- Attendez que la ganache prenne pour une découpe plus propre, ou servez immédiatement.
Notes
Nutrition

Hi, I’m Olivia Parker, the founder of BakingSecret.com and a lifelong lover of all things sweet and homemade. I grew up in a small town in Oregon, where the smell of fresh cookies in my family’s kitchen sparked my passion for baking. Over the years, I turned that passion into a mission: to help home bakers feel confident, inspired, and creative.
After studying food science and working in several artisan bakeries across the U.S., I decided to create a space where everyone from beginners to seasoned bakers can find reliable recipes, expert tips, and a warm, welcoming community. BakingSecret.com is my way of sharing the magic of baking with the world. When I’m not testing new recipes, you’ll find me exploring farmers’ markets, collecting vintage cookbooks, or perfecting my sourdough technique.