
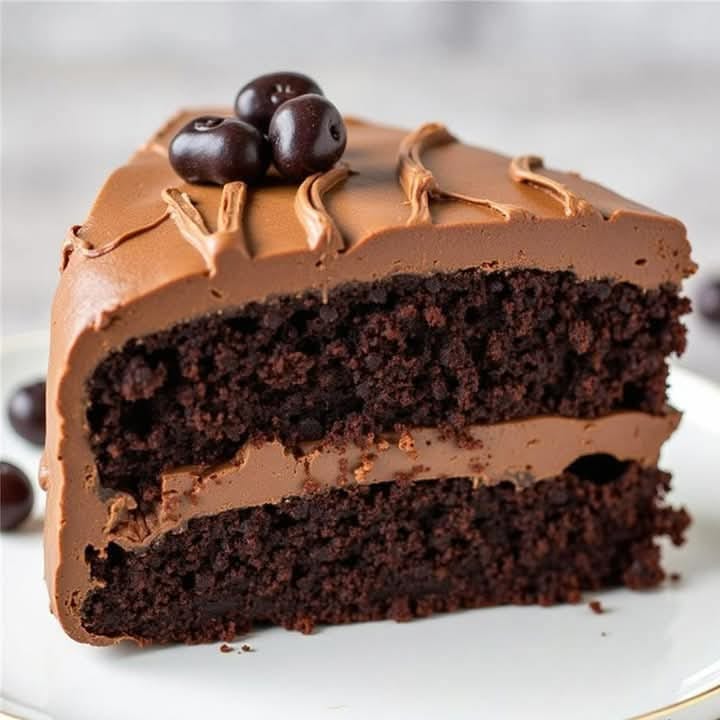
The Only Fudgy Chocolate Bliss Cake Recipe You’ll Ever Need
You know that moment when you need a chocolate fix so deep that only a truly epic cake will do? I’ve been there more times than I can count. After a particularly tough week, I set out to create the ultimate, soul-soothing chocolate cake. This Fudgy Chocolate Bliss is the glorious result. It’s not just a cake; it’s a hug in dessert form, with a crackly top that gives way to a molten-soft, intensely chocolatey heart. Trust me, this recipe is a keeper.
A Slice of Heaven: The Story Behind This Fudgy Chocolate Cake
My search for the perfect fudge cake began with my grandma’s old recipe box. Her cakes were always dense and rich, but I wanted something with a more modern, gooey texture. I tinkered for months! The ‘secret’ came from a Parisian patisserie blog I stumbled upon, which emphasized using an extra egg yolk for richness and baking just until the center is set but still soft. Merging that with grandma’s love for dark chocolate created this magic. It’s a beautiful blend of old-school comfort and new-school indulgence, perfect for today’s chocolate lovers.
Why You Will Fall in Love With This Blissful Chocolate Cake
This cake is pure joy for so many reasons. First, it’s incredibly simple—no layers to stack, no fancy decorating skills needed. It’s a one-bowl wonder (mostly!). The flavor is deep, dark, and sophisticated, thanks to the 70% cocoa chocolate. Yet, it remains wonderfully soft and almost brownie-like inside. It’s the kind of decadent delight that makes any day feel special, and it’s nearly impossible to mess up. Even my kids, who are tough critics, declared it “the best cake ever.” That’s a win in my book!
Perfect Occasions for Your Fudgy Chocolate Bliss Creation
This cake is your new best friend for celebrations. It’s a star at birthday parties (just add candles!). It turns a simple dinner into a luxury baking event. I love serving it warm with a scoop of vanilla ice cream for a dinner party—it always gets oohs and aahs. It’s also my go-to “thank you” gift for neighbors. A slice of this homemade cake wrapped in parchment says “I care” better than any store-bought card. Rainy days, tough days, happy days—they all deserve a slice of chocolate sensation.
Gathering Your Ingredients for Chocolate Heaven
Quality matters here, but the list is beautifully simple. Here’s what you’ll need:
- 200 g dark chocolate (70% cocoa)
- 180 g unsalted butter
- 170 g granulated sugar
- 50 g brown sugar
- 3 large eggs + 1 extra egg yolk
- 2 teaspoons vanilla extract
- 90 g all-purpose flour
- 25 g cocoa powder
- 1/4 teaspoon salt
- 50 g semi-sweet chocolate chunks (optional, but highly recommended!)
Handy Substitutions for Your Pantry
Out of something? No worries! Here are easy swaps:
Dark Chocolate: Use a 60% cocoa bar if that’s what you have. Avoid milk chocolate.
Brown Sugar: Use all granulated sugar in a pinch.
All-Purpose Flour: A 1:1 gluten-free baking blend works well.
Semi-Sweet Chunks: Chop up a chocolate bar, or use dark or milk chocolate chips.
Creating Your Masterpiece: Step-by-Step Guide
Step 1: Prep and Melt
First, get your oven humming at 350°F (180°C). Grease your 8-inch round cake tin and line the bottom with parchment paper—this is your cake’s insurance policy for a clean release. Now, for the good part! Chop the dark chocolate and cube the butter. Melt them together in a bowl set over a pot of simmering water. Stir slowly as they become a single, glossy, deep brown pool of luxury. The aroma is already incredible. Take it off the heat and let it cool for about 10 minutes. Pro tip: Don’t let the bowl touch the simmering water; we want gentle, indirect heat.
Step 2: Whip the Eggs and Sugar
While the chocolate cools, grab your mixer. Add the granulated sugar, brown sugar, eggs, and that special extra egg yolk. Beat them on medium-high speed. Watch as the mixture transforms from grainy yellow to a pale, thick, and creamy foam. This takes about 3-4 minutes. The sugar crystals are dissolving, creating a lighter cake texture. Now, stir in the vanilla extract. Its warm fragrance will mix beautifully with the coming chocolate.
Step 3: Combine the Chocolate and Egg Mixtures
Time to bring the two worlds together. Pour the slightly cooled chocolate mixture into the fluffy egg mixture. Use a spatula and fold gently. You’ll see beautiful ribbons of dark chocolate swirling into the pale foam. Keep folding until it’s one uniform, luscious, chocolate-brown batter. It should be smooth and thick, like the perfect cake batter. Take a moment to appreciate the silky texture.
Step 4: Fold in the Dry Ingredients
Sift the flour, cocoa powder, and salt right over the batter. Why sift? It prevents lumps and adds air, keeping the cake tender. Now, fold everything together with a light hand. Stop just when you no longer see dry flour streaks. Overmixing makes a tough cake, and we want fudgy! This is the time to fold in those chocolate chunks. They’ll create glorious little pockets of molten chocolate in every bite.
Step 5: Bake to Perfection
Pour the thick, luxurious batter into your prepared tin. Smooth the top with your spatula. Place it in the center of your preheated oven. Now, set a timer for 25 minutes. This is crucial! The cake is done when the edges are set and pull slightly away from the tin, but the center still has a slight, gentle wobble. A toothpick inserted near the edge should come out clean, but in the center, it should have a few moist crumbs. This is the secret to that fudgy heart.
Step 6: Cool and Serve
When the timer goes off, pull out your masterpiece. Let it cool in the tin on a wire rack for just 10 minutes. This lets it settle. Then, run a knife around the edge, place a plate on top, and confidently flip it over. Lift off the tin and peel away the parchment to reveal that perfect, shiny top. Let it cool a bit more if you like, but serving it slightly warm is a true sweet indulgence. Chef’s tip: For an extra touch, dust the top with powdered sugar or cocoa powder right before serving.
Timing Your Baking Therapy Session
This cake is wonderfully quick from craving to eating!
Prep Time: 20 minutes (mostly measuring and melting)
Baking Time: 25-30 minutes (watch that center wobble!)
Cooling Time: 10 minutes in the pan
Total Time: About 50-60 minutes to chocolate bliss
The One Secret for Ultimate Fudginess
Here’s my chef’s secret that changed everything: the extra egg yolk. The white provides structure, but the yolk adds richness, fat, and a gorgeous, tender crumb. It’s what stops the cake from being just a brownie and turns it into a luxurious, melt-in-your-mouth experience. Don’t skip it!
A Chocolatey Fact For Fun
Did you know the type of cocoa powder you use changes the flavor? Natural cocoa (like most grocery store brands) is acidic and gives a classic chocolate taste. Dutch-processed cocoa is alkalized, making it darker and milder. This recipe uses natural to balance the sweetness. Choosing high-quality chocolate isn’t just snobbery—it’s the main flavor, so make it count for true dark chocolate goodness.
Equipment You’ll Need
You don’t need fancy gear! Just gather:
- 8-inch (20 cm) round cake tin
- Parchment paper
- Mixing bowls (large and medium)
- Whisk and spatula
- Hand mixer or stand mixer
- Sifter or fine-mesh sieve
- Heatproof bowl for the double boiler
Storing Your Heavenly Cake
If, by some miracle, you have leftovers, here’s how to keep them perfect. Let the cake cool completely first. Any warmth will create steam and make it soggy.
Once cool, wrap it tightly in plastic wrap or store it in an airtight container. It will stay deliciously fudgy at room temperature for up to 3 days. The flavor actually deepens on the second day!
For longer storage, you can freeze it. Wrap individual slices or the whole cake tightly in plastic, then in foil. It will keep for up to 3 months. Thaw overnight in the fridge or at room temperature for a few hours.
My Best Tips for Cake Success
Room Temp is Key: Use eggs and butter straight from the counter, not the fridge. They blend better for a smooth batter.
Don’t Over-bake: Seriously, take it out when the center is still soft. It keeps cooking from residual heat.
Weigh Your Ingredients: A kitchen scale is a baker’s best friend for perfect results every time.
Let it Cool: I know it’s hard, but let it cool in the pan. It’s too delicate to handle hot.
Presentation Ideas to Wow Your Guests
Make it pretty! Here are some ideas:
- Dust with powdered sugar and fresh berries.
- Serve with a big scoop of vanilla bean ice cream.
- Drizzle individual slices with salted caramel or raspberry sauce.
- Top with a dollop of freshly whipped cream and chocolate shavings.
- For a party, add edible gold leaf or fresh mint leaves.
Healthier Twists on Fudgy Chocolate Bliss
Love the flavor but want to lighten it up? Try these simple swaps for a different version.
1. Whole Wheat & Honey: Swap half the all-purpose flour for whole wheat pastry flour. Replace the granulated sugar with 3/4 cup honey. The cake will be denser but still delicious.
2. Avocado Secret: Replace half the butter with mashed ripe avocado. You won’t taste it, and it adds healthy fats for extra moisture.
3. Sweet Potato Power: Purée 1/2 cup of cooked sweet potato and reduce the butter by 2 tablespoons. It adds natural sweetness and nutrients.
4. Coconut Sugar & Oil: Use coconut sugar instead of granulated and refined coconut oil instead of butter for a dairy-free, caramel-noted version.
5. Black Bean Brownie Cake: Sounds wild, but blend a 15oz can of rinsed black beans into the egg and sugar mixture. Omit the flour. It becomes a super fudgy, gluten-free, protein-packed treat.
6. Zucchini Boost: Add 1/2 cup of finely grated, drained zucchini to the batter. It keeps the cake incredibly moist for days without changing the chocolate flavor.
If you love the combination of fruit and chocolate, you must try our stunning raspberry and chocolate swiss roll for a beautiful dessert. For a festive twist, our cranberry and white chocolate bundt cake is always a crowd-pleaser. Looking for more layered chocolate joy? This black forest chocolate roll is a classic. And when you need a no-bake option, this peanut butter cheesecake is pure, creamy happiness.
Common Mistakes to Avoid for Perfect Fudgy Chocolate Bliss
Mistake 1: Overbaking the Cake
This is the biggest mistake! It turns a fudgy dream into a dry disappointment. It happens because we’re trained to bake until a toothpick comes out clean. For this cake, that rule is wrong. Take it out when the center is just set but still soft. The toothpick should have a few moist crumbs attached. The cake keeps cooking as it cools. If you wait for a clean pick, it’s already overdone. Tip: Set your timer for 25 minutes and check. It’s better slightly under than over.
Mistake 2: Using Cold Ingredients
Adding cold eggs or butter to melted chocolate is a recipe for trouble. Cold butter can re-solidify in streaks. Cold eggs won’t whip up properly with the sugar, and they can even cause the warm chocolate to seize up into a grainy mess. Always plan ahead. Take your eggs and butter out of the fridge at least an hour before you start baking. Room-temperature ingredients blend seamlessly for that smooth, velvety batter we all want.
Mistake 3: Overmixing the Batter After Adding Flour
Once you add the flour and cocoa powder, you need a gentle hand. Overmixing develops the gluten in the flour. This makes the cake tough and chewy instead of tender and fudgy. Fold the dry ingredients in just until you no longer see white streaks. A few small lumps are okay! It’s better to have a slightly uneven mix than to overwork it. Use a wide spatula and a light, sweeping motion from the bottom up.
Mistake 4: Not Letting the Melted Chocolate Cool Slightly
Pouring piping hot chocolate into your whipped eggs and sugar can “cook” the eggs on contact. This can give you a weird, scrambled texture and prevent the cake from rising properly. After melting the chocolate and butter, let the bowl sit on the counter for about 8-10 minutes. It should still be liquid and warm to the touch, but not hot. This ensures it blends smoothly without shocking the other ingredients.
Remember, enjoying treats like this is part of a happy life. For great advice on balancing indulgence with overall wellness, the CDC has helpful resources on smart eating habits that can guide your everyday choices.
This Fudgy Chocolate Bliss cake is just one of many amazing treats you can create. For more inspiration and recipes that will make you the star of any bake sale or family gathering, be sure to explore our entire collection of delicious cakes and cupcakes.
Your Fudgy Chocolate Bliss Cake Questions, Answered
Can I make this cake gluten-free?
Yes, absolutely! You can make a fantastic gluten-free version of this fudgy chocolate cake. Simply replace the 90 grams of all-purpose flour with the same weight of a good-quality 1:1 gluten-free baking blend. Look for a blend that contains xanthan gum, which helps mimic the structure that gluten provides. Be sure to also check that your cocoa powder is labeled gluten-free, as cross-contamination can sometimes occur. The method remains exactly the same. The result will be just as rich, fudgy, and satisfying as the original, making it a perfect decadent delight for everyone to enjoy.
What’s the best chocolate to use for this recipe?
The chocolate is the star, so choose wisely! For the 200 grams of dark chocolate, use a bar you enjoy eating on its own. A good-quality baking bar with 70% cocoa solids is ideal. It provides a deep, intense chocolate flavor without being overly sweet or bitter. Avoid using chocolate chips for the melted portion, as they contain stabilizers that can affect the smooth texture. For the optional chunks inside, semi-sweet chocolate chips or chopped baking chocolate are perfect. The quality directly impacts the final taste, making your homemade cake truly special.
How do I know when the cake is perfectly baked?
This is the most important step for that legendary fudgy center. At around 25 minutes, open the oven and gently jiggle the pan. The edges should look set and might be just pulling away from the sides. The center should have a slight wobble—it shouldn’t look liquid, but it should look soft. You can also use a toothpick. Insert it into the center of the cake. For a fudgy cake, you want the toothpick to come out with a few sticky crumbs clinging to it, not completely clean. If it’s clean, the cake is over-baked. Remember, it continues to set as it cools.
Can I double this recipe?
You can definitely double the recipe to make a larger cake or two separate ones. The key is to use the correct pan size. If you want one large cake, bake it in a 9×13 inch rectangular pan or a 10-inch springform pan. You will need to increase the baking time. Start checking at 35-40 minutes, using the same visual and toothpick tests. If you’re making two 8-inch rounds, split the doubled batter evenly between the two prepared pans. The baking time might be slightly less than the single batch, so check them at 22-25 minutes. Doubling is great for layer cakes!
Why did my cake sink in the middle?
A sunken center usually points to two issues. First, it might be under-baked. The structure didn’t set fully, so it collapsed as it cooled. Next time, bake a few minutes longer. Second, you might have opened the oven door too early or too often. The rush of cold air can cause a rising cake to fall. Try not to open the door before the 20-minute mark. Also, make sure your baking powder is fresh. Old leavening agents lose their power. A slight dip is normal for a very fudgy cake, but a major sink is a sign to adjust your technique.
How can I make this cake dairy-free?
Making a delicious dairy-free version is easy with a couple of swaps. Replace the unsalted butter with a plant-based butter alternative that is meant for baking. Popular brands like Earth Balance work well. Make sure to use a dairy-free dark chocolate bar—many high-quality dark chocolates are naturally dairy-free, but always check the label. For an extra-rich touch, you could use a chocolate specifically made with oat or almond milk. The rest of the recipe stays the same. You’ll still get an incredibly indulgent chocolate treat that everyone can enjoy.
Can I use milk chocolate instead of dark chocolate?
I don’t recommend it for the main 200 grams. Milk chocolate has more sugar and milk solids and less cocoa. This changes the structure and flavor of the cake entirely. It will be much sweeter, less chocolaty, and might not set properly. The cake could become overly soft or even greasy. If you prefer a milder chocolate flavor, the best compromise is to use a dark chocolate bar with a lower cocoa percentage, like 60%. This will give you a smoother taste while keeping the cake’s perfect fudgy texture intact.
What’s the purpose of the extra egg yolk?
That single extra egg yolk is my secret weapon for ultimate fudgy bliss. Egg whites provide structure through protein. Egg yolks, however, are packed with fat and emulsifiers like lecithin. The extra fat adds incredible richness and a velvety mouthfeel. The lecithin helps bind the water and fat in the batter together, creating a smoother, more homogeneous texture. This results in a cake that is exceptionally moist, tender, and has that luxurious melt-in-your-mouth quality that sets it apart from a standard cake or brownie.
How should I store leftovers and for how long?
Once completely cooled, wrap the cake tightly in plastic wrap or store it in an airtight container. At room temperature in a cool kitchen, it will stay fresh and fudgy for up to 3 days. The flavor often improves on the second day! If your kitchen is very warm, you can store it in the fridge for up to 5 days. Let a refrigerated slice come to room temperature for 30 minutes before eating for the best texture. You can also freeze it for up to 3 months. Wrap the whole cake or individual slices in plastic, then foil. Thaw in the fridge overnight.
Can I add coffee to enhance the chocolate flavor?
Yes, this is a fantastic pro tip! Coffee doesn’t make the cake taste like coffee. Instead, it deepens and enhances the chocolate flavor, making it taste even more chocolaty. You can do this in two ways. First, add one teaspoon of instant espresso powder to the dry ingredients. Second, you can replace one tablespoon of the vanilla extract with strong, cooled brewed coffee or espresso. This small addition elevates the cake to a more sophisticated, bakery-level chocolate dessert without any extra work.
The Final Slice
So there you have it—my heart and soul poured into this one perfect cake recipe. This Fudgy Chocolate Bliss is more than just ingredients and steps. It’s about creating a moment of pure, unadulterated joy. It’s about the smile on a friend’s face, the quiet satisfaction of a baking win, and the simple pleasure of a truly great piece of chocolate cake. I hope this recipe becomes a beloved staple in your home, just like it is in mine. Now, go preheat that oven. Your chocolate heaven awaits.
Equipment
- Grand bol
- Fouet
- Spatule
- Plaque à pâtisserie
- Papier sulfurisé
Ingredients
- 4 œufs
- 170 g sucre cristallisé
- 50 g sucre brun
- 90 g farine tout usage
- 25 g cacao en poudre
- 1 g sel
- 200 g chocolat noir 70% de cacao
- 180 g beurre non salé
- 50 g morceaux de chocolat semi-sucré optionnels
- 2 cuil. à café extrait de vanille
Instructions
- Préchauffez le four à 180°C et graissez un moule rond de 20 cm en tapissant le fond de papier sulfurisé.
- Hachez le chocolat noir et le beurre, puis faites-les fondre ensemble dans un bol résistant à la chaleur placé au-dessus d'une casserole d'eau frémissante, en remuant jusqu'à ce que le mélange soit homogène. Laissez refroidir pendant environ 10 minutes.
- Dans un batteur, battez le sucre cristallisé, le sucre brun, les œufs et le jaune d'œuf supplémentaire à vitesse moyenne-élevée jusqu'à ce que le mélange devienne pâle et crémeux (environ 3-4 minutes). Incorporez l'extrait de vanille.
- Incorporez le mélange de chocolat refroidi dans le mélange d'œufs à l'aide d'une spatule jusqu'à ce que le tout soit homogène.
- Tamisez la farine, le cacao en poudre et le sel sur la pâte, puis incorporez délicatement jusqu'à ce que tout soit juste mélangé. Ajoutez les morceaux de chocolat et incorporez à nouveau.
- Versez la pâte dans le moule préparé et lissez le dessus. Faites cuire pendant 25 minutes jusqu'à ce que les bords soient pris et que le centre ait un léger mouvement.
- Laissez le gâteau refroidir dans le moule pendant 10 minutes, puis passez un couteau autour des bords, retournez-le sur une assiette et retirez le papier sulfurisé.
Notes
Nutrition

Hi, I’m Olivia Parker, the founder of BakingSecret.com and a lifelong lover of all things sweet and homemade. I grew up in a small town in Oregon, where the smell of fresh cookies in my family’s kitchen sparked my passion for baking. Over the years, I turned that passion into a mission: to help home bakers feel confident, inspired, and creative.
After studying food science and working in several artisan bakeries across the U.S., I decided to create a space where everyone from beginners to seasoned bakers can find reliable recipes, expert tips, and a warm, welcoming community. BakingSecret.com is my way of sharing the magic of baking with the world. When I’m not testing new recipes, you’ll find me exploring farmers’ markets, collecting vintage cookbooks, or perfecting my sourdough technique.