
A Slice of Heaven: My Ultimate Chocolate Peanut Butter Cake
I have a confession. My love for chocolate and peanut butter began as a child sneaking spoonfuls of peanut butter straight from the jar. It reached its peak last year when I baked this Decadent Peanut Butter Cake for my best friend’s birthday. The look on her face when that dark chocolate ganache cascaded down the sides? Priceless. This isn’t just a cake; it’s a celebration in dessert form, and I’m so excited to share it with you.
The Delicious History of Peanut Butter Cakes
While peanut butter itself has roots in ancient cultures, its marriage with chocolate in cake form is a true American classic. Think of the beloved peanut butter cup, but amplified into a grand, shareable layer cake. This recipe takes that timeless combo and elevates it. The moist chocolate layers, creamy peanut butter, and silky ganache create a modern masterpiece that feels both nostalgic and wonderfully indulgent.
Why You’ll Adore This Decadent Peanut Butter Cake
You will love this recipe because it delivers huge flavor without fussy techniques. The cake batter comes together in one bowl, and the ganache is simply cream and chocolate. It’s deceptively simple for a dessert that looks and tastes so impressive. The contrast of the rich, dark chocolate with the salty-sweet peanut butter is simply magic. Every bite is a perfect balance.
Perfect Occasions for This Show-Stopping Cake
This cake is your secret weapon for any event that calls for a wow factor. It’s perfect for birthdays, anniversaries, potlucks where you want to be the hero, or even a cozy Sunday treat to make the weekend special. I’ve even made it as a “just because” cake to cheer up a friend. It always brings smiles.
What You’ll Need: Ingredients
- 2 cups all-purpose flour
- 1 3/4 cups granulated sugar
- 3/4 cup unsweetened cocoa powder
- 2 tsp baking powder
- 1 1/2 tsp baking soda
- 1 tsp salt
- 2 large eggs
- 1 cup whole milk
- 1/2 cup vegetable oil
- 2 tsp vanilla extract
- 1 cup boiling water
- 1 cup creamy peanut butter
- 1 cup heavy cream
- 2 cups dark chocolate chips
- Crushed peanuts for garnish
Easy Ingredient Swaps
No whole milk? Any milk you have works. For the oil, melted coconut oil or a light-tasting olive oil are fine. You can use natural peanut butter, but stir it very well first. If you’re out of dark chocolate chips, semi-sweet or even milk chocolate will make a sweeter ganache.
How to Make Your Decadent Chocolate Peanut Butter Layer Cake
Step 1: Get Your Pans Ready
First, preheat your oven to 350°F (175°C). This gives it time to reach the perfect temperature. Grease two 9-inch round cake pans with butter or non-stick spray. Then, dust them lightly with flour, tapping out the excess. This creates a non-stick barrier so your beautiful cakes release cleanly. Pro Tip: Lining the bottom with a circle of parchment paper is extra insurance against sticking.
Step 2: Mix the Dry Ingredients
Grab a large mixing bowl. Whisk together the flour, sugar, cocoa powder, baking powder, baking soda, and salt. You’ll see the cocoa dust float up, smelling divine. This whisking ensures all the leavening agents are evenly distributed. That means your cake will rise perfectly and have a consistent chocolate flavor in every single bite.
Step 3: Combine the Wet Ingredients
Make a well in the center of your dry ingredients. Crack in the eggs, then pour in the milk, vegetable oil, and vanilla extract. Use a hand mixer or a sturdy whisk to blend everything. The batter will be thick and glossy at this stage. The vanilla aroma mixing with the deep cocoa scent is your first hint that something wonderful is happening.
Step 4: The Secret to a Moist Cake
Here’s the unique step: carefully stir in the boiling water. The batter will become very thin and liquid. Don’t panic! This hot water “blooms” the cocoa powder, intensifying its flavor. It also creates a batter that bakes up incredibly moist and tender. Just stir until it’s smooth and pourable.
Step 5: Bake to Perfection
Divide the thin batter evenly between your prepared pans. Slide them into the preheated oven. Bake for 30-35 minutes. You’ll know it’s done when the top springs back at a light touch and a toothpick inserted in the center comes out with just a few moist crumbs. Pro Tip: Avoid opening the oven door before the 30-minute mark to prevent the cakes from falling.
Step 6: Cool the Layers
Let the cakes cool in their pans on a wire rack for exactly 10 minutes. This allows them to firm up just enough to handle. Then, run a knife around the edges and invert them onto the rack. Peel off the parchment paper if you used it. Let them cool completely. A warm cake will melt your peanut butter and ganache, so patience is key here.
Step 7: Create the Luxurious Ganache
While the cakes cool, make the chocolate ganache. Heat the heavy cream in a small saucepan until it just begins to simmer—little bubbles will form at the edges. Pour the hot cream over the dark chocolate chips in a heatproof bowl. Let it sit, untouched, for one full minute. This melts the chocolate gently. Then, stir slowly from the center outward until you have a smooth, velvety, glossy chocolate waterfall.
Step 8: Assemble with Love
Place your first cake layer on a serving plate or cake stand. Spread the entire cup of creamy peanut butter evenly over the top. It’s a generous layer, and that’s the point! Gently place the second cake layer on top, pressing down slightly. You now have a glorious peanut butter sandwich waiting for its chocolate coat.
Step 9: The Grand Finale: Frosting
Pour your slightly cooled, but still pourable, ganache onto the center of the top layer. Use an offset spatula or the back of a spoon to gently push it towards the edges, encouraging it to drip beautifully down the sides. Cover the top completely. Don’t worry about it being perfect; those rustic drips look gorgeous.
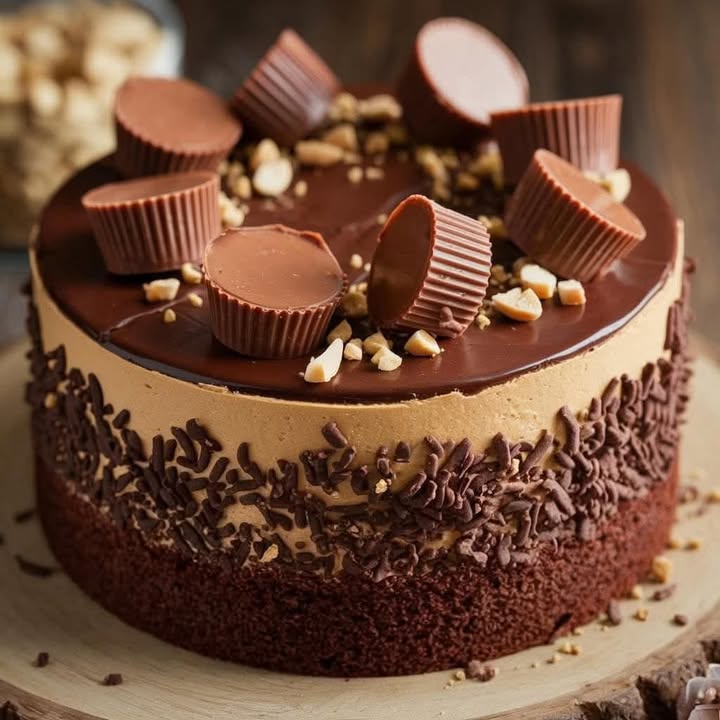
Step 10: Garnish and Serve
Immediately, while the ganache is still soft, sprinkle the top generously with crushed peanuts. You can also add some extra swirls of ganache or even a few peanut butter cups for fun. Let the cake set for about 15 minutes before slicing. Then, pour the milk, slice big pieces, and watch everyone’s eyes light up.
Time Commitment
Prep Time: 30 minutes
Baking Time: 30-35 minutes
Cooling & Assembly Time: 30 minutes
Total Time: About 1 hour 30 minutes
Servings: 12 happy slices
Chef’s Secret: The Warm Knife Trick
For super clean slices, run your knife under very hot water, wipe it dry, and then cut. The heat glides through the ganache and peanut butter layers without dragging, giving you picture-perfect pieces every time. Repeat the warming between each slice.
A Fun Fact About Your Ingredients
Adding hot liquid to cocoa is a technique called “blooming.” It opens up the cocoa particles, releasing more of their complex flavors and giving your cake a deeper, richer chocolate taste than if you just mixed it in dry. That cup of boiling water is your flavor power tool!
Necessary Equipment
- Two 9-inch round cake pans
- Large mixing bowl
- Whisk and spatula
- Hand mixer (optional, but helpful)
- Measuring cups and spoons
- Small saucepan
- Wire cooling rack
- Offset spatula for frosting
How to Store Your Masterpiece
Because of the perishable dairy in the ganache and filling, this cake needs to be refrigerated. Cover it loosely with a cake dome or invert a large bowl over it. This protects it from fridge odors while letting it breathe.
It will keep beautifully in the refrigerator for up to 4 days. The flavors actually meld and get even better on day two! Just let a slice sit at room temperature for 15-20 minutes before eating. This takes the chill off and softens the ganache and peanut butter to their perfect, creamy texture.
You can also freeze this cake for up to 2 months. Wrap the whole cake or individual slices tightly in plastic wrap, then in foil. Thaw overnight in the refrigerator before serving.
Pro Tips for the Best Cake Ever
- Use room temperature eggs and milk for a smoother batter.
- Level your cake layers with a serrated knife if they domed for a stable stack.
- If your ganache gets too thick to pour, gently reheat it in 5-second bursts in the microwave.
- For a neater look, place strips of parchment paper under the edges of the bottom cake layer before frosting. Pull them out after you’re done to reveal a clean plate.
Presentation Ideas to Impress Your Guests
- Serve each slice with a dollop of whipped cream and a drizzle of caramel sauce.
- Garnish with whole peanut butter cups or chocolate-dipped pretzels for crunch.
- Dust the plate with a little cocoa powder or powdered sugar for a professional touch.
- Use a piping bag to create elegant ganache swirls on top before adding the peanuts.
Healthier & Creative Variations
Love this combo but want to mix it up? Try these ideas:
- Gluten-Free Delight: Swap the all-purpose flour for a 1-to-1 gluten-free baking blend. Ensure your other ingredients are certified GF.
- Dairy-Free Version: Use almond or oat milk, vegan butter in the pans, and coconut cream to make the ganache with dairy-free chocolate chips.
- Peanut Butter Swirl Cake: Instead of a thick peanut butter layer, dollop spoonfuls of peanut butter onto the batter in the pans and swirl with a knife before baking.
- Mini Layer Cakes: Bake the batter in three 6-inch pans for a taller, adorable cake perfect for smaller gatherings.
- Mocha Twist: Add 1-2 teaspoons of instant espresso powder to the dry ingredients for a sophisticated mocha flavor that pairs wonderfully with peanut butter.
- Salt Lover’s Dream: Top the finished cake with a light sprinkle of flaky sea salt instead of, or in addition to, the crushed peanuts.
If you’re a fan of deep, fudgy chocolate experiences, you must try this incredible Fudgy Chocolate Heaven Cake as well. For a lighter, fruity chocolate option, this Black Forest Roll Cake is a dream. And if peanut butter is your soulmate but you want a different format, our creamy New York Style Banana Pudding Cheesecake or elegant White Chocolate Raspberry Mini Cheesecakes are waiting for you.
Common Mistakes to Avoid
Mistake 1: Adding the Peanut Butter to Warm Cake Layers
This is the biggest trap. If your cake layers are even slightly warm, the peanut butter will turn into a greasy, melty mess that soaks into the cake and slides everywhere. It makes assembly a nightmare. Always, always let your cakes cool completely on a wire rack. Touch the top lightly with your finger—it should feel completely room temperature. Patience here saves the whole structure of your Decadent Peanut Butter Cake.
Mistake 2: Overmixing the Batter
Once you add the flour mixture and the boiling water, you want to mix just until the ingredients are combined and the batter is smooth. Overmixing, especially with a powerful electric mixer, develops the gluten in the flour. This can lead to a tough, dense cake instead of the tender, moist crumb we’re after. Use a gentle hand and a spatula for the final stirs.
Mistake 3: Burning the Ganache
When heating the cream for the ganache, the goal is a simmer, not a rolling boil. If the cream gets too hot, it can cause the chocolate to “seize” or become grainy and oily when you mix them. Heat the cream over medium heat and watch for small bubbles around the edge of the pan. As soon as you see them, remove it from the heat. Pouring it over the chocolate chips does the rest of the work gently.
Mistake 4: Not Measuring Flour Correctly
Scooping flour directly from the bag with your measuring cup packs it down, leading to too much flour in your recipe. A dry, dense cake can be the result. For accuracy, spoon the flour lightly into your measuring cup until it’s heaping, then level it off with the flat edge of a knife. This “spoon and level” method is a baker’s best friend for perfect textures.
Mistake 5: Skipping the Garnish
Those crushed peanuts aren’t just pretty. They add a critical textural element. The cake is soft and creamy. The ganache is smooth. The peanuts provide a wonderful, salty crunch that completes every bite. Don’t skip them! If you have a nut allergy, try garnishing with crushed pretzels or a sprinkle of coarse sugar for a similar textural contrast.
Remember, baking is a joy, and the quality of your ingredients matters. For general wellness tips that complement your baking adventures, like the importance of water intake for overall health, it’s good to check trusted resources.
Frequently Asked Questions
Can I make this cake ahead of time?
Absolutely, and it might even taste better! You can bake the cake layers up to 2 days in advance. Let them cool completely, then wrap each layer tightly in plastic wrap and store at room temperature. You can also make the ganache a day ahead, store it covered in the fridge, and gently reheat it in short microwave bursts until it’s pourable again. Assemble the cake the day you plan to serve it for the freshest presentation and texture.
What kind of peanut butter works best?
I recommend using a standard, creamy commercial peanut butter like Jif or Skippy. These are stabilized and have a consistent texture and sweetness that spreads easily and holds up well. Natural peanut butter (the kind with oil that separates) can be used, but you must stir it thoroughly first. Its looser texture and less sweetness might slightly alter the final result and make the peanut butter layer a bit oilier.
Why do I add boiling water to the cake batter?
The boiling water does two fantastic things. First, it “blooms” the cocoa powder. This process opens up the cocoa solids, releasing a deeper, more intense chocolate flavor. Second, the hot water helps dissolve the sugar and creates a very thin batter. This batter bakes into an exceptionally moist and tender cake with a fine crumb. Don’t worry, the cake bakes perfectly despite how liquid the batter seems.
My ganache is too runny/thick. How can I fix it?
Ganache consistency depends on temperature and the ratio of cream to chocolate. If it’s too runny and won’t coat the cake, let it sit at room temperature to cool and thicken, stirring occasionally. You can also pop it in the fridge for 5-minute intervals, stirring each time. If it’s too thick and won’t pour, gently reheat it. Use a double boiler or the microwave at 50% power in 10-second bursts, stirring between each, until it’s fluid again.
Can I freeze this chocolate peanut butter layer cake?
Yes, you can! Freeze it without the peanut garnish for the best results. Wrap the completely assembled and set cake tightly in a layer of plastic wrap, then a layer of aluminum foil. It will keep for up to 2 months. To serve, thaw it overnight, still wrapped, in the refrigerator. Let it come to room temperature for about 30 minutes before slicing and adding your fresh crushed peanut garnish.
How do I get my layers to be perfectly flat?
Cake layers often dome slightly in the center. For a flat, professional stack, use a long serrated knife. Once the cakes are completely cool, place one layer on a flat surface. Hold the knife parallel to the counter and gently saw off the domed top. Repeat with the second layer. You can snack on the trimmings—a chef’s treat!
Can I use natural cocoa powder instead of unsweetened?
In this recipe, “unsweetened cocoa powder” typically refers to natural cocoa powder (like Hershey’s). It’s acidic and works with the baking soda for leavening. Do not substitute it with Dutch-processed cocoa unless you adjust the leavening, as it is alkalized and will react differently. Stick with a standard unsweetened natural cocoa for guaranteed results.
What can I use instead of vegetable oil?
Any neutral-tasting oil will work fine. Canola oil, avocado oil, or a light olive oil are great substitutes. Melted and cooled coconut oil also works but will impart a slight coconut flavor. Avoid strong-flavored oils like extra virgin olive oil or toasted sesame oil, as they will clash with the chocolate and peanut butter flavors.
Is it okay to use a different size pan?
You can, but it will change the bake time and the look of your cake. Using three 8-inch pans will give you thinner layers and require less baking time (start checking at 20-25 minutes). Using a 9×13-inch pan will make a sheet cake; bake for 35-40 minutes. Adjust your frosting and assembly method accordingly. For more classic layer cake inspiration, browse our full collection of favorite cake and cupcake recipes for any occasion.
The cake stuck to the pan! What do I do?
Don’t panic. Let the pan cool for the full 10 minutes. Then, gently run a thin, flexible spatula or a butter knife around the entire edge. Place a wire rack on top of the pan, hold them together firmly, and flip everything over. The cake should release. If a small piece stays behind, carefully use the spatula to remove it and “glue” it back onto the cake with a dab of peanut butter or ganache during assembly. It will be hidden!
Your New Go-To Celebration Cake
This Decadent Chocolate Peanut Butter Layer Cake is more than just a recipe. It’s a memory maker. It’s the cake you’ll be asked to make again and again. The rich chocolate, the creamy peanut butter, and that glossy ganache come together in pure harmony. It looks like it came from a fancy bakery but is made with love in your own kitchen. So gather your ingredients, put on some music, and bake something truly spectacular. Your friends and family will thank you. Now, who’s ready for a slice?
Equipment
- Grand bol
- Fouet
- Spatule
- Moules à gâteau de 9 pouces
- Papier sulfurisé
Ingredients
- 2 tasses farine tout usage
- 1.75 tasses sucre granulé
- 3/4 tasse cacao en poudre non sucré
- 2 c. à café poudre à lever
- 1.5 c. à café bicarbonate de soude
- 1 c. à café sel
- 2 grands oeufs
- 1 tasse lait entier
- 1/2 tasse huile de végétale
- 2 c. à café extrait de vanille
- 1 tasse eau bouillante
- 1 tasse beurre de cacahuète crémeux
- 1 tasse crème épaisse
- 2 tasses pépites de chocolat noir
- q.s. cacahuètes concassées pour la garniture
Instructions
- Préchauffez le four à 175°C et graissez deux moules à gâteau ronds de 9 pouces.
- Mélangez la farine, le sucre, le cacao en poudre, la poudre à lever, le bicarbonate de soude et le sel dans un grand bol.
- Faites un puits au centre des ingrédients secs et ajoutez les œufs, le lait, l'huile et l'extrait de vanille. Mélangez jusqu'à ce que le mélange soit homogène.
- Ajoutez lentement l'eau bouillante en remuant jusqu'à obtenir une pâte lisse et liquide.
- Divisez la pâte entre les moules préparés et faites cuire au four pendant 30 à 35 minutes, jusqu'à ce qu'un cure-dent inséré en ressorte propre.
- Refroidissez les gâteaux dans les moules pendant 10 minutes, puis démoulez sur une grille pour refroidir complètement.
- Pour la ganache, chauffez la crème épaisse dans une casserole jusqu'à frémissement, versez-la sur les pépites de chocolat et laissez reposer une minute avant de remuer jusqu'à ce que le mélange soit lisse.
- Placez la première couche de gâteau sur un plat de service, étalez le beurre de cacahuète sur le dessus, puis ajoutez la seconde couche.
- Versez la ganache sur la couche supérieure et laissez-la couler sur les côtés.
- Garnissez avec des cacahuètes concassées et laissez la ganache se raffermir pendant environ 15 minutes avant de trancher.
Notes
Nutrition

Hi, I’m Olivia Parker, the founder of BakingSecret.com and a lifelong lover of all things sweet and homemade. I grew up in a small town in Oregon, where the smell of fresh cookies in my family’s kitchen sparked my passion for baking. Over the years, I turned that passion into a mission: to help home bakers feel confident, inspired, and creative.
After studying food science and working in several artisan bakeries across the U.S., I decided to create a space where everyone from beginners to seasoned bakers can find reliable recipes, expert tips, and a warm, welcoming community. BakingSecret.com is my way of sharing the magic of baking with the world. When I’m not testing new recipes, you’ll find me exploring farmers’ markets, collecting vintage cookbooks, or perfecting my sourdough technique.