
How to Make Fresh Cherry Cobbler with Cake Mix
Last summer, my neighbor brought over a bowl of fresh cherries from her tree. I stared at those beautiful red fruits and panicked a little. I wanted to make something special, but I didn’t have time for a complicated recipe. That’s when I remembered my grandmother’s secret weapon: cake mix. She used to swear by it for quick desserts, and now I understand why.
Making a cherry cobbler with cake mix changed everything for me. It’s honestly one of the easiest desserts you’ll ever make. You don’t need fancy baking skills or a long list of ingredients. Just a few simple items and about ten minutes of prep time. The result is a warm, bubbly cobbler with a golden top that tastes like you spent hours in the kitchen.
I love using cake mix in cobblers because it takes all the guesswork out of baking. No measuring flour, baking powder, or sugar separately. The mix already has everything balanced perfectly. Plus, it creates this amazing texture on top that’s somewhere between cake and a crispy crust. My kids call it the “crunchy sweet part,” and they always fight over the corner pieces.
Cake mix cobblers have become super popular for good reason. Busy parents love them. College students living in dorms make them. Even experienced bakers use this shortcut when they need a quick dessert for unexpected guests. There’s no shame in using a mix. It’s smart, practical, and delicious.
Today I’m going to walk you through everything you need to know about making fresh cherry cobbler with cake mix. We’ll cover the basic recipe first, then I’ll share some fun variations. You’ll learn about different ingredients you can add, tips for getting that perfect golden crust, and answers to common questions people ask me all the time.
What You’ll Need for This Recipe
The ingredient list is refreshingly short. For a basic cherry cobbler with cake mix, you need:
- 4 to 5 cups of fresh cherries (or two cans of cherry pie filling)
- 1 box of yellow or white cake mix
- 1/2 cup of melted butter
- 1/2 cup of sugar (if using fresh cherries)
- 1/4 cup of water or lemon juice
You can find everything at any grocery store. The cake mix aisle usually has several options. I prefer yellow cake mix for a richer flavor, but white cake mix cherry pie filling combinations work great too. Some people even use chocolate cake mix with cherries for a black forest vibe.
If you want to get creative, try making cherry cobbler with cake mix and Sprite. Just replace the butter with a can of Sprite poured over the cake mix. The soda creates tiny air pockets that make the topping extra fluffy. My sister uses this method every Thanksgiving, and people always ask for her recipe.
Another favorite variation is cherry cobbler with cake mix and cream cheese. You dollop small chunks of cream cheese over the cherries before adding the cake mix. As it bakes, the cream cheese melts into creamy pockets throughout the cobbler. It’s rich and wonderful.
Getting Your Cherries Ready
Fresh cherries taste amazing, but they require some work. You need to wash them, remove the stems, and pit them. I use a cherry pitter tool that I bought for about ten dollars online. It saves so much time and keeps my hands from getting stained.
Once your cherries are pitted, toss them with sugar and let them sit for about 15 minutes. This draws out the juices and creates a syrupy base. Add a tablespoon of cornstarch if you want a thicker filling. Some people add almond extract or vanilla here. I like a squeeze of fresh lemon juice to brighten the flavor.
Don’t stress if you don’t have fresh cherries. Canned cherry pie filling works perfectly fine. I keep a few cans in my pantry for last-minute dessert emergencies. The 3 ingredient cherry dump cake method uses just pie filling, cake mix, and butter. That’s it. Dump everything in a pan and bake. It doesn’t get easier than that.
Frozen cherries are another option. Thaw them first and drain some of the excess liquid. Too much moisture can make your cobbler soggy instead of perfectly gooey.
Putting It All Together
Preheat your oven to 350 degrees. Grab a 9×13 inch baking dish and spray it with cooking spray. Pour your prepared cherries into the bottom of the dish and spread them evenly.
Here’s where it gets fun. Sprinkle the dry cake mix directly over the cherries. Don’t mix it in. Just let it sit on top like a blanket of powder. This is the magic of dump cakes. The moisture from the fruit will soak up into the mix as it bakes.
Drizzle your melted butter evenly over the cake mix. Try to cover as much of the surface as possible. The butter helps the top get crispy and golden. I use a spoon and move it back and forth across the pan in a zigzag pattern.
Some recipes tell you to mix the butter into the cake mix first. That works fine too. You’ll get more of a crumbly topping that way. I prefer the dump method because it’s faster and creates interesting texture variations.
For cherry cobbler with cake mix and pineapple, add a can of crushed pineapple between the cherries and cake mix layer. The pineapple adds moisture and a tropical twist. My aunt makes this version every summer, and it disappears in minutes.
Baking Tips for Perfect Results
Slide your cobbler into the oven and set a timer for 45 minutes. The top should turn golden brown and the edges should bubble. That bubbling is important. It means the fruit juices are cooking with the cake mix to create that signature cobbler texture.
If your top is browning too quickly but the center isn’t done, cover it loosely with aluminum foil. This protects the surface while letting the inside finish cooking.
I learned this trick from my grandmother: place a baking sheet on the rack below your cobbler. Sometimes the fruit juices bubble over, and this catches any drips. It saves you from scrubbing your oven later.
For cherry cobbler with cake mix dutch oven cooking, use the same ingredient ratios. Place your dutch oven over hot coals or on a camp stove. Put coals on the lid too for even heating. Check it after 30 minutes since dutch ovens cook differently than regular ovens.
The cherry dump cake with coconut version adds shredded coconut between layers. Sprinkle about a cup of sweetened coconut over the cherries before adding the cake mix. It adds chewiness and flavor that reminds me of cherry macaroons.
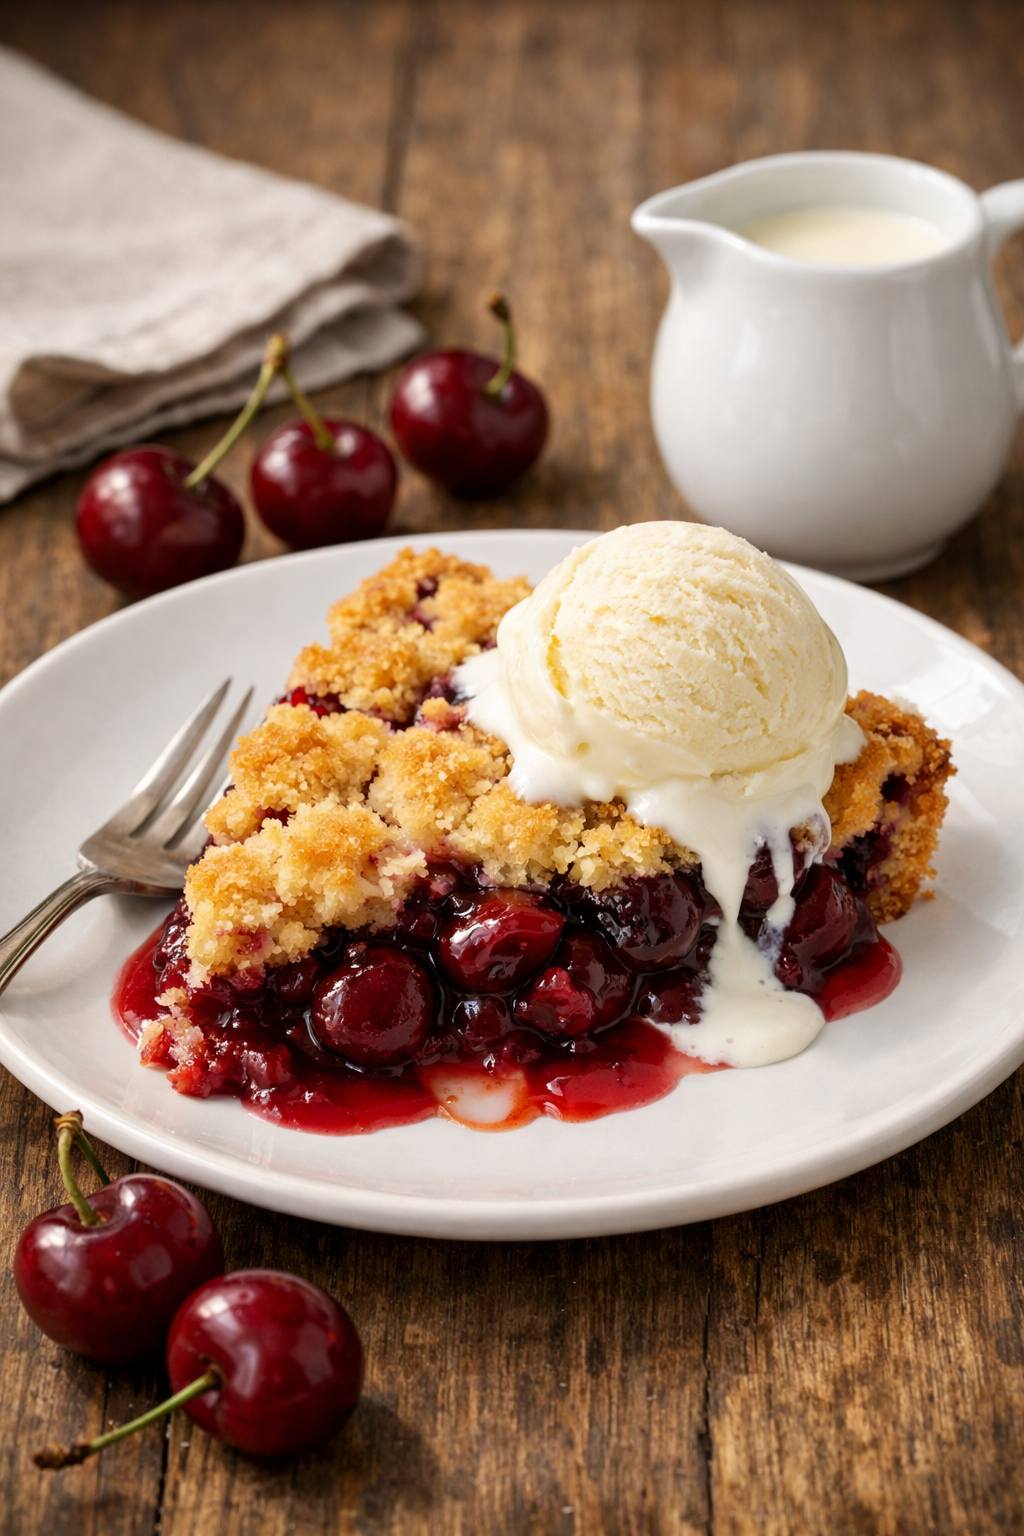
Let your cobbler cool for at least 15 minutes before serving. I know it’s hard to wait when your kitchen smells incredible, but the filling needs time to set up. Otherwise, it’ll be too runny.
Serve it warm with vanilla ice cream or whipped cream. The cold cream melting into the hot cobbler is pure comfort food. Some people like it for breakfast with coffee. I won’t judge.

Variations and Creative Twists
Once you’ve mastered the basic cobbler, the real fun begins with experimenting. I’ve spent years trying different combinations, and some have become family favorites that rotate through our dessert menu constantly.
Cherry Cobbler with Cake Mix and Sprite
The first time someone told me about using soda in a cobbler, I thought they were pulling my leg. But cherry cobbler with cake mix and Sprite is absolutely legitimate, and it works like magic.
Instead of drizzling melted butter over your dry cake mix, you pour a can of cold Sprite directly over everything. The carbonation reacts with the cake mix during baking, creating these amazing little air bubbles throughout the topping. It comes out lighter and fluffier than the butter version, almost like a soufflé texture in places.
The citrus notes in Sprite brighten up the cherry flavor too. It’s subtle, not overpowering. You won’t taste lemon-lime specifically, but you’ll notice the fruit tastes fresher somehow. My brother-in-law refuses to make cobbler any other way now. He’s converted his entire camping group to the Sprite method.
Here’s the thing: you can experiment with different sodas. I’ve tried ginger ale, which adds a subtle spice that works beautifully. My friend Rachel uses Dr. Pepper, which creates this unique caramel undertone. She also makes a killer pumpkin better than sex cake that uses similar layering techniques if you want to branch out seasonally.
One warning though: use regular soda, not diet. The sugar content matters for the chemical reaction. Diet versions don’t create the same texture. Trust me on this. I learned that lesson at a potluck where my cobbler came out disappointingly flat.
Cherry Cobbler with Cake Mix and Cream Cheese
If you want to elevate your cobbler to dinner party status, cherry cobbler with cake mix and cream cheese is the way to go. This version tastes ridiculously fancy but requires minimal extra effort.
Take an 8-ounce block of cream cheese straight from the fridge. Don’t soften it. Cut it into small cubes, maybe half-inch pieces. After spreading your cherries in the baking dish, scatter these cream cheese chunks randomly across the fruit layer. Then proceed with the cake mix and butter as usual.
As everything bakes, the cream cheese melts into creamy pockets throughout the cobbler. You’ll hit these rich, tangy spots that contrast perfectly with the sweet cherries. It’s similar to the concept behind a cream cheese coffee cake, where the dairy element creates contrast and depth.
Sometimes I add a teaspoon of vanilla extract to the cherries when I make this version. The vanilla plays nicely with both the fruit and the cream cheese. My mother-in-law requests this specific cobbler for her birthday every year instead of traditional cake.
You can also create a cream cheese swirl by beating softened cream cheese with a bit of powdered sugar, then dolloping spoonfuls on top before baking. It creates a cheesecake-like layer that’s absolutely divine. Fair warning: this version is rich. Serve smaller portions than you normally would.
Cherry Cobbler with Cake Mix in a Dutch Oven
Camping season always gets me excited because it means cherry cobbler with cake mix dutch oven adventures. There’s something special about making dessert outdoors over a campfire.
The method stays basically the same, but heat management becomes crucial. You want about 10-12 charcoal briquettes underneath your dutch oven and another 15-18 on the lid. This creates top-and-bottom heat similar to a conventional oven.
Rotate your dutch oven a quarter turn every 15 minutes, and rotate the lid in the opposite direction. This prevents hot spots that can burn sections of your cobbler. I set a timer on my phone because it’s easy to lose track of time when you’re sitting around a campfire telling stories.
Check for doneness after about 35 minutes. The timing varies depending on outdoor temperature and wind conditions. You’re looking for that same golden top and bubbling edges. I bring a long-handled spoon to peek under the lid without getting too close to the heat.
Funny enough, my kids think campfire cobbler tastes better than oven-baked. Maybe it’s the outdoor setting or the hint of smoke flavor. We’ve made it a tradition on every camping trip, and neighboring campers always wander over asking what smells so good.
Pro tip for camping: pre-measure your dry cake mix into a ziplock bag at home. Bring canned pie filling instead of fresh fruit. This cuts down on prep work when you’re dealing with limited cooking space and equipment.
White Cake Mix and Cherry Pie Filling Combinations
The white cake mix cherry pie filling pairing creates a lighter flavor profile than yellow cake mix. White cake mix has a more delicate taste that lets the cherry flavor shine through completely.
This combination works especially well if you’re adding other ingredients. When I make cherry cobbler with cake mix and pineapple, I always use white cake mix. The subtle base doesn’t compete with the fruit flavors. Just layer a 20-ounce can of crushed pineapple (drained) over your cherry pie filling before adding the cake mix.
The pineapple adds moisture and tropical sweetness that transforms the whole dessert. It reminds me of a pineapple upside-down cake but easier. Kids especially love this version. I’ve served it at birthday parties where it competed successfully against fancy decorated cakes.
For cherry dump cake with coconut, sprinkle about one cup of sweetened shredded coconut between the fruit and cake mix layers. The coconut toasts as it bakes, creating nutty flavor and chewy texture. Some people add slivered almonds too for extra crunch. I sometimes do half coconut and half chopped pecans.
By the way, if you’re exploring different cake mix and pie filling recipes beyond cherry, the same techniques work with apple, peach, or berry fillings. I rotate through flavors seasonally. Peach in summer, apple in fall, cherry in spring. Even made a tuna-free version as a cake for cats using cat-safe ingredients for my pet’s birthday, though that’s obviously a different concept entirely.
The Simplicity of 3 Ingredient Cherry Dump Cake
When people ask me about the absolute easiest cobbler possible, I always point them toward the 3 ingredient cherry dump cake. It’s foolproof. Literally just cherry pie filling, cake mix, and butter.
Two cans of cherry pie filling go in your baking dish. One box of cake mix gets sprinkled over top. One stick of melted butter drizzled over everything. Bake at 350 degrees for 45 minutes. Done.
This is my go-to recipe when I’m exhausted but need to bring dessert somewhere. I’ve made it on weeknights after long work days. I’ve thrown it together when unexpected guests called to say they were coming over. It never fails.
The cherry dump cake pioneer woman version adds chopped pecans on top before baking, which is a nice touch if you have nuts on hand. But honestly, the basic three-ingredient version is perfect as-is.
What’s the Difference Between a Cherry Crisp and a Cherry Cobbler?
People mix these up constantly, and I get asked about this all the time. A crisp has a streusel-like topping made from oats, flour, butter, and sugar mixed together. It’s crumbly and granular.
A cobbler has a biscuit or cake-like topping. When you use cake mix, you’re definitely making cobbler, not crisp. The topping is softer and more cake-like in texture. Crisps stay crunchier throughout.
Both are delicious, just different. I make crisps when I want that oat texture. I make cobblers when I want something more substantial and cake-like. My husband prefers cobblers. My daughter likes crisps. So I alternate to keep everyone happy.
Cobblers also tend to be a bit easier since you don’t need to mix the topping ingredients. With cake mix cobblers especially, you just dump and go. Crisps require cutting butter into dry ingredients, which adds steps and dishes.
More Delicious Combinations and Tips
After years of making these cobblers, I’ve discovered that once you understand the basic formula, the possibilities become almost endless. The beauty of working with cake mix is that it’s incredibly forgiving. You can throw in additions, switch up flavors, and experiment without much risk of failure.
Cherry Dump Cake with Coconut
If you haven’t tried adding coconut to your cherry cobbler yet, you’re missing out on something special. The tropical element sounds a little unexpected with cherries at first, but it creates this amazing flavor combination that reminds me of chocolate-covered cherry candies with coconut filling.
To make a proper cherry dump cake with coconut, spread your cherry filling in the bottom of your dish like usual. Then take about one and a half cups of sweetened shredded coconut and sprinkle it evenly over the cherries. I sometimes mix the coconut with a tablespoon of sugar and a pinch of cinnamon first. It helps the coconut caramelize better as it bakes.
After your coconut layer, add the dry cake mix, then drizzle your melted butter over everything. What happens during baking is pretty cool. The coconut on the bottom gets soft and almost jammy from the cherry juices. The coconut that peeks through the cake mix on top toasts to a beautiful golden brown and gets crunchy.
My cousin introduced me to this version at a family reunion three years ago. She’d added sliced almonds along with the coconut, creating this Almond Joy vibe. People kept going back for seconds and thirds. She eventually had to guard the last few servings so her kids could have some.
Here’s a fun variation: use coconut extract in addition to the shredded coconut. Add about half a teaspoon to your cherry filling before you spread it in the pan. It intensifies that tropical flavor without being overwhelming. Just don’t overdo it. Coconut extract is potent, and a little goes a long way.
You can also use unsweetened coconut if you’re watching sugar intake. The cherries and cake mix provide plenty of sweetness already. The unsweetened version gives you that coconut flavor and texture without making the dessert cloyingly sweet.
Cherry Dump Cake Pioneer Woman Style
Ree Drummond, better known as the Pioneer Woman, has popularized so many simple, crowd-pleasing recipes over the years. Her approach to the cherry dump cake pioneer woman style adds a few special touches that really do make a difference.
One signature move is adding chopped pecans or walnuts between layers. She typically uses about a cup of roughly chopped nuts sprinkled over the fruit before adding the cake mix. The nuts toast during baking and add this wonderful crunch and depth. I started doing this after watching one of her cooking shows, and my family noticed immediately. My dad actually asked if I’d changed the recipe because it tasted “fancier.”
Another Pioneer Woman trick is using real butter instead of margarine, which might seem obvious but genuinely impacts flavor. She also recommends cutting the butter into thin pats and laying them across the top of the cake mix rather than melting it first. This method creates little butter pools that form extra-crispy spots throughout the topping. Those crispy bits are often everyone’s favorite part.
I’ve adapted her style by sometimes adding a dash of almond extract to the cherries, maybe a quarter teaspoon. Cherries and almonds have this natural affinity that’s been recognized in European baking for centuries. It’s subtle but elevating.
She’s also big on serving suggestions. A scoop of vanilla ice cream is standard, but she sometimes adds a drizzle of caramel sauce or a sprinkle of sea salt over the top. That salt thing sounded weird to me initially, but it actually works. The tiny bit of salt makes all the sweet flavors pop.
For holidays, I’ll sometimes follow her lead and add seasonal spices. A bit of nutmeg and cloves around Thanksgiving. Some cardamom during winter holidays. These small additions don’t change the fundamental simplicity of the recipe but make it feel appropriate for special occasions.
Cake Mix and Pie Filling Recipes
Once you’ve conquered cherry cobbler, a whole world of cake mix and pie filling recipes opens up. The technique works with virtually any canned pie filling you can find at the grocery store.
Peach is probably my second favorite after cherry. Peach cobbler with yellow cake mix tastes like summer in a pan. I add a teaspoon of cinnamon to the peaches and sometimes throw in some fresh blueberries if I have them on hand. The combination is fantastic.
Apple pie filling with spice cake mix creates this instant autumn dessert that’s perfect for October gatherings. Add some raisins and chopped walnuts to really lean into fall flavors. My neighbor makes this every year for her Halloween party, and people literally line up for it.
Blueberry filling with lemon cake mix is incredibly refreshing. I serve this one in summer when it’s too hot for heavy desserts. The lemon brightens everything up. Sometimes I add lemon zest to both the filling and sprinkle some over the cake mix before adding butter.
Here’s where it gets creative: mix two different pie fillings together. Cherry and apple. Blueberry and peach. Strawberry and rhubarb. You can create custom flavors that you’ll never find in a bakery. I made a triple berry version last Fourth of July using strawberry, blueberry, and blackberry fillings. It looked patriotic and tasted amazing.
You can even use savory applications, though I’ll admit I haven’t gone there personally. I’ve heard of people making similar dump-style dishes with chicken and vegetables for dinner, using biscuit mix instead of cake mix. The method translates across sweet and savory cooking, which speaks to how versatile this technique really is.
By the way, if you’re interested in other cooking methods that bring out fruit flavors differently, grilling stone fruits like peaches or cherries before using them in cobblers adds an incredible smoky-sweet dimension. I tried grilled peaches in a cobbler last summer, and the caramelization from the grill added layers of flavor I never expected.
The cake mix and pie filling formula also works with fresh fruit when you prepare it properly. Just remember to add sugar and a thickening agent like cornstarch or tapioca to fresh fruit. The canned fillings already have everything balanced, which is why they’re so convenient.
Different cake mix flavors create entirely different desserts. Chocolate cake mix with cherry filling tastes like Black Forest cake. White cake with strawberry filling becomes strawberry shortcake-adjacent. Lemon cake with raspberry filling is elegant enough for a dinner party. I’ve built an entire dessert rotation around these combinations, and I rarely repeat the same one twice in a season.
If you’re looking for even more dessert ideas beyond cobblers and want to explore what else you can do with simple techniques, check out the full range of options in the cakes and cupcakes section where you’ll find plenty of creative approaches to easy baking that don’t require professional skills.
The portion sizes work out nicely too. A 9×13 pan serves about twelve people comfortably, assuming normal serving sizes. For smaller gatherings, cut the recipe in half and use an 8×8 or 9×9 square pan. The baking time stays roughly the same, maybe five minutes less depending on your oven.
Storage is straightforward. Cover any leftovers with plastic wrap or transfer to an airtight container. It keeps in the refrigerator for about four days. You can reheat individual portions in the microwave for about thirty seconds. Some people actually prefer leftover cobbler cold for breakfast with their coffee, though I’m firmly in the warm-with-ice-cream camp.
The best part about mastering these simple cake mix and pie filling recipes is how confident you’ll feel tackling desserts. No more panic when someone asks you to bring something to a potluck. No more stress about impressing dinner guests. You’ve got a reliable method that works every single time and tastes homemade because, well, it is homemade. Just simplified.
Frequently Asked Questions
How do you make a 3 ingredient cake cobbler?
The absolute simplest version uses just pie filling, cake mix, and butter. Spread two cans of cherry pie filling in a greased 9×13 inch pan. Sprinkle one box of dry cake mix evenly over the filling without stirring. Melt one stick of butter and drizzle it across the top, covering as much surface as possible. Bake at 350 degrees for about 45 minutes until golden and bubbly. That’s it—no mixing bowls, no complicated steps, just three ingredients creating something delicious.
Can I make cherry cobbler ahead of time?
Absolutely, though I recommend assembling it but not baking it until closer to serving time. You can layer everything in your baking dish, cover it tightly with plastic wrap, and refrigerate for up to 24 hours. When you’re ready, remove it from the fridge, let it sit at room temperature for about 15 minutes, then bake as directed. You might need to add five extra minutes to the baking time since it starts cold. Alternatively, bake it completely, let it cool, and reheat covered with foil at 300 degrees for about 20 minutes before serving.
What’s the best way to serve cherry cobbler?
I’m biased toward warm cobbler with vanilla ice cream melting over the top, but there are plenty of options. Whipped cream is classic and lighter than ice cream. Some people love it plain with just a fork. For breakfast lovers, try it cold with coffee or warm with a dollop of Greek yogurt. At fancy dinners, I’ve served it with a drizzle of heavy cream and fresh mint leaves for garnish. Honestly, there’s no wrong way—it’s delicious however you eat it.
Can I use fresh cherries instead of canned filling?
Fresh cherries work beautifully and taste incredible. You’ll need about 4 to 5 cups of pitted fresh cherries. Toss them with half a cup of sugar, a tablespoon of cornstarch, and a squeeze of lemon juice. Let the mixture sit for 15 minutes to draw out juices, then proceed with the recipe as normal. The cornstarch is important because fresh fruit releases more liquid than canned filling, and you need that thickener to prevent a soupy cobbler. The flavor difference is noticeable and worth the extra prep work when cherries are in season.
Why did my cobbler turn out soggy?
Excess moisture is usually the culprit. If you used frozen cherries, make sure to thaw and drain them first. Too much liquid in the fruit layer prevents the cake mix from baking properly. Also check that you used enough cake mix to cover the fruit adequately and that your butter was distributed evenly. Underbaking can cause sogginess too—make sure you see those bubbling edges and a golden top before removing it from the oven. Let it rest for at least 15 minutes after baking so everything can set up properly.
Can I freeze cherry cobbler?
You can freeze it either before or after baking. To freeze unbaked, assemble everything in a disposable aluminum pan, cover tightly with plastic wrap and then foil, and freeze for up to three months. Bake from frozen, adding about 15-20 extra minutes to the cooking time. For already-baked cobbler, let it cool completely, wrap well, and freeze. Thaw in the refrigerator overnight and reheat at 300 degrees for about 25 minutes. The texture won’t be quite as perfect as fresh, but it’s still delicious and incredibly convenient for make-ahead planning.
What other sodas work besides Sprite?
Several sodas create interesting variations. Ginger ale adds subtle spice that complements cherries nicely. Lemon-lime sodas like 7-Up work the same as Sprite. Dr. Pepper creates a unique caramel-like undertone that some people absolutely love. Root beer makes things interesting with vanilla and spice notes. I’d avoid strongly flavored sodas like grape or orange unless you really want those flavors competing with your cherries. Always use regular soda, not diet, because the sugar content matters for proper texture and rise.
How do I get a crispier topping?
A few tricks help maximize crispiness. Use real butter instead of margarine. Cut cold butter into thin slices and lay them across the top instead of melting it—this creates crispy butter pockets. Sprinkle a tablespoon or two of sugar over the dry cake mix before adding butter. Don’t cover the cobbler while baking unless the top browns too quickly. Finally, run it under the broiler for the last two minutes of baking if you want extra crunch on top, but watch it carefully because it can burn fast.
Can I make individual servings instead of one big pan?
Individual cobblers are adorable and perfect for dinner parties. Use ramekins or oven-safe mason jars. Put about half a cup of cherry filling in each container, then add a few tablespoons of dry cake mix and a tablespoon of melted butter on top. Reduce baking time to about 25-30 minutes since smaller portions cook faster. Place all your ramekins on a baking sheet to catch any overflow. These individual servings also make great gifts—I’ve brought them to new neighbors and sick friends, and they’re always appreciated.
Is there a way to reduce the sugar in this recipe?
You have several options for cutting sugar. Use sugar-free or no-sugar-added pie filling, which many brands now offer. Choose a reduced-sugar cake mix if you can find it. With fresh cherries, reduce the added sugar by half or use a natural sweetener like honey or maple syrup instead. Skip any extra sugar sprinkled on top. The dessert will be less sweet but still delicious, and the natural fruit flavors come through more prominently. Just know that sugar affects texture as well as sweetness, so significant reductions might change how the topping bakes.
The wonderful thing about cherry cobbler is how it brings people together without requiring you to be a baking expert. Every time you pull that golden, bubbling pan from the oven, you’re creating a memory and sharing something made with your own hands. So grab your ingredients, trust the simplicity of the method, and enjoy watching your family’s faces light up when they taste your creation.
Equipment
- Mixing bowl
- Spoon for drizzling butter
- Cooking Spray
- 9x13 inch baking dish
- Measuring cups
Ingredients
- 5 cups Fresh cherries or two cans of cherry pie filling
- 1 box Yellow or white cake mix
- 1/2 cup Melted butter
- 1/2 cup Sugar if using fresh cherries
- 1/4 cup Water or lemon juice
Instructions
- Preheat oven to 350 degrees F (175 degrees C).
- Wash, stem, and pit the fresh cherries, or use canned cherry pie filling.
- If using fresh cherries, toss them with sugar and let sit for about 15 minutes.
- Grease a 9x13 inch baking dish with cooking spray.
- Pour the prepared cherries (or cherry pie filling) into the bottom of the dish and spread evenly.
- Sprinkle the dry cake mix evenly over the cherries; do not mix.
- Drizzle the melted butter evenly over the cake mix.
- Bake in the preheated oven for 45 minutes or until the top is golden brown and the edges are bubbling.
- Let the cobbler cool for at least 15 minutes before serving.
Notes
Nutrition
Hi there! I’m Emma Lawson, and I’m thrilled to be part of the BakingSecret.com team! Baking has been a part of my life since I was a little girl, growing up in a family that loved to bake together. From birthday cakes to cookies, I learned early on that the kitchen was a place of creativity and connection.
After studying culinary arts at The Culinary Institute of America, I fell in love with the science behind baking. Understanding how different ingredients interact and how slight adjustments can change the final product is something that continues to fascinate me. My background in pastry arts and food science has helped me develop recipes that are not only delicious but also reliable.
At BakingSecret.com, I’m excited to share recipes that cater to all levels, from beginners to seasoned bakers. My goal is to make sure that you feel confident in the kitchen and have fun with every bake. When I’m not in the kitchen, you can find me experimenting with new flavor combinations, hiking, or trying out new coffee shops in town!