
The Ultimate Berry Chocolate Indulgence Is Here!
You know that feeling when you crave something chocolatey, but also fruity, creamy, and a little bit fancy? I was searching for that perfect dessert for my book club last month. I wanted to make everyone say “wow” without spending all day in the kitchen. Then I created this Berry Bliss Chocolate Cheesecake. The moment I took it out of the fridge, saw that glossy ganache and those ruby-red berries peeking through, I knew I had a winner. My friends literally went quiet for a second—the best compliment a baker can get! This is my go-to recipe when I need a showstopper that’s secretly straightforward.
A Sweet Slice of History: From Classic to Berry-Fied
The classic cheesecake has been around for centuries, starting with the ancient Greeks. Our modern version, with its creamy, tangy filling, became a star in American diners and bakeries. I love taking that classic comfort and giving it a seasonal twist. This recipe is my “modern mash-up.” It swaps the traditional graham cracker crust for a rich chocolate one. It replaces plain topping with a layer of tart raspberry compote and fresh fruit. It’s like the cheesecake dressed up for a very delicious party. I think of it as celebrating tradition while having a ton of fun with flavors.
Why You’ll Fall In Love With This Berry Chocolate Indulgence
First, let’s talk about the texture party happening in your mouth. You get a firm, crumbly chocolate crust. Then, a bright, jammy berry layer. Finally, a silky-smooth dark chocolate ganache sets over the top. It’s pure bliss in every forkful. Second, it looks incredibly professional, but the steps are simple. There’s no water bath or tricky baking for the filling—the ganache sets in the fridge. It’s perfect for bakers who find traditional cheesecake intimidating. Lastly, the flavor balance is just right. The dark chocolate is rich but not too sweet, and the raspberries cut through with a perfect zing. It’s a dessert that feels luxurious and satisfying.
When to Whip Up This Decadent Dessert
This cheesecake is your secret weapon for so many occasions! It’s elegant enough for holiday dinners like Christmas or Valentine’s Day. I love bringing it to summer potlucks because the berries feel so seasonal. It’s also a fantastic birthday “cake” for anyone who prefers dessert over actual cake. Honestly, a regular Friday night feels special when this is waiting in the fridge. It turns any gathering into a celebration.
Gathering Your Ingredients for Berry Bliss
Here’s your shopping list for this gorgeous dessert. Using good-quality chocolate makes a real difference here!
For the Chocolate Crust:
- 1 1/2 cups all-purpose flour
- 1/2 cup unsweetened cocoa powder
- 1/4 cup granulated sugar
- 1/2 tsp salt
- 1/2 cup (1 stick) unsalted butter, cold and diced
- 1 large egg yolk
- 2 tbsp ice water
For the Filling and Topping:
- 1 cup fresh raspberries
- 1/4 cup raspberry compote (store-bought or homemade)
- 1 1/2 cups dark chocolate chips
- 1 cup heavy cream
- Chocolate shavings for garnish
No Problem! Handy Substitution Options
Don’t have every ingredient? No worries! Here are some easy swaps:
- Raspberries: Use blackberries, chopped strawberries, or even a mixed berry blend. Frozen berries work year-round—just thaw and pat them dry.
- Raspberry Compote: Any seedless berry jam will do. Apricot or cherry jam would also be delicious.
- Dark Chocolate Chips: Chop up a good dark chocolate bar instead. You can use semi-sweet if you prefer a sweeter ganache.
- Heavy Cream: For the ganache, you need the high fat content. There’s no great substitute here, but in a pinch, full-fat coconut cream can work for a dairy-free version.
Creating Your Berry Chocolate Indulgence: Step-by-Step
Step 1: Craft the Chocolate Crust
Get your food processor ready! Pulse the flour, cocoa powder, sugar, and salt together. It will look like a dark, powdery cloud. Add those cold, diced butter pieces. Pulse again until the mixture looks like coarse, chocolatey sand. Now, with the motor running, stream in the egg yolk and ice water. Watch as it magically starts to clump together into a dark, rich dough. Pro tip: The dough should hold together when pinched. If it’s too dry, add another half tablespoon of ice water.
Step 2: Form and Chill the Base
Dump the dough into your tart pan. I use my fingers to press it evenly across the bottom and up the fluted sides. Take your time here—a nice, even layer means every slice will have the perfect crust ratio. Once it’s pressed in, pop the whole pan into the fridge. This 30-minute chill is key! It lets the gluten relax and the butter firm up, which prevents your crust from shrinking in the oven.
Step 3: Bake to Perfection
Preheat your oven to 375°F (190°C). Place your chilled tart pan right on the center rack. You’ll soon smell the most amazing aroma of baking chocolate. Bake for 20 minutes. The crust will look set and feel dry to the touch. Pull it out and let it cool completely on a rack. Be patient—if you add the berries to a warm crust, they’ll make it soggy.
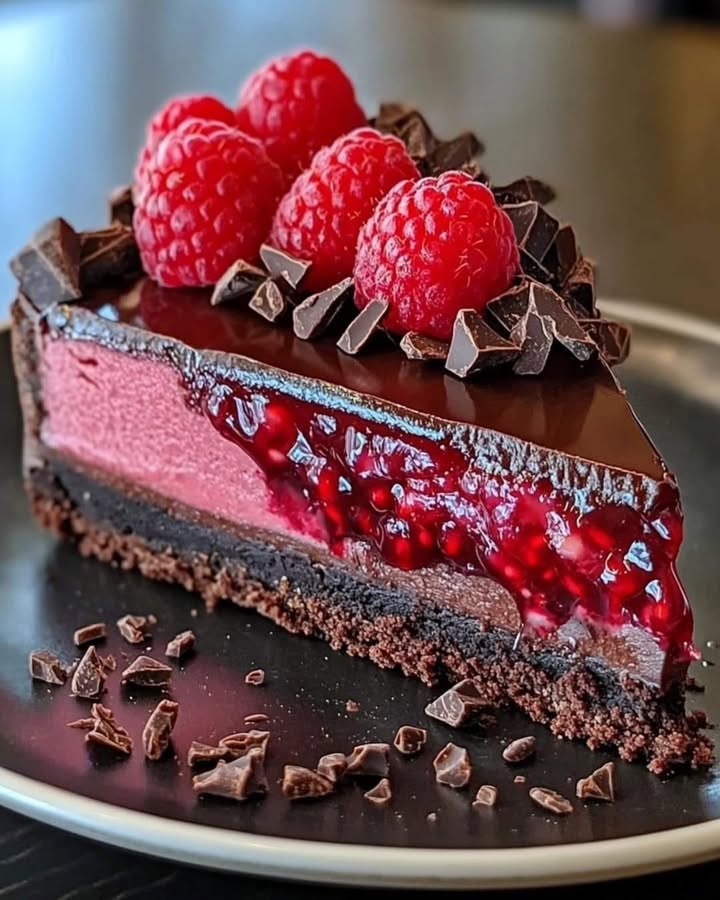
Step 4: Layer on the Berry Goodness
Once the crust is completely cool, it’s time for the colorful layer. Spoon your raspberry compote into the center. Use the back of the spoon to spread it in a smooth, even, ruby-red layer across the entire crust. Now, take your fresh raspberries and scatter them artfully over the compote. I like to press them in just slightly so they nestle into the jam and won’t roll off.
Step 5: Make the Silky Chocolate Ganache
This is the really fun part. Pour your heavy cream into a small saucepan and heat it over medium until you see small bubbles form around the edges—it should be steaming but not boiling. Place your chocolate chips in a heatproof bowl. Pour the hot cream over the chocolate. Let it sit for a full 5 minutes. This allows the cream to melt the chocolate gently. Then, take a whisk and start stirring from the center outwards. You’ll see it transform into a glossy, luxurious, pourable chocolate sauce. Chef’s tip: For an extra smooth ganache, strain it through a fine-mesh sieve to remove any tiny unmelted chocolate bits.
Step 6: Chill and Set for the Grand Finale
Slowly pour your beautiful ganache over the berry layer. Tilt the pan gently to help it spread evenly and cover every berry in a blanket of chocolate. Now, the hardest part: waiting. Carefully transfer the tart to the refrigerator. Let it chill for at least 2 hours, but longer is better. The ganache needs this time to firm up into a sliceable, decadent layer.
Step 7: Garnish and Serve with Pride
Just before serving, take a vegetable peeler to a bar of chocolate to make delicate chocolate shavings. Sprinkle them over the top for a beautiful, professional finish. To slice, use a sharp knife dipped in hot water and wiped clean between cuts. This gives you those picture-perfect, clean slices with every layer showing.
Your Berry Bliss Chocolate Cheesecake Timeline
Prep Time: 30 minutes
Chill Time (Crust): 30 minutes
Bake Time: 20 minutes
Cooling Time: 1 hour
Setting Time (Fridge): 2 hours minimum
Total Time (Hands-off): About 4.5 hours
My Secret Weapon for the Best Ganache
The secret is in the chocolate-to-cream ratio and the quality of the chocolate. I always use a 3:2 ratio of chocolate to cream by weight for a perfectly firm but creamy ganache that sets without being too hard. For this recipe, that means about 9 ounces of chocolate to 6 ounces (3/4 cup) of heavy cream. Use the best dark chocolate you can find—it makes all the difference in flavor!
A Little Fun Fact About Raspberries
Did you know that raspberries are not actually berries? Botanically speaking, they’re “aggregate fruits” made up of dozens of tiny individual drupelets, each with its own seed. That’s why they have that unique bumpy texture! They’re also packed with antioxidants and vitamin C. For more on understanding the nutritional content of your ingredients, the FDA’s food information pages are a great resource for reliable info.
Tools You’ll Need in Your Kitchen
- 9-inch tart pan with a removable bottom
- Food processor
- Medium saucepan and whisk
- Mixing bowls
- Measuring cups and spoons
- Wire cooling rack
- Vegetable peeler (for chocolate shavings)
How to Store Your Masterpiece
This cheesecake must be stored in the refrigerator. Once set, cover it loosely with plastic wrap or place a large bowl overturned on top. This protects the ganache from picking up any other fridge odors. It will keep beautifully for up to 3-4 days.
For longer storage, you can freeze it. Place the whole tart (or individual slices) on a baking sheet in the freezer until solid, about 2 hours. Then, wrap it tightly in plastic wrap and a layer of aluminum foil. It can be frozen for up to 1 month.
To serve a frozen cheesecake, transfer it to the refrigerator and let it thaw overnight. Do not thaw at room temperature, as this can cause condensation to form on the ganache, making it look less shiny.
Tips and Advice from My Kitchen to Yours
- Use room-temperature fresh berries. If they’re too cold from the fridge, they can cause the warm ganache to set too quickly and unevenly around them.
- When making the crust dough, if you don’t have a food processor, you can use a pastry cutter or even your fingertips to work the butter into the dry ingredients until it resembles coarse crumbs.
- If your ganache develops a few air bubbles after pouring, gently tap the bottom of the tart pan on the counter a few times to release them before chilling.
Presentation Ideas to Wow Your Guests
- Serve each slice with a small dollop of lightly sweetened whipped cream and a single perfect raspberry on the side.
- Drizzle a little extra raspberry compote on the plate in an artistic swirl before placing the slice.
- Add a few fresh mint leaves next to the slice on the plate for a pop of green color and fresh aroma.
- For a party, cut the tart into small, bite-sized squares instead of wedges for easy grabbing.
Exploring Healthier & Fun Recipe Twists
Love the idea but want to mix it up? Here are six delicious variations to try. For more baking inspiration, I have a whole collection of fabulous cheesecake recipes waiting for you.
- Dairy-Free Berry Indulgence: Use vegan butter in the crust and full-fat coconut milk to make the ganache. The result is just as rich and decadent.
- Orange-Chocolate Berry Tart: Add the zest of one orange to the chocolate ganache. The citrus note brightens all the flavors beautifully.
- Nutty Chocolate Crust: Replace 1/4 cup of the flour in the crust with finely ground almonds or hazelnuts for a deeper, toasty flavor.
- White Chocolate & Berry Tart: Swap the dark chocolate ganache for white chocolate. The contrast with the red berries is stunning and the flavor is sweeter.
- Mini Berry Tarts: Use a muffin tin to press the crust into small circles. Bake for less time, then fill individually. Perfect for party portions!
- Mocha Berry Cheesecake: Dissolve 1 tablespoon of instant espresso powder into the hot cream before pouring it over the chocolate chips for a mocha-flavored ganache.
If you love creative dessert mash-ups, you should definitely try my Banana Caramel Cupcakes for another fruit-and-cream sensation. For a different cheesecake vibe, my festive Cranberry Orange Cheesecake is a holiday staple. Need something simpler but just as addictive? These Chocolate Pecan Turtle Clusters are a guaranteed crowd-pleaser. And for a light, citrusy treat, my Lemon Cream Swiss Roll is a springtime favorite.
Common Mistakes to Avoid for Perfect Results
Mistake 1: Using Warm Butter for the Crust
This mistake leads to a greasy, tough crust that shrinks in the pan. It happens because warm butter melts too fast and over-activates the gluten in the flour. Always start with cold, diced butter straight from the fridge. The goal is to create tiny pockets of fat that steam during baking, giving you that perfect, flaky texture. Tip: If your kitchen is warm, you can even chill your flour and cocoa powder for 15 minutes before starting.
Mistake 2: Pouring Ganache on a Warm Crust
Impatience is the culprit here! If the crust or berry layer is even slightly warm, the ganache will not set properly. It can become oily, separate, or stay forever sticky. The heat prevents the cocoa butter in the chocolate from crystallizing correctly. Always let the baked crust cool completely on a wire rack. Touch it with your finger—it should feel cool, not warm.
Mistake 3: Boiling the Cream for the Ganache
Heating the cream until it’s boiling or simmering too hard can cause big problems. Excessively hot cream can “seize” the chocolate, making it grainy and clumpy instead of smooth and shiny. You only need to heat the cream until it’s steaming and you see small bubbles forming at the very edges of the saucepan. This is called scalding. Once you pour it over the chocolate, let it sit. The residual heat will do all the work.
Mistake 4: Not Letting it Set Long Enough
We’ve all been tempted to cut into a dessert early! But slicing this tart before the ganache has fully set is a recipe for a messy, collapsed slice. The ganache needs a full 2 hours in the fridge to become sliceable. For the cleanest cuts and best texture, I recommend letting it chill for 4 hours or even overnight. The wait is absolutely worth it.
Frequently Asked Questions
Can I use a springform pan instead of a tart pan?
Yes, you can! A 9-inch springform pan will work. The crust might be a bit thicker, so you could consider par-baking it for a couple of extra minutes. The presentation will be different—more like a traditional cheesecake with higher sides. The removable bottom of the springform makes it just as easy to serve. Just be sure to press the crust firmly up the sides of the pan to contain all the layers.
My ganache turned out grainy. What happened and can I fix it?
A grainy ganache usually means the cream was too hot and caused the chocolate to “seize,” or the chocolate and cream weren’t emulsified properly. To fix it, try adding a tiny splash (a teaspoon) of warm cream or milk and whisk vigorously. Sometimes this can bring it back together. To prevent it, always chop chocolate finely if using bars, and make sure your cream is just hot enough to melt the chocolate, not boiling.
Can I make this dessert a day ahead?
Absolutely! In fact, I highly recommend it. Making this Berry Bliss Chocolate Cheesecake a day ahead allows all the flavors to meld together beautifully. The ganache will set perfectly firm, and the crust will stay crisp. Just keep it covered in the refrigerator. Add the final chocolate shavings garnish right before you serve it so they stay fresh and don’t get damp.
What can I use if I don’t have a food processor?
No food processor, no problem! You can make the crust in a large bowl. Whisk the dry ingredients together first. Then, use a pastry cutter, two forks, or even your clean fingertips to work the cold butter into the flour mixture until it looks like coarse crumbs. Mix the egg yolk and ice water in a cup, then drizzle it over the crumbs while stirring with a fork until a dough forms.
Is it necessary to use a compote, or can I just use fresh berries?
The raspberry compote is important for two reasons. First, it creates a sticky base layer that helps anchor the fresh berries in place. Second, it adds a concentrated burst of berry flavor that complements the fresh berries. If you skip it and only use fresh, they might float or shift when you pour the ganache, and the final tart might lack that deep raspberry punch.
Can I use milk or semi-sweet chocolate instead of dark?
You can, but the result will be much sweeter. Dark chocolate provides a bittersweet balance to the sweet compote and crust. If you use milk chocolate, the overall dessert may taste overly sweet to some. Semi-sweet is a good middle ground. Just be aware that different chocolates set differently—milk chocolate has more milk solids and may result in a softer-set ganache.
How do I get perfect, clean slices?
The secret is a hot, dry knife. Fill a tall glass with very hot water. Have a clean kitchen towel ready. For each slice, dip the blade of a sharp chef’s knife into the hot water, wipe it completely dry with the towel, and then make your cut in one smooth, confident motion. Wipe the blade clean, reheat, and repeat for the next slice. This prevents the ganache and berry layers from sticking to the knife.
My crust cracked when I pressed it in. What should I do?
Don’t panic! This is common with a short dough like this. Simply take small pieces of the extra dough and press them into the cracks to patch them. Since the dough is forgiving, it will bake together seamlessly. Just try to press as evenly as you can to begin with to avoid thick and thin spots.
Can I use frozen raspberries for the top layer?
I don’t recommend using frozen berries for the fresh top layer. They release too much water as they thaw, which can create a soggy crust and make the ganache weep. Frozen berries are excellent for making the compote, however! Just thaw them first, then cook them down with a little sugar to make your own quick compote.
Is this recipe suitable for beginners?
Yes, it is! While it looks impressive, the techniques are straightforward. There’s no tricky cheesecake baking or tempering chocolate. The steps are clearly separated: make a press-in crust, bake it, add cold toppings, and let the fridge do the final work. It’s a fantastic recipe for building confidence in dessert making because the results are so rewarding.
This Berry Bliss Chocolate Cheesecake is more than just a dessert. It’s a moment of pure joy on a plate. It’s the happy silence that falls over the table when you bring it out. It’s the combination of rich, dark chocolate and bright, tangy berry that makes your taste buds dance. It proves that making something beautiful doesn’t have to be complicated. So gather your ingredients, put on some good music, and treat yourself and your loved ones to this unforgettable Berry Chocolate Indulgence. You deserve it!
Equipment
- Plaque à tarte de 9 pouces
- Robot culinaire
- Casserole moyenne
- Fouet
- Grille de refroidissement
Ingredients
- 1 1/2 tasse farine tout usage
- 1/2 tasse cacao en poudre non sucré
- 1/4 tasse sucre granulé
- 1/2 cuil. sel
- 1/2 tasse beurre non salé, froid et coupé en dés
- 1 jaune d'œuf jaune d'œuf
- 2 cuil. eau glacée
- 1 tasse framboises fraîches
- 1/4 tasse compote de framboises achetée en magasin ou faite maison
- 1 1/2 tasse pépites de chocolat noir
- 1 tasse crème épaisse
- q.s. copeaux de chocolat pour la garniture
Instructions
- Pulsez la farine, le cacao en poudre, le sucre et le sel dans un robot culinaire jusqu'à ce que le mélange soit homogène.
- Ajoutez le beurre froid coupé en dés et pulsez jusqu'à obtenir une texture sableuse.
- Versez le jaune d'œuf et l'eau glacée en filet pendant que le robot fonctionne, jusqu'à ce que la pâte se forme.
- Incorporez la pâte uniformément dans un moule à tarte de 9 pouces et réfrigérez pendant 30 minutes.
- Préchauffez le four à 190°C (375°F) et faites cuire la croûte pendant 20 minutes.
- Laissez la croûte refroidir complètement sur une grille.
- Étalez la compote de framboises uniformément sur la croûte refroidie.
- Parsemez les framboises fraîches sur la compote et appuyez doucement dessus.
- Chauffez la crème épaisse dans une casserole jusqu'à ce qu'elle soit chaude et versez-la sur les pépites de chocolat noir dans un bol ; laissez reposer pendant 5 minutes.
- Fouettez jusqu'à ce que le mélange soit lisse pour créer la ganache, et filtrez si désiré.
- Versez la ganache sur la couche de baies, en vous assurant qu'elle couvre toutes les baies.
- Réfrigérez pendant au moins 2 heures pour que ça prenne.
- Décorez avec des copeaux de chocolat avant de servir.