
Have you ever had one of those cravings that hits like a summer storm? You know, the kind where you need something rich, creamy, and a little bit fruity, but the thought of making a whole cheesecake feels, well, intimidating? That was me last Sunday. I wanted cheesecake, but I also wanted sunshine, simplicity, and the freedom to eat it with my hands. So, I did what any sane person would do: I headed to the kitchen and whipped up a batch of these unbelievably good Blueberry Cheesecake Bars. Let me tell you, friends, they were gone faster than kids finding a cookie jar! They’re thick, luscious, and swirled with a fresh blueberry topping that bursts in your mouth. It’s the perfect “fancy-feeling” dessert without any of the fuss. I think you’re going to love them as much as my family does.
A Slice of Bar History: From Classic Cheesecake to Handheld Bliss
Let’s talk about the genius of the cheesecake bar. Traditional cheesecakes, with their elegant stature, have roots tracing back to ancient Greece. They’ve evolved into New York-style giants and delicate Japanese soufflé versions. But somewhere along the line, a clever baker had a brilliant thought: “What if we make all that creamy goodness portable?” And thus, the cheesecake bar was born. It takes the very best parts of a classic cheesecake—the velvety filling, the tangy-sweet topping—and packages them into neat, shareable squares. This particular recipe, with its vibrant blueberry swirl, is a modern twist that celebrates fresh, simple flavors. It’s a dessert that fits a backyard BBQ just as well as a quiet afternoon tea. I love how it brings a bit of timeless dessert elegance into a more relaxed, fun form. It’s a testament to how great recipes adapt to our busy, joy-seeking lives.
Why You’ll Fall Head Over Heels for These Blueberry Cheesecake Bars
Okay, beyond the obvious fact that they taste like a dream, here’s why this recipe is a permanent fixture in my home. First, they are incredibly easy. No water-bath stress, no wrestling with a springform pan. You just mix, swirl, and bake. Second, the texture is pure magic. The trick of letting them cool slowly in the oven gives you a filling that’s creamy-set, not dense or eggy. And third, they’re a total crowd-pleaser. I’ve brought these to potlucks, served them at book club, and even sent them to school for bake sales. They always get rave reviews. The combination of the rich, tangy cheesecake with the bright, sweet-tart blueberry swirl is simply irresistible. You get a little bit of everything in every single bite.
The Perfect Moments for These Irresistible Bars
These bars are wonderfully versatile. They shine at any event where you want to bring a smile. Think summer picnics, where their no-fork-needed style is perfect. They’re fantastic for baby showers or bridal luncheons, offering a dainty yet decadent sweet. I love making them for weekend family gatherings as a special treat. Honestly, they’re also just perfect for a Wednesday. Sometimes, you need a little square of happiness with your afternoon coffee. Any day is a good day for easy cheesecake bars.
What You’ll Need: Blueberry Cheesecake Bar Ingredients
Let’s gather our simple, star players! For the freshest flavor, I recommend using full-fat dairy products, but I’ll give you swaps below.
For the Luscious Blueberry Topping:
- 1/2 cup fresh or frozen blueberries: The star of our swirl!
- 1 tbsp sweetener of choice: Granulated sugar, honey, or maple syrup all work.
- 2 tsp lemon juice (optional): Brightens the berry flavor wonderfully.
- Zest of one lemon (optional): For a fragrant, sunny kick.
For the Creamy Cheesecake Filling:
- 12 oz cream cheese (or vegan cream cheese): Full-fat, room temperature is key.
- 3/4 cup plain yogurt: Greek yogurt adds extra tang and creaminess.
- 1/2 cup sweetener of choice: Again, white sugar, honey, or a monk fruit blend are fine.
- 1 1/2 tsp pure vanilla extract: Use the good stuff!
- 1 tbsp cornstarch or 4 tbsp almond flour: The secret to a perfect set without graininess.
Optional Crust: Feel free to press your favorite cookie or graham cracker crust into the pan first for a classic base. I sometimes do, and sometimes I love the pure, creamy experience without it!
No Stress Substitutions for Your Cheesecake Bars
Out of something? No worries! This recipe is wonderfully adaptable.
- Cream Cheese: Vegan cream cheese works perfectly. For a lighter option, Neufchâtel is great.
- Yogurt: Sour cream is a fantastic 1:1 swap for a richer tang.
- Sweetener: Any granulated or liquid sweetener you love will work. Adjust to taste.
- Cornstarch: The almond flour substitute adds a lovely, subtle nuttiness and works as a great thickener.
- Blueberries: Swap for blackberries, raspberries, or a mix! You could even use a high-quality fruit jam.
Creating Your Masterpiece: Step-by-Step Instructions
Let’s make some magic! Follow these simple steps for perfect bars every time.
Step 1: Prep Your Pan and Create a Spa for Your Cheesecake
First, line an 8-inch square baking pan with parchment paper, leaving some overhang on two sides. This creates a sling to lift your whole batch of bars out later for perfect, clean cuts. Now, preheat your oven to 350°F (175°C). Here’s my favorite trick: place a larger pan (like a 9×13-inch) on the lower oven rack and fill it halfway with hot water. This creates steam, which gives your blueberry cheesecake bars a beautifully moist environment. It helps prevent those pesky cracks on top. It’s like a little spa treatment for your dessert! Pro tip: Use a kettle to fill the water pan—it’s much easier and safer than carrying a pan of water.
Step 2: Whip Up the Vibrant Blueberry Swirl
Grab a small saucepan. Add your plump blueberries, sweetener, and that splash of lemon juice. Turn the heat to medium. As the berries warm, they’ll start to release their gorgeous, deep purple juice. Use a fork to gently mash them, encouraging them to break down. Stir constantly for just 3-5 minutes until you have a lovely, spoonable sauce. It will thicken slightly as it cools. The smell is incredible—like a tiny, sweet summer farm stand right on your stove. Once done, set it aside to cool while you make the filling.
Step 3: Craft the Dreamy, Smooth Cheesecake Filling
This is the heart of the recipe. Ensure your cream cheese is fully softened to room temperature. If it’s cold, you’ll end up with lumps. Add the cream cheese, yogurt, sweetener, vanilla, and your chosen thickener (cornstarch or almond flour) to a large bowl. Using a hand mixer or a sturdy whisk, blend everything together until it is completely smooth and silky. Pro tip: Scrape down the sides of the bowl often to incorporate every bit. Be careful not to over-mix once it’s smooth, as we don’t want to incorporate too much air.
Step 4: The Beautiful Swirl Assembly
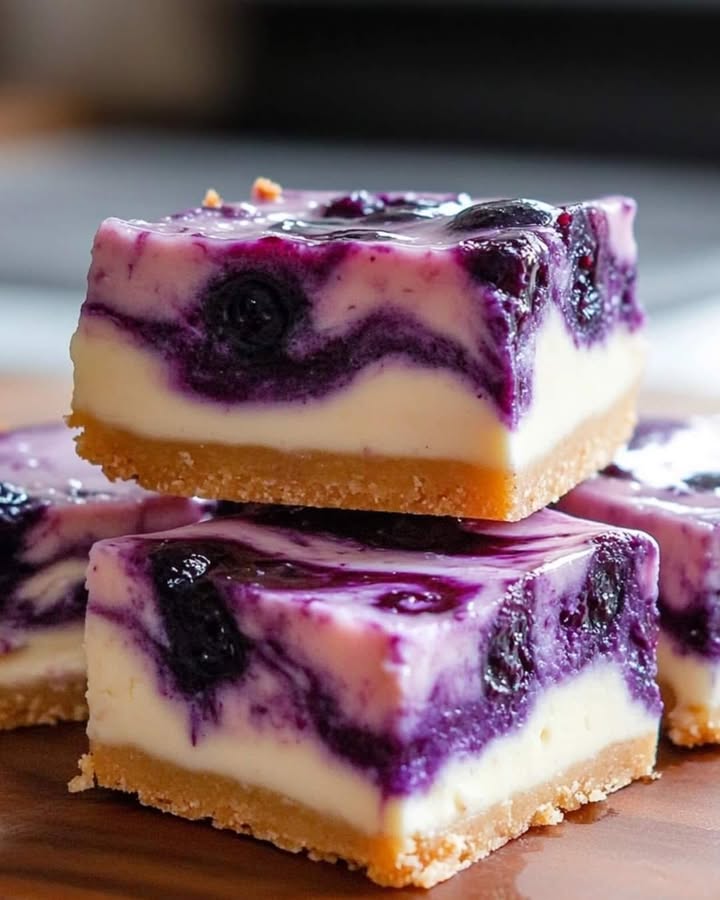
Pour your luxurious cheesecake filling into your prepared pan. Use a spatula to smooth it into a perfectly even layer. Now, take spoonfuls of your cooled blueberry topping and dot them all over the creamy surface. Grab a knife, a skewer, or even a toothpick. Gently drag it through the blueberry dots and the filling in a swirling, figure-eight motion. Don’t overdo it! You want beautiful, distinct ribbons of purple, not a muddled, grayish mix. This is where the art happens.
Step 5: Bake, Cool, and Let Patience Work Its Magic
Place your pan on the center oven rack, above the water bath. Bake for about 25 minutes. The edges should look set, but the center will still have a slight, gentle jiggle—like Jell-O. This is perfect! Turn the oven off, crack the door open just a sliver, and let the pan sit inside for 10 more minutes. This gradual cooling prevents shocking and cracking. Remove it from the oven and let it cool completely on the counter. Then, and this is crucial, cover it and refrigerate for at least 4 hours, or better yet, overnight. This sets the structure and develops the flavor. Chef’s tip: Run a thin knife dipped in hot water around the edges before lifting the parchment sling out for the cleanest cuts.
Timing is Everything
Here’s a quick breakdown so you can plan your baking adventure:
- Prep Time: 15 minutes
- Cook Time: 25 minutes (plus 10 minutes in the turned-off oven)
- Cooling Time: 1 hour at room temperature
- Chilling Time: Minimum 4 hours (overnight is best)
- Total Time (until serving): About 5.5 hours
Chef’s Little Secret
For the absolute silkiest, most professional texture in your blueberry cheesecake bars, press the cheesecake filling through a fine-mesh sieve after mixing. It catches any tiny lumps of cream cheese or cornstarch for an impossibly smooth result. It’s an extra step, but oh boy, is it worth it for that melt-in-your-mouth feeling.
A Berry Interesting Tidbit
Did you know blueberries are one of the few naturally blue foods on the planet? Their beautiful color comes from anthocyanins, powerful antioxidants. When you swirl that vibrant topping into your creamy filling, you’re not just making a pretty dessert—you’re adding a little boost of nature’s goodness. It’s a win-win for both your taste buds and your body. For more on incorporating delicious, nutritious meals and ingredients into your lifestyle, there are fantastic resources available.
Your Simple Kitchen Toolkit
- 8-inch square baking pan
- Parchment paper
- Small saucepan
- Mixing bowls (medium and large)
- Hand mixer or sturdy whisk
- Spatula
- Fork or potato masher
- Knife or toothpick for swirling
How to Keep Your Blueberry Cheesecake Bars Fresh
These bars store beautifully, making them a perfect make-ahead dessert. Once they are fully set and cut, you have a few options for keeping them delicious.
For short-term storage, place them in an airtight container in the refrigerator. They will stay fresh and hold their perfect texture for 4 to 5 days. I like to separate layers with parchment paper to keep the swirls looking pretty.
Yes, you can freeze them! Individually wrap each square in plastic wrap, then place them all in a freezer bag or airtight container. They will keep for up to 2 months. Thaw overnight in the refrigerator before serving. This is a fantastic way to always have a little treat on hand for unexpected guests (or cravings).
Pro Tips for Absolute Perfection
- Room Temperature is Rule #1: Cold cream cheese will never blend smoothly. Plan ahead and let it sit out for a good hour.
- Don’t Over-Bake: That slight jiggle in the center is your friend. It will set firm as it chills.
- Chill is Non-Negotiable: Slicing into warm cheesecake filling is a recipe for a gooey mess. Let the fridge do its work.
- Clean Cuts: Use a sharp knife, and wipe it clean with a hot, damp cloth between each cut for gorgeous, sharp edges.
Make Them Shine: Presentation Ideas
- Dust with a light shower of powdered sugar just before serving for a snowy, elegant look.
- Top each square with a single, fresh, perfect blueberry and a tiny mint leaf.
- Serve on a pretty platter with a dollop of freshly whipped cream on the side.
- Drizzle with a little extra melted white chocolate for a decadent finish.
Love This Recipe? Try These Twists!
Once you master the basic swirl, the world is your cheesecake bar! Here are six delicious variations to try:
- Lemon Blueberry Bliss: Add the zest of two lemons to the cheesecake filling. Use the lemon juice in the topping for an ultra-bright, sunny bar.
- Chocolate Crust Base: Use crushed chocolate wafer cookies or Oreos (filling removed) mixed with melted butter for a rich, chocolaty foundation.
- Mixed Berry Medley: Swap the blueberries for a mix of raspberries, blackberries, and chopped strawberries for a beautiful, complex berry flavor.
- Georgia Peach Cheesecake Bars: Replace the blueberry topping with a cooked peach compote. Add a pinch of cinnamon to the filling for a warm, Southern twist.
- Tropical Swirl: Use a mango puree for the swirl and add a tablespoon of toasted coconut to the cheesecake filling. It’s a vacation in a bar! If you love tropical flavors, our Tropical Pineapple Dream Swirl soft serve captures a similar sunny spirit.
- S’mores Cheesecake Bars: Use a graham cracker crust. Swirl with chocolate sauce and after baking, top with mini marshmallows and broil for 60 seconds to toast. Divine!
Common Mistakes to Avoid
A little know-how goes a long way to guarantee perfect bars. Here are the common pitfalls and how to steer clear of them.
Mistake 1: Using Cold Cream Cheese Straight from the Fridge
This is the number one reason for lumpy cheesecake filling. Cold cream cheese doesn’t blend smoothly with other ingredients, no matter how hard you mix. Those tiny lumps bake right in, ruining the silky texture. How to avoid it: Simply plan ahead. Take the cream cheese out of the refrigerator at least 60 minutes before you start baking. Let it sit on the counter until it’s soft to the touch. It should blend effortlessly.
Mistake 2: Over-Baking the Bars
It’s so tempting to keep baking until the top is firm and golden, but cheesecake continues to cook as it cools. An over-baked cheesecake bar will be dry, dense, and prone to major cracking. How to avoid it: Trust the jiggle test! At 25 minutes, the edges should be set, but the center (about a 3-inch circle) should have a slight, gentle wobble when you tap the pan. It will firm up perfectly during its slow cool-down in the oven and in the fridge.
Mistake 3: Skipping the Chill Time
I know it’s hard to wait, but cutting into these bars before they are fully chilled is a disaster. The filling won’t be set, leading to a soupy, messy slice that won’t hold its shape. How to avoid it: Treat the chilling time as a mandatory part of the recipe, not a suggestion. A minimum of 4 hours is needed, but overnight is truly ideal. This patience rewards you with a firm, sliceable texture and a flavor that has had time to meld beautifully.
Mistake 4: Over-Swirling the Topping
Getting creative with the knife swirls is fun, but too much swirling mixes the blueberry topping completely into the cheesecake batter. Instead of pretty purple ribbons, you’ll end up with a uniformly grayish-purple top. How to avoid it: Less is more. Use a toothpick or knife to make just 4-5 figure-eight motions through the dollops of topping. You want distinct streaks, not a homogenous blend.
Frequently Asked Questions (FAQ)
Can I make these blueberry cheesecake bars without a water bath?
You can, but I don’t recommend it. The water bath (steam pan) is the best insurance against cracks and ensures an even, gentle bake. It creates a humid environment that prevents the top of your cheesecake from drying out and splitting as it rises and falls. If you absolutely must skip it, bake at a slightly lower temperature (325°F) and be extra vigilant about not over-baking. The edges might firm up faster, and cracking is more likely, but the bars will still taste great.
Can I use frozen blueberries for the topping?
Absolutely! Frozen blueberries work wonderfully and are often more affordable year-round. There’s no need to thaw them first. Just add the frozen berries directly to the saucepan with the sweetener and lemon juice. You may need to cook the mixture for an extra minute or two to cook off a bit more liquid, as frozen berries release more water. Mash and stir as directed until you have a nice, thick compote.
What’s the best sweetener to use in this recipe?
This recipe is very forgiving with sweeteners. For a classic taste, regular granulated white sugar is perfect. For a deeper flavor, light brown sugar works nicely. If you prefer natural sweeteners, an equal amount of honey, maple syrup, or agave nectar will do the job. If you’re using a granulated sugar substitute like monk fruit or erythritol, just ensure it’s a 1:1 baking substitute. The flavor profile will change slightly, but the structure will be fine.
My cheesecake filling is lumpy! Can I fix it?
Don’t panic! If you have small lumps in your filling before baking, you have a couple of rescue options. The best is to pass the entire filling through a fine-mesh strainer, using a spatula to press it through. This will catch all the lumps. Alternatively, if you have an immersion blender, you can carefully blend the mixture in the bowl until completely smooth. Just be cautious not to over-blend and add too much air.
How do I know when the bars are done baking?
Look for the edges to be fully set and slightly puffed. The very center (about the size of a lemon) should still look a little soft and will jiggle like firm Jell-O when you gently shake the pan. The top should not be browned. Remember, the bars will continue to set from residual heat during the 10-minute oven sit and the long chill. It’s better to err on the side of slightly underdone than overdone.
Can I double this recipe?
Yes, you can easily double it for a crowd. Double all ingredients and bake it in a 9×13-inch pan. The baking time will be longer, likely 35-40 minutes, but always rely on the jiggle test to determine doneness. You may also need to add more water to your steam pan if it evaporates quickly. Check out our full collection of dessert bar and brownie recipes for more crowd-pleasing ideas.
Are there vegan/dairy-free adaptations for this recipe?
Yes! This recipe adapts beautifully. Use a high-quality, firm vegan cream cheese (like Kite Hill or Miyoko’s). For the yogurt, use a plain, unsweetened plant-based yogurt (almond, coconut, or soy). Ensure your sweetener is vegan (like agave or maple syrup if avoiding refined sugar). With these swaps, you’ll have delicious vegan blueberry cheesecake bars that everyone can enjoy.
Why did my blueberry topping turn greenish or brownish?
This is a natural reaction between the anthocyanins (blue pigments) in the blueberries and the alkaline compounds in your baking powder or other ingredients, or from prolonged high heat. To keep a vibrant purple color, don’t overcook the topping—just until it breaks down. Adding the lemon juice (which is acidic) also helps stabilize the color. Even if it darkens a bit, the flavor will still be fantastic.
Can I use a different fruit topping?
Of course! The cheesecake base is a wonderful canvas. Try raspberries, blackberries, chopped strawberries, or a cherry pie filling. For a decadent twist, a salted caramel swirl is heavenly. Looking for other fruit and cheese pairings? Our luxurious White Chocolate Strawberry Cheesecake is a beautiful classic worth trying.
How do I get picture-perfect, clean slices?
The secret is a hot, clean knife. Fill a tall glass with very hot water. After your bars are fully chilled, use a sharp chef’s knife. Dip the blade in the hot water, wipe it completely dry with a clean towel, and make a single, confident cut. Wipe the blade clean, re-dip in hot water, dry, and repeat for each cut. This melts through the creamy filling cleanly and prevents smearing or dragging the blueberry swirl.
There you have it! From the first sweet whiff of cooking blueberries to the final, satisfying slice, these Blueberry Cheesecake Bars are pure joy. They prove that incredible desserts don’t have to be complicated. Whether you’re a seasoned baker or just starting out, this recipe is your ticket to rave reviews and happy faces. For another decadent, nutty variation, our rich Peanut Butter Cheesecake offers a completely different but equally delicious experience. So, preheat that oven, grab your favorite mixing bowl, and get ready to make something truly special. Don’t forget to share your beautiful swirls—I’d love to see your creations. Happy baking!
Equipment
- Grand bol
- Fouet
- Spatule
- Plaque à pâtisserie
- Papier sulfurisé
Ingredients
- 125 g myrtilles
- 20 g sucre
- 1 cuil. jus de citron facultatif
- 1 cuil. zeste de citron facultatif
- 340 g fromage à la crème ou fromage à la crème vegan
- 200 g yaourt nature yaourt grec recommandé
- 100 g sucre
- 1 cuil. extrait de vanille
- 15 g fécule de maïs
Instructions
- Tapissez un moule à pâtisserie carré de 8 pouces de papier sulfurisé et préchauffez le four à 175°C.
- Placez un grand plat rempli d'eau chaude sur la grille inférieure du four pour créer de la vapeur.
- Dans une petite casserole, mélangez les myrtilles, le sucre et le jus de citron à feu moyen et écrasez jusqu'à obtenir une sauce (3-5 minutes). Laissez refroidir.
- Dans un grand bol, mélangez le fromage à la crème ramolli, le yaourt, le sucre, la vanille et la fécule de maïs jusqu'à obtenir un mélange lisse à l'aide d'un batteur électrique ou d'un fouet.
- Versez la préparation dans le moule préparé et étalez uniformément.
- Déposez la garniture aux myrtilles refroidie et tourbillonnez doucement avec un couteau ou un cure-dent.
- Faites cuire pendant environ 25 minutes jusqu'à ce que les bords soient bien pris et que le centre ait une légère oscillation. Éteignez le four et laissez la porte entrouverte pendant 10 minutes.
- Laissez refroidir complètement, puis réfrigérez pendant au moins 4 heures ou toute la nuit avant de couper en barres.