
Boston Cream Pie Fudge: A No-Bake Slice of Heaven
Is it a pie? Is it a cake? Is it fudge? Who cares! When you combine the soul-satisfying flavors of vanilla custard and rich chocolate ganache into a creamy, foolproof no-bake treat, you’ve won dessert. This Boston Cream Pie Fudge is my new secret weapon for potlucks and “I need something sweet, stat!” moments. It’s like holding the entire iconic dessert in one perfectly decadent, bite-sized square. Trust me, the first time I made it, my family declared it even better than the original—and they don’t say that lightly!
A Sweet Slice of History in Your Fudge
The real Boston Cream Pie is a beautiful accident of culinary history. Invented at Boston’s Parker House Hotel in the 1800s, it’s famously a cake, not a pie! Bakers used pie tins for cakes back then, hence the confusing name. This fudge takes that legendary combo—soft vanilla cake, silky custard, glossy chocolate—and reimagines it for the modern, busy cook. It’s a tribute to tradition without needing to turn on your oven. Every layer tells a delicious story, from the old-world hotel kitchen right to your no-bake pan.
Why You’ll Go Nuts for This Fudge
You’ll love this recipe because it’s practically magic. No thermometers, no tricky candy stages—just melt, stir, and chill. The result is unbelievably smooth, rich, and captures that classic flavor perfectly. It’s a fantastic make-ahead dessert that impresses everyone. Plus, it’s a dream for anyone who finds traditional baking intimidating. If you can stir a pot, you can make this spectacular Boston Cream Pie Fudge. It’s the ultimate cheat code for a stunning homemade sweet.
When to Whip Up This Celebratory Fudge
This fudge isn’t just for holidays! It’s perfect for so many moments. Bring it to book club, serve it at a birthday party instead of cake, or pack it in pretty boxes as a heartfelt gift. It’s a superstar on dessert tables for graduations and baby showers. I always make a batch for my husband’s poker nights—it disappears faster than the chips! Any time you want to offer a homemade treat that looks and tastes like you spent all day in the kitchen, this is your recipe.
Gathering Your Boston Cream Pie Fudge Ingredients
Simple ingredients create something extraordinary. Here’s your shopping list for this creamy dream:
For the Vanilla Fudge Layer:
- 3 cups white chocolate chips
- 1 can (14 oz) sweetened condensed milk
- 1/4 cup unsalted butter
- 1 tsp pure vanilla extract
- 1/4 cup instant vanilla pudding mix (dry powder)
For the Chocolate Ganache Layer:
- 1 1/2 cups semi-sweet chocolate chips
- 1/2 cup heavy cream
- 1 tsp vanilla extract
Easy Ingredient Swaps & Substitutions
No worries if you’re missing something! This recipe is very forgiving.
- White Chocolate Chips: Use a high-quality vanilla candy melts or almond bark for a similar result.
- Semi-Sweet Chocolate Chips: Dark or milk chocolate chips work wonderfully. Use what you love!
- Heavy Cream: For the ganache, full-fat coconut cream can be a dairy-free alternative.
- Vanilla Pudding Mix: This is the secret for that authentic “creme” flavor! If you must skip it, add an extra teaspoon of vanilla and a pinch of salt, but the texture will be slightly different.
Crafting Your Boston Cream Pie Fudge Masterpiece
Ready to make magic? Follow these simple steps. The smell alone will make your kitchen feel like a bakery.
Step 1: Prepare Your Pan
First, grab your 8×8-inch pan. Lining it is non-negotiable! Take a sheet of parchment paper and let it hang over two opposite sides. This creates “handles” that make lifting out your giant fudge slab a breeze. A quick spritz of cooking spray on the pan under the paper helps it stick. Getting this right means you won’t be chiseling fudge out later.
Step 2: Make the Vanilla Fudge Layer
This is where the creamy magic starts. In a medium saucepan, combine the white chocolate chips, sweetened condensed milk, and butter. Use low heat and stir constantly. You’re not boiling, just melting everything into a smooth, luscious pool. Once it’s perfectly fluid, take it off the heat. Stir in the vanilla and that magical dry pudding powder. You’ll see it thicken slightly and smell heavenly. Pour this creamy vanilla river into your waiting pan and spread it evenly. Pop it in the fridge for 30 minutes to firm up. Pro tip: Lick the spatula. It’s a cook’s reward!
Step 3: Create the Chocolate Ganache Layer
While the vanilla layer chills, make the ganache. It’s easier than you think! Combine the chocolate chips and heavy cream in a microwave-safe bowl. Heat in 20-second bursts, stirring well after each, until it’s glossy and smooth. No microwave? Use a double boiler. Stir in the vanilla last. You want a pourable, satiny chocolate mixture that will drape beautifully over the vanilla. Let it cool for about 5 minutes so it doesn’t melt the layer below.
Step 4: Assemble the Layers
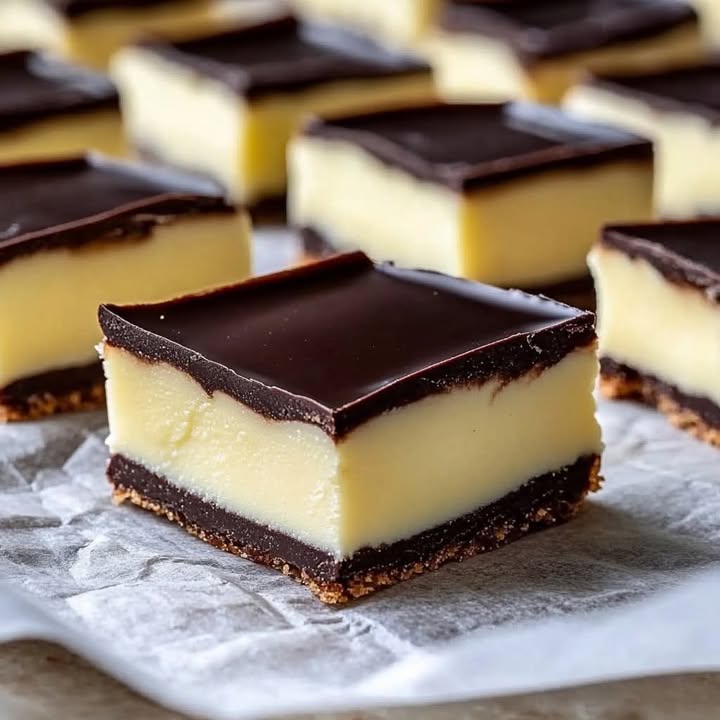
Time for the grand finale! Pull your pan from the fridge. The vanilla layer should be set but not rock-hard. Slowly pour your slightly cooled ganache over the center. Gently tilt the pan or use a spatula to guide it to the edges, creating a perfect, dark chocolate blanket. Try to get it as even as you can. The contrast is gorgeous. Once covered, it goes back into the fridge. Now, the hardest part: waiting at least 2 hours for everything to set completely.
Step 5: Slice and Serve Your Creation
Finally! Use the parchment paper handles to lift the entire fudge block onto a cutting board. Warm a sharp knife under hot water, wipe it dry, and make your first cut. Clean the knife between cuts for beautiful, clean squares. Arrange them on a plate and watch them disappear. For softer, creamier bites, let the fudge sit out for 10-15 minutes before serving. Chef’s tip: For a gorgeous bakery-style finish, sprinkle a tiny bit of gold dust or sea salt on top right after you pour the ganache.
Your Boston Cream Pie Fudge Timeline
Good things come to those who wait, but this recipe is surprisingly quick!
- Prep Time: 15 minutes
- Cook Time: 10 minutes (melting/stirring)
- Chill Time: 2 hours 30 minutes
- Total Time: About 3 hours
- Servings: 36-48 small squares, depending on how you cut them
A Little Extra Food for Thought
That vanilla pudding mix isn’t just for flavor. It’s a clever thickener and stabilizer! The cornstarch in the pudding mix helps give the fudge layer that distinct, creamy, custard-like body without any actual baking or egg-cooking required. It’s the secret ingredient that makes this no-bake fudge taste so authentically like the filling of the classic pie.
Tools You’ll Need for Success
You likely have everything already! Just gather:
- 8×8-inch square baking pan
- Parchment paper
- Medium saucepan
- Mixing bowls (microwave-safe for ganache)
- Spatula
- Sharp knife for slicing
Keeping Your Fudge Fresh and Fabulous
Because this fudge contains dairy, it must be stored in the refrigerator. Place the squares in a single layer in an airtight container, separated by parchment paper if stacking. It will keep beautifully for up to 1 week.
For longer storage, you can freeze this fudge! Wrap squares tightly in plastic wrap, then place them in a freezer bag or container. They will keep for 2-3 months. Thaw overnight in the fridge before serving.
Remember, fudge can pick up odors from the fridge. A really tight-sealing container is your best friend. If you’re gifting it, a cute decorative tin lined with wax paper works perfectly.
Pro Tips for Perfect Fudge Every Time
- Low and Slow is the Way to Go: When melting the white chocolate layer, keep the heat low. High heat can cause the chocolate to seize or the dairy to scorch.
- Set it and Forget it: Don’t rush the chilling time. If the layers aren’t fully set, they’ll smoosh together when you cut them. Patience yields perfect layers.
- Clean Cuts: The hot knife trick is real! Run your knife under very hot water, wipe it dry, and make a cut. Repeat for each cut for super clean edges.
- Customize It: Add a pinch of espresso powder to the ganache for a mocha twist, or sprinkle chopped toasted almonds between the layers for crunch.
Making Your Fudge Look Fancy
Presentation is half the fun! Try these ideas:
- Drizzle melted white chocolate in zig-zags over the set ganache before cutting.
- Place each square in a mini paper cupcake liner for easy serving.
- Stack them on a cake stand for a stunning tiered effect.
- Dust with cocoa powder or confectioners’ sugar just before serving.
Love This? Try These No-Bake Twists!
If you’re obsessed with no-bake desserts (aren’t we all?), you have to explore more! Our site is full of easy, chilled treats. For instance, if you love the creamy layers in this fudge, you’ll adore the stunning layers in our Tropical Fruit Trifle. Or, for another chocolatey no-bake adventure, check out our Chocolate & Praline Yule Log. The options are endless when you don’t want to heat up the oven. Plus, you can find a whole world of inspiration in our collection of easy no-bake desserts perfect for any skill level.
Common Mistakes to Avoid
Even easy recipes have pitfalls. Here’s how to steer clear of the common ones.
Mistake 1: Rushing the Melting Process
Turning up the heat to melt the white chocolate faster is a recipe for disaster. High heat can cause the fats to separate, making your fudge layer oily and grainy. It can also scorch the sweetened condensed milk, giving a burnt flavor. Always use low heat and stir constantly until just melted and smooth. The gentle heat protects the delicate ingredients. Tip: If your chocolate seems stiff, take it off the heat and keep stirring—the residual heat will often finish the job.
Mistake 2: Skipping the Pudding Mix
You might think the pudding mix is optional. It’s not just for flavor! The instant pudding powder contains cornstarch and thickeners that give the vanilla layer its signature custardy texture and help it set firmly. Leaving it out will result in a much softer, gooier layer that might not hold its shape. It’s the key to that authentic “Boston cream” taste and feel. Don’t skip it!
Mistake 3: Pouring Hot Ganache on a Warm Layer
If your vanilla layer hasn’t chilled long enough, pouring the warm chocolate ganache on top will melt it. This ruins the beautiful, distinct separation of layers and can create a muddy-looking swirled mess instead of clean lines. Ensure the first layer has chilled for a full 30 minutes and is firm to a gentle touch before adding the chocolate. Patience creates perfection.
Mistake 4: Using a Dull or Unheated Knife to Cut
Sawing through your beautiful fudge with a dull knife will crush the layers and make messy, crumbly squares. The chocolate ganache can crack and pull away from the vanilla base. For pristine, clean-cut squares, use a large, sharp chef’s knife. Run it under very hot water and wipe it completely dry before each cut. The warm blade glides through the chilled fudge like butter.
Frequently Asked Questions
Can I use dark chocolate for the ganache?
Absolutely! Dark chocolate or even milk chocolate chips work perfectly in the ganache layer. Using dark chocolate will give a deeper, less sweet chocolate flavor that pairs wonderfully with the sweet vanilla layer. Just keep the cream-to-chocolate ratio the same (1/2 cup cream to 1 1/2 cups chips) for the right consistency. It’s a great way to customize the fudge to your personal taste.
Why did my white chocolate layer get lumpy or grainy?
This usually happens if the heat was too high or if a tiny bit of moisture got into the mixture. White chocolate is very sensitive. Always melt it over low heat with the condensed milk and butter, which helps stabilize it. Stir constantly and remove from heat as soon as it’s smooth. If you see tiny lumps, you can try pressing the mixture through a fine-mesh strainer before pouring it into the pan, though this is tricky with thick fudge.
How do I get my fudge to set faster?
The refrigerator is your best bet. Don’t put it in the freezer to speed things up, as this can cause condensation and make the top layer wet or cause cracking. For a faster set, you can place the pan in the coldest part of your fridge (usually the back, not the door). Spreading the layers in a thinner pan, like a 9×13, will also reduce chilling time, but your pieces will be thinner.
Can I make this recipe dairy-free?
You can certainly try! Use dairy-free white chocolate chips, a dairy-free sweetened condensed milk alternative (like one made from coconut milk), and vegan butter. For the ganache, use full-fat coconut cream and dairy-free chocolate chips. The texture and flavor will be slightly different, but it can still be delicious. Be sure your pudding mix is also dairy-free, as some brands contain milk derivatives.
My ganache split or looks oily. What happened?
A broken ganache usually means the cream got too hot and separated from the fat in the chocolate. To fix it, try adding a teaspoon of warm milk or cream and whisk vigorously. Sometimes you can bring it back. To avoid it, heat the cream until it’s just steaming, not boiling, when you pour it over the chips. Let it sit for a few minutes before stirring gently to emulsify.
What’s the best way to cut fudge cleanly?
A hot, dry, sharp knife is the only tool you need. I run my large chef’s knife under hot tap water, wipe it thoroughly dry with a towel, and make one confident cut. I wipe the blade clean, reheat, re-dry, and make the next cut. For super sharp edges, you can also lightly mark your cutting lines with a knife before fully chilling the fudge block.
Can I add other flavors to the vanilla layer?
Yes, but be gentle! The vanilla pudding flavor is key, but you can add 1/4 teaspoon of almond extract or a tablespoon of lemon zest for a subtle twist. You could also swap the vanilla pudding for cheesecake or banana cream pudding mix for a totally different flavor profile. Get creative!
How long can I leave the fudge out at a party?
Because it’s dairy-based, don’t leave it out for more than 2 hours at room temperature. The fudge will become very soft. It’s best to keep it on a serving platter in the fridge and put out small batches at a time. For longer events, set the platter over a bowl of ice to keep it cool.
Is there a nut-free version?
This recipe is naturally nut-free as written! Just double-check all your packaging, especially for chocolate chips and pudding mix, to ensure they’re processed in a facility that meets your allergy needs. Most major brands of white chocolate chips and semi-sweet chips are safe, but always verify.
Can I double this recipe?
You can easily double it! Use a 9×13-inch pan instead. The layers will be similar in thickness, and you’ll get more squares to share. Simply double all ingredients and follow the same instructions. The melting and chilling times will be roughly the same. It’s perfect for a big crowd or for holiday gifting.
A Sweet Final Word
This Boston Cream Pie Fudge is more than just a recipe; it’s a little bite of joy. It proves that you don’t need fancy skills or all day to make something truly special. Whether you’re treating your family, impressing friends, or just satisfying your own sweet craving, this no-bake wonder delivers every single time. The rich chocolate, the creamy vanilla—it’s pure comfort. Remember, enjoying treats like this as part of a balanced lifestyle is a wonderful thing. For more on finding that balance with delicious food, you can explore resources on heart-smart eating to keep your body as happy as your taste buds. Now, go grab that spatula and make some magic! Your kitchen—and your lucky taste-testers—will thank you.
Equipment
- Moule carré de 8x8 pouces
- Papier sulfurisé
- Casserole moyenne
- Bol compatible avec le micro-ondes
- Spatule
- Couteau aiguisé
Ingredients
- 3 tasses pépites de chocolat blanc
- 1 boîte lait concentré sucré (14 oz)
- 1/4 tasse beurre non salé
- 1 cuil. à café extrait de vanille
- 1/4 tasse mélange de pouding à la vanille (sec)
- 1 1/2 tasses pépites de chocolat semi-sucré
- 1/2 tasse crème épaisse
- 1 cuil. à café extrait de vanille
Instructions
- Préparez un moule carré de 8x8 pouces en le tapissant de papier sulfurisé.
- Dans une casserole moyenne, combinez les pépites de chocolat blanc, le lait concentré sucré et le beurre à feu doux, en remuant constamment jusqu'à ce que le mélange soit homogène et lisse.
- Retirez du feu et incorporez l'extrait de vanille et le mélange de pouding à la vanille jusqu'à épaississement.
- Versez le mélange vanille dans le moule préparé et étalez uniformément. Réfrigérez pendant 30 minutes pour prendre.
- Dans un bol compatible avec le micro-ondes, combinez les pépites de chocolat semi-sucré et la crème épaisse. Chauffez par intervalles de 20 secondes en remuant jusqu'à obtenir un mélange lisse et brillant.
- Incorporez l'extrait de vanille et laissez le ganache refroidir pendant environ 5 minutes.
- Une fois la couche de vanille prise, versez la ganache par-dessus, en inclinant le moule pour bien recouvrir.
- Réfrigérez pendant au moins 2 heures jusqu'à ce que le tout soit bien pris.
- Soulevez le fudge du moule à l'aide des poignées en papier sulfurisé et découpez en carrés avec un couteau chaud et aiguisé.
Notes
Nutrition

Hi, I’m Olivia Parker, the founder of BakingSecret.com and a lifelong lover of all things sweet and homemade. I grew up in a small town in Oregon, where the smell of fresh cookies in my family’s kitchen sparked my passion for baking. Over the years, I turned that passion into a mission: to help home bakers feel confident, inspired, and creative.
After studying food science and working in several artisan bakeries across the U.S., I decided to create a space where everyone from beginners to seasoned bakers can find reliable recipes, expert tips, and a warm, welcoming community. BakingSecret.com is my way of sharing the magic of baking with the world. When I’m not testing new recipes, you’ll find me exploring farmers’ markets, collecting vintage cookbooks, or perfecting my sourdough technique.