
Introduction: Welcome to My Cake Happy Birthday Chocolate Journey
Last week, I watched my niece’s eyes light up when she saw her chocolate birthday cake. The pure joy on her face reminded me why I fell in love with baking in the first place. There’s something magical about a cake happy birthday chocolate that turns an ordinary day into a celebration worth remembering.
I’ve been baking for over fifteen years now. What started as a simple hobby has become my favorite way to show love to the people who matter most. Every birthday deserves something special, and nothing beats the classic combination of cake, birthday wishes, and rich chocolate flavor.
My kitchen has seen its share of baking adventures. From lopsided layers to frosting disasters, I’ve learned through trial and error. But those mishaps taught me everything I know about creating the perfect chocolate birthday cake. Now I want to share that knowledge with you.
This article will walk you through everything you need to know about making an amazing cake happy birthday chocolate. We’ll explore why chocolate cakes hold such a special place in birthday celebrations. I’ll share my favorite recipes and techniques that guarantee moist, flavorful results every time. You’ll also learn decorating tips that make your cake look as good as it tastes.
Whether you’re baking for a child’s first birthday or a grandmother’s eightieth, this guide has you covered. I believe anyone can create a beautiful chocolate birthday cake with the right guidance and a little patience.
Why Choose a Cake Happy Birthday Chocolate?
Birthdays only come once a year. That single day deserves something extraordinary. A chocolate birthday cake delivers that special feeling better than almost any other dessert. It represents celebration, love, and the sweetness of another year lived.
I remember my eighth birthday like it was yesterday. My mom made a three-layer chocolate cake covered in glossy ganache. She wasn’t an expert baker, but she spent hours in the kitchen creating something beautiful just for me. That memory still warms my heart thirty years later. The cake tasted wonderful, but what I remember most is feeling incredibly loved.
That’s the real power of a cake happy birthday chocolate. It’s not just food on a plate. It’s a symbol of care, effort, and celebration. When someone takes the time to bake or order a special cake, it says “you matter” louder than words ever could.
Chocolate holds a unique position in the dessert world. Science shows that chocolate triggers the release of endorphins in our brains. These feel-good chemicals create actual happiness. Combine that natural joy with birthday excitement, and you’ve got a winning combination.
Here’s why chocolate works so well for birthdays:
- Universal appeal: Most people love chocolate, making it a safe choice for mixed groups
- Rich flavor: Chocolate tastes indulgent and special, perfect for celebrations
- Versatile base: You can customize chocolate cake in countless ways
- Timeless classic: Chocolate never goes out of style or feels trendy
- Pairs well: Chocolate complements many frostings, fillings, and toppings
I’ve baked vanilla cakes, red velvet cakes, and fruit-filled creations. They all have their place. But when someone asks for birthday cake recommendations, I always lean toward chocolate. It rarely disappoints.
My friend Sarah once told me about her daughter’s fifth birthday. They planned an elaborate unicorn theme with pastel colors everywhere. Sarah worried that a chocolate cake wouldn’t match the aesthetic. She almost ordered a vanilla cake with food coloring instead.
I convinced her to make a chocolate cake and decorate it with colorful frosting and sprinkles. The result looked stunning and tasted incredible. Her daughter declared it “the best cake ever,” and several parents asked for the recipe. The chocolate flavor made the cake memorable, while the decorations fit the theme perfectly.
That experience taught me an important lesson. A chocolate birthday cake works for any celebration theme. You just need creativity with your decorating approach.
Children often request chocolate cake for obvious reasons. Kids love sweet, rich flavors. But adults appreciate chocolate birthday cakes just as much. I’ve seen grown men get emotional over a really good chocolate cake at milestone birthdays.
My father turned sixty last year. He’s not usually sentimental about food. But when I presented him with a homemade chocolate layer cake, his eyes got misty. He told me it reminded him of cakes his grandmother used to make. One slice transported him back to childhood birthday parties.
Food memories run deep. Many of us have strong associations between chocolate cake and happy birthday memories. When you smell cocoa baking or taste rich chocolate frosting, your brain recalls those positive experiences. This makes chocolate cake feel comforting and celebratory at the same time.
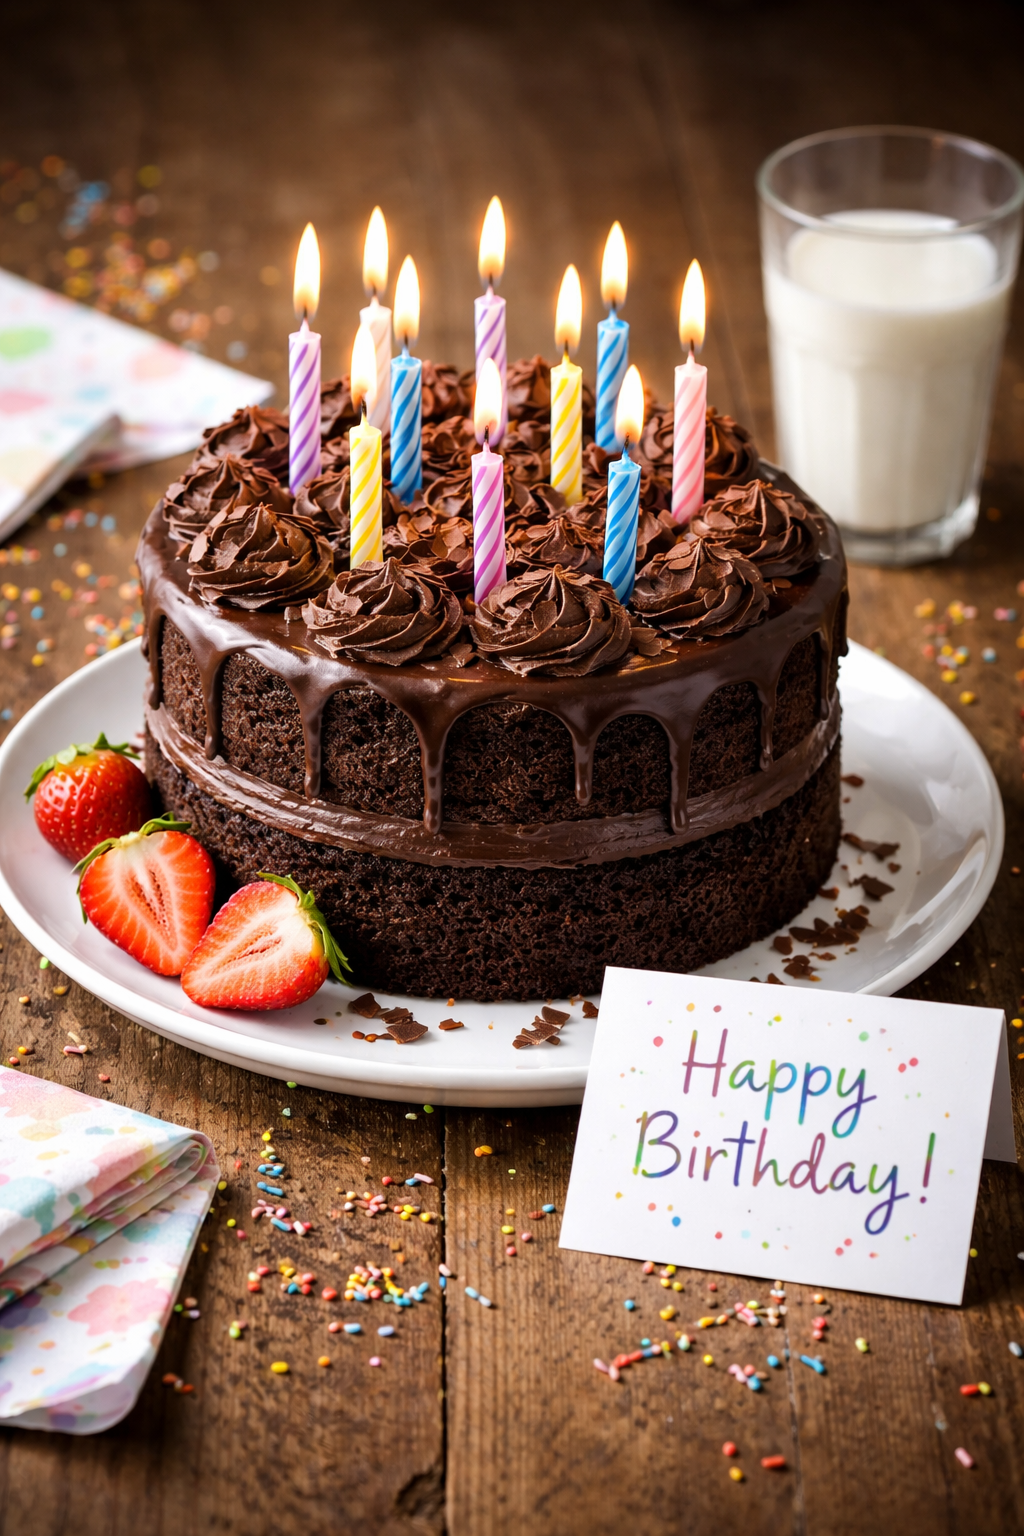
The visual impact matters too. A beautiful cake happy birthday chocolate becomes the centerpiece of any birthday gathering. Guests gather around it for photos. The birthday person makes a wish while blowing out candles. These rituals create shared memories that last for years.
I’ve noticed something interesting at birthday parties I attend. People might skip other desserts, but they rarely turn down chocolate cake. Even those watching their diet often make an exception for birthday celebrations. Chocolate cake gives people permission to indulge and enjoy the moment.
The texture of chocolate cake adds to its appeal. A properly made chocolate cake should be moist, tender, and almost impossibly soft. Each bite should melt on your tongue, releasing layers of chocolate flavor. This luxurious mouthfeel makes eating chocolate cake feel like a treat.
When you combine great taste, positive memories, and celebratory meaning, chocolate birthday cake becomes more than dessert. It transforms into an experience that brings people together and marks important moments in our lives.

Getting Your Ingredients and Equipment Ready for Chocolate Birthday Cake Success
Now that you understand why chocolate cake creates such special birthday moments, let’s talk about actually making one. I learned early in my baking journey that having the right ingredients and tools makes everything easier. Trust me, I’ve tried shortcuts that seemed convenient but ended up creating more problems than they solved.
The foundation of any great cake happy birthday chocolate starts with quality ingredients. You don’t need fancy specialty items from gourmet shops, but you do need fresh, good-quality basics. I keep my pantry stocked with baking essentials so I can whip up a birthday cake whenever someone needs one.
Here’s what you absolutely need for a classic chocolate birthday cake. First, get yourself some all-purpose flour. I prefer unbleached, but bleached works fine too. You’ll need about three cups for a standard two-layer cake. Make sure your flour hasn’t been sitting in the pantry for months. Old flour can taste stale and affect your cake’s texture.
Cocoa powder is where the chocolate flavor really comes from. I use Dutch-process cocoa for a deeper, less acidic taste, but natural cocoa powder works wonderfully too. The difference comes down to personal preference. My grandmother always used Hershey’s natural cocoa, and her cakes were legendary. Don’t overthink this part.
Sugar does more than sweeten your cake. It creates tenderness and helps with browning. Regular granulated white sugar is what I reach for every time. You’ll need about two cups, give or take. Some recipes call for brown sugar too, which adds moisture and a subtle caramel note.
By the way, eggs are crucial for structure and richness. I always use large eggs at room temperature. Cold eggs don’t incorporate as well into the batter. If you forget to set them out ahead, just place them in a bowl of warm water for five minutes. Problem solved.
Butter versus oil is an ongoing debate in the baking world. I’ve made chocolate cakes on chocolate cake day using both methods. Butter gives you better flavor, while oil creates a moister texture. For birthday cakes that might sit out during a party, I usually choose oil. The cake stays soft longer and doesn’t dry out as quickly.
Buttermilk is my secret weapon for incredibly tender chocolate cake. The acidity reacts with baking soda to create a light, fluffy crumb. If you don’t have buttermilk, you can make a substitute by adding a tablespoon of lemon juice or white vinegar to regular milk. Let it sit for five minutes until it curdles slightly. Works every time.
Coffee might seem like an odd ingredient for chocolate cake, but hear me out. A cup of strong brewed coffee intensifies the chocolate flavor without making the cake taste like coffee. I discovered this trick about ten years ago, and I’ve never looked back. Even people who hate coffee love cakes made with this method.
For leavening, you’ll need both baking soda and baking powder. They’re not interchangeable, despite what you might think. Baking soda needs an acid to activate, while baking powder contains its own acid. Using both creates the perfect rise and texture.
Vanilla extract rounds out the flavors beautifully. Get real vanilla if you can afford it. The imitation stuff works in a pinch, but real vanilla adds depth that you can definitely taste. I buy the big bottles from warehouse stores to save money.
Here’s the thing about salt. Even sweet recipes need it. A teaspoon of salt balances the sweetness and enhances all the other flavors. Never skip it.
For frosting, you’ll need powdered sugar, more butter, cream or milk, vanilla, and additional cocoa powder if you’re making chocolate frosting. I prefer chocolate frosting on chocolate cake, but some people like the contrast of vanilla buttercream. Your birthday, your rules.
Funny enough, the equipment matters almost as much as the ingredients. I baked in a terrible oven with warped pans for years before I understood why my cakes always came out uneven. Good tools don’t guarantee success, but they definitely help.
Two or three round cake pans are essential. I use 9-inch pans most often. Make sure they’re at least two inches deep. Light-colored aluminum pans work best because dark pans can cause over-browning. If you only have dark pans, reduce your oven temperature by 25 degrees.
A stand mixer makes everything easier, but I baked for years with just a hand mixer. Some of my best cakes came from hand-mixing with a whisk and wooden spoon. It builds character and arm muscles. But if you bake regularly, a stand mixer is worth the investment.
Measuring cups and spoons need to be accurate. I keep two sets: one for dry ingredients and one for wet. Those all-in-one measuring tools never give you quite the right measurements. Baking is chemistry, and precision matters more than it does in regular cooking.
A kitchen scale changed my baking life. Weighing ingredients gives you consistent results every single time. Flour measurements can vary wildly depending on how you scoop it. When I started weighing everything, my success rate jumped dramatically.
Parchment paper is non-negotiable for me. I line the bottom of my cake pans with parchment circles, then grease everything. Cakes release perfectly every time. I used to grease and flour my pans, but I always ended up with stuck spots. Parchment solved that problem.
Wire cooling racks let air circulate around your cakes as they cool. Without them, condensation makes the bottoms soggy. I learned this lesson the hard way after several cakes stuck to the plates I set them on.
An offset spatula is the secret to smooth frosting. These angled spreaders give you control and leverage that regular knives can’t match. I resisted buying one for years because it seemed unnecessary. Now I can’t imagine frosting a cake without it.
Where you shop matters less than you might think. I get most ingredients at my regular grocery store. The flour, sugar, eggs, and butter there work just as well as fancy versions from specialty shops. That said, I do buy my vanilla extract and cocoa powder from better sources because the quality difference is noticeable.
Step-by-Step Instructions for Baking Your Perfect Chocolate Birthday Cake
Let me walk you through the actual baking process. I’ll share the techniques that work for me, along with the mistakes to avoid. This isn’t rocket science, but there are definitely tricks that make things easier.
Start by preheating your oven to 350 degrees Fahrenheit. Don’t skip this step or try to rush it. Putting a cake into a not-quite-hot-enough oven throws off the whole baking time and can affect texture. While the oven heats, prepare your pans with butter or cooking spray and parchment paper circles.
Measure out all your dry ingredients first. I combine the flour, cocoa powder, sugar, baking powder, baking soda, and salt in my mixer bowl. Give everything a quick whisk to distribute the leavening agents evenly. This prevents pockets of baking soda that can create a metallic taste.
In a separate bowl, whisk together your wet ingredients: eggs, buttermilk, oil, and vanilla. Some recipes tell you to add these one at a time to the dry mixture, but I’ve found that pre-mixing the wet ingredients creates a smoother batter with fewer lumps.
Add the wet ingredients to the dry mixture and mix on medium speed for about two minutes. The batter should look smooth and well combined. Then comes the coffee. Pour it in slowly while mixing on low speed. The batter will be thin, almost pourable like a thick milkshake. Don’t panic. This is exactly what you want.
Divide the batter evenly between your prepared pans. I use a kitchen scale to make sure each layer weighs the same. Equal batter means equal baking time and layers that stack nicely. If you eyeball it and one pan has more batter, that layer takes longer to bake and might dome more.
Bake for 30 to 35 minutes. Every oven is different, so start checking at 30 minutes. A toothpick inserted in the center should come out with just a few moist crumbs. If it comes out completely clean, you’ve probably overbaked slightly. The cake will still taste good, just not quite as moist as it could be.
This is crucial: let the cakes cool in the pans for exactly 10 minutes. Not five, not fifteen. Ten minutes gives the structure time to set without steaming the cakes and making them soggy. After ten minutes, turn them out onto cooling racks and let them cool completely before frosting.
I cannot stress this enough. Completely means room temperature all the way through. I once tried to frost a cake that felt cool on the outside but was still warm inside. The frosting melted and slid right off. I had to scrape everything off and start over. Learn from my mistake.
While the cakes cool, make your frosting. Chocolate buttercream is my go-to for birthday chocolate cake. Beat softened butter until it’s light and fluffy, about three minutes. Add powdered sugar gradually, alternating with splashes of cream or milk. Mix in cocoa powder and vanilla. Beat everything for at least five minutes until the frosting becomes pale and incredibly smooth.
The texture should be spreadable but not too soft. If it’s too stiff, add more cream a tablespoon at a time. Too soft? Add more powdered sugar. Getting the right consistency takes practice, but you’ll develop a feel for it.
Now comes the fun part. If your cakes domed during baking, use a serrated knife to level them. I set one layer on my serving plate or cake board. Spread a generous layer of frosting on top, going right to the edges. Place the second layer on top, making sure it’s centered.
Apply a thin layer of frosting all over the cake. This is called a crumb coat. It seals in all the loose crumbs so they don’t show up in your final frosting layer. Refrigerate the cake for 20 minutes to let this layer set.
After the crumb coat hardens, apply your final frosting layer. Use your offset spatula to create smooth sides and top. I hold the spatula at a slight angle and rotate the cake while keeping the spatula still. It takes practice, but this technique creates those professional-looking smooth finishes.
Decorating is where you can get creative. Sprinkles, chocolate chips, fresh berries, or even simple piped borders all work beautifully. I sometimes make elaborate decorated cakes like a Marie Antoinette style, but honestly, a simple chocolate cake with “Happy Birthday” written on top is often perfect.
For a special touch that kids especially love, try adding crushed cookies or candy to the frosting. I’ve made birthday cakes topped with everything from M&Ms to pieces of German chocolate cake ice cream right before serving. Sometimes the simpler approach works better though. Even techniques I use for completely different desserts like lemon bars with cake mix can inspire decoration ideas.
The cake can sit at room temperature for a few hours before serving, but refrigerate it if your kitchen is warm or if you’re not serving it soon. Just remember to let it come to room temperature before cutting. Cold cake doesn’t taste as good, and the frosting gets hard.
Creative Ideas for Decorating Your Cake Happy Birthday Chocolate
Honestly, decorating is where you can really make a cake happy birthday chocolate feel personal and unforgettable. The cake tastes amazing on its own, but the visual presentation transforms it into something truly special. I’ve decorated hundreds of birthday cakes over the years, and I’ve learned that you don’t need professional pastry skills to create something beautiful.
Themes make decorating so much easier because they give you direction. For kids’ birthdays, think about what they’re obsessed with right now. My nephew went through a dinosaur phase, so I made him a chocolate cake with plastic dinosaurs on top and crushed chocolate cookies for “dirt.” Cost me about five dollars extra, but he talked about that cake for months.
Superhero themes work wonderfully with chocolate cake. Use colored frosting to pipe or spread the hero’s logo on top. You can also buy edible image sheets that you just peel and stick onto frosted cake. I used one for my friend’s son who loved Spider-Man. The image looked professionally printed, and it took me thirty seconds to apply.
Sports themes are another crowd-pleaser. I once made a chocolate birthday cake shaped like a soccer field for a twelve-year-old. I used green-tinted coconut flakes for grass and white frosting lines for field markings. A small plastic soccer ball from the dollar store topped it off. The birthday boy said it was better than anything from a bakery.
For adults, elegance often beats elaborate designs. A smooth chocolate ganache coating with fresh berries arranged on top looks sophisticated and restaurant-quality. I make ganache by heating equal parts heavy cream and chocolate chips until smooth. Pour it over the cooled cake and let it drip down the sides naturally. Those drips create an artsy, modern look that everyone loves.
Gold leaf or edible gold dust instantly makes any chocolate cake look expensive. A little goes a long way. I buy sheets of edible gold online for about ten dollars, and they last through multiple cakes. Just place small pieces randomly on the frosting or dust it lightly over the top. Suddenly your homemade cake looks like something from a fancy bakery.
Here’s the thing about edible decorations. The options are endless and most are surprisingly affordable. Sprinkles come in every color and shape imaginable. I keep a collection in my pantry organized by color. Rainbow sprinkles work for cheerful celebrations, while chocolate sprinkles create a classic, elegant look.
Chocolate shavings add texture and visual interest. I use a vegetable peeler on a room-temperature chocolate bar to create curls. Press them gently into the sides of your frosted cake. This technique covers up any frosting imperfections while adding a gourmet touch. When I’m feeling lazy about getting smooth frosting, chocolate shavings save the day.
Fresh flowers make gorgeous cake toppers, but make sure they’re food-safe and pesticide-free. I’ve used roses, pansies, and lavender. Place them in small florist tubes filled with water, then insert the tubes into the cake. This keeps the flowers fresh and prevents stems from touching the frosting directly. My sister’s fortieth birthday cake featured purple flowers that matched her party decorations perfectly.
Writing messages on cakes intimidated me for years. My handwriting is terrible, and I thought cake writing required special talent. Then I discovered a simple trick. Write your message on parchment paper first with a marker. Place the paper on the cake and use a toothpick to trace over the letters, creating light indentations. Remove the paper and pipe frosting along those guidelines. Game changer.
If piping still feels too difficult, use letter stamps or cookie cutters. Press them lightly into the frosting to create outlines, then fill in with contrasting colored frosting or sprinkles. I’ve also spelled out messages using candy letters or alphabet cookies. Kids especially love this because they can eat the letters.
Funny enough, sometimes the simplest messages mean the most. “Happy Birthday” never goes out of style. But I also love adding the person’s age or name for a personal touch. For milestone birthdays like Sweet Sixteen or Over the Hill parties, playful messages add humor and personality.
Adding personal touches makes your birthday chocolate cake truly memorable. Think about the birthday person’s hobbies, favorite colors, or inside jokes. My best friend loves reading, so I topped her cake with miniature edible books made from fondant. They weren’t perfect, but she got emotional because she knew I put thought into them.
Photos printed on edible paper create incredibly personal cakes. Many grocery stores and specialty shops offer this service. You send them a photo, they print it on edible frosting sheets. I made one for my parents’ anniversary with their wedding photo on top of a chocolate cake. Mom cried happy tears.
Color schemes matter more than you might think. Even though you’re working with chocolate cake, you can use frosting colors to match party themes or favorite colors. Pastel frosting on chocolate cake looks soft and romantic. Bright, bold colors create energy and fun. I once made an ombre effect using different shades of purple frosting for a teenager’s birthday. She posted photos all over social media.
Candy bars and cookies make excellent decorations. Crushed Oreos, chopped Reese’s cups, M&Ms, or Kit Kats all work beautifully. I sometimes create a “candy explosion” effect by placing various chocolates on top and letting them cascade down one side. It looks impressive but requires zero artistic skill.
Seasonal decorations connect your cake to the time of year. Autumn birthday cakes can feature candy corn, fall leaves, or pumpkin decorations. Winter birthdays get snowflakes made from white chocolate or peppermint candies. Spring calls for pastel colors and flower decorations, while summer birthdays shine with bright colors and fruit.
Texture variations add visual interest without requiring artistic talent. Smooth frosting on the top with textured sides, or vice versa, creates contrast. I use a fork to make wave patterns, or a spatula to create swoops and swirls. Sometimes I deliberately leave the frosting rustic and imperfect. That “homemade” look has its own charm.
By the way, naked cakes have become incredibly popular. These barely-frosted cakes show the layers and have frosting only between layers and minimal frosting on the outside. The dark chocolate cake layers contrast beautifully with light-colored frosting. This style looks modern and rustic simultaneously. Plus, it’s way easier than trying to achieve perfectly smooth frosting.
Candles deserve consideration too. Beyond standard birthday candles, you can find sparkler candles, number candles, or decorative candles shaped like characters or objects. I bought candles that spelled out “BIRTHDAY” for my daughter’s party. They cost about eight dollars but added so much to the presentation.
Height creates drama. Stack three or even four layers instead of two. Each layer doesn’t need to be as thick, but the extra height makes any cake look more impressive. I’ve also created tiered cakes using different sized pans. A small six-inch cake stacked on a larger nine-inch base looks wedding-worthy but uses the same recipe.
Piping borders and rosettes seemed impossible until I practiced for fifteen minutes. Seriously, that’s all it took. I bought a basic decorating tip set with a star tip and round tip. I practiced on wax paper, scraping off the frosting and trying again. After a few attempts, I could make decent-looking borders. They’re not bakery-perfect, but they’re good enough to make people think I know what I’m doing.
For those interested in using quality ingredients that align with healthier eating habits, choosing minimally processed foods where possible can make your cake not just delicious but also made with more wholesome components. Real butter, quality cocoa, and natural vanilla make a difference you can taste.
Don’t forget the cake board or serving platter. A beautiful cake on a paper plate loses some impact. I collect cake stands from thrift stores and clearance sales. A nice presentation base elevates even a simply decorated cake. Some of my favorite stands cost less than five dollars.
Creating a theme that tells a story makes decorating more meaningful. For a retirement party, I made a chocolate cake decorated like a beach scene because the retiree planned to move to Florida. Graham cracker “sand,” blue frosting “water,” and a tiny umbrella created a simple scene that everyone loved. The cake sparked conversations and photo opportunities.
Here’s something I learned from making countless birthday cakes: perfection isn’t the goal. Heart is. A slightly crooked message or uneven frosting doesn’t matter when the cake was made with love. I’ve seen professionally perfect store-bought cakes that got polite thank-yous. Meanwhile, my imperfect homemade creations often bring tears and tight hugs.
The time and effort you invest in decorating shows how much you care. That’s what people remember. Years from now, they won’t recall whether your frosting was perfectly smooth. They’ll remember that you spent your afternoon creating something special just for them.
If you’re looking for more inspiration and detailed techniques for various cake styles, explore other options in the cakes and cupcakes section where you’ll find creative ideas that can transform any celebration.
Common Questions About Making Chocolate Birthday Cakes
What are some alternatives to traditional chocolate cake for those with dietary restrictions?
Great news for people with dietary needs – chocolate cake adapts beautifully to most restrictions. For gluten-free versions, substitute regular flour with a gluten-free baking blend in a one-to-one ratio. I’ve had excellent results with Bob’s Red Mill and King Arthur brands. For dairy-free cakes, use plant-based milk and coconut oil instead of buttermilk and butter. Vegan chocolate cakes work wonderfully using flax eggs (one tablespoon ground flaxseed mixed with three tablespoons water per egg). The texture might differ slightly from traditional recipes, but these alternatives still create delicious, celebratory cakes. I’ve served dairy-free chocolate cakes at parties where nobody noticed the difference until I mentioned it.
Can I make a cake happy birthday chocolate ahead of time? How should I store it?
Absolutely, and advance preparation actually reduces party-day stress. Bake the cake layers up to two days ahead, let them cool completely, then wrap tightly in plastic wrap and refrigerate. You can also freeze unfrosted layers for up to three months wrapped in plastic and then aluminum foil. Frosted cakes stay fresh at room temperature for about two days or refrigerated for up to five days. I often bake on Thursday for Saturday parties, frost on Friday, and refrigerate overnight. Just bring the cake to room temperature an hour before serving for the best flavor and texture. The flavors often develop and improve with a day of rest.
What if I don’t have a stand mixer? Can I still make a great cake?
Yes, definitely! I made amazing chocolate cakes for years using just a hand mixer or even a whisk and some arm power. Hand mixers work perfectly for cake batter – just mix a bit longer to ensure everything incorporates well. For a completely manual approach, whisk the dry ingredients together, then whisk the wet ingredients separately before combining them. The batter might take an extra few minutes of whisking, but you’ll get excellent results. In fact, chocolate cake batter is more forgiving than many other types because it’s meant to be thin. I actually prefer making chocolate cake by hand compared to something like pound cake which requires serious creaming.
How do I prevent the cake from sticking to the pan?
Pan sticking is frustrating, but totally preventable with the right approach. I use a three-step method that never fails: grease the pan with butter or cooking spray, line the bottom with a parchment paper circle, then grease the parchment too. This might seem excessive, but it guarantees easy release every single time. Let the cakes cool in the pans for exactly ten minutes after baking – this gives the structure time to set. Run a knife around the edges before inverting onto a cooling rack. Even if you skip the parchment paper, proper greasing and that ten-minute rest period will solve most sticking issues. Dark-colored pans stick more than light ones, so consider that when choosing your bakeware.
Are there any easy ways to make the cake look professionally decorated?
Several simple techniques create impressive results without requiring professional skills. A smooth chocolate ganache poured over the cake and allowed to drip naturally down the sides looks incredibly elegant. Covering frosting imperfections with chocolate shavings, sprinkles, or crushed cookies creates texture that hides any amateur mistakes. Try the “naked cake” style with minimal frosting showing the layers – this trendy look is actually easier than fully frosted cakes. Use a bench scraper or large offset spatula held at a slight angle while rotating the cake to smooth frosting. Fresh flowers or fruit arranged on top add instant sophistication. Even a simple dusting of powdered sugar or cocoa powder through a doily creates a beautiful pattern with zero skill required.
How long does chocolate birthday cake stay fresh?
At room temperature, a frosted chocolate cake stays fresh for about two to three days if covered loosely with plastic wrap or stored under a cake dome. Refrigerated, it lasts four to five days, though I find the texture stays better at room temperature. Unfrosted cake layers refrigerate well for up to a week or freeze for three months when properly wrapped. The type of frosting matters – buttercream holds up better than whipped cream frostings which require refrigeration. I’ve noticed that chocolate cakes with oil rather than butter stay moist longer, making them ideal for cakes you’re baking a day or two ahead. Always bring refrigerated cake to room temperature before serving for the best flavor.
What’s the best way to transport a chocolate birthday cake safely?
Transporting cakes stresses me out every time, but these strategies help. Use a sturdy cake board or flat container as your base, and place the cake on a non-slip mat or damp towel in a large, flat box. If possible, refrigerate the cake beforehand so the frosting firms up and is less likely to shift. Drive carefully, avoiding sudden stops and sharp turns. For longer distances, I transport unfrosted layers and frost on-site. Those plastic cake carriers with tall domes work wonderfully and cost about fifteen dollars. I once drove forty-five minutes with a three-layer cake by placing it on the floor behind the passenger seat, securing the box with pool noodles on all sides. Worked perfectly.
Can I turn a chocolate cake mix into something that tastes homemade?
Box mixes can definitely be doctored into something impressive. Replace water with whole milk or buttermilk for richer flavor and better texture. Add an extra egg for more structure and moisture. Use melted butter instead of oil for superior taste. Mix in a tablespoon of instant coffee granules to intensify the chocolate flavor. Add a teaspoon of vanilla extract even if the mix doesn’t call for it. I sometimes fold in chocolate chips or a handful of mini marshmallows for extra interest. These simple additions transform a basic box mix into something that tastes much closer to homemade. Nobody needs to know you started with a mix unless you want to share your shortcuts.
What should I do if my chocolate cake turns out dry?
A dry cake isn’t ruined – you have options. Brush the layers with simple syrup (equal parts sugar and water heated until the sugar dissolves) before frosting. This adds moisture throughout without making it soggy. Use a generous amount of frosting between layers and on the outside. Serve with ice cream, whipped cream, or a chocolate sauce that adds moisture to each bite. For future baking, check your oven temperature with an oven thermometer – many ovens run hot, causing overbaking. Don’t overbake based on time alone; start checking several minutes early. Measure flour correctly by spooning it into the measuring cup rather than scooping directly, which packs in too much flour. Adding an extra tablespoon of oil or sour cream to the batter creates insurance against dryness.
How do I fix frosting that’s too thin or too thick?
Frosting consistency problems are easy to solve. For frosting that’s too thin and slides off the cake, add more powdered sugar a quarter cup at a time, beating well after each addition. Refrigerating thin frosting for fifteen to twenty minutes also helps it firm up. If your frosting is too thick and tears the cake when you try to spread it, add liquid (milk, cream, or water) one tablespoon at a time until it reaches spreadable consistency. Temperature matters too – frosting that’s too cold becomes stiff, while warm frosting gets runny. Let refrigerated frosting sit at room temperature for ten minutes before using, or briefly warm it in the microwave for five to ten seconds if it’s too thick. I keep extra powdered sugar and milk nearby when frosting just in case adjustments are needed.
Making a chocolate birthday cake brings joy to both the baker and the birthday person. Each cake you create builds your skills and confidence. Don’t worry about perfection – focus on the love and celebration behind your creation. That personal touch means more than any bakery cake ever could.
Equipment
- Mixing Bowls
- Mixer
- Offset Spatula
- Cake Pans
- Parchment Paper
Ingredients
- 3 cups all-purpose flour preferably unbleached
- 2 cups granulated sugar
- 3/4 cup cocoa powder Dutch-process or natural
- 1 1/2 tsp baking powder
- 1 1/2 tsp baking soda
- 1 tsp salt
- 3 large eggs room temperature
- 1 1/2 cups buttermilk
- 1 cup vegetable oil
- 2 tsp vanilla extract
- 1 cup strong brewed coffee
- q.s. powdered sugar for frosting
- 1 cup butter softened for frosting
- to taste heavy cream or milk for frosting
- to taste cocoa powder for chocolate frosting, if desired
Instructions
- Preheat oven to 350°F (175°C) and prepare your cake pans with butter or cooking spray and parchment paper.
- Combine dry ingredients: flour, cocoa powder, sugar, baking powder, baking soda, and salt in a mixer bowl.
- In a separate bowl, whisk wet ingredients: eggs, buttermilk, oil, and vanilla.
- Mix the wet ingredients into the dry ingredients on medium speed for about two minutes.
- Gradually add brewed coffee to the batter while mixing on low speed.
- Divide the batter evenly between prepared pans.
- Bake for 30 to 35 minutes until a toothpick inserted comes out with a few moist crumbs.
- Let cakes cool in pans for 10 minutes, then turn out onto wire cooling racks to cool completely.
- While cooling, prepare frosting by beating butter until light and fluffy, then gradually add powdered sugar alternating with milk until smooth.
- Level cooled cakes if domed and apply a layer of frosting between layers.
- Apply a thin crumb coat and refrigerate for 20 minutes.
- Frost the entire cake with final frosting layer, decorating as desired.