
My Journey with Cheesecake Mix Started on a Busy Tuesday
I’ll never forget the night I had twelve guests coming over in three hours and zero time to make dessert from scratch. My sister called and casually mentioned she was bringing her new boyfriend. My in-laws were already on their way. I stood in my kitchen, staring at my empty counter, wondering how I’d pull off a impressive dessert without spending the next two hours measuring ingredients.
That’s when I grabbed a cheesecake mix box from my pantry. I’d bought it weeks earlier but never tried it. Within minutes, I was mixing ingredients. Within an hour, I had a beautiful cheesecake chilling in my fridge. My guests raved about it all night. Nobody believed me when I said it came from a box.
Since that night, I’ve become a huge fan of boxed cheesecake mixes. They’ve saved me countless times when I needed a quick dessert that still looked and tasted homemade. The Cheesecake Factory mix has become my go-to choice for good reason.
Why Cheesecake Factory Mix Wins Every Time
The Cheesecake Factory brand built its reputation on rich, creamy cheesecakes that people line up for at their restaurants. When they released a box mix version, I was curious but skeptical. Could a box really capture that same quality?
After using it dozens of times, I can say it comes pretty close. The mix creates that signature dense, creamy texture you expect from a good cheesecake. It’s not exactly like spending four hours making one from scratch, but it’s miles better than most shortcuts.
People love this mix because it takes the guesswork out of making cheesecake. You don’t need to worry about curdling, cracking, or getting the right consistency. The mix handles the hard parts. You just add a few simple ingredients and follow basic steps.
My mom, who bakes everything from scratch, even keeps a box in her pantry now. She uses it when she’s short on time but still wants to serve something special. That’s high praise from someone who usually measures vanilla by the bean.
Where to Buy Cheesecake Factory Mix Without the Hassle
Finding Cheesecake Factory mix used to be tricky. Not every store carried it. I’d drive to three different stores just to find one box. Now it’s gotten much easier.
Walmart consistently stocks cheesecake mix in their baking aisle. I’ve found it at almost every Walmart I’ve visited across different states. They usually place it near the brownie mixes and cake mixes. The price at Walmart tends to run between $4 and $6 per box, depending on sales.
Target also carries it, though their selection can be hit or miss. I’ve had better luck at larger Target stores than smaller ones. They often feature it in their baking section, sometimes on end caps during holiday seasons.
Grocery stores like Kroger, Safeway, and Publix stock it too. Call ahead if you want to save yourself a trip. I’ve learned this the hard way after showing up to find empty shelves.
Online shopping opens up more options:
- Amazon usually has boxes available, often sold in packs of two or three
- Walmart.com offers both pickup and delivery options
- Target.com provides same-day delivery in many areas
- Cheesecake Factory’s website sometimes sells directly to customers
My Tips for Finding the Best Deals
I’ve gotten good at scoring deals on cheesecake mix over the years. Here’s what works for me:
Check store apps before you shop. Walmart and Target both have digital coupons you can clip right from their apps. I’ve saved $1 or more per box this way. It takes thirty seconds and adds up fast.
Buy during holiday seasons. Stores stock up on baking supplies before Thanksgiving and Christmas. They often put mixes on sale to move inventory. I stock up in November and have enough to last months.
Compare prices between stores and online retailers. The same box might cost $5.99 at one store and $4.49 at another. I use my phone to check prices while I’m shopping.
Join store loyalty programs. Many grocery chains offer points or discounts for members. These programs are free and can save you money on every purchase.
Watch for clearance deals. Sometimes stores discount baking mixes when they’re getting close to their best-by dates. These mixes last a long time, so buying them a few months before the date is fine.
Where I Buy for the Best Quality and Price
After trying all the options, I usually buy my cheesecake mix at Walmart. Their prices stay consistent and low. I can count on them having it in stock. The quality is the same no matter where you buy it since it’s the same manufacturer.
For convenience, I order from Amazon when I’m stocking up. Buying multiple boxes brings the per-unit price down. I don’t have to carry heavy bags from the store. The boxes arrive at my door in two days.
Local grocery stores work best when I need just one box for a last-minute dessert. I can grab it while doing my regular shopping. The price might be slightly higher, but the convenience makes up for it.
My Honest Cheesecake Factory Box Mix Review
I’ve used the Cheesecake Factory box mix more times than I can count. I’ve served it to family, friends, coworkers, and even brought it to potlucks. Here’s what I’ve learned from all that experience.
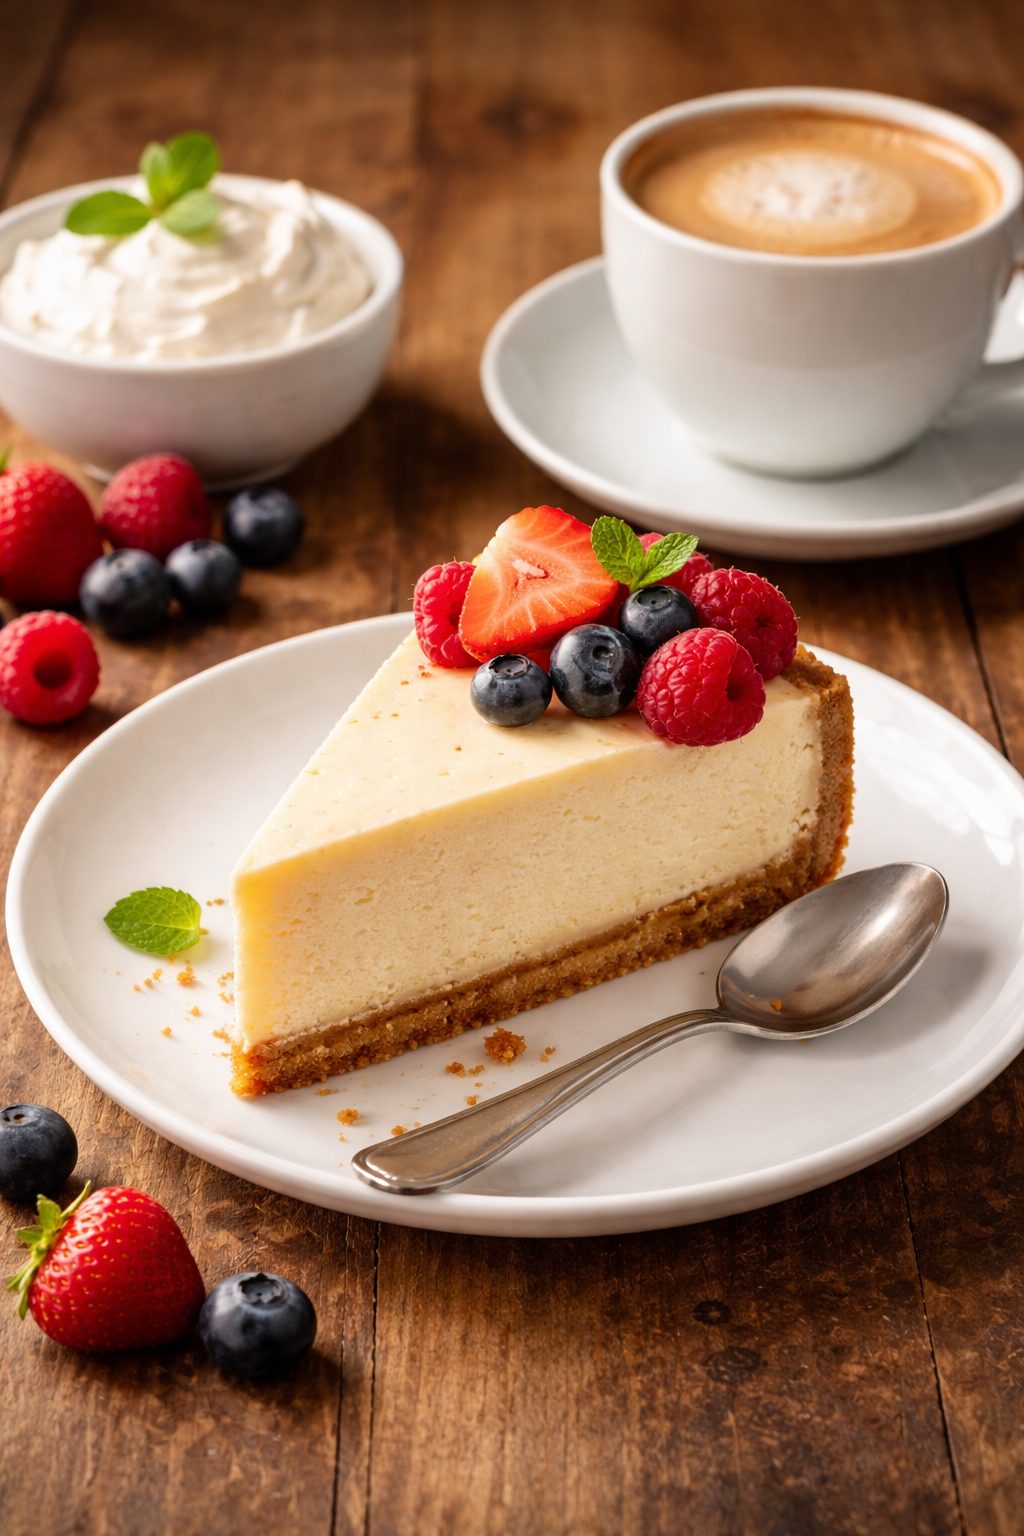
The texture comes out smooth and creamy every time. It has that classic cheesecake density without being too heavy. The flavor is rich but not overpowering. It tastes like real cream cheese, not artificial or chemical-like.
The cheesecake factory box mix directions are straightforward. You need cream cheese, butter, sugar, and milk. Most people already have these ingredients at home. The instructions walk you through each step clearly. Even if you’ve never made cheesecake before, you can follow along easily.
One box makes enough for a standard 9-inch pie pan. That serves about eight people with decent-sized slices. I’ve stretched it to ten servings when I’m serving other desserts too.
The mix works for both baked and no bake cheesecake filling options. The box includes instructions for both methods. I prefer the no-bake version on hot summer days when I don’t want to turn on my oven.
How It Stacks Up Against Other Brands
I’ve tried other cheesecake mixes from different brands. Jell-O makes a popular version that’s lighter and fluffier. It’s good for people who prefer a mousse-like texture. But if you want traditional cheesecake density, Cheesecake Factory wins.
Store brands cost less but often taste less rich. The texture can be grainy or too soft. I’ve had store-brand mixes that didn’t set properly even when I followed the directions exactly.
Philadelphia makes a cream cheese-based mix that works well. It’s my second choice after Cheesecake Factory. The texture is similar, though I think Cheesecake Factory has a slightly better flavor.
The Good and the Not-So-Good
Let me break down the pros and cons based on my personal experience:
What I Love:
- Takes less than 15 minutes of active prep time
- Creates a rich, creamy texture consistently
- Tastes close to homemade without the fuss
- Works for both baked and no-bake versions
- Easy to customize with toppings and flavors
- Doesn’t require specialty ingredients
- Stores well in the pantry for months
What Could Be Better:
- Costs more than making completely from scratch
- Not available at every grocery store
- Contains some processed ingredients
- Makes a smaller cheesecake than full homemade recipes
- Limited flavor options (mostly plain or vanilla)
The processed ingredient issue doesn’t bother me much for a convenience product. Yes, making cheesecake from scratch with whole ingredients is healthier. But this mix still uses real cream cheese and butter. It’s not like eating a Twinkie.
The smaller size actually works in my favor most times. I don’t need a massive cheesecake for just my family. When I do need more, I buy two boxes and make two separate cheesecakes. They bake or chill in the same time.

Mastering the Cheesecake Factory Mix Instructions
Now that you know where to get your hands on the mix, let’s talk about actually making the thing. I remember my first attempt—I was so excited that I almost skipped reading the cheesecake factory box mix directions completely. Big mistake. I ended up with a lumpy mess because I added everything at once instead of following the proper order.
Here’s what I’ve learned works best. First, take your cream cheese out of the fridge about twenty minutes before you start. Room temperature cream cheese mixes way easier than cold blocks. I learned this after my hand mixer nearly burned out trying to blend cold cream cheese. Not fun.
The basic cheesecake factory mix instructions call for cream cheese, butter, milk, and the mix itself. Pretty simple lineup. But the order matters more than you’d think. Start by beating your softened cream cheese and butter together until they’re fluffy and smooth. This takes about three minutes with an electric mixer. Don’t rush this step—those air bubbles you’re creating make your cheesecake lighter and creamier.
Once your cream cheese mixture looks fluffy, add the mix powder gradually. I dump in about a third at a time, mixing between each addition. This prevents those annoying powder clouds that end up all over your counter and in your nose. Been there, sneezed through that.
The milk goes in last. Pour it slowly while your mixer runs on low speed. The mixture will look thin at first, and that freaked me out the first time. I thought I’d ruined it. But keep mixing for another minute or two, and it thickens up beautifully. The whole mixing process takes maybe ten minutes total.
Here’s something the box doesn’t emphasize enough—scrape down your bowl sides at least twice during mixing. Cream cheese loves to hide in corners and stick to the bottom. You want everything incorporated evenly. I use a rubber spatula and make sure to get all the way to the bottom edges.
For the crust, I’ve found that graham crackers work perfectly, but I’ve also experimented with chocolate cookie crusts similar to what I use in my chocolate cherry rolls. The chocolate adds a nice contrast to the creamy filling. Crush about a cup and a half of cookies, mix with melted butter, press into your pan, and you’re set.
One trick I picked up from my neighbor—chill your crust for fifteen minutes before adding the filling. This helps it hold together better when you slice the finished cheesecake. Seems like a small thing, but it makes a real difference in getting clean slices.
Common Mistakes I’ve Made So You Don’t Have To
Let me save you some headaches by sharing my biggest mess-ups. First major mistake—overmixing. When I got my first stand mixer, I got a little power-happy. I let the thing run for like seven minutes because I thought more mixing meant better results. Wrong. Overmixing adds too much air, which creates cracks and a weird foamy texture. Mix just until everything’s combined and smooth, then stop.
Second mistake—using cold ingredients. I mentioned this earlier, but it’s worth repeating because it matters so much. Cold cream cheese creates lumps that never fully smooth out. Cold butter doesn’t blend properly. Everything needs to be room temperature. I set mine out while I’m making breakfast, then make the cheesecake after lunch.
Third mistake—skipping the chill time. I get it. You’re excited. You want to eat cheesecake now, not in four hours. But that refrigeration time isn’t optional. The first time I tried cutting into a cheesecake after only an hour, the whole thing fell apart. It looked like I’d dropped it on the floor. Give it at least four hours, overnight if you can manage the patience.
The thing about using too much milk also caught me once. I accidentally grabbed my measuring cup marked in ounces instead of cups and added way too much liquid. The cheesecake never set properly—it stayed pudding-like even after a full day in the fridge. Measure carefully. The ratios in these mixes are pretty precise.
Another gotcha—using low-fat cream cheese to “save calories.” Don’t do it. The mix is formulated for full-fat cream cheese. Low-fat versions have different moisture content and don’t set up right. They also taste noticeably worse. If you’re eating cheesecake, commit to the full experience.
Making Perfect No Bake Cheesecake Filling
The no bake cheesecake filling option changed my summer dessert game completely. Running the oven when it’s ninety degrees outside? No thanks. The no-bake method keeps your kitchen cool and actually takes less total time than the baked version.
The process starts the same way—room temperature cream cheese and butter, mixed until fluffy. But here’s where it differs. For no-bake versions, you want to whip the mixture a bit more to incorporate extra air since you won’t get any rise from baking. I usually beat it for about four minutes instead of three.
The cheesecake factory mix directions for no-bake include adding a bit of lemon juice. This isn’t just for flavor—the acid helps the filling set up firmer without heat. Don’t skip it even if you’re not a huge lemon fan. You won’t really taste it in the final product.
Texture-wise, no-bake cheesecake comes out lighter and fluffier than baked versions. It’s more mousse-like, which some people prefer. My kids actually like it better than traditional cheesecake because it feels less heavy after a big dinner. When I’m making dessert for a crowd, especially in warm weather, I almost always go with no-bake.
One thing that really improves no bake cheesecake filling texture—folding in some whipped cream at the end. The box doesn’t tell you to do this, but trust me. Whip about half a cup of heavy cream to stiff peaks, then gently fold it into your finished cheesecake mixture. This makes it incredibly light and creamy. It’s kind of like the technique I use for my strawberry chocolate ice cream cake, where that extra whipped cream creates an amazing texture.
The setting time for no-bake is crucial. You need at least six hours in the fridge, preferably eight. The mixture firms up through chilling rather than baking, so it needs that full time to reach the right consistency. I usually make mine in the evening and let it sit overnight. Morning cheesecake for breakfast isn’t the worst idea I’ve ever had.
My Favorite No-Bake Variations That Actually Work
Once you’ve mastered the basic no bake cheesecake filling, the flavor possibilities get really fun. I’ve tried probably fifteen different variations at this point. Some were disasters. Some were amazing.
My absolute favorite involves fresh strawberries. I hull and slice about two cups of berries, toss them with a tablespoon of sugar, and let them sit for thirty minutes. This draws out their juice and creates a natural syrup. I layer half the plain cheesecake filling in my crust, add a layer of these strawberries, then top with the remaining filling. The fruit stays bright and fresh-tasting since there’s no baking involved.
For chocolate lovers, I melt about four ounces of chocolate chips and let them cool slightly before folding them into the prepared filling. This creates a marbled chocolate cheesecake that looks fancy but takes zero extra skill. Sometimes I’ll add a chocolate ganache on top, similar to my Boston cream cheesecake, which creates incredible layers of chocolate flavor.
Coffee cheesecake became my husband’s obsession after I made it once. Dissolve two tablespoons of instant espresso powder in a tablespoon of warm water, then add it to your cream cheese mixture. It creates this sophisticated mocha flavor that pairs perfectly with after-dinner coffee. Way better than anything you’d get at a restaurant.
Key lime works beautifully too. Add a quarter cup of fresh lime juice and some lime zest to your filling. The citrus brightens everything up and makes it taste incredibly fresh. I make this version constantly in summer. It’s like vacation in dessert form.
Here’s a wild one that surprised me—peanut butter swirl. Mix a half cup of creamy peanut butter with a quarter cup of powdered sugar until smooth. Dollop spoonfuls of this mixture over your cheesecake filling and swirl with a knife. The combination reminds me of my banana split cake where unexpected flavors come together perfectly. Kids go absolutely crazy for this version.
The beauty of no-bake filling is how forgiving it is for flavor experiments. Since you’re not baking, you can taste as you go and adjust. Too tangy? Add more sugar. Want it richer? Fold in some melted white chocolate. The possibilities expand once you realize the basic recipe is just a starting point.
My one warning—don’t add too much liquid flavoring. Liquids prevent the filling from setting up properly. If you’re using extracts or liqueurs, stick to a tablespoon or less. When I want stronger flavors, I use concentrated ingredients like jam, melted chocolate, or citrus zest instead of juices.
Your Biggest Cheesecake Mix Questions Answered
Over the years, I’ve gotten tons of questions from friends and family about using cheesecake mix. Every time I bring a cheesecake to a gathering, someone corners me in the kitchen asking how I did it. So let me tackle the questions I hear most often, along with a few surprises I’ve discovered along the way.
What are the main ingredients in the cheesecake factory mix?
The box itself contains a powdered mixture of sugar, modified food starch, natural flavors, and some stabilizers that help everything set properly. That’s the dry mix part. But to actually make your cheesecake, you’ll need to add cream cheese—usually two packages of the standard eight-ounce blocks. You’ll also need butter, milk, and sometimes eggs depending on whether you’re going baked or no-bake.
The ingredient list on the box isn’t scary or filled with unpronounceable chemicals. It’s pretty straightforward stuff. I appreciate that the bulk of the flavor comes from the real cream cheese you add, not artificial nonsense. My cousin follows a plant-forward diet most of the time, and even she admits this is relatively clean compared to other boxed desserts.
One thing I noticed—the mix doesn’t contain any dairy itself, which means it stays shelf-stable for months. All the perishable ingredients come from what you add fresh. That’s actually pretty clever when you think about it. It’s why I can keep a box in my pantry for emergencies without worrying it’ll go bad.
Can I substitute any ingredients in the cheesecake factory mix?
Here’s where I’ve done quite a bit of experimenting, sometimes successfully, sometimes not so much. The cream cheese is pretty non-negotiable. I tried using Neufchâtel once thinking it was close enough. Nope. The texture came out softer and less stable. Greek yogurt? Even worse—way too tangy and didn’t set right.
The butter you can mess with a bit more. I’ve used margarine in a pinch, and honestly, it worked okay. Not quite as rich, but acceptable if that’s all you have. Coconut oil is hit or miss—it gives a slight coconut flavor that works with some toppings but clashes with others.
Milk substitutions are tricky. I’ve successfully used almond milk and oat milk with decent results. The texture stays pretty similar. But skim milk doesn’t work as well as whole milk. You need that fat content for proper richness and texture. My sister tried using half-and-half once and made the richest, most decadent cheesecake I’ve ever tasted. A bit too much for my taste, but some people loved it.
Sugar substitutions in the mix itself aren’t really possible since the sugar’s already mixed in. But if you want to reduce sweetness in the crust or toppings, that’s totally doable. I’ve cut the sugar in graham cracker crusts by half with no problems.
How long does it take to prepare a cheesecake using the cheesecake factory mix?
Active prep time runs about fifteen minutes if you’re moving at a relaxed pace. That includes making your crust, mixing your filling, and getting everything into the pan. I can do it in ten minutes if I’m rushing, but there’s no real reason to stress. It’s already a quick process.
The baking version adds about forty-five minutes in the oven, then you need cooling time. Count on at least four hours of refrigeration before serving. So total time from start to first bite is around six hours, but you’re only actively working for that first fifteen minutes.
No-bake versions skip the oven time entirely. You’re looking at fifteen minutes of mixing plus six to eight hours of chill time. I usually make these the night before I need them. Pop it in the fridge before bed, and it’s perfect by dinnertime the next day.
The chill time is really the only thing that requires planning ahead. You can’t rush it, and honestly, you shouldn’t try. I learned this the hard way when I tried using my freezer to speed things up. The edges froze solid while the middle stayed soft. Not pretty.
Can I make a no bake cheesecake with the cheesecake factory mix?
Absolutely, and I actually prefer it most of the time. The cheesecake factory mix directions include specific instructions for no bake cheesecake filling, and they work beautifully. The process is nearly identical to the baked version—you just skip the oven step and let it set up in the refrigerator instead.
The texture difference is noticeable but not in a bad way. No-bake comes out airier and lighter, almost mousse-like. Baked versions are denser and more traditional. Neither is better or worse—just different. My husband prefers baked. My kids prefer no-bake. I like both depending on my mood and the weather.
One advantage of no-bake that nobody talks about—it’s way more forgiving for beginners. You don’t risk overbaking, cracking, or dealing with water baths. You literally cannot mess it up unless you forget to refrigerate it or add way too much liquid. My teenage niece made a perfect no-bake cheesecake on her first try. That’s how easy it is.
Is the cheesecake factory mix suitable for people with dietary restrictions?
This is where things get a bit limited, unfortunately. The mix isn’t suitable for anyone avoiding dairy since the main ingredient you add is cream cheese. It’s not vegan-friendly, and I haven’t found a good vegan cream cheese substitute that works with the mix chemistry.
For gluten concerns, the mix itself doesn’t contain wheat or gluten ingredients. But check the label because manufacturing processes can introduce cross-contamination. If you’re making it for someone with celiac disease, verify the specific batch. The crust is where gluten usually shows up from graham crackers. Swap those for gluten-free cookies or a nut-based crust, and you’re good to go.
Lactose intolerant folks might struggle unless they use lactose-free cream cheese and milk, which do exist and actually work fine in the recipe. The texture stays consistent because the proteins and fats are still there—just without the lactose.
The mix does contain quite a bit of sugar, so it’s not ideal for diabetics or people watching their sugar intake. There’s no easy way around this since the sugar is premixed into the powder. You’d need to find a sugar-free cheesecake mix alternative if that’s a concern.
How should I store the cheesecake factory mix before and after use?
The unopened box lives happily in your pantry for months, even up to a year if stored properly. I keep mine in a cool, dry cabinet away from the stove and dishwasher. Heat and humidity are the enemies here. Don’t store it above your oven or near steamy appliances.
Once you open the box but don’t use all the mix—which hasn’t happened to me because one box makes one cheesecake—you’d want to transfer any remaining powder to an airtight container. Those zip-top bags work, or better yet, a sealed plastic or glass container. Moisture will clump the powder and potentially grow mold, so keep it sealed tight.
The finished cheesecake needs refrigeration, always. I cover mine with plastic wrap or aluminum foil to prevent it from absorbing fridge odors. Nothing ruins a beautiful cheesecake faster than it tasting like last night’s salmon. I learned this lesson once. Only once.
Cheesecake actually freezes really well, which surprised me. Wrap individual slices tightly in plastic wrap, then again in foil. They’ll keep for up to two months in the freezer. Thaw them in the fridge overnight before serving. The texture stays remarkably good. I do this when I’m worried about having too much leftover, which is rare because cheesecake disappears fast around here.
What are some creative ways to use the cheesecake factory mix besides making cheesecakes?
Oh man, this is where things get fun. I’ve gotten pretty experimental with this mix beyond traditional cheesecake. My favorite discovery? Cheesecake stuffed strawberries. Hollow out large strawberries and pipe the no-bake filling inside. They’re like fancy party food that takes five minutes to make.
I’ve used the filling as a layer in trifles. Alternate the cheesecake mixture with fresh berries, whipped cream, and crumbled cookies in a clear glass. It looks incredibly impressive for basically zero effort. My mother-in-law asked for the recipe, and when I told her it started with a box mix, she didn’t believe me.
Cheesecake dip is another winner. Make the no-bake filling and serve it in a bowl with graham crackers, pretzels, and fruit for dipping. I brought this to a Super Bowl party last year, and people went nuts for it. Someone asked if I’d gone to culinary school. I wish I’d said yes, but I’m a terrible liar.
You can make individual parfaits by layering the filling with crushed cookies and fruit in small glasses or mason jars. These work great for portion control or when you’re serving a crowd and don’t want to deal with slicing. Plus they look adorable, which counts for something.
Here’s a weird one that totally works—cheesecake pancakes. Add a few tablespoons of the dry mix to your regular pancake batter along with some extra cream cheese. They come out thick, fluffy, and have this subtle cheesecake flavor. Top them with berry compote, and you’ve got a breakfast that feels like dessert.
I’ve also stirred the prepared filling into softened ice cream and refroze it for a cheesecake ice cream that’s unbelievably good. It’s similar to things I’ve done with other desserts when I want to create new flavors without starting from scratch.
Are there any tips for making the cheesecake look and taste like it’s from The Cheesecake Factory?
The restaurant versions have a few signature elements you can replicate at home. First, they’re always super tall and impressive-looking. To get that height, use a springform pan rather than a regular pie pan. The straight sides create that classic cheesecake look.
The Cheesecake Factory always serves generous portions, so don’t skimp on your slices. Cut them thick. Nobody ever complained about getting too much cheesecake. Use a hot knife—run it under hot water and wipe it clean between each cut. This prevents dragging and creates clean, professional-looking slices.
Toppings matter more than you’d think. The restaurant versions always have beautiful garnishes. Fresh fruit arranged artfully, chocolate shavings, whipped cream rosettes, or glossy fruit glazes all elevate the presentation. I keep a can of whipped cream in the fridge specifically for last-minute dessert decorating.
One technique I picked up from watching too many cooking shows—make a sour cream topping. Mix a cup of sour cream with two tablespoons of sugar and a teaspoon of vanilla. Spread it over your cooled cheesecake and chill for another hour. This creates that signature tangy layer that many Cheesecake Factory varieties have.
Serve it cold, really cold. The restaurant serves theirs straight from the fridge, almost to the point where they’re quite firm. This isn’t a warm dessert. The colder it is, the cleaner your slices will be and the better the texture holds up.
What’s the shelf life of a finished cheesecake made from the mix?
In the refrigerator, your finished cheesecake stays good for about five to seven days. I’ve personally pushed it to eight days with no issues, but that’s probably the limit. After that, the texture starts getting weird, and you risk food safety problems.
The key is proper storage. Keep it covered tightly so it doesn’t dry out or absorb other flavors. I use a cake dome when I have one, or just tent some foil over it loosely so it doesn’t stick to the top.
Baked cheesecakes last slightly longer than no-bake versions because the heat kills more bacteria during preparation. But honestly, the difference is minimal—maybe an extra day or two at most. Both versions need to be consumed within that week-long window for best quality and safety.
Funny thing is, I’ve never had a cheesecake last more than three days in my house. Between my family and random friends stopping by who somehow sense that I’ve baked something, it vanishes pretty quickly. That’s probably the best form of quality control—it gets eaten before it has a chance to go bad.
Can I double the recipe using two boxes of mix?
You can, but here’s what I’ve learned from experience—it’s better to make two separate cheesecakes than one giant one. Doubling everything in a single pan creates thickness issues. The outside edges set up before the middle does, and you end up with uneven texture.
When I need to serve a big crowd, I make two cheesecakes side by side. They bake or chill in the same timeframe, and you end up with better results. Plus, this lets you do two different flavors, which people always appreciate. Half your crowd wants strawberry, half wants chocolate—now everyone’s happy.
If you absolutely must make one giant cheesecake, use a much deeper pan and extend your chill time significantly. We’re talking overnight minimum, possibly longer. The filling needs extra time to set when it’s that thick. I tried this once for a family reunion and ended up with a cheesecake that was still soft in the very center even after twelve hours of chilling.
If you’re looking for more cheesecake inspiration and recipes to try, there are tons of variations worth exploring beyond the basic mix. Sometimes experimenting with different approaches helps you figure out exactly what works best for your taste and your kitchen.
Final Thoughts on Your Cheesecake Journey
The Cheesecake Factory mix turned me from someone who was intimidated by cheesecake into someone who makes it regularly without stress. That’s not a small thing. Desserts should bring joy, not anxiety. Whether you’re baking for a special occasion or just because it’s Tuesday and you want something sweet, this mix delivers consistent results without demanding culinary school expertise. Try it once, mess around with different toppings and flavors, and see where it takes you. Chances are, you’ll end up with your own favorite way to make it that becomes your signature dessert.
Frequently Asked Questions About Cheesecake Mix
What’s the difference between the Cheesecake Factory mix and other brands?
The Cheesecake Factory mix creates a denser, creamier texture compared to most competitors. Other brands like Jell-O tend to make lighter, fluffier versions that feel more like mousse. The flavor is richer too, closer to what you’d get at the actual restaurant. Store brands cost less but often have grainy textures or don’t set up as firmly. Philadelphia makes a decent alternative, but I still think Cheesecake Factory has the most authentic traditional cheesecake taste and consistency.
Do I need a springform pan to use the cheesecake mix?
Not necessarily, though it makes your life easier. A springform pan lets you remove the sides cleanly for that professional bakery look. But I’ve successfully made cheesecakes in regular pie pans, square baking dishes, and even individual ramekins. You just serve them directly from the pan instead of unmolding them. The taste stays exactly the same. If you’re doing no-bake versions, you can use pretty much any container that holds the right volume—I’ve even used a nice serving bowl when I planned to scoop rather than slice.
Can I add alcohol to the cheesecake mix?
Yes, but keep it to small amounts—a tablespoon or two maximum. Alcohol contains liquid that can prevent proper setting, especially in no-bake versions. I’ve successfully added Baileys Irish Cream, Kahlua, and rum to different batches. The alcohol flavor comes through nicely without messing up the texture. Add it when you’re mixing in the wet ingredients, and make sure it’s incorporated evenly. If you want stronger flavor without more liquid, try using extracts like rum extract or brandy extract instead of the actual liquor.
Why did my cheesecake crack on top?
Cracking usually happens from temperature changes or overbaking. If you’re making a baked version, avoid opening the oven door during baking—the temperature drop causes the surface to contract and crack. Overbaking dries out the top layer, which also leads to cracks. The good news is cracks don’t affect taste at all, just appearance. Cover them with whipped cream, fruit, or chocolate sauce, and nobody will know. For no-bake versions, cracking is pretty rare unless you put it in the freezer instead of the fridge.
How do I know when my baked cheesecake is done?
The center should still jiggle slightly when you gently shake the pan. It seems underdone, but it continues setting as it cools. If the whole thing looks firm and solid in the oven, you’ve probably overbaked it. I learned to check about five minutes before the recipe’s suggested time and watch for that slight wobble in the middle. The edges should look set and maybe slightly puffed. Don’t use a toothpick test like you would with cake—that creates holes and doesn’t give you useful information anyway.
Can I make mini cheesecakes with the mix?
Absolutely, and they’re adorable. Use a muffin tin lined with paper liners. Put a cookie or small amount of crushed graham crackers in each cup for the crust, then fill with the cheesecake mixture. One box makes about twelve regular-sized muffin cups. Bake for about twenty minutes if you’re doing baked versions, or just chill for four hours for no-bake. Mini cheesecakes are perfect for parties because there’s no slicing required, and everyone gets their own perfectly portioned dessert. Plus kids love anything in mini form.
What’s the best way to transport a cheesecake?
Keep it cold and flat, those are your two main goals. I use a cake carrier with a tight lid if I have one. If not, I put the cheesecake on a flat cutting board or sturdy plate, cover it loosely with foil, and place it on the floor of my car behind the front seat where it can’t slide around. Never put it on a car seat where it might tip over when you brake. If it’s hot outside, I put it in a cooler with ice packs around but not touching the cheesecake itself. The whole thing needs to stay cold and level during transport to arrive in good condition.
Can I make the cheesecake mixture ahead and refrigerate it before baking?
For baked versions, it’s better to pour the mixture into the crust and bake it right away. Letting it sit mixed but unbaked can cause separation issues. However, you can make the crust ahead and refrigerate that for a day or two. For no-bake versions, you want to pour the mixture and let it set immediately after mixing. The chemistry works best when everything happens in sequence. If you need to prep ahead, make the entire finished cheesecake a day or two before you need it. Cheesecake actually tastes better after sitting in the fridge overnight anyway.
Why is my no-bake cheesecake not setting properly?
Usually this means too much liquid got added somewhere. Double-check your measurements—even an extra quarter cup of milk can prevent proper setting. Make sure you’re using full-fat cream cheese, not reduced-fat or whipped versions which have different moisture contents. The other culprit is not enough chill time. No-bake really needs those full six to eight hours to firm up completely. If it’s been twelve hours and still seems soft, pop it in the freezer for thirty minutes, then back to the fridge. Sometimes that initial freeze helps it set better.
What should I do if my cheesecake tastes too sweet?
The mix itself is pre-sweetened, so you can’t reduce that sugar. But you can balance the sweetness with toppings and additions. Add a layer of unsweetened whipped cream or sour cream on top. Use tart fresh fruit like raspberries or blackberries instead of sweet strawberries. A squeeze of lemon juice stirred into the mixture before setting cuts through sweetness nicely. Some people like adding a tiny pinch of salt to the filling, which doesn’t make it salty but somehow reduces the perception of sweetness. For future batches, pairing the sweet filling with less-sweet or savory crusts like pretzel crusts also helps balance everything out.
Equipment
- Mixing Bowl
- Electric Mixer
- Rubber Spatula
- 9-inch Pie Pan
- Measuring Cups
Ingredients
- 1 box Cheesecake Factory mix
- 16 oz cream cheese, softened
- 1/2 cup butter, softened
- 1/2 cup milk
- 1.5 cups crushed graham crackers or chocolate cookies (optional)
- 1/2 cup melted butter (optional)
Instructions
- Remove cream cheese from the fridge 20 minutes before starting to bring it to room temperature.
- In a mixing bowl, beat the softened cream cheese and butter together until fluffy and smooth (about 3 minutes).
- Gradually add the cheesecake mix powder to the cream cheese mixture, mixing between each addition to avoid powder clouds.
- Slowly pour in the milk while mixing on low speed until well combined and thickened (about 1-2 minutes).
- For the crust, mix crushed cookies with melted butter and press into the bottom of a 9-inch pie pan. Chill the crust for 15 minutes.
- Pour the cheesecake filling into the crust and smooth the top.
- Chill in the refrigerator for at least 4 hours (or overnight) for best results.
Notes
Nutrition

Hello! I’m Sarah Mitchell, and I’m passionate about bringing creativity and innovation to baking. My love for baking started in high school when I first tried my hand at decorating cupcakes for a class project. What began as a fun hobby quickly became a full-time passion. I’ve spent the past decade working in bakeries and dessert shops, honing my skills in everything from simple cookies to intricate wedding cakes.
After working in some of the top bakeries across the country, I realized that baking was about more than just following recipes — it was about infusing your personality into each creation. At BakingSecret.com, I love creating recipes that push boundaries while staying true to the heart of classic baking. I specialize in creating delicious and visually stunning pastries that will wow your guests.
When I’m not baking, I enjoy teaching baking classes, trying out new cake decoration techniques, and traveling to find inspiration in global dessert traditions. I’m so excited to share my tips and tricks with you to help elevate your baking game!