
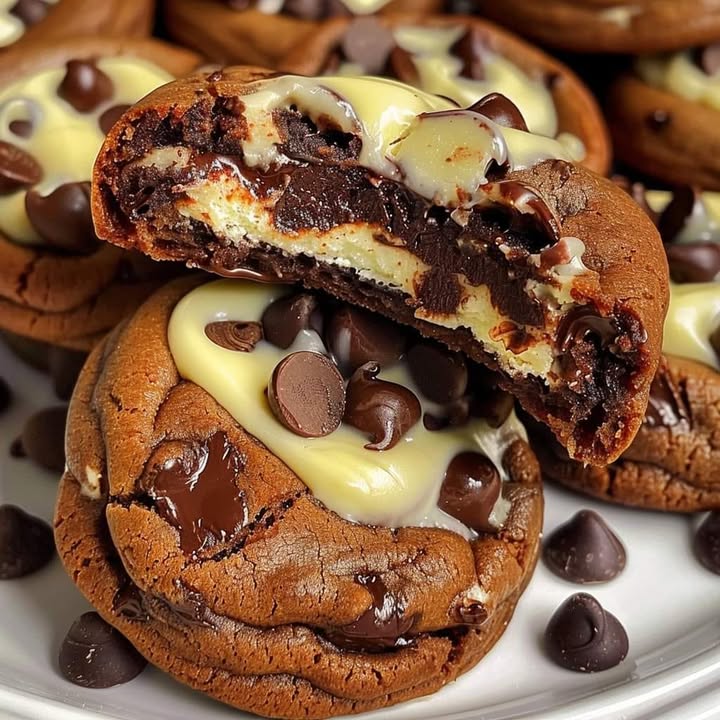
Two Desserts in One Bite: My Ultimate Cheesecake Stuffed Cookies
Let me tell you, the first time I made Cheesecake Stuffed Cookies, my kitchen smelled like pure, unadulterated joy. I had friends coming over, and I wanted something that felt like a giant, warm hug. You know that magical moment when you first pull a tray of regular chocolate chip cookies from the oven? Now, imagine that, but with a hidden pocket of creamy, dreamy cheesecake inside. That’s what these cookies are. They combine the best of two worlds: the comforting, buttery crunch of a great cookie and the cool, rich luxury of cheesecake. It’s a trick that never fails to wow a crowd!
From Bakery Trend to My Family’s Favorite
Stuffed cookies have been a fun bakery trend for a few years now. They take that classic chocolate chip cookie—the one we all learned to bake as kids—and give it an epic upgrade. While I love the simple traditions, part of the fun in baking is playing and creating something new. This recipe is my modern twist on that foundational cookie recipe. It pays homage to the classic but adds a surprise that feels utterly indulgent. My family now requests these for birthdays, game nights, and “just because” days. They’ve become our go-to celebration treat, because honestly, every bite feels like a celebration.
Why You’ll Fall in Love with These Cookies
You’re going to adore this recipe for three big reasons. First, the flavor contrast is simply magical. The warm, slightly salty cookie with its melted chocolate chips meets the cool, tangy cheesecake center. It’s a textural party! Second, they are impressive without being complicated. The steps are straightforward, and the “wow” factor is through the roof. Third, they are incredibly versatile. You can eat them warm and gooey, or chilled and firm. They’re perfect with a cold glass of milk, a cup of coffee, or even a scoop of vanilla ice cream. Trust me, they check every box.
The Perfect Moments for a Sweet Surprise
These cookies are special enough for any occasion. They absolutely shine at holiday cookie swaps—you’ll be the talk of the party. Bring them to a potluck or picnic for a dessert that’s easy to share. They’re also the ultimate after-school surprise for your kids (or let’s be real, for you after a long day). Having a movie night? Skip the boring popcorn and serve a plate of these instead. Any time you want to make an ordinary moment feel extraordinary, these cheesecake filled cookies are your secret weapon.
What You’ll Need For Your Cookie Dough & Filling
Gather these simple ingredients. Using room temperature items (butter, eggs, cream cheese) is the real key to success!
- 1 cup unsalted butter, softened: Brings richness and moisture for a tender, soft cookie texture.
- 1 cup packed brown sugar: Adds a deep, caramel-like sweetness and keeps the cookies moist.
- 1/2 cup granulated sugar: Balances the sweetness and gives a slight crisp to the cookie edges.
- 2 large eggs: Provide structure and moisture to hold the cookie dough together.
- 1 tablespoon vanilla extract: Enhances the flavor of both the cookie and the cheesecake filling.
- 2 1/2 cups all-purpose flour: The foundation of our dough, giving structure and softness.
- 1 teaspoon baking soda: Helps the cookies rise just right and keeps them from being too dense.
- 1/2 teaspoon salt: Balances the sweetness and makes all the other flavors pop.
- 1 1/2 cups chocolate chips: For that classic chocolate chip taste, plus a little extra for the topping.
- 8 oz cream cheese, softened: The star of the cheesecake filling! It gives a creamy, tangy flavor.
- 1/4 cup powdered sugar: Sweetens the cheesecake filling without making it too heavy.
Handy Substitutions for Your Pantry
Out of something? No worries! Here are some easy swaps:
- Butter: Salted butter works fine; just omit the extra 1/2 teaspoon of salt in the dough.
- Sugar: You can use all brown sugar for a chewier, more caramel-flavored cookie.
- Chocolate Chips: Use chunks, dark chocolate, or even white chocolate chips for a different twist.
- Cream Cheese: Use full-fat for the best texture. Low-fat will work but may be slightly less creamy.
How to Make Cheesecake Stuffed Cookies: A Step-by-Step Guide
Step 1: Make the Cheesecake Filling
This first step is all about prep work that pays off later! In a medium bowl, beat together the softened cream cheese and powdered sugar. You want it super smooth and creamy, with no lumps. Then, get a baking sheet lined with parchment paper. Drop little spoonfuls of this filling—about 1 to 2 teaspoons each—onto the sheet. Pop the whole tray into the freezer for at least 30 minutes. Freezing these little cheesecake dollops is the secret trick! It makes them firm enough to handle and wrap in cookie dough without melting into a mess.
Step 2: Prepare the Cookie Dough
Now for the fun part: the cookie dough base. In a large bowl, beat together the softened butter, brown sugar, and granulated sugar. Beat it for a good 2-3 minutes until it becomes light, fluffy, and pale in color. This step incorporates air, which helps with texture. Next, add the eggs one at a time, beating well after each addition. Finally, mix in the vanilla extract. The aroma at this point is already heavenly—buttery and sweet with that warm vanilla scent.
Pro tip: Don’t rush the creaming of the butter and sugars. That lightness is key for a perfect cookie texture.
Step 3: Mix the Dry Ingredients
In a separate, smaller bowl, whisk together the all-purpose flour, baking soda, and salt. This ensures the leavener and salt are evenly distributed. Gradually add this dry mixture to your wet butter and sugar mixture. Mix on low speed, just until the flour disappears. You don’t want to over-mix! Then, grab a spatula and gently fold in those glorious chocolate chips. The dough will be thick, rich, and speckled with chocolate—ready to become the cozy blanket for our cheesecake filling.
Step 4: Assemble Your Stuffed Masterpieces
This is where the magic happens! Preheat your oven to 350°F (175°C). Grab about 2 tablespoons of cookie dough and flatten it slightly in your palm. Take one of the now-frozen cheesecake bits from the freezer and place it right in the center. Top with another flattened spoonful of dough. Now, carefully seal the edges, rolling and pinching the dough until the cheesecake filling is completely enclosed. Roll it into a neat ball. It will look like a regular cookie dough ball, but you and I know the delicious secret hiding inside.
Step 5: Bake to Golden Perfection
Place your cookie dough balls on a parchment-lined baking sheet, leaving about 2 inches between them for spreading. Bake for 12 to 15 minutes. You’ll know they’re done when the edges are a beautiful golden brown, but the centers still look just slightly soft. They will continue to cook a bit on the hot baking sheet. This method guarantees a soft, chewy center. The chocolate chips will be glossy and melty, and your kitchen will smell absolutely divine.
Step 6: The (Hardest) Final Step: Cooling
I know, I know—waiting is the hardest part! Let the cookies cool on the baking sheet for at least 5-10 minutes. This allows them to set so they don’t fall apart when you move them. Then, transfer them to a wire rack to cool completely. The cheesecake filling needs this time to firm back up. For the ultimate experience, try one still slightly warm. The cookie is crisp on the edges, soft in the middle, and the cheesecake is a creamy, dreamy river running through it. Pure bliss!
Chef’s secret: For a picture-perfect cookie, press a few extra chocolate chips onto the tops of the dough balls right before baking. It makes them look beautifully loaded!
Your Cookie Baking Timeline
| Prep Time (Dough & Filling): | 25 minutes |
| Freezer Time (Filling): | 30 minutes |
| Assembly Time: | 15 minutes |
| Baking Time (per batch): | 15 minutes |
| Cooling Time: | 15 minutes |
| Total Time: | About 1 hour 40 minutes |
Common Mistakes to Avoid
Skipping the Freezer Step for the Filling
This is the biggest mistake and can lead to a kitchen meltdown—literally! If your cream cheese filling isn’t frozen solid, it becomes impossible to wrap in dough. It will ooze out everywhere and bake into a puddle instead of a neat pocket. Set a timer for that full 30 minutes. If you’re in a rush, you can pop the dollops in the freezer for 45-60 minutes while you make the dough. A firm filling is non-negotiable for perfect Cheesecake Stuffed Cookies.
Using Cold Butter or Cream Cheese
Room temperature ingredients are not just a suggestion; they are the law for creamed cookies and smooth fillings. Cold butter won’t cream properly with the sugar, leading to dense, flat cookies. Cold cream cheese will stay lumpy no matter how long you beat it. Let your butter and cream cheese sit on the counter for about an hour before you start. They should be soft to the touch but not oily or melted. This simple step ensures a fluffy dough and a silky filling.
Over-Baking the Cookies
Remember, you are baking a stuffed cookie! The center has a dense, cold filling that needs heat to set, but the surrounding cookie dough can over-brown quickly. Take them out when the edges are set and golden, but the tops still look a little underdone in the middle. They will finish setting as they cool on the hot pan. Over-baked stuffed cookies become dry and lose that amazing contrast between the soft cookie and creamy center. When in doubt, err on the side of slightly underdone.
Over-Mixing the Dough After Adding Flour
Once you add the flour, you need to switch to a gentle hand. Over-mixing develops the gluten in the flour, which can make your cookies tough and chewy in a bad way, instead of tender and soft. Mix the dry ingredients in just until you no longer see any streaks of white flour. Then stop! It’s okay if there’s a tiny bit of flour visible; it will get incorporated when you fold in the chocolate chips. Treat the dough with kindness for the best texture.
Extra Info: The Science of Soft Cookies
Ever wonder why these cookies stay so wonderfully soft? Thank the brown sugar and the cornstarch-like effect of the cheesecake filling! Brown sugar contains molasses, which is hygroscopic—meaning it attracts and retains moisture from the air. This keeps baked goods soft for days. The creamy filling also acts as a barrier, keeping the interior of the cookie wonderfully moist. So not only are these cookies delicious, they’re a little lesson in baking science, too!
Grab These Tools Before You Start
- Stand mixer or hand mixer
- Large and medium mixing bowls
- Whisk and spatula
- Parchment paper
- Baking sheets
- Measuring cups and spoons
- #30 cookie scoop (about 2 tablespoons) – optional but so helpful!
- Wire cooling rack
How to Keep Your Cookies Fresh & Delicious
Because of the cream cheese filling, these cookies need to be stored in the refrigerator. Let them cool completely first. Then, place them in an airtight container with layers separated by parchment paper. They will keep beautifully in the fridge for up to 5 days.
If you want to bake them later, you can freeze the assembled cookie dough balls! After you’ve stuffed and sealed them, place them on a tray and freeze until solid. Then transfer to a freezer bag. You can bake them straight from frozen; just add 1-2 minutes to the baking time. This is a fantastic trick for having fresh-baked cookies anytime!
Proper storage is key for quality and safety, especially for dairy-based treats. Always follow guidelines for safe leftovers to enjoy your creations without worry.
My Best Tips for Cookie Success
- Chill the Dough: If your dough feels too soft after assembling a few cookies, pop the whole bowl in the fridge for 15 minutes. This firms up the butter and makes handling much easier.
- Use a Scoop: A cookie scoop ensures all your cookies are the same size. This means they bake evenly and look professional.
- Don’t Crowd the Pan: These cookies spread! Give them plenty of room so they bake evenly and don’t merge into one giant cookie (tasty, but messy).
- Salt on Top: For a next-level flavor pop, sprinkle a tiny pinch of flaky sea salt on top of each cookie dough ball right before baking.
Making Your Cookies Look as Good as They Taste
Presentation is part of the fun! Serve these warm on a beautiful platter with a dusting of powdered sugar. For a party, place each cookie in a colorful cupcake liner. You could even offer a little bowl of warm chocolate sauce or caramel sauce for dipping. If you’re gifting them, a clear cookie bag tied with a ribbon makes them look like they came from a fancy bakery.
More Baking Adventures to Try
If you loved this mashup of cookie and cheesecake, our baking site has so many more creative ideas waiting for you. For another show-stopping cheesecake, you must try our stunning Strawberry Kiwi Dream Cheesecake with its fruity, refreshing flavor. Chocolate lovers will swoon for the decadent layers in our Caramel Brownie Cheesecake. If you need something savory, these quick and delicious Baked Ham and Cheese Croissants are perfect. And for a bright, fruity breakfast treat, our Lemon Raspberry Coffee Cake is always a hit.
Inspired to bake more sweet treats? Explore our entire collection of recipes in the cookies and biscuits category for your next baking project.
Healthier & Fun Variations
Want to mix it up? Here are six delicious twists on the classic Cheesecake Stuffed Cookie:
- Funfetti Cheesecake Cookies: Swap the chocolate chips for rainbow sprinkles in the dough and add a teaspoon of almond extract to the filling. Perfect for birthdays!
- Peanut Butter Cup Stuffed: Use a peanut butter cookie dough base and place a miniature peanut butter cup inside instead of the cheesecake dollop.
- Gluten-Free Version: Use a 1:1 gluten-free all-purpose flour blend in place of regular flour. Ensure all other ingredients are certified gluten-free.
- Lemon Poppy Seed: Add 2 tablespoons of lemon zest and 1 tablespoon of poppy seeds to the cookie dough. Mix a teaspoon of lemon zest into the cheesecake filling.
- Double Chocolate: Replace 1/2 cup of flour with unsweetened cocoa powder in the dough. Use dark chocolate chips for an intensely chocolatey experience.
- Cookie Dough Stuffed: For an egg-free filling, mix the cheesecake filling with a tablespoon of flour and use pasteurized egg product or omit the egg to create an edible, safe cookie dough center.
Frequently Asked Questions (FAQ)
Can I make the cheesecake filling ahead of time?
Absolutely! You can make the cheesecake filling dollops and freeze them on the tray. Once they are solid, transfer them to a freezer bag or container. They can be frozen for up to a month. This is a huge time-saver when you want fresh cookies on demand. Just pull out as many frozen filling bits as you need, and proceed with the cookie dough recipe. No need to thaw them first.
Why did my cheesecake filling leak out while baking?
This usually happens for one of two reasons. First, the filling might not have been frozen long enough. It needs to be completely solid to withstand the heat of the oven at first. Second, the cookie dough might not have been sealed completely. Make sure you pinch and roll the dough ball well, ensuring there are no thin spots or holes where the filling can escape. Taking a little extra time on both these steps will solve the leak problem.
You can, but the results won’t be quite as good. Store-bought dough is often formulated to spread a specific way and may be softer or sweeter than homemade. It might be trickier to seal around the filling. If you do use it, I recommend chilling the stuffed dough balls for at least an hour before baking to help them hold their shape. For the best flavor and texture, the homemade dough is worth it!
Don’t wait for them to look fully “set” in the middle. The key is to look at the edges. When the edges are golden brown and look firm, but the centers still look soft and slightly puffy, they are done. They will continue to cook from residual heat on the hot baking sheet. Removing them at this stage guarantees a soft, chewy center with a perfectly cooked cheesecake pocket inside.
Yes, you can! Once the baked cookies are completely cooled, place them in a single layer on a tray to freeze until solid. Then, transfer them to an airtight freezer bag or container, separating layers with parchment paper. They will keep for up to 2 months. Thaw them in the refrigerator or at room temperature. You can also warm them up for a few seconds in the microwave for that fresh-baked feel.
Flat cookies are often caused by butter that is too warm or melted. Make sure your butter is softened but still cool to the touch. Another culprit could be an old or under-measured baking soda. Also, check that you measured your flour correctly—don’t scoop the cup directly into the flour bag. Instead, spoon the flour into the measuring cup and level it off. Finally, make sure your baking sheet is cool before placing the next batch of dough on it.
Can I add nuts or other mix-ins to the dough?
Of course! Feel free to customize. Replace 1/2 cup of the chocolate chips with chopped walnuts, pecans, or even toffee bits. Just keep the total volume of mix-ins about the same so the dough can still hold together well around the cheesecake center. Dried cranberries or cherries could also be a fantastic, tangy addition.
Is it safe to eat the cheesecake filling since it’s not fully baked?
The filling does bake inside the cookie, but it may not reach the same internal temperature as a standalone baked cheesecake. Using pasteurized eggs in the cookie dough and a commercially produced, pasteurized cream cheese minimizes any risk. If you are concerned, you can ensure the cookie is fully baked until an instant-read thermometer inserted into the cookie part (near the filling) reads at least 160°F (71°C).
You can adjust the size! For smaller, bite-sized cookies, use about 1 tablespoon of dough per side and a smaller dollop of filling. Reduce baking time by 2-3 minutes. For giant bakery-style cookies, use 1/4 cup of dough per side. You’ll need to increase baking time by 4-5 minutes. Just remember to adjust the amount of cheesecake filling proportionally and maintain adequate spacing on the baking sheet.
The best method is a quick 10-15 second zap in the microwave. This gently warms the cookie and makes the cheesecake center soft and creamy again, almost like it was just baked. You can also warm them in a 300°F (150°C) oven for 5-7 minutes. Avoid using a toaster oven, as it can make the edges too hard or burn the chocolate chips.
Ready, Set, Bake!
There you have it! My absolute favorite recipe for cookies that are anything but ordinary. They might look like a simple chocolate chip cookie from the outside, but that first bite reveals the most wonderful, creamy secret. Baking is about sharing love and creating memories, and these Cheesecake Stuffed Cookies are guaranteed to do just that. So preheat that oven, soften that butter, and get ready for the happiest little “oohs” and “aahs” you’ve ever heard. Now go create something delicious!
Equipment
- Grand bol
- Fouet
- Spatule
- Plaque à pâtisserie
- Papier sulfurisé
Ingredients
- 1 tasse beurre non salé, ramolli
- 1 tasse sucre brun tassé
- 1/2 tasse sucre granulé
- 2 grands œufs
- 1 cuillère à soupe extrait de vanille
- 2 1/2 tasses farine tout usage
- 1 cuillère à café bicarbonate de soude
- 1/2 cuillère à café sel
- 1 1/2 tasses pépites de chocolat
- 8 oz fromage à la crème, ramolli
- 1/4 tasse sucre glace pour saupoudrer
Instructions
- Dans un bol moyen, battez ensemble le fromage à la crème et le sucre glace jusqu'à consistance lisse et crémeuse.
- Déposez des cuillerées du mélange de fromage à la crème sur une plaque à pâtisserie et congelez pendant au moins 30 minutes.
- Dans un grand bol, battez le beurre ramolli, le sucre brun et le sucre granulé pendant 2 à 3 minutes jusqu'à ce que le mélange soit léger et crémeux.
- Ajoutez les œufs un à un, en mélangeant bien après chaque ajout, puis incorporez l'extrait de vanille.
- Dans un bol séparé, tamisez ensemble la farine, le bicarbonate de soude et le sel.
- Incorporez progressivement le mélange sec au mélange humide, en remuant à faible vitesse jusqu'à ce qu'il soit juste combiné.
- Incorporez délicatement les pépites de chocolat.
- Préchauffez le four à 175°C.
- Prenez environ 2 cuillères à soupe de pâte à biscuit, aplatissez-la et placez une garniture de cheesecake congelée au centre.
- Recouvrez d'une autre cuillère de pâte aplatie, scellez les bords et roulez en boule.
- Disposez les boules de pâte à biscuit sur une plaque à pâtisserie tapissée de papier sulfurisé et faites cuire pendant 12 à 15 minutes jusqu'à ce que les bords soient dorés.
- Laissez refroidir les biscuits sur la plaque pendant 5 à 10 minutes, puis transférez-les sur une grille pour qu'ils refroidissent complètement.