
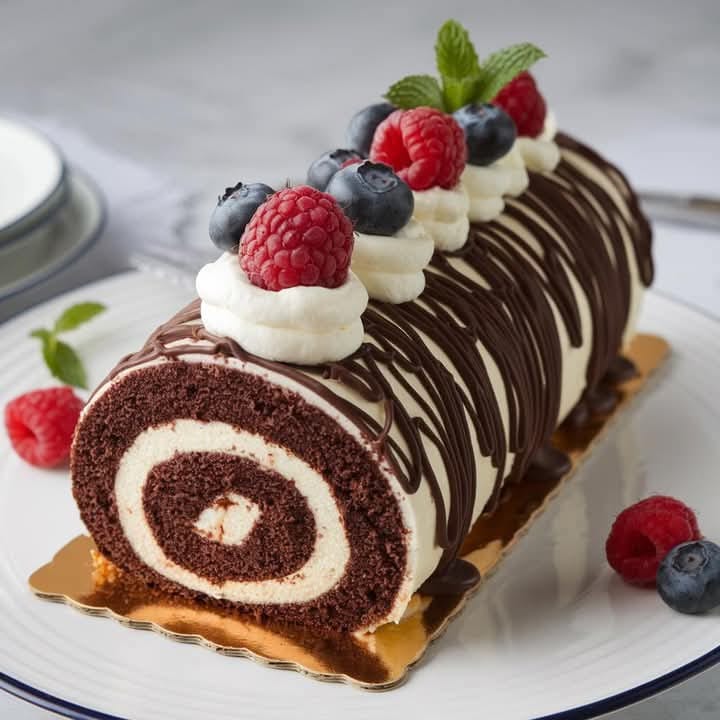
Black Forest Roll Cake: A Sumptuous Chocolate & Cherry Rendezvous
Is there anything more beautiful than a perfect slice of chocolate cake? I remember trying to make my first roll cake for a family picnic. It ended up looking more like a chocolate landslide than an elegant dessert! But after many (many!) practice runs, this Black Forest Roll Cake became my go-to masterpiece. It’s that magical dessert combining a rich chocolate sponge, clouds of sweet cream, and the bright pop of cherry. It looks like it took all day but comes together with surprisingly simple steps. Let me show you how to create this chocolate and cherry delight.
From a German Classic to Your Kitchen Table
The famous Black Forest gâteau, or Schwarzwälder Kirschtorte, hails from Germany’s Black Forest region. Traditionally, it’s a layered chocolate cake with cherries, whipped cream, and a splash of kirschwasser (cherry brandy). My roll cake version takes those beloved flavors and wraps them into a stunning spiral. It’s a modern twist on a timeless classic. It keeps all the indulgent charm but is often simpler to assemble than a layer cake. Whether for a festive holiday or just a Tuesday treat, it feels wonderfully special.
Why You’ll Fall in Love with This Cherry Chocolate Roll
You’ll adore this recipe for three big reasons. First, the flavor combination is unbeatable. Dark, moist chocolate, sweet cherries, and light cream are a match made in heaven. Second, it’s a showstopper. The swirled interior looks incredible on any dessert table. Finally, it’s genuinely fun to make. Rolling the warm cake is a satisfying little kitchen magic trick. It’s a recipe that builds confidence and rewards you with endless compliments.
Perfect Occasions for Your Chocolate Cherry Roll
This cake is incredibly versatile. It’s elegant enough for a holiday centerpiece at Christmas or Thanksgiving. It’s casual enough for a summer potluck or birthday party. I love making it for afternoon tea with friends—it slices beautifully with a cup of coffee. It’s also a fantastic “just because” bake. Sometimes, we all need a slice of chocolate cherry bliss on a regular Wednesday.
Gathering Your Ingredients for Black Forest Roll Cake
Let’s check the pantry! You likely have most of this on hand. For the best results, make sure your eggs are at room temperature. This helps the cake achieve maximum volume and a light texture.
For the Chocolate Sponge Cake:
- 4 large eggs, at room temperature
- 1/2 cup granulated sugar
- 1/2 cup all-purpose flour
- 1/4 cup unsweetened cocoa powder
- 1 teaspoon baking powder
- 1/4 teaspoon salt
- Powdered sugar, for dusting
For the Cherry Cream Filling & Garnish:
- 1 cup heavy whipping cream, cold
- 2 tablespoons powdered sugar
- 1 teaspoon pure vanilla extract
- 1 can (21 oz) cherry pie filling
- Chocolate shavings or curls, for decoration
Handy Ingredient Substitutions
Don’t worry if you’re missing something. Here are easy swaps:
- Cherry Pie Filling: Use a homemade cherry compote or pitted, lightly sweetened fresh cherries. For a boozy note, add a teaspoon of kirsch to the canned filling.
- Cocoa Powder: Dutch-processed or natural cocoa both work well here.
- Heavy Cream: For a stabilized cream that holds up longer, add 1-2 tablespoons of instant pudding mix while whipping.
- Flour: For a gluten-free version, use a reliable 1:1 gluten-free all-purpose flour blend.
Your Step-by-Step Guide to the Perfect Roll
Step 1: Preheat and Prepare Your Pan
Start by heating your oven to 350°F (175°C). This ensures it’s perfectly hot when your batter is ready. Take a 10×15-inch jelly roll pan and line it with parchment paper. Let the paper overhang slightly on the short sides. This creates “handles” that make removing the baked cake an absolute breeze. A quick spritz of cooking spray under the parchment helps it stick to the pan.
Step 2: Create the Light and Airy Cake Batter
In a large bowl, beat the eggs and granulated sugar together with an electric mixer. Keep going for a full 5 minutes. You’ll know it’s ready when the mixture is thick, pale yellow, and has tripled in volume. It should leave a visible “ribbon” trail when you lift the beaters. In another bowl, gently sift together the flour, cocoa powder, baking powder, and salt. This aerates the dry ingredients and prevents lumps. Now, carefully fold the dry mix into the egg mixture. Use a gentle hand and a spatula, folding just until no white streaks remain. Overmixing is the enemy of a light sponge!
Step 3: Bake and Roll the Warm Chocolate Sponge
Pour the beautiful, velvety batter into your prepared pan. Use an offset spatula to spread it into a perfectly even layer, reaching all the corners. Slide the pan into the oven and bake for 12-15 minutes. The cake is done when the top springs back lightly at your touch. While it bakes, lay a clean, thin kitchen towel on the counter. Dust it generously with powdered sugar. As soon as the cake comes out, invert it directly onto the sugared towel. Peel off the parchment paper slowly. Immediately, starting from a short end, use the towel to roll the cake up. Let this rolled bundle cool completely on a wire rack. This crucial step “trains” the cake to roll without cracking later.
Step 4: Whip Up the Dreamy Cherry Cream Filling
While the cake cools, make the filling. Pour the cold heavy cream into a chilled bowl. Add the powdered sugar and vanilla. Using a whisk or mixer, whip the cream until it forms beautiful, firm peaks. Be careful not to over-whip, or it can become grainy. The aroma of sweet vanilla cream filling your kitchen is pure joy. Pro tip: Chill your bowl and beaters in the freezer for 10 minutes beforehand for faster, higher-volume whipped cream.
Step 5: The Grand Assembly of Your Chocolate Cherry Roll
Time for the fun part! Carefully unroll the completely cooled cake. It will lie flat with a gentle curl. Spread the whipped cream in an even layer, leaving a small border around all edges. Spoon the glossy, ruby-red cherry pie filling over the cream. Gently, using the towel to guide you, re-roll the cake forward, tucking it in snugly as you go. Don’t roll the towel into the cake this time. Finish with the seam side down. Transfer your beautiful roll to a serving platter.
Step 6: Garnish, Chill, and Imagine the Compliments
For the final flourish, sprinkle the top with delicate chocolate shavings. You can make these by running a vegetable peeler along the edge of a chocolate bar. Now, patience! Refrigerate the cake for at least one hour. This allows the cream to set and makes slicing clean, beautiful spirals much easier. The wait is tough, but so worth it. Chef’s tip: For an extra glossy finish, drizzle a simple chocolate ganache over the top before adding the shavings. It looks divine.
Your Black Forest Roll Cake Timetable
| Activity | Time |
|---|---|
| Preparation & Baking | ~30 minutes |
| Cooling Time | ~1 hour |
| Chilling Time | 1 hour (minimum) |
| Total Time | About 2.5 hours |
| Servings | 8-10 perfect slices |
The Chef’s Secret for a Crack-Free Roll
The number one secret is rolling the cake while it is still warm. The heat makes the sponge flexible. Rolling it immediately with the towel sets that flexible “memory” into the cake’s structure. When you unroll it later to add filling, it will easily curl back up without splitting. It’s a simple trick that makes all the difference between a good cake and a great one.
An Extra Slice of Information
Did you know the “Black Forest” in the name refers to more than just the region’s dark, wooded hills? The traditional costume for women there includes a hat with big, red pom-poms that look like cherries! Some say the cake’s decoration of cream and red cherries was inspired by this folk costume. Whether true or not, it’s a delicious story to share when you serve your masterpiece.
Necessary Kitchen Equipment
- 10×15-inch Jelly Roll Pan
- Parchment Paper
- Electric Hand Mixer or Stand Mixer
- Two Large Mixing Bowls
- Fine Mesh Sieve (for sifting)
- Rubber Spatula
- Clean Kitchen Towel
- Wire Cooling Rack
Storing Your Chocolate and Cherry Delight
Because this cake is filled with fresh whipped cream, it must be stored in the refrigerator. Cover it loosely with plastic wrap or place it in a large cake carrier. The chilled environment keeps the cream firm and fresh.
For the best texture and flavor, enjoy your Black Forest Roll Cake within 2 days. The sponge may start to dry out a bit after that, though it will still taste delicious. If you need to keep it longer, you can freeze it.
To freeze, wrap the whole roll (or individual slices) tightly in plastic wrap, then in aluminum foil. It will keep for up to a month. Thaw overnight in the refrigerator before serving.
Tips and Advice for Baking Success
- Room Temp Eggs: This is non-negotiable for maximum volume. Take eggs out an hour before baking.
- Measure Flour Correctly: Spoon flour into your measuring cup and level it off. Scooping packs it down and can lead to a dry cake.
- Don’t Rush the Cooling: Make sure the cake is completely cool before adding the filling. Warm cake will melt the whipped cream.
- Use a Sharp Knife: For clean slices, use a long, sharp knife. Wipe it clean with a damp cloth between cuts.
Presentation Ideas to Wow Your Guests
- Dust the plated slice with a snowy shower of powdered sugar.
- Add a dollop of extra whipped cream and a single perfect cherry on the side.
- Serve with a side of warm chocolate sauce for dipping.
- Garnish the platter with fresh mint leaves for a pop of green color.
- For a party, cut the cake into smaller “pinwheel” bites for easy finger food.
6 Delicious Healthier & Creative Variations
Love the idea but want to mix it up? Here are six fantastic spins on the classic Cherry Chocolate Roll.
- Berry Blast Roll: Swap the cherry filling for mixed berries (raspberries, blueberries, blackberries). The tartness pairs wonderfully with chocolate.
- Decadent Chocolate Mocha Roll: Add 1 tablespoon of instant espresso powder to the dry ingredients. Fill with a coffee-infused whipped cream.
- Cheesecake Swirl Roll: Fold 4 oz of softened cream cheese into half of the whipped cream filling. You’ll get lovely tangy ribbons.
- Nutty Delight Roll: Sprinkle finely chopped toasted hazelnuts or almonds over the whipped cream before rolling for a delightful crunch.
- Lighter Angel Food Roll: Use a fat-free angel food cake base and fill with light Cool Whip and sugar-free cherry pie filling.
- Peanut Butter Chocolate Roll: Swirl 1/2 cup of creamy peanut butter into the whipped cream. It’s a match made in heaven with the chocolate cake, much like the indulgent layers in our No-Bake Peanut Butter Cheesecake.
Common Mistakes to Avoid
Mistake 1: Overbaking the Sponge
This is the top culprit for a cracked roll cake. An overbaked sponge becomes dry and brittle, losing the flexibility needed to roll. It’s tempting to leave it in “just to be safe,” but set a timer and trust it. The cake is done when the top looks set and springs back when you lightly press it. A toothpick inserted will have a few moist crumbs, not be completely clean. Pull it out promptly!
Mistake 2: Adding Filling to a Warm Cake
Impatience can lead to a melted, soupy mess. After you’ve rolled the cake with the towel to train it, it must cool completely before you unroll and add the cream. If the cake is even slightly warm, it will melt the whipped cream on contact. This makes the roll soggy and difficult to handle. Let it sit on the rack until it’s truly room temperature—no warmth when you touch it.
Mistake 3: Under-whipping the Cream
Soft, runny cream won’t hold the shape of the roll. When you slice it, the filling will squish out. Whip the cream until it forms firm, distinct peaks that hold their shape when you lift the beater. Using a chilled bowl and cream straight from the fridge is key. If your kitchen is very warm, place the bowl of whipped cream in the fridge for 10 minutes before assembling to firm it up further.
Mistake 4: Spreading Filling to the Very Edge
It seems logical to cover the whole cake, but this causes the filling to ooze out the ends when you roll. Always leave a small border—about half an inch—around all edges. As you roll, the filling will push toward the ends slightly. Having that buffer zone ensures it stays neatly contained inside your beautiful spiral.
Frequently Asked Questions
Can I make this Black Forest Roll Cake a day ahead?
Absolutely! This cake is an excellent make-ahead dessert. Simply prepare, assemble, and garnish as directed. Then, cover it loosely and refrigerate overnight. The flavors actually meld together beautifully. The key is to ensure it’s well covered to prevent the cake from absorbing any fridge odors. I often make it the night before a party to save time and stress on the day itself.
My cake cracked when I rolled it. What did I do wrong?
Don’t worry, it happens! The most common reasons are overbaking the sponge (making it dry) or not rolling it while it was warm. If you get a small crack, don’t panic. The powdered sugar on the towel helps hide minor flaws. Once it’s filled, rolled, and garnished with chocolate shavings, no one will ever know. Consider it a homemade badge of honor.
What can I use instead of canned cherry pie filling?
You have great options. You can make a quick compote by simmering fresh or frozen pitted cherries with a little sugar and cornstarch until thickened. Another easy swap is to use well-drained jarred Morello cherries. If using fresh, chop them slightly and let them macerate with a touch of sugar to draw out their juices. Each option gives a slightly different, delicious twist.
How do I get the chocolate shavings for the top?
It’s very easy. Take a block of semi-sweet or dark chocolate that’s slightly warm (hold it in your hand for a minute). Then, use a vegetable peeler and run it down the side of the chocolate block. The warmth helps create beautiful, curly shavings. For smaller shavings, you can use a microplane grater. Do this over a plate and keep them cool until you’re ready to decorate.
Can I freeze the assembled roll cake?
Yes, you can. Wrap the completely assembled and chilled cake very tightly in plastic wrap, then in aluminum foil. Freeze for up to one month. To serve, thaw it overnight, still wrapped, in the refrigerator. This helps prevent condensation from making the cake soggy. The texture will be slightly different but still very tasty.
What’s the best way to slice the cake cleanly?
Use a long, thin, sharp knife—a serrated bread knife works wonders. Run the knife under very hot water, then wipe it completely dry with a towel. The slight warmth helps slice through the cream and cake smoothly. Make a single, confident cut without sawing. Wipe the knife clean and reheat it between each slice for picture-perfect results every time.
Is there a non-alcoholic version of the traditional Black Forest flavor?
Yes, and this recipe is it! The traditional cake uses kirschwasser (cherry brandy). My version focuses on the pure flavors of chocolate and cherry without any alcohol. The vanilla in the whipped cream adds a lovely depth. To mimic a hint of the traditional almond note, you could add 1/4 teaspoon of almond extract to the whipped cream. It’s completely family-friendly.
Why is my whipped cream turning out grainy or buttery?
This means you’ve over-whipped it. Once heavy cream passes stiff peaks, the fat solids begin to separate, creating butter and buttermilk. To avoid this, start mixing at medium speed and watch closely as it thickens. Stop as soon as the beaters leave firm peaks that tip over just slightly at the top. If it does break, you can sometimes save it by gently whisking in another tablespoon or two of cold liquid cream.
Can I use a different size pan?
The 10×15-inch jelly roll pan is ideal for getting the right thickness. A larger pan will make the sponge too thin and fragile. A smaller pan will make it too thick, making it difficult to roll and increasing the baking time. If you must use a slightly different size, adjust the baking time and watch the cake closely for the spring-back test.
This looks similar to a Yule Log. Is it the same thing?
They are close cousins! A Yule Log (or Bûche de Noël) is traditionally a roll cake decorated to look like a wooden log, often with bark texture and meringue mushrooms. This Black Forest Roll Cake is defined by its specific flavor profile of chocolate, cherries, and cream. You could certainly decorate this cake as a Yule Log for the holidays by adding textured buttercream bark. For more chocolate cake inspiration, check out our recipe for a deeply satisfying Fudgy Chocolate Heaven Cake.
For more decadent dessert ideas that pair fruit and chocolate, explore our celebration-worthy White Chocolate Cranberry Bundt Cake, or if you’re a fan of the roll cake format, our Black Forest Chocolate Swiss Roll recipe offers another delightful take. You can find all of these and more wonderful creations in our main collection of cake and cupcake recipes for every skill level and occasion.
Creating a beautiful dessert doesn’t require professional training, just a bit of love and these simple steps. This Black Forest Roll Cake is proof of that. The rich chocolate, sweet cherries, and fluffy cream come together in a dessert that’s as fun to make as it is to eat. It’s the kind of recipe that makes people think you spent all day in the kitchen, but we’ll keep our little secret. It’s surprisingly simple. Remember, the key is rolling it warm and filling it cool. Whether for a special event or a simple family treat, this Cherry Chocolate Roll is sure to become a requested favorite. Don’t forget, the ingredients you choose contribute to the final dish. For detailed nutritional profiles of foods like the eggs and cream used here, you can always reference the USDA’s trusted FoodData Central database for dietary protein and nutrient information. Now, go preheat that oven and get ready for the compliments to roll in!
Equipment
- Grand bol
- Fouet
- Spatule
- Plaque à pâtisserie
- Papier sulfurisé
Ingredients
- 4 œufs
- 100 g sucre
- 30 g cacao en poudre
- 50 g farine tout usage
- 5 g poudre à lever
- 1 g sel
- 240 ml crème épaisse
- 600 g compote de cerises
- q.s. sucre glace pour saupoudrer
- q.s. paillettes de chocolat pour le décor
Instructions
- Préchauffez votre four à 175°C. Graissez une plaque à pâtisserie de 15x10 pouces et tapissez-la de papier sulfurisé.
- Dans un grand bol, battez les œufs et le sucre jusqu'à ce que le mélange soit épais et pâle. Tamisez le cacao en poudre, la farine, la poudre à lever et le sel. Incorporez délicatement jusqu'à obtenir une pâte lisse.
- Versez la pâte dans le moule préparé et étalez-la uniformément. Faites cuire au four pendant 12-15 minutes ou jusqu'à ce que le gâteau rebondisse au toucher.
- Une fois le gâteau cuit, retournez-le sur un torchon saupoudré de sucre glace. Retirez soigneusement le papier sulfurisé et roulez-le avec le torchon à l'intérieur. Laissez-le refroidir complètement.
- Déroulez le gâteau et étalez la crème fouettée uniformément, puis ajoutez la compote de cerises au-dessus.
- Roulez de nouveau le gâteau, le côté de la couture vers le bas, et transférez-le sur un plat de service.
- Saupoudrez le dessus du rouleau de sucre glace et décorez de paillettes de chocolat. Réfrigérez pendant au moins 1 heure avant de servir.
Notes
Nutrition

Hi, I’m Olivia Parker, the founder of BakingSecret.com and a lifelong lover of all things sweet and homemade. I grew up in a small town in Oregon, where the smell of fresh cookies in my family’s kitchen sparked my passion for baking. Over the years, I turned that passion into a mission: to help home bakers feel confident, inspired, and creative.
After studying food science and working in several artisan bakeries across the U.S., I decided to create a space where everyone from beginners to seasoned bakers can find reliable recipes, expert tips, and a warm, welcoming community. BakingSecret.com is my way of sharing the magic of baking with the world. When I’m not testing new recipes, you’ll find me exploring farmers’ markets, collecting vintage cookbooks, or perfecting my sourdough technique.