
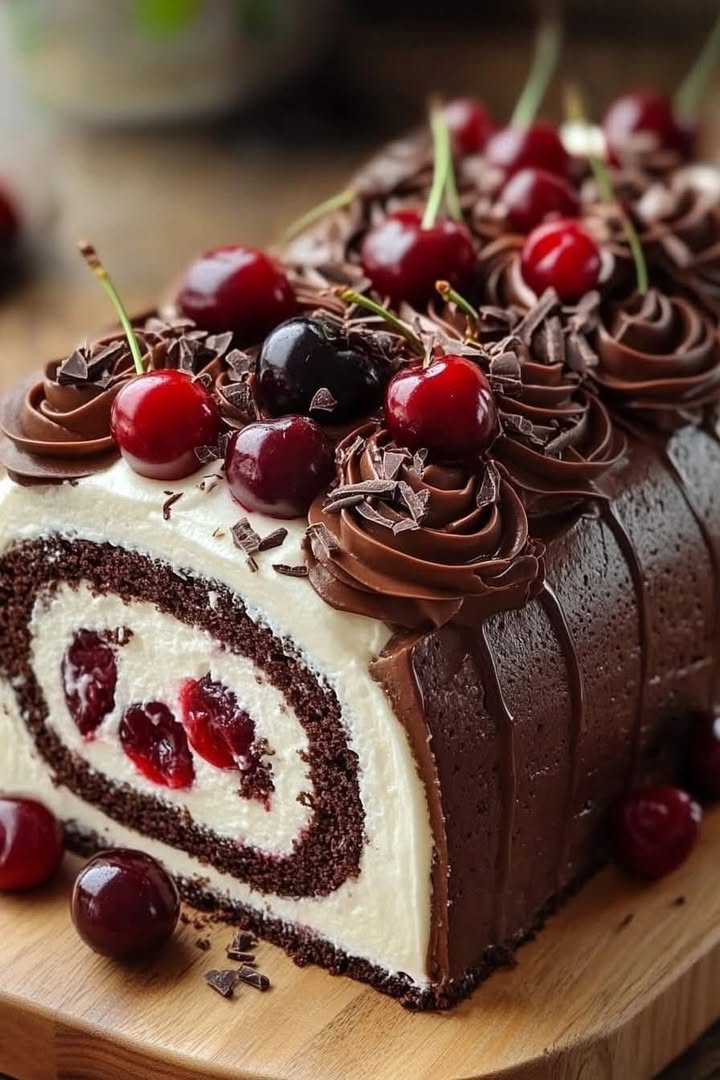
Have you ever had one of those moments where you look at a dessert and think, “That’s way too fancy for me to make”? I used to feel exactly that way about Swiss rolls. Visions of cracked cakes and runaway filling haunted me. But let me tell you, this Black Forest Roll Cake changed everything. The first time I made it for a family dinner, the “oohs” and “ahhs” made every second worth it. It’s not just a cake; it’s a chocolate and cherry delight that feels like a celebration on a plate.
A Slice of History: From German Forests to Your Kitchen
The Black Forest, or Schwarzwälder Kirschtorte, is a legend from the Black Forest region of Germany. The classic version is a multi-layered chocolate cake soaked in Kirsch (cherry brandy), packed with cherries, and topped with whipped cream. My Cherry Chocolate Roll is a playful, less fussy take on that icon. It captures all the magic – the rich cocoa, the sweet-tart cherries, the billowy cream – but in a beautiful spiral that’s somehow easier to tackle. It’s the perfect marriage of traditional flavor and modern, simple baking.
Why You’ll Fall in Love With This Cherry Chocolate Roll
What’s not to love? It’s stunningly beautiful, which means you get major baker bragging rights. But more importantly, it’s deliciously balanced. The light-as-air chocolate sponge isn’t too sweet, letting the juicy cherries and sweet cream shine. It’s a textural dream: soft cake, cool cream, and bursts of fruity filling. Plus, it looks like you slaved for hours, when the secret is in a few clever techniques (which I’ll share!). If you want to explore another stunning chocolate creation, you must try this Decadent Dark Chocolate Layer Cake Recipe for your next special occasion.
Perfect Occasions for Your Chocolate Roll Cake
This cake is your secret weapon for making moments memorable. It’s a showstopper for birthday dinners, holiday gatherings (think Christmas or Valentine’s Day!), or a fancy weekend treat. I love bringing it to potlucks because it travels well and always disappears first. It’s also my go-to when I want to treat my book club or have a “just because” girls’ night. It says “I care” in the sweetest way possible.
Gathering Your Ingredients for Success
Using simple, quality ingredients makes all the difference. Here’s what you’ll need:
For the Chocolate Sponge Cake:
- 3/4 cup (95g) all-purpose flour
- 1/4 cup (30g) unsweetened cocoa powder
- 1 tsp baking powder
- 4 large eggs, room temperature
- 1/2 cup (100g) granulated sugar
- 1/4 cup (60ml) whole milk
- 1 tsp vanilla extract
For the Whipped Cream Filling:
- 1 1/2 cups (360ml) heavy whipping cream, cold
- 1/3 cup (40g) powdered sugar
- 1 tsp vanilla extract
For the Cherry Filling:
- 1 cup (250g) cherry pie filling OR fresh cherries, pitted and halved
- 2 tbsp (30ml) cherry syrup or juice
For the Chocolate Ganache & Garnish:
- 1/2 cup (90g) semi-sweet chocolate chips
- 1/4 cup (60ml) heavy whipping cream
- Fresh cherries and chocolate shavings for decoration
No Stress Substitutions
Don’t have everything on hand? No worries! This recipe is flexible.
- Cocoa Powder: Use natural or Dutch-processed. Dutch-processed gives a deeper, richer chocolate color.
- Cherry Filling: Cherry pie filling is easy and reliable. For a fresher taste, simmer pitted fresh or frozen cherries with a tablespoon of sugar and a splash of water until syrupy.
- Heavy Cream: For the filling, it must be heavy whipping cream (at least 35% fat) to whip up stiff. There’s no real substitute for that perfect texture.
- Flour: A 1-to-1 gluten-free flour blend works great for a GF sponge.
Making Your Chocolate & Cherry Delight: Step-by-Step
Step 1: Bake the Perfect Chocolate Sponge
Start by preheating your oven to 350°F (175°C). Line your jelly roll pan with parchment paper and give it a light grease. This is your insurance policy! Sift the flour, cocoa, and baking powder together. This tiny step prevents lumps and makes the cake extra light. Now, beat the eggs and sugar. This is the most important part. You want the mixture thick, pale, and tripled in volume. It should leave a ribbon trail on itself when you lift the beaters. Gently fold in the dry ingredients, then the milk and vanilla. The batter will be lush and airy. Pour it into the pan, spread it evenly, and bake for just 10-12 minutes. The cake is done when it springs back at your touch. Pro tip: Right out of the oven, sprinkle the top with a little powdered sugar, lay a clean kitchen towel over it, and roll it up from the short end. Letting it cool rolled like this trains the cake to avoid cracks!
Step 2: Whip Up the Cloud-Like Filling
While the cake cools, make your filling. Ensure your bowl and beaters are cold. Pour in the heavy cream, powdered sugar, and vanilla. Start beating on medium, then move to high. Watch as it goes from liquid to soft peaks to beautiful, stiff peaks that hold their shape. Don’t walk away! Over-beating turns cream to butter. Once it’s perfect, pop it in the fridge to stay chilled and firm.
Step 3: The Fun Part – Assembling the Roll
Unroll your cooled cake gently on a flat surface. It will have a lovely curved shape from its training. Spread your cherry filling evenly, leaving a small border. Then, spread a thick, even layer of the whipped cream over the cherries. Now, using the parchment paper to help you, start rolling the cake back up, but this time without the towel inside. Go slowly and gently, guiding it into a tight log. Place it seam-side down on your serving platter. Admire your handiwork! For another fabulous dessert that combines fruit and creamy textures, these Blueberry Crunch Cheesecake Bars are always a crowd-pleaser.
Step 4: Drizzle with Decadent Ganache
This is the glamorous finish. Heat the 1/4 cup of cream until it’s just simmering. Pour it over the chocolate chips in a bowl. Let it sit for two minutes to melt the chocolate, then stir until it’s glossy and smooth. Let it cool for a minute so it’s not too runny. Using a spoon, drizzle the ganache artfully over the roll, encouraging some to drip down the sides. It looks professional and tastes heavenly.
Step 5: The Final Garnish Touch
Top your masterpiece with fresh cherries and a shower of chocolate shavings. To make shavings, run a vegetable peeler along the edge of a chocolate bar. This final step adds texture and makes it irresistibly inviting. Now, for the hard part: you have to chill it! Pop it in the fridge for at least an hour before slicing. This sets the fillings and guarantees clean, beautiful slices.
Your Recipe Timing Breakdown
Let’s plan your baking session:
- Prep Time: 25 minutes
- Bake Time: 12 minutes
- Cooling & Rolling Time: 30 minutes
- Chilling Time (before serving): 1 hour minimum
- Total Time: About 2 hours, plus chilling
Chef’s Secret for a No-Crack Roll
My absolute best trick is the “towel roll”. As soon as the sponge comes out of the oven, lay a thin, clean kitchen towel (not terry cloth) over it. Flip the whole pan over so the cake releases onto the towel. Carefully peel off the parchment paper, then sprinkle the cake lightly with powdered sugar. While it’s still warm and flexible, roll it up—towel and all—from the short end. Let it cool completely like this. This process “trains” the cake’s memory, so when you unroll it to add filling, it will roll back up easily without a single crack!
A Little Extra, Just for Fun
Did you know the “Black Forest” in the name might not just refer to the region? Some historians think the chocolate shavings on the classic cake are meant to look like dark forest trees, while the red cherries resemble the traditional red pom-poms on the hats of the forest’s costume! Whether that’s true or not, it’s a charming story that makes baking this roll feel like creating a little edible folklore.
Equipment You’ll Need
You don’t need anything too special! A 10×15 inch jelly roll pan is key for the right thickness. You’ll also need:
- Parchment paper
- Hand mixer or stand mixer (for the eggs and cream)
- Sifter or fine mesh strainer
- Large bowls
- Rubber spatula
- Clean kitchen towel (see Chef’s Secret!)
How to Store Your Black Forest Roll
This cake is best enjoyed within 1-2 days. Because of the fresh whipped cream, it needs to stay refrigerated. Cover it loosely with plastic wrap or place a cake dome over it to protect it from absorbing other fridge odors.
You can prepare the sponge roll a day ahead. Bake, cool, and roll it up in the towel. Wrap the whole bundle tightly in plastic wrap and keep it at room temperature. The next day, unroll, fill, and finish! This is a fantastic time-saver for parties.
I do not recommend freezing the fully assembled roll, as the whipped cream filling can become grainy and weep when thawed. However, you can freeze the unfilled, baked sponge roll (wrapped very well) for up to a month. Thaw in the refrigerator before filling.
My Best Tips & Advice
- Room Temp Eggs: This is non-negotiable for maximum volume when beating. Take them out an hour before you start.
- Don’t Over-Bake: The sponge should spring back lightly. Over-baking makes it dry and more likely to crack.
- Chill Your Tools: A cold bowl and beaters make whipping cream faster and more stable.
- For Adults: Brush the unrolled sponge with 1-2 tablespoons of Kirsch (cherry brandy) before adding the fillings. It’s authentic and delicious!
Presentation Ideas to Wow Your Guests
- Slice with a hot, clean knife. Wipe the blade between each cut for pristine slices.
- Serve on individual plates with a tiny dollop of extra whipped cream and a single perfect cherry on the side.
- Dust the platter with a little powdered sugar or cocoa powder before placing the roll for a professional bakery look.
- For a holiday touch, use mint leaves or edible gold dust alongside the cherries.
Healthier & Creative Recipe Twists
Love the idea but want to mix it up? Here are six delicious variations:
- Berry Bliss Roll: Swap cherries for a mix of raspberries and blueberries. Use a berry jam as the base layer.
- Orange Chocolate Roll: Add the zest of one orange to the cake batter. Fill with whipped cream flavored with a touch of orange liqueur or extract.
- Mocha Roll: Add 1 tablespoon of instant espresso powder to the cocoa powder for the sponge. Fill with coffee-flavored whipped cream.
- Peanut Butter Cup Roll: Fill the chocolate sponge with a layer of sweetened peanut butter mixed with a little cream, then whipped cream. Drizzle with chocolate ganache.
- Lemon Delight Roll: Make a vanilla sponge instead of chocolate. Fill with lemon curd and sweetened whipped cream for a bright, sunny dessert.
- Dairy-Free Version: Use your favorite plant-based milk and a thick coconut cream (chilled) for the whipped filling.
If you’re a fan of combining chocolate and coffee in a richer format, the Caramel Chocolate Coffee Cheesecake is pure, sophisticated indulgence.
Common Mistakes to Avoid
Mistake 1: Using Cold Eggs for the Sponge
Cold eggs simply will not whip up to the volume you need. A weak, thin batter bakes into a dense, flat sponge that’s almost guaranteed to crack. Always use room temperature eggs. If you forgot to take them out, place them in a bowl of warm (not hot) water for 10 minutes. You’ll see a huge difference in the light, fluffy texture of your cake.
Mistake 2: Rolling the Cake After It Cools
This is the number-one cause of a cracked Swiss roll. A warm sponge is flexible. A cold sponge is set and brittle. You must roll it while it’s still warm from the oven. Use the towel method described in the Chef’s Secret. Letting it cool in its rolled shape creates a “muscle memory” so it re-rolls around the filling perfectly.
Mistake 3: Under-Whipping or Over-Whipping the Cream
The filling needs structure. If your cream is too soft (under-whipped), it will squish out when you roll and slice, making a messy cake. If you go too far (over-whipped), it becomes grainy and buttery. Whip until you have stiff peaks: when you lift the beaters, the cream stands straight up and doesn’t droop at all. Stop immediately once you get there.
Mistake 4: Skipping the Chill Before Slicing
I know it’s tempting to slice right away! But a warm, freshly assembled roll is unstable. The filling is soft, and the cake is tender. Chilling for at least an hour firms up the cream, sets the ganache, and makes everything hold together. The result is a clean, beautiful spiral in every slice. Patience is a key ingredient here.
Frequently Asked Questions
Can I make this Black Forest Roll Cake a day ahead?
Absolutely, and it’s a great strategy for stress-free entertaining. Bake and cool the sponge roll in the towel, then wrap the whole bundle tightly in plastic wrap. Store it at room temperature overnight. The next day, whip the cream, assemble the roll, add the ganache, and garnish. You can also fully assemble it and refrigerate it overnight. The flavors will meld beautifully. Just add fresh cherries right before serving so they stay perky.
My cake cracked when I rolled it! Can I fix it?
Don’t panic! Small cracks happen and are usually easy to hide. As you assemble, position the cake so the final seam is on the bottom—it will hide a world of sins. A generous drizzle of ganache over the top can also camouflage minor flaws. For larger cracks, once the cake is rolled, you can gently press the seam together and use a little extra whipped cream as “spackle” before adding the ganache. Remember, it will still taste incredible!
What can I use instead of cherry pie filling?
You have several tasty options. You can make a quick compote by cooking pitted fresh or frozen cherries with a bit of sugar and cornstarch until thickened. A good-quality cherry jam or preserves, lightly warmed to make it spreadable, works great too. For an elegant touch, macerate fresh chopped cherries in a little sugar and Kirsch. Each option offers a slightly different texture, but all deliver that essential cherry flavor. For more cherry-chocolate inspiration, the Cherry Chocolate Mousse Cake is another fantastic dessert to try.
Why is my whipped cream filling runny or watery?
A runny filling usually means one of three things: your cream wasn’t cold enough, your bowl/beaters were warm, or you accidentally over-whipped it past stiff peaks into butter. Always start with everything very cold. If your cream is already runny, you can try to salvage it by chilling it for 15 minutes and re-whipping with a new, cold whisk attachment. Sometimes, gently folding in a tablespoon of powdered sugar can help stiffen it slightly. For best results, start fresh with new cold cream.
Can I freeze this cake roll?
I don’t recommend freezing the fully assembled cake with the whipped cream filling, as it will separate and become grainy when thawed. However, you can absolutely freeze the unfilled sponge roll. Once it’s completely cooled in its towel roll, wrap it tightly in plastic wrap and then foil. Freeze for up to 1 month. Thaw overnight in the refrigerator, then unroll, fill, and finish as directed. This is a wonderful way to get a head start on baking.
How do I get a really tight roll?
The key is a confident start. When you first roll the warm cake with the towel, don’t be shy—make the initial turn tight and firm. Use the edge of the towel to pull it towards you as you roll. When you assemble, place your fillings evenly but avoid overloading the very beginning of the roll. Use the parchment paper to lift and tuck the cake over the filling firmly to create that first tight loop, then continue rolling with steady pressure.
What’s the best way to slice it without squishing?
A sharp, thin-bladed knife is your best friend. Run the blade under very hot water, wipe it completely dry, and then make your cut in one smooth, gentle sawing motion. The heat helps the knife glide through the cream and cake cleanly. Wipe the blade clean and reheat it between every single slice. This ensures each beautiful piece looks as good as the first.
I don’t have a jelly roll pan. Can I use something else?
You can, but the results will be different. A standard baking sheet (like a half-sheet pan) is larger and will yield a thinner sponge that bakes even faster. Watch it carefully after 8 minutes. A 9×13 inch pan will produce a thicker cake that may be harder to roll tightly and might need a slightly longer bake time. The 10×15 inch size is ideal for the perfect balance of thickness and flexibility.
Is this cake very sweet?
Not overly so, and that’s its beauty! The chocolate sponge itself is only mildly sweet. The sweetness comes mostly from the powdered sugar in the whipped cream and the cherry filling. Using a tart cherry pie filling or less sugar in a homemade compote can balance it further. The bittersweet ganache drizzle adds richness without adding a ton of sugar, creating a wonderfully balanced dessert that isn’t cloying. Choosing high-quality ingredients is part of building balanced, healthy food patterns that include delightful treats.
Can I decorate this cake with anything besides cherries?
Of course! Get creative. Chocolate curls or shavings are classic. You could use candied violets or rose petals for a floral touch. A light dusting of powdered sugar or cocoa powder looks elegant. For a winter theme, sugared cranberries are stunning. Even a simple sprinkle of edible gold flakes can turn it into a gilded masterpiece. Let the occasion guide your garnish.
This Black Forest Roll Cake is just one of the many joyful creations you can explore in the wonderful world of cakes and cupcakes. There’s always a new flavor combination or technique to try.
You’ve Got This!
So, are you ready to make some magic? This Black Forest Roll Cake might look like it came from a fancy bakery, but it’s truly within your reach. Remember the warm roll, the cold cream, and the joy of that first slice revealing a perfect spiral. Baking is about sharing love and creating memories. This chocolate and cherry delight is sure to do both. Gather your ingredients, take a deep breath, and have fun with it. Your kitchen is about to smell amazing, and someone (maybe you!) is about to feel very special. Happy baking!
Equipment
- Grand bol
- Fouet
- Spatule
- Plaque à pâtisserie
- Papier sulfurisé
Ingredients
- 4 œufs
- 100 g sucre
- 30 g cacao en poudre
- 95 g farine tout usage
- 5 g poudre à lever
- 240 ml crème fouettée
- 40 g sucre glace pour saupoudrer
- 250 g garniture de cerises
- 90 g pépites de chocolat
- 60 ml crème épaisse
Instructions
- Préchauffez le four à 175°C et préparez une plaque à pâtisserie rectangle de 10x15 pouces en la tapissant de papier sulfurisé.
- Tamisez la farine, le cacao en poudre et la poudre à lever dans un bol.
- Dans un grand bol, battez les œufs et le sucre jusqu'à ce qu'ils soient épais et pâles, en formant un ruban.
- Incorporez délicatement les ingrédients secs, le lait et l'extrait de vanille pour former une pâte onctueuse.
- Versez la pâte dans le moule préparé, étalez uniformément, et faites cuire 10-12 minutes, jusqu'à ce qu'elle reprenne sa forme au toucher.
- Une fois cuite, saupoudrez de sucre glace et roulez-la avec un torchon propre pendant qu'elle est encore chaude.
- Dans un autre bol, fouettez la crème froide avec le sucre glace et la vanille jusqu'à obtenir des pics fermes; réfrigérez jusqu'à utilisation.
- Déroulez le gâteau refroidi, étalez la garniture de cerises et la crème fouettée, puis roulez-le à nouveau en plaçant la couture en bas.
- Pour la ganache, chauffer la crème jusqu'à frémissement, puis la verser sur les pépites de chocolat, laisser reposer, puis mélanger jusqu'à consistance lisse.
- Nappez le rouleau de ganache et décorez avec des cerises fraîches et des copeaux de chocolat.
- Réfrigérez au moins une heure avant de trancher pour que les garnitures se raffermissent.