
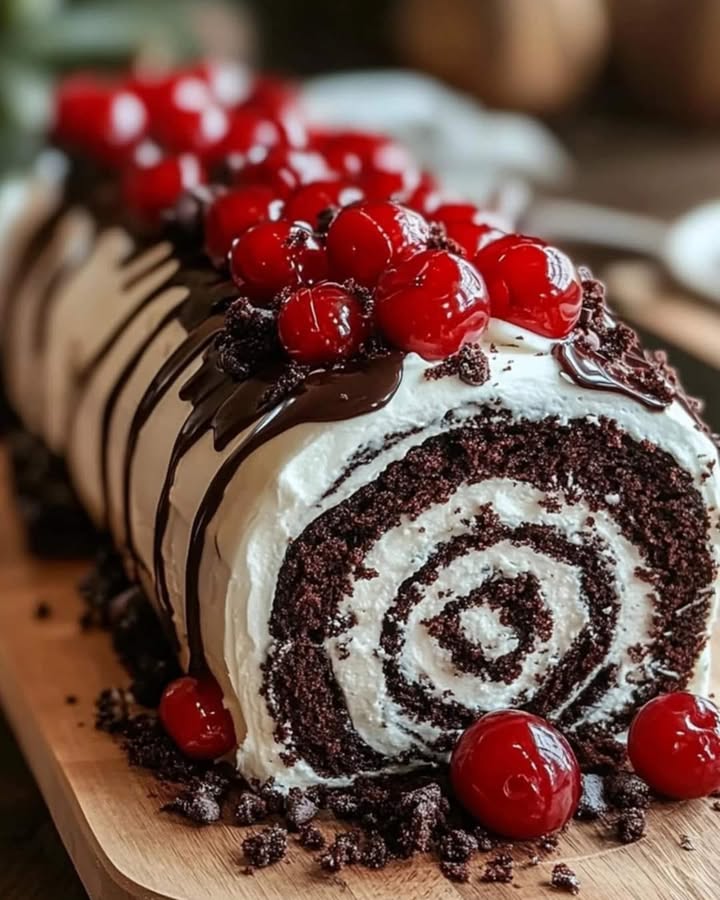
A Slice of Sweet, Swirly Joy
Have you ever watched a beautifully swirled pastry roll come out of the oven and just *had* to have a piece? That’s how this recipe found me. I was determined to create a dessert that combined my two great loves: rich chocolate and tart, juicy cherries. After a few comical attempts (let’s just say my first roll looked more like a chocolate pancake fold), I perfected this Cherry Chocolate Roll. It’s my go-to for when I want to impress without spending hours in the kitchen. It looks fancy, tastes incredible, and honestly, rolling it up is so satisfying!
A Nod to a Classic: The Black Forest Inspiration
This delightful Cherry Chocolate Roll takes its cue from the legendary Black Forest cake of Germany. That iconic dessert layers chocolate cake, cherries, and whipped cream into a towering treat. My version is like its playful, portable cousin—all the same magical flavors rolled into one elegant log. It captures the spirit of tradition but in a simpler, more relaxed form that’s perfect for modern bakers. Whether you grew up with Black Forest cake or are just discovering it, this roll cake is a wonderful, less-daunting way to enjoy that timeless combination.
Why You’ll Fall in Love With This Cherry Chocolate Roll
This isn’t just another cake. It’s a showstopper that’s secretly easy. You get a light, airy chocolate sponge, a layer of sweet-tart cherry goodness, and clouds of homemade whipped cream—all in one stunning spiral. It’s lighter than a traditional layer cake, making it perfect for a summer barbecue or a cozy winter gathering. Plus, the process of rolling it is oddly therapeutic and always earns a “wow” from friends and family. It’s proof that the most delicious things often come in simple packages.
Perfect Occasions for Your Swirled Masterpiece
This Cherry Chocolate Roll is wonderfully versatile. It’s elegant enough for a birthday or holiday dessert table but simple enough for a Sunday family treat. I love bringing it to potlucks because it slices beautifully and everyone always asks for the recipe. It’s a fantastic finish to a dinner party, and because you make it ahead, you get to relax with your guests. Think of it for Mother’s Day, a bridal shower, or just a “just because” Tuesday when you need a little sweet magic.
Gathering Your Ingredients for Success
Great baking starts with great ingredients. For the best flavor and texture, I recommend using the freshest eggs and high-quality cocoa powder you can find. Here’s everything you’ll need:
For the Chocolate Sponge Cake:
- 4 large eggs, at room temperature
- 3/4 cup granulated sugar
- 1 tsp vanilla extract
- 1/3 cup unsweetened cocoa powder
- 2/3 cup all-purpose flour
- 1 tsp baking powder
- 1/4 tsp salt
For the Cherry Filling:
- 2 cups pitted cherries, fresh or frozen
- 1/4 cup granulated sugar
- 1 tbsp cornstarch
- 1 tbsp water
For the Whipped Cream Filling:
- 1 1/2 cups heavy cream, chilled
- 1/3 cup powdered sugar
- 1 tsp vanilla extract
For Garnish:
- Additional cherries, for decoration
- Chocolate shavings or cocoa powder
Simple Swaps: Your Kitchen, Your Rules
Don’t sweat it if you’re missing an ingredient! Baking should be fun and flexible.
- Cherries: No fresh cherries? Frozen work perfectly. You can also use a high-quality cherry jam or pie filling for a quicker option.
- Cocoa Powder: Any unsweetened cocoa works, but Dutch-processed will give you a deeper, darker chocolate flavor.
- Heavy Cream: For a stabilizing alternative, you can substitute half the cream with mascarpone cheese for a richer, firmer filling.
- All-Purpose Flour: A 1:1 gluten-free flour blend can be used for a gluten-free Cherry Chocolate Roll.
Step-by-Step: Crafting Your Cherry Chocolate Roll
Follow these steps for a flawless, impressive dessert. Take your time and enjoy the process!
Step 1: Prep Your Pan and Oven
Start by preheating your oven to 350°F (175°C). This ensures it’s perfectly hot when your batter is ready. Take a 10×15-inch jelly roll pan and line it with parchment paper. A light spray of cooking oil under the parchment helps it stick. This little paper hammock is your best friend for lifting the cake out later. Trust me, it makes the rolling step so much easier.
Step 2: Whip Up the Chocolate Sponge
In a large bowl, beat the room-temperature eggs, sugar, and vanilla. You’ll want to beat for a full 5 minutes until the mixture is thick, pale, and leaves a “ribbon” trail when you lift the beaters. This is the secret to a light, springy cake! In another bowl, gently whisk together your sifted cocoa, flour, baking powder, and salt. Carefully fold these dry ingredients into the egg mixture. You want to keep all that lovely air you just whipped in. Pour the batter into your prepared pan, spread it evenly, and pop it in the oven.
Step 3: Create the Luscious Cherry Filling
While the cake bakes, let’s make the cherry filling. Combine pitted cherries and sugar in a saucepan. Cook over medium heat until the cherries soften and let out their gorgeous ruby-red juices. In a small cup, mix the cornstarch with water to make a smooth slurry. Stir this into the bubbling cherries. The mixture will transform from juicy to gloriously thick and glossy in just a minute. Remove it from the heat and let it cool completely. This prevents it from melting our whipped cream later.
Step 4: Make the Cloud-Like Whipped Cream
For the whipped cream, everything must be cold. Use a chilled bowl and beaters if possible. Pour your heavy cream, powdered sugar, and vanilla into the bowl. Start beating on medium-low, then increase the speed as it thickens. Stop when you have firm peaks that hold their shape when you lift the beaters. Be careful not to overbeat, or you’ll start making butter! This fluffy cloud is the glue that holds our roll together.
Step 5: The Magical Assembly and Roll
Once your cake is baked and slightly cooled, it’s showtime! Lay a clean kitchen towel on the counter. Invert the warm cake onto the towel and carefully peel off the parchment paper. Gently spread the whipped cream evenly over the entire surface. Then, spoon your cooled cherry filling in an even layer over the cream. Using the towel to help you, start rolling the cake from the short end. Lift and tuck to create a tight, neat log. Don’t worry about small cracks—they add character! Transfer your beautiful Cherry Chocolate Roll to a platter.
Step 6: Chill, Garnish, and Serve with Pride
Patience is key here. Refrigerate the roll for at least an hour. This chilling time lets everything set so you get clean, beautiful slices. Just before serving, dust the top with a snowy shower of cocoa powder or elegant chocolate shavings. Add a few fresh cherries on top for a pop of color. Then, slice, serve, and accept the compliments. You’ve just made bakery-level magic at home.
Your Cherry Chocolate Roll Timeline
Good baking is all about timing. Here’s how your schedule will look:
- Prep Time: 30 minutes (active kitchen fun)
- Cook Time: 15 minutes (for the perfect sponge)
- Chilling Time: At least 1 hour (for a firm roll)
- Total Time: About 1 hour 45 minutes from start to first bite.
Chef’s Secret: The Warm Cake Roll
Here’s my little trick: roll the warm, plain sponge cake up in the kitchen towel for about 10 minutes after it comes out of the oven. Let it cool slightly in this rolled shape. Then, unroll it, add your fillings, and roll it back up. This “trains” the cake to roll and dramatically reduces the chance of cracking. It’s like a little yoga session for your dessert!
A Fun Fact About Roll Cakes
Did you know roll cakes, or “roulade” as they’re formally called, became super popular in mid-century America? They were a staple at ladies’ luncheons and holiday gatherings. Their elegant spiral made them seem fancy, but their simple components made them accessible. You’re baking a piece of sweet history!
Tools You’ll Need
You likely have most of this in your kitchen already:
- 10×15-inch jelly roll pan (a rimmed baking sheet)
- Parchment paper
- Hand mixer or stand mixer (for the eggs and cream)
- Mixing bowls (large and medium)
- Saucepan
- Spatula
- Clean kitchen towel
Storing Your Swirled Creation
This Cherry Chocolate Roll is best enjoyed fresh but keeps beautifully. Cover it well with plastic wrap or place it in an airtight container. Store it in the refrigerator. The chilled environment helps the whipped cream stay firm and prevents the cake from drying out.
It will stay delicious for up to 2-3 days. After that, the cake may start to soften a bit from the moisture of the filling, but it will still taste wonderful.
I don’t recommend freezing this roll, as the whipped cream filling doesn’t thaw well and can become grainy. It’s always a hit, so leftovers are rare anyway!
My Best Tips for Roll Cake Success
- Room Temp Eggs: They whip up so much higher, giving you that perfect airy sponge.
- Don’t Over-mix: When folding in the dry ingredients, stop as soon as no streaks of flour remain. A few lumps are okay.
- Cool Fillings Completely: A warm cherry filling will melt your beautiful whipped cream into a puddle.
- Use the Towel: That kitchen towel isn’t just for drying hands. It’s your primary rolling tool. Let it do the work.
Making It Picture-Perfect
Presentation is half the fun! Try dusting the top with powdered sugar instead of cocoa for a wintery look. You can pipe extra whipped cream rosettes on top and crown each with a cherry. For a festive touch, use a zester to make delicate chocolate curls instead of shavings. Serve on a rustic wooden board or a pretty cake stand to make it the centerpiece of your table. Don’t forget to slice with a hot, clean knife for those pristine, magazine-worthy layers.
Love This Recipe? Try These Variations!
The beauty of a roll cake is how easily you can change the flavors. Here are six delicious twists:
- Raspberry Chocolate Roll: Swap the cherries for fresh raspberries and add a touch of Chambord liqueur to the fruit filling for a sophisticated twist.
- Pumpkin Spice Roll: Perfect for fall! Replace the cocoa in the sponge with pumpkin pie spice, and use a spiced cream cheese filling instead of whipped cream and cherries.
- Lemon Blueberry Roll: Make a vanilla sponge, fill with lemon curd and fresh blueberries folded into the whipped cream. It’s bright, tangy, and perfect for spring.
- Tropical Mango & Coconut Roll: Use a vanilla cake, fill with coconut whipped cream and a fresh mango puree. Top with toasted coconut flakes.
- Cookies & Cream Roll: Add crushed Oreo cookies to the chocolate sponge batter, and fold more crushed cookies into the whipped cream filling. A kid (and adult) favorite!
- Espresso Hazelnut Roll: Add a tablespoon of instant espresso to the chocolate batter. Fill with hazelnut-spiked whipped cream and chopped toasted hazelnuts.
Cherry Chocolate Roll and Its Delicious Cousins
If you adore the chocolate-cherry combo of this roll, you must explore our other decadent recipes. For a more traditional take, our classic Black Forest Cake is a celebration in every slice. Looking for something savory? These Reuben Pastry Squares are a flaky, cheesy masterpiece. Or, if you’re in a fully indulgent mood, this Caramel Fudge Cheesecake will satisfy any sweet tooth. And for a bright, fruity dessert, our Southern Pineapple Orange Swirl Cheesecake is pure sunshine.
Common Mistakes to Avoid
Avoid these simple pitfalls for a perfect roll every time.
Mistake 1: Using Cold Eggs
Cold eggs simply won’t whip up to the same full, voluminous height as room-temperature ones. This means your cake might be a bit dense and more likely to crack when you roll it. To avoid this, take your eggs out of the fridge at least 30 minutes before you start baking. If you’re short on time, place them in a bowl of warm (not hot) water for 5-10 minutes. This small step makes a huge difference in achieving that light, flexible sponge.
Mistake 2: Adding a Warm Filling
Impatience here leads to a soupy mess. If you spoon warm cherry filling onto the whipped cream, the heat will instantly melt the cream. This results in a soggy cake and a runny, hard-to-roll log. Always, always let your cooked cherry filling cool completely to room temperature. You can even pop it in the fridge for a bit to speed things up. A cool, thick filling is your friend.
Mistake 3: Overbeating the Whipped Cream
We want stiff peaks, not butter! If you beat the heavy cream too long, it will go past fluffy peaks and begin to look grainy and separate. At this point, it’s turning into butter and will not spread smoothly or taste right. To avoid this, start beating on medium speed and watch closely. As soon as the cream holds a firm peak when you lift the beater, stop immediately. Pro tip: Use a chilled bowl and beaters to help the cream whip faster with less risk of overbeating.
Mistake 4: Skipping the Parchment Paper
Thinking you can just grease the pan? Don’t do it! The parchment paper is non-negotiable for a successful roll cake. It allows you to lift the entire cake out of the pan effortlessly and provides a smooth surface for rolling. Without it, the cake will likely stick and tear. Secure the parchment with a light spray of oil underneath so it stays put while you spread the batter.
A Note on Workflow and Quality
Organizing your steps before you start, known as your cooking workflow, is a game-changer for any recipe, but especially for baking. It ensures you have everything ready and reduces mistakes. Having a logical sequence—like making the filling first so it can cool while you bake the cake—makes the whole process smoother and more enjoyable.
Frequently Asked Questions
Can I make the Cherry Chocolate Roll a day ahead?
Absolutely! In fact, I highly recommend it. Making it a day ahead allows all the flavors to meld together beautifully, and the roll has more time to set firmly in the fridge. Just be sure to wrap it tightly in plastic wrap once it’s chilled to prevent it from absorbing any other odors. Garnish with fresh cherries and chocolate shavings right before you serve it for the freshest look.
My cake cracked when I rolled it. What did I do wrong?
Don’t worry, this happens to everyone at least once! The most common culprits are overbaking the cake (making it too dry) or not rolling it while it’s still warm and flexible. Next time, try the “training” method: roll the warm cake in a towel for 10 minutes after baking, then unroll, fill, and re-roll. Also, check your oven temperature with a thermometer to ensure you’re not baking it hotter than the recipe states. Small cracks can usually be covered with whipped cream or a dusting of cocoa powder.
Can I use cherry pie filling from a can?
Yes, you can use canned cherry pie filling for a quick shortcut. The texture will be a bit different from homemade, but the flavor will still be great. Look for a quality brand and drain a little of the excess syrup if it seems very runny. I prefer making my own filling because I can control the sweetness and use fresh fruit, but on a busy day, the canned version is a perfectly fine time-saver.
What can I use instead of a jelly roll pan?
If you don’t have a dedicated jelly roll pan (a 10×15-inch rimmed baking sheet), you can use a standard half-sheet pan (approximately 13×18 inches). Just be aware that your cake will be thinner and will bake even faster, so start checking for doneness around the 8-10 minute mark. You can also use a 9×13-inch cake pan, but your roll will be shorter and thicker.
How do I prevent the whipped cream from deflating?
The key is keeping everything cold and not overworking it. Use cream straight from the fridge, and chill your mixing bowl and beaters for 15 minutes beforehand. Whip the cream just until stiff peaks form, then stop immediately. Once assembled, the roll should go right into the fridge to set. The cold environment will keep the cream firm.
Can I freeze the assembled roll cake?
I don’t recommend freezing the fully assembled roll with whipped cream filling, as dairy-based whipped cream doesn’t freeze and thaw well—it can become watery and grainy. However, you can successfully freeze the un-filled chocolate sponge cake roll. Once cooled, wrap it tightly in a double layer of plastic wrap and freeze. Thaw in the fridge overnight before filling and serving.
Is it necessary to sift the dry ingredients?
For a light and airy sponge cake, yes, sifting is important. It breaks up any lumps in the cocoa and flour and aerates the mixture, making it easier to fold gently into the egg mixture without deflating it. Skipping this step can result in small pockets of dry ingredients in your baked cake and a denser texture.
My cherry filling is too runny. How can I fix it?
If your filling is too runny, it likely needs more thickening time or a bit more cornstarch. You can mix another teaspoon of cornstarch with a tablespoon of cold water, stir it into the simmering cherry mixture, and cook for another minute or two until thickened. Remember, the filling will continue to thicken as it cools, so let it reach room temperature before judging the final consistency.
Can I add liquor to this recipe?
Definitely! A tablespoon of kirsch (cherry brandy) or amaretto added to the cherry filling or brushed onto the warm cake before filling adds a lovely, authentic Black Forest flavor. Just add it to the cherries after you’ve removed the filling from the heat, and let the alcohol cook off slightly as it cools.
How do I get perfectly even slices?
Use a long, thin, sharp knife. For the cleanest cuts, run the knife under very hot water and wipe it dry with a towel before each slice. The heat helps the knife glide through the cream and cake without squishing the beautiful spiral. Clean the knife between slices for picture-perfect servings every time.
Baking should be a joy, not a chore, and this Cherry Chocolate Roll is the perfect example of that. It brings together simple techniques to create something truly special. I hope this recipe becomes a treasured part of your collection of favorite cakes, bringing smiles to your table for years to come.
Your New Favorite Dessert is Ready
There you have it—a dessert that looks like it came from a professional patisserie but was made right in your own kitchen. The combination of fluffy chocolate, sweet-tart cherries, and pillowy cream is pure magic. I love watching people’s eyes light up when I bring this to the table. It’s more than just a cake; it’s a swirl of sweet memories in the making. So preheat that oven, gather your ingredients, and get ready to roll. Happy baking!
Equipment
- Grand bol
- Fouet
- Spatule
- Plaque à pâtisserie
- Papier sulfurisé
Ingredients
- 4 œufs
- 150 g sucre
- 30 g cacao en poudre
- 65 g farine tout usage
- 5 g poudre à lever
- 1 g sel
- 240 ml crème épaisse
- 250 g cerises dénoyautées
- 30 g sucre glace pour saupoudrer
- 1 cuil. à soupe fécule de maïs
- 15 ml eau
Instructions
- Préchauffez le four à 175°C et tapissez un moule à pâtisserie de 10x15 pouces de papier sulfurisé.
- Dans un grand bol, battez les œufs, le sucre et la vanille pendant 5 minutes jusqu'à obtenir un mélange épais et pâle.
- Dans un autre bol, tamisez le cacao, la farine, la poudre à lever et le sel. Incorporez délicatement ce mélange à la préparation à base d’œufs.
- Versez la pâte dans le moule préparé et enfournez pendant 15 minutes.
- Préparez la garniture de cerises en cuisant les cerises et le sucre dans une casserole jusqu'à ce qu'elles soient tendres.
- Mélangez la fécule de maïs avec l'eau et incorporez-la à la préparation de cerises jusqu'à épaississement. Laissez refroidir.
- Portez la crème épaisse, le sucre glace et la vanille à ébullition jusqu'à formation de pics fermes.
- Une fois le gâteau cuit et légèrement refroidi, retournez-le sur un torchon et retirez le papier sulfurisé.
- Étalez uniformément la crème fouettée sur le gâteau puis ajoutez la garniture de cerises refroidie.
- Roulez le gâteau à l’aide du torchon en formant un boudin serré et déplacez-le sur une assiette.
- Réfrigérez pendant au moins une heure, puis saupoudrez de cacao ou de copeaux de chocolat avant de servir, et décorez avec des cerises supplémentaires.
Notes
Nutrition

Hi, I’m Olivia Parker, the founder of BakingSecret.com and a lifelong lover of all things sweet and homemade. I grew up in a small town in Oregon, where the smell of fresh cookies in my family’s kitchen sparked my passion for baking. Over the years, I turned that passion into a mission: to help home bakers feel confident, inspired, and creative.
After studying food science and working in several artisan bakeries across the U.S., I decided to create a space where everyone from beginners to seasoned bakers can find reliable recipes, expert tips, and a warm, welcoming community. BakingSecret.com is my way of sharing the magic of baking with the world. When I’m not testing new recipes, you’ll find me exploring farmers’ markets, collecting vintage cookbooks, or perfecting my sourdough technique.