
Chocolate Caramel Flan: Two Heavenly Desserts in One
You know that moment when you can’t decide between a silky chocolate mousse and a rich caramel custard? Well, my friends, I have fantastic news: you don’t have to choose! This Chocolate Caramel Flan is the glorious mash-up of both worlds. The first time I made this, my family’s eyes rolled back in blissful happiness. I knew right then this recipe was a forever keeper. It’s that magical dessert that looks fancy but is secretly simple to make. Let’s make some creamy, rich magic together.
A Sweet Tale: The History of This Chocolate Caramel Flan
Flan has a wonderful history that spans continents. Its roots go back to ancient Rome, but it found a sweet home in Latin America and Spain. The classic version is a vanilla custard with a golden caramel top. My chocolate twist is a modern love letter to that tradition. I was inspired by my love for dense chocolate pots de crème and wanted that same intensity in a flan. Adding melted chocolate and cocoa powder creates a dessert that’s both familiar and excitingly new. It’s a perfect example of how old recipes can evolve into something even more delightful.
Why You’ll Fall Head Over Heels for This Chocolate Flan
This recipe isn’t just delicious; it’s a joy to make! First, the flavor is pure luxury—deep chocolate and bitter-sweet caramel in every spoonful. Second, it’s impressively smooth and creamy, with a texture that melts on your tongue. Best of all, it uses simple ingredients you might already have in your pantry. The process of making the caramel and the gentle bake in a water bath is almost therapeutic. You get to watch simple ingredients transform into a show-stopping dessert. It’s the kind of treat that makes any dinner feel like a special occasion.
When to Whip Up This Chocolate Caramel Flan
This dessert is your secret weapon for celebrations! It’s perfect for holiday dinners, birthday parties, or a fancy weekend treat. I love bringing it to potlucks because it travels well in its dish and always draws a crowd. It’s also fantastic for a relaxed dinner with friends. You can make it the day before, so you’re not stressed when guests arrive. It pairs beautifully with a strong coffee after a meal. Honestly, any day that calls for a little extra joy is a good day for this flan.
What You’ll Need: Chocolate Flan Ingredients
Gathering your ingredients is the first step to dessert happiness. Here’s your shopping list:
For the Caramel:
- 1 cup of granulated sugar
For the Chocolate Flan:
- 1 can (397 g / 14 oz) sweetened condensed milk
- 1 can (354 ml / 12 oz) evaporated milk
- 4 large eggs, at room temperature
- 1 teaspoon pure vanilla extract
- 200 g (about 7 oz) semisweet chocolate, finely chopped and melted
- 1/4 cup unsweetened cocoa powder (optional, for super chocolate lovers!)
- A small pinch of salt
Easy Swaps: Ingredient Substitutions
No stress if you’re missing something! Here are easy fixes:
- Chocolate: Use bittersweet or dark chocolate for a less sweet, more intense flavor. Milk chocolate will make it sweeter and milder.
- Cocoa Powder: If you don’t have it, just leave it out. The melted chocolate provides plenty of flavor.
- Evaporated Milk: You can use whole milk in a pinch, but the texture won’t be as rich and creamy.
- Vanilla Extract: Try almond extract for a lovely nutty twist.
Your Step-by-Step Guide to Chocolate Caramel Flan Perfection
Step 1: Crafting the Golden Caramel
Place your sugar in a clean, dry saucepan over medium heat. Watch as the sugar begins to melt, swirling the pan gently but never stirring with a spoon. The sugar will clump, then slowly turn into a clear liquid before deepening into a beautiful, fragrant amber color. You’ll smell a rich, toasty scent. Once it’s a deep golden hue, immediately pour it into the bottom of your flan mold or cake pan. Be careful, as the caramel is extremely hot! Tilt the pan to coat the bottom evenly. The caramel will harden quickly, creating that glorious sticky layer.
Step 2: Getting Your Oven Ready
Preheat your oven to 350°F (175°C). Now, prepare a water bath, or bain-marie. Place your caramel-coated flan mold inside a larger roasting pan. Bring a kettle of water to boil. This gentle, steamy oven environment is the secret to a smooth, crack-free flan. It cooks the custard evenly without curdling the eggs. It’s like giving your dessert a cozy, warm bath!
Step 3: Blending the Silky Chocolate Mixture
In your blender, combine the sweetened condensed milk, evaporated milk, eggs, vanilla, melted chocolate, optional cocoa powder, and that pinch of salt. The melted chocolate should be slightly cooled so it doesn’t cook the eggs. Blend on medium speed for about 45 seconds to 1 minute. You want everything perfectly smooth, with no streaks of egg white or cocoa. The mixture will be a lovely, dark chocolate brown and smell incredible. Pour this silky liquid carefully over the hardened caramel in your mold.
Pro tip: To minimize bubbles, let the blended mixture sit for a minute or two, then gently pop any large bubbles on the surface with a spoon before baking.
Step 4: The Art of Baking in a Water Bath
Place the roasting pan with the filled flan mold onto the middle rack of your preheated oven. Carefully pour the hot water from your kettle into the roasting pan, around the outside of the flan mold, until it reaches about halfway up the sides of the mold. Close the oven door gently. Bake for 50 to 60 minutes. The flan is done when the edges are set, but the very center still has a slight, gentle jiggle—like set Jell-O. Over-baking will make it rubbery.
Step 5: The Crucial Cool Down and The Big Reveal
Remove the pan from the oven and let the flan cool in the water bath for about an hour. Then, take it out, let it come to room temperature, and finally, refrigerate it for at least 4 hours, preferably overnight. This chilling time is non-negotiable—it allows the flan to fully set and makes unmolding a dream. To serve, run a thin knife around the edge of the mold. Place your serving plate upside-down on top of the mold, then, with confidence, flip it over in one quick motion. Give the mold a little shake and lift it off to reveal your beautiful, caramel-topped Chocolate Flan.
Chef’s tip: For the cleanest unmolding, briefly dip the bottom of the mold in warm water before flipping.
Step 6: Serving Your Masterpiece
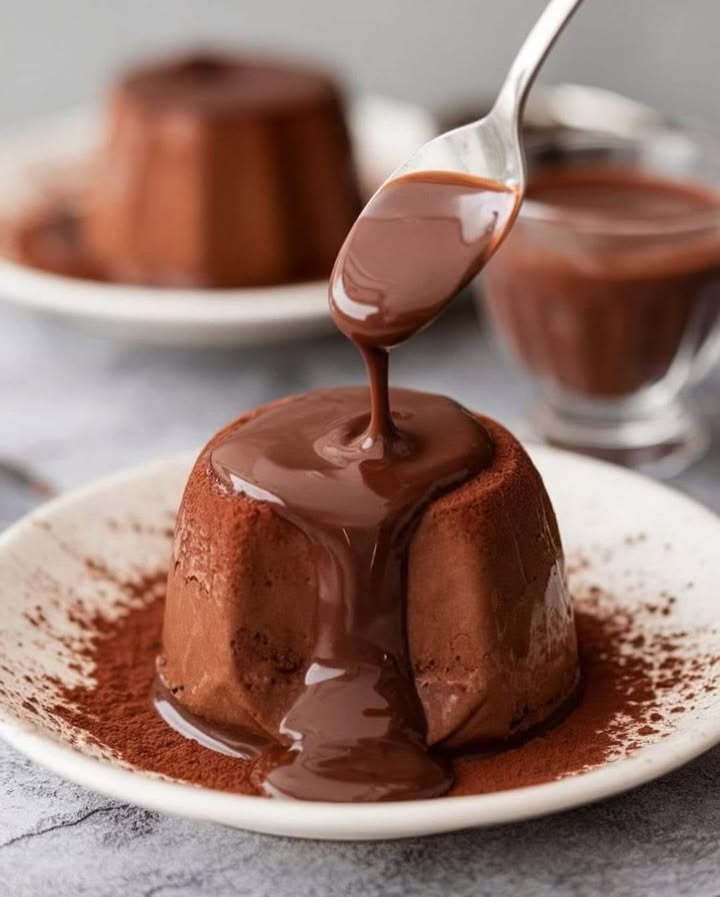
Now for the best part! Slice your Chocolate Caramel Flan and watch the gorgeous caramel sauce cascade over each piece. The contrast of the dark chocolate custard and the golden sauce is stunning. I love to add a dollop of freshly whipped cream or a handful of tart red berries like raspberries to cut through the richness. It’s an exquisite pleasure that deserves to be savored slowly.
Time Breakdown: Patience Makes Perfect
- Prep Time: 20 minutes
- Cook Time: 55 minutes
- Cooling & Chilling Time: 5+ hours (overnight is best)
- Total Time: About 6 hours 15 minutes (mostly hands-off)
The Secret to a Super Smooth Chocolate Flan
My absolute best trick is to strain the blended mixture through a fine-mesh sieve into the caramel-coated mold. This catches any tiny bits of unmixed egg or cocoa, guaranteeing a texture as smooth as silk. It’s an extra 30-second step that makes a huge difference in the final mouthfeel.
A Fun Chocolate Fact
Did you know the type of cocoa powder you use can change the flavor? Natural cocoa powder (like Hershey’s) is acidic and gives a sharper chocolate taste, while Dutch-processed cocoa is alkalized and has a deeper, smoother flavor. For this recipe, either works, but Dutch-processed will give you an even richer, darker chocolate color.
Gear You’ll Need
- A flan mold, Bundt pan, or 9-inch round cake pan
- A large roasting pan for the water bath
- Blender
- Saucepan for caramel
- Fine-mesh sieve (for the ultra-smooth secret!)
- Kettle or jug for hot water
Storing Your Chocolate Caramel Flan
Leftovers? A happy problem! Keep the flan covered in the refrigerator for up to 4 days. The caramel might seep a bit more into the custard, making it even more delicious. The texture stays perfectly creamy.
Can you freeze it? I don’t recommend freezing the whole flan, as the custard can become grainy and separate when thawed. This dessert is best enjoyed fresh from the fridge.
If you need to make it ahead, it’s actually ideal. Prepare it completely 1-2 days before your event. The flavors meld and the texture sets perfectly in the fridge, making your party day completely stress-free.
Handy Tips and Tricks for Success
- Use room temperature eggs and dairy. They blend together more smoothly and create a more uniform custard.
- Don’t rush the caramel. Medium heat is your friend. Burnt caramel tastes bitter.
- When making the water bath, use hot tap water or boiled water from a kettle. Putting a cold mold into a cold water bath in a hot oven slows the cooking too much.
- If the top of your flan browns too quickly, tent it loosely with a piece of aluminum foil.
Making It Beautiful: Presentation Ideas
- Garnish with fresh mint leaves and a single, perfect raspberry.
- Drizzle a little extra caramel sauce around the plate for a restaurant-style look.
- Serve with a side of orange segments; chocolate and orange are a classic pair.
- For a festive touch, sprinkle some edible gold flakes or chocolate shavings on top.
Healthier Alternative Recipes
Want to lighten things up? Try a few clever swaps:
- Coconut Milk Chocolate Flan: Use light coconut milk instead of evaporated milk and coconut sugar in the caramel for a dairy-free, tropical twist.
- Stevia-Sweetened Flan: Replace the sugar in the custard with a stevia blend made for baking. The caramel is trickier, but you can make a date paste “caramel” layer.
- Avocado Chocolate Flan: Blend in half a ripe avocado for extra creaminess and healthy fats, reducing the number of egg yolks.
- Pumpkin Spice Chocolate Flan: Add 1/2 cup of pumpkin puree and a dash of pumpkin pie spice for a fall-inspired, fiber-rich version.
- Greek Yogurt Flan: Swap the evaporated milk for full-fat Greek yogurt thinned with a little milk. It adds protein and a lovely tang.
- Single-Serve Ramekin Flans: Bake in individual ramekins for perfect portion control. Just reduce the baking time to about 25-30 minutes.
If you love creative desserts that don’t require an oven, you must try this stunning Orange and Double Chocolate Raw Cake. It’s packed with nuts and natural sweeteners for a healthier but utterly decadent treat.
Common Mistakes to Avoid
Mistake 1: Burning the Caramel
This happens when the heat is too high or you walk away from the pan. Sugar goes from perfect amber to burnt and bitter in seconds. Keep the heat at medium and stay put! Swirl the pan gently to help it melt evenly. Have your flan mold ready right next to the stove so you can pour it immediately when it reaches that perfect deep gold color.
Mistake 2: Skipping the Water Bath
Baking the flan directly on the oven rack seems easier, but it’s a sure path to a rubbery, cracked, or curdled dessert. The water bath creates gentle, even steam. This cooks the eggs slowly and gently, giving you that signature creamy texture. Don’t skip this crucial step!
Mistake 3: Not Chilling Long Enough
Impatience is the enemy of a perfect flan. Trying to unmold a warm flan leads to a runny, broken mess. The custard needs those hours in the fridge to fully set and firm up. For the cleanest slices and best texture, make it a day ahead. Overnight chilling is your best friend.
Mistake 4: Over-blending the Mixture
Blending for too long at high speed can incorporate too much air. This leads to a foamy top and creates bubbles in your baked flan. Blend just until everything is smooth and combined, about 45-60 seconds. Let it rest for a minute so the bubbles rise and pop, or skim them off with a spoon.
Your Chocolate Flan Questions, Answered
Can I make Chocolate Flan without a blender?
Yes, you can! A blender is the easiest tool for a super smooth mix, but a whisk and some elbow grease will work. First, ensure your melted chocolate is slightly cooled. In a large bowl, whisk the eggs thoroughly. Then, slowly whisk in the condensed milk, evaporated milk, and vanilla until smooth. Finally, whisk in the melted chocolate and cocoa powder until fully incorporated. The key is to whisk vigorously to break up the eggs completely. Straining the mixture afterward is even more important if you mix by hand.
Why did my caramel turn hard and crack?
Caramel hardens as it cools, which is normal! The crack you hear when you pour the flan mixture over it is typical. As it bakes and chills, the sugar softens again into a sauce. Problems arise if the caramel layer is too thick or if it gets overcooked and burnt. A thin, even layer of properly cooked golden caramel will always re-liquefy perfectly around your set flan.
My flan has bubbles/holes on top. What went wrong?
Small bubbles usually mean the mixture was blended too vigorously, trapping air. Next time, blend more gently and let the mix rest before pouring. Also, avoid over-baking. If the oven temperature is too high or you bake too long, the proteins in the eggs tighten too much, squeezing out moisture and creating a porous texture. The water bath and correct baking time prevent this.
Can I use milk chocolate instead of semisweet?
Absolutely, but know that it will change the final dessert. Milk chocolate is sweeter and less intense than semisweet. Your flan will be much sweeter overall and might taste more like a milk chocolate pudding. To balance it, you could reduce the amount of condensed milk slightly, but I’d recommend trying it as-is first if you have a serious sweet tooth!
How do I know exactly when the flan is done baking?
The “jiggle test” is your best guide. About 50 minutes in, give the pan a gentle shake. The edges should look fully set, but the center (about the size of a quarter) should have a slight, jelly-like wobble. It will not look liquid. If the whole surface jiggles wildly, it needs more time. If it doesn’t jiggle at all, it might be overdone. Remember, it continues to cook a bit as it cools in the water bath.
What’s the best pan to use for flan?
A metal flan mold with a center tube (like a Bundt pan) is classic because it helps heat distribute evenly. A 9-inch round cake pan works great too. Just ensure whatever you use is oven-safe and can hold the volume. Ceramic or glass dishes are fine, but they may require a slightly longer baking time.
Can I make individual portion flans?
Of course! Ramekins or small oven-safe jars are perfect for individual Chocolate Caramel Flans. The process is the same: caramel in the bottom of each, fill with mixture, bake in a water bath. The baking time will be much shorter—start checking at 25-30 minutes.
Why is there water in my flan after unmolding?
This is usually “syneresis,” where the proteins in the eggs tighten and squeeze out water. It’s often caused by over-baking. Make sure you’re using the water bath and baking just until the center is set but wobbly. Also, avoid poking it with a knife to test doneness, as that can release liquid.
Is Chocolate Flan served warm or cold?
Always serve it cold, straight from the refrigerator. The chilling sets the custard to the perfect sliceable yet creamy consistency. The contrast between the cool, smooth chocolate and the room-temperature caramel sauce is part of the magic.
Can I salvage broken caramel?
If your sugar seizes into clumps or hardens before melting, add just a few tablespoons of water to the pan, return to heat, and stir until the sugar dissolves again. Then continue cooking to evaporate the water and make your caramel. If it’s truly burnt (smells bitter and is very dark), it’s best to start over. Clean the pan and try again with lower heat.
This Chocolate Caramel Flan is a showstopper that’s easier than it looks. For another elegant dessert that’s sure to impress, explore more creamy creations in our wide collection of cheesecake recipes.
The Final Slice: A Dessert to Remember
So there you have it! My go-to recipe for a dessert that feels luxurious but is made with love and simple steps. The joy of flipping that mold and revealing the gorgeous, shiny caramel waterfall never gets old. It’s a dish that sparks conversation and requests for the recipe. Remember, using quality ingredients is key, and a great way to honor your efforts is by reducing food waste—plan your cooking and store leftovers smartly. I hope this Chocolate Caramel Flan becomes a cherished recipe in your home, just like it is in mine. Now, go preheat that oven and get ready for some delicious, creamy, rich pleasure!
Equipment
- Moule à flan
- Grand plat de cuisson
- Blender
- Casserole pour caramel
- Chinois
Ingredients
- 1 tasse sucre cristallisé pour le caramel
- 1 boîte lait concentré sucré
- 1 boîte lait évaporé
- 4 grands œufs à température ambiante
- 1 cuil. à café extrait de vanille
- 200 g chocolat noir finement haché et fondu
- 1/4 tasse cacao en poudre optionnel
- 1 pincée sel
Instructions
- Placez le sucre dans une casserole propre et sèche à feu moyen pour faire le caramel, en faisant tourner doucement, jusqu'à ce qu'il devienne d'une couleur dorée profonde. Versez dans le fond du moule à flan et laissez durcir.
- Préchauffez votre four à 175°C et préparez un bain-marie en plaçant le moule à flan enrobé de caramel dans un plat de cuisson.
- Dans un blender, combinez le lait concentré sucré, le lait évaporé, les œufs, la vanille, le chocolat fondu, le cacao en poudre (si utilisé) et le sel. Mixez jusqu'à l'obtention d'un mélange lisse et versez sur le caramel durci.
- Versez de l'eau chaude dans le plat de cuisson jusqu'à mi-hauteur des côtés du moule et faites cuire pendant 50-60 minutes, jusqu'à ce que les bords soient pris et que le centre tremble légèrement.
- Laissez le flan refroidir dans le bain-marie pendant une heure, puis réfrigérez pendant au moins 4 heures ou de préférence toute la nuit.
- Passez un couteau autour des bords, retournez sur une assiette de service et servez avec de la crème fouettée ou des baies.
Notes
Filtrer le mélange mixé pour une texture extra lisse.
Vous pouvez préparer ce flan jusqu'à 1 à 2 jours à l'avance pour améliorer sa saveur.
Servez frais pour la meilleure texture et goût. Profitez d'une délicate garniture de baies fraîches ou de crème fouettée !