
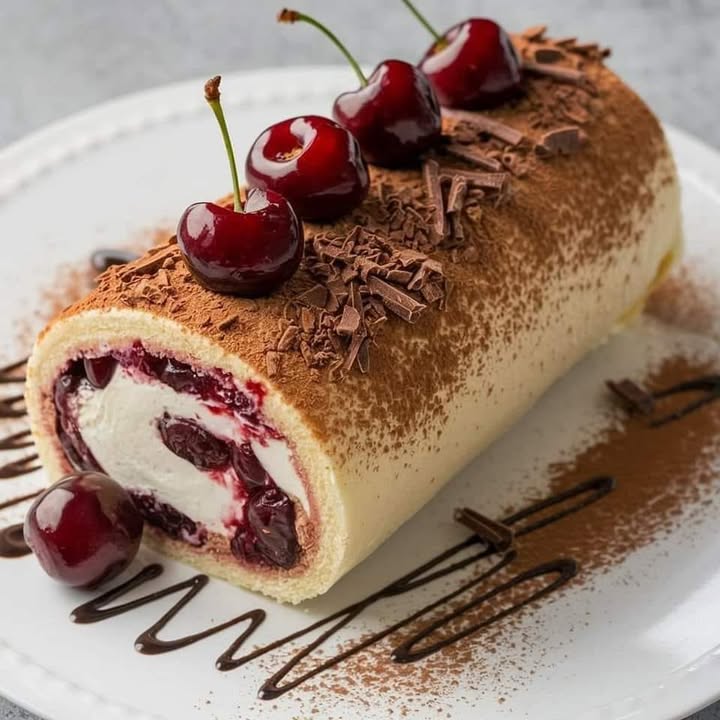
The Chocolate Cherry Swiss Roll Delight: A Black Forest Dream Cake!
Let me tell you about the day I almost gave up on rolling cakes. It involved a spectacular kitchen explosion of crumbs and cream. But then, I cracked the code for this Chocolate Cherry Swiss Roll Delight, and it was pure magic. This cake isn’t just a dessert; it’s a Black Forest Dream Cake come to life—fluffy chocolate, juicy cherries, and pillowy cream, all hugging each other in one beautiful, swoon-worthy spiral. It’s the kind of showstopper that makes everyone think you spent hours, when secretly, it’s a joy to make!
A Slice of Sweet History: From Black Forest to Your Table
The classic Black Forest cake is a German legend, named for the region’s dark, wooded forests and its famous kirschwasser (cherry brandy). My version, this Chocolate Cherry Bliss roll, is a playful, modern twist on that tradition. We keep the iconic trio—chocolate, cherries, and cream—but roll it into a stunning log that’s easier to slice and endlessly elegant. It feels both timeless and fresh, perfect for when you want that familiar, comforting flavor in a new, exciting shape that’s sure to wow your guests.
Why You’ll Fall in Love With This Chocolate Cherry Bliss
This recipe is your new best friend for so many reasons. First, the flavors are a perfect match: deep, rich cocoa with bright, tangy cherries cut by sweet, smooth cream. It’s a symphony in every bite! Second, it’s surprisingly simple. The sponge comes together quickly, and the rolling part is a fun, little kitchen craft project. Finally, it’s just stunning. That dramatic swirl, dusted with cocoa and dotted with cherries, turns any table into a dessert tableau. It’s a win for your taste buds and your Instagram feed!
Perfect Occasions for Your Dream Cake
This roll is versatile enough for any calendar event! It’s a star at holiday gatherings, adding festive cheer to Christmas or Thanksgiving. Bring it to a potluck and watch it become the centerpiece. It’s a beautiful birthday cake for someone special who adores chocolate. I even love making it for a cozy weekend family treat—because why wait for a party to enjoy a slice of heaven?
Gathering Your Ingredients for Chocolate Cherry Bliss
Let’s gather everything for this delightful bake. Using quality ingredients makes all the difference!
For the Chocolate Sponge Cake:
- 4 large eggs
- 3/4 cup granulated sugar
- 1 tsp vanilla extract
- 1/3 cup unsweetened cocoa powder
- 2/3 cup all-purpose flour
- 1 tsp baking powder
- 1/4 tsp salt
For the Cherry Filling:
- 2 cups pitted cherries (fresh or frozen)
- 1/4 cup granulated sugar
- 1 tbsp cornstarch
- 1 tbsp water
For the Whipped Cream Filling:
- 1 1/2 cups heavy cream, very cold
- 1/4 cup powdered sugar
- 1 tsp vanilla extract
For Garnish:
- Extra fresh cherries
- Chocolate shavings or a dusting of cocoa powder
Smart Swaps: Ingredient Substitutions
No worries if you’re missing something! Here are easy swaps:
- Cherries: Use frozen pitted cherries (thaw first) or a high-quality cherry pie filling for a shortcut.
- Cocoa Powder: Dutch-processed cocoa gives a darker, richer color, but natural unsweetened works perfectly.
- Heavy Cream: For a sturdier filling, you can substitute 1 cup of the heavy cream with an equal amount of mascarpone cheese. Whip it with the powdered sugar and vanilla first, then fold in the remaining 1/2 cup of whipped cream.
- Flour: For a gluten-free version, use a reliable 1:1 gluten-free flour blend.
Creating Your Chocolate Cherry Dream Cake: Step-by-Step
Step 1: Preheat and Prep
Start by heating your oven to 350°F (175°C). This ensures it’s perfectly hot when your batter is ready. Take your 10×15-inch jelly roll pan and line it with parchment paper. A little baking spray or butter on the pan helps the parchment stick. This simple step is your best friend for a clean, easy release later. Have your ingredients measured and ready to go—mise en place makes the process smooth and relaxing.
Step 2: Whip Up the Chocolate Sponge
In a large bowl, beat the eggs, granulated sugar, and vanilla together. Use an electric mixer on high speed for a good 5 minutes. You’re looking for a thick, pale, and luxurious mixture that leaves a ribbon trail when you lift the beaters. This air is what gives the cake its lovely lift. Sift the cocoa powder, flour, baking powder, and salt right over the egg mixture. Gently fold everything together with a spatula until just combined, keeping all that precious air inside. Pour the gorgeous dark batter into your prepared pan, spreading it evenly to the edges.
Pro tip: Don’t skip the sifting! It breaks up lumps in the cocoa and flour, ensuring a perfectly smooth, tender cake with no dry pockets.
Step 3: Cook the Cherry Filling
While the cake bakes, make your cherry magic. In a saucepan, combine the pitted cherries and sugar. Cook over medium heat, stirring occasionally, until the cherries soften and release their gorgeous ruby juices. In a small dish, mix the cornstarch and water into a smooth slurry. Stir this into the simmering cherries. The mixture will transform before your eyes, turning from juicy to glossy and thick in just a minute or two. Remove it from the heat and let it cool completely—a warm filling will melt your cream!
Step 4: Make the Whipped Cloud Filling
For the whipped cream, chill your bowl and beaters for 10 minutes first. This helps the cream whip up faster and sturdier. Pour the cold heavy cream into the chilled bowl. Add the powdered sugar and vanilla. Whip on medium-high speed until stiff peaks form. This means when you lift the beaters, the cream stands up straight and doesn’t flop over. Be careful not to go too far, or you’ll make butter! This fluffy cloud is the cozy blanket for your cherries.
Step 5: The Grand Assembly and Roll
Once the cake is baked (a light press should see it spring back), let it cool just for a minute in the pan. Then, carefully turn it out onto a clean kitchen towel dusted lightly with cocoa powder or powdered sugar. Peel off the parchment paper. While it’s still warm and flexible, start rolling the cake up from the short end, using the towel to help guide it. Let it cool completely rolled up. This “trains” the cake to roll without cracking later. Unroll the cooled cake, spread the whipped cream evenly, then spoon the cooled cherry filling in a line along one edge. Now, roll it back up, gently but firmly, using the towel to assist. Place it seam-side down on a platter.
Chef’s tip: Rolling the warm cake with the towel is the secret to a crack-free roll! It creates “muscle memory” for the sponge.
Step 6: Garnish and Serve the Delight
Pop your beautiful roll into the fridge for at least an hour to firm up. This makes slicing clean and easy. Just before serving, crown your Chocolate Cherry Swiss Roll with a flourish. Add a row of fresh, gleaming cherries down the center. Shower it with delicate chocolate shavings or a final, elegant dusting of cocoa powder. Use a sharp, warm knife (dipped in hot water and wiped dry) for perfect slices. Each piece reveals that stunning black-and-red swirl—a true Black Forest Dream Cake!
Your Baking Timeline
- Prep Time: 30 minutes (active, fun kitchen time)
- Cook Time: 12-15 minutes (quick bake!)
- Chill Time: 1 hour (the hardest part—waiting!)
- Total Time: About 1 hour 45 minutes
- Servings: 8-10 happy people
A Little Extra Secret for You
For an incredibly moist sponge and even more intense cherry flavor, try this: Brush the unrolled, cooled cake very lightly with a simple syrup (equal parts water and sugar, heated until dissolved, then cooled) or a tiny bit of kirsch before adding the fillings. It adds a professional touch and keeps every bite super tender.
Did You Know?
Cherries and chocolate are more than just a tasty pair—they’re a scientific flavor match! Food scientists say they share key flavor compounds, which is why the combination tastes so uniquely “right” and satisfying to our brains. It’s a match made in culinary heaven!
Necessary Kitchen Equipment
- 10×15-inch Jelly Roll Pan
- Parchment Paper
- Electric Mixer (hand or stand)
- Mixing Bowls (various sizes)
- Saucepan
- Spatula
- Whisk
- Clean Kitchen Towel
Storing Your Chocolate Cherry Masterpiece
The best way to store the Swiss roll is in the refrigerator. Cover it loosely with plastic wrap or place it in a large, airtight container. It will keep beautifully for up to 2-3 days. The flavors actually meld and improve after the first day!
You can also freeze the roll for longer storage. Wrap the whole roll (or individual slices) tightly in plastic wrap, then in aluminum foil. Freeze for up to 1 month. Thaw overnight in the refrigerator before serving.
Remember, the whipped cream filling is dairy-based, so it should not be left out at room temperature for more than 2 hours. Always keep it chilled until you’re ready to serve and enjoy.
Tips and Advice for Roll Success
- Cold Cream is Key: Ensure your heavy cream and mixing bowl are very cold for the best whip.
- Don’t Over-mix the Batter: Fold the dry ingredients gently to keep the sponge light and airy.
- Cool the Cherry Filling: A hot filling will deflate your beautiful whipped cream.
- Roll With Confidence: Don’t be timid! A firm, steady roll creates a tight, pretty spiral.
Presentation Ideas to Impress
- Dust with powdered sugar instead of cocoa for a snowy, wintery look.
- Pipe little rosettes of extra whipped cream on top of each slice.
- Serve with a small pitcher of warm chocolate sauce for a decadent drizzle.
- For a party, slice it and plate the slices on individual dishes with a fresh cherry on the side.
Explore More Dreamy Desserts
If you loved this rolled cake, you might enjoy exploring other delicious variations. For another no-bake, hazelnut-chocolate treat, our No-Bake Hazelnut Chocolate Cheesecake is pure indulgence. Craving more chocolate and fruit? Try the elegant twist in our Chocolate Caramel Forest Roll Cake. Or, for a cozy, spiced option perfect for fall, our Apple Pecan Cake with Caramel Glaze is a crowd-pleaser. And for individual, no-bake portions with a floral touch, these No-Bake Mini Blackberry Lavender Cheesecakes are stunning.
Common Mistakes to Avoid
Mistake 1: Overbaking the Sponge
This is the biggest culprit for a cracked roll. An overbaked sponge becomes dry and brittle, losing its flexibility. It will tear when you try to roll it. To avoid this, set a timer for the minimum baking time (12 minutes) and check. The cake is done when the top springs back lightly when touched and the edges just start to pull away from the pan. It might look slightly underdone to you, but it will continue to cook a bit as it cools. Remember, a slightly moist sponge is a rollable sponge!
Mistake 2: Adding Warm Filling to the Cream
We get it—you’re excited to assemble! But if your cherry compote is still warm or hot when you spoon it onto the whipped cream, it will immediately melt the cream. This creates a soggy, runny mess that’s impossible to roll neatly. The solution is simple: let the cherry filling cool completely to room temperature, or even chill it in the fridge for a bit. Patience here guarantees clean, distinct layers of cream and fruit.
Mistake 3: Not Rolling the Cake While Warm
It sounds counterintuitive—won’t it stick? Actually, rolling the warm cake is the professional trick! As the cake cools, it sets in its shape. If you let it cool flat, it will be stiff and prone to cracking when you finally try to roll it with the filling. As soon as the cake is out of the oven, flip it onto your prepared towel, peel off the parchment, and roll it up (towel and all). Let it cool completely inside the rolled towel. This “trains” the cake’s memory for its final curled form.
Mistake 4: Under-whipping the Cream
Soft, droopy whipped cream won’t hold the structure of the roll once you slice it. The filling will squish out, and the spiral won’t hold its shape. You need stiff peaks that stand straight up when you lift the beater. Ensure your cream, bowl, and beaters are very cold. Whip on medium-high speed and stop just when the cream looks thick, holds its shape, and doesn’t slide in the bowl. A sturdy cream filling is the supportive mattress for your cherry layer.
Keeping Your Kitchen Safe
When working with raw eggs and fresh fruit, always practice good kitchen hygiene. Use clean utensils and surfaces to prevent cross contamination. For instance, don’t use the same knife to pit cherries and then slice the finished cake without washing it. Keeping ingredients separate until they are cooked or combined ensures your beautiful dessert is also safe for everyone to enjoy.
This recipe is a fantastic addition to your baking repertoire, and I encourage you to browse our entire collection of delicious cake and cupcake recipes for more inspiration!
Frequently Asked Questions
Can I make this Swiss roll a day ahead?
Absolutely! In fact, making it a day ahead is often recommended. The flavors have more time to meld together beautifully, and the cake sets firmly, making it easier to slice cleanly. Just be sure to store it properly: after assembling, wrap the whole roll tightly in plastic wrap and keep it in the refrigerator overnight. Add the fresh garnishes (like cherries and chocolate shavings) right before you serve it to keep them looking fresh and vibrant.
My cake cracked when I rolled it. What did I do wrong?
Don’t worry, this happens to almost everyone at least once! The most common reasons are overbaking the sponge (making it dry) or not rolling it while it’s still warm and flexible. Next time, bake it just until the top springs back and immediately roll it with the towel. If it does crack a little, don’t stress—it will still taste amazing. You can often hide smaller cracks with a strategic dusting of cocoa powder or a line of whipped cream rosettes.
Can I use frozen cherries?
Yes, frozen cherries work perfectly well. Just be sure to thaw them completely first and drain any excess liquid. You might need to cook the filling for a minute or two longer to reduce the extra juice. Using frozen fruit is a great way to make this dessert year-round, and it’s often more affordable than fresh cherries when they’re not in season.
What can I use instead of a jelly roll pan?
If you don’t have the classic 10×15-inch jelly roll pan, you can use a standard large baking sheet with a rim (like a half-sheet pan). Just be aware that if your pan is larger, the batter will spread thinner and bake faster, so keep a close eye on it. If your pan is smaller, the cake will be thicker and may need a slightly longer bake time. The key is to spread the batter into an even rectangle about 1/4-inch thick.
How do I get clean, neat slices?
The secret weapon is a sharp, thin-bladed knife. Run the blade under very hot water, wipe it completely dry, and then make your slice. The heat helps the knife glide through the cream and cake without dragging or squishing the layers. Wipe the blade clean and reheat it between each slice for the most perfect, restaurant-quality presentation every single time.
Can I add liquor, like Kirsch, to this recipe?
You certainly can, for a more authentic Black Forest flavor! Add 1-2 tablespoons of Kirsch (cherry brandy) to the cooled cherry filling, or brush a light layer of it onto the unrolled sponge cake before adding the cream. For a non-alcoholic version, a teaspoon of pure almond extract mixed into the cherry filling gives a wonderful, marzipan-like note that pairs beautifully with the cherries.
Is it possible to make this dairy-free?
You can experiment with dairy-free alternatives. For the whipped cream filling, look for a brand of heavy coconut cream or a plant-based “heavy whipping cream” alternative that whips well. Chill it thoroughly first. For the chocolate sponge, ensure your cocoa and other ingredients are dairy-free. The final texture of the whipped topping may be slightly different, but you’ll still get a delicious, celebratory dessert.
Why did my whipped cream become grainy or buttery?
This means you whipped it too far! When heavy cream is over-whipped, the fat solids separate from the liquid, creating butter and buttermilk. To avoid this, whip on medium-high speed and stop as soon as you have firm peaks that hold their shape. If it happens, sadly, you can’t fix it—you’ll need to start over with new, cold cream. It’s better to under-whip slightly and check often than to go too far.
Can I use a different fruit filling?
Of course! This chocolate roll is a fantastic canvas for other fruits. Raspberry, strawberry, or even a spiced apple compote would be divine. Just follow the same method: cook your fruit with a little sugar and a cornstarch slurry to thicken the juices. Let it cool completely before using. The flavor combinations are endless, so have fun making this recipe your own.
How long will leftovers keep?
Leftovers (if you have any!) will keep well in the refrigerator, covered, for 2-3 days. The sponge may soften a bit from the moisture of the filling, but it will still taste delightful. I do not recommend freezing the fully assembled roll with the whipped cream, as the cream can separate and become watery upon thawing. You can, however, freeze the baked, unfilled sponge roll tightly wrapped for up to a month.
Ready, Set, Roll!
And there you have it—your path to creating a stunning Chocolate Cherry Swiss Roll Delight that honestly tastes even better than it looks. This Black Forest Dream Cake is all about celebrating simple, glorious flavors in a show-stopping way. It proves that a little bit of kitchen love can create something truly special. So preheat that oven, pit those cherries, and get ready to roll. Your friends and family are in for the most delicious, chocolatey, cherry-filled treat. Happy baking!
Equipment
- Grand bol
- Fouet
- Spatule
- Plaque à pâtisserie
- Papier sulfurisé
Ingredients
- 4 œufs
- 150 g sucre
- 30 g cacao en poudre
- 65 g farine tout usage
- 5 g poudre à lever
- 1 g sel
- 240 ml crème épaisse
- 120 ml sauce caramel
- 90 g pépites de chocolat
- q.s. sucre glace pour saupoudrer
- q.s. cacao en poudre pour saupoudrer
- q.s. sauce caramel pour le décor
Instructions
- Préchauffez votre four à 175°C. Graissez une plaque à pâtisserie de 15x10 pouces et tapissez-la de papier sulfurisé.
- Dans un grand bol, battez les œufs et le sucre jusqu'à ce que le mélange soit épais et pâle. Tamisez le cacao en poudre, la farine, la poudre à lever et le sel. Incorporez délicatement jusqu'à obtenir une pâte lisse.
- Versez la pâte dans le moule préparé et étalez-la uniformément. Faites cuire au four pendant 12-15 minutes ou jusqu'à ce que le gâteau rebondisse au toucher.
- Alors que le gâteau cuit, chauffez la crème épaisse dans une casserole jusqu'à frémissement. Ajoutez la sauce caramel et les pépites de chocolat jusqu'à obtenir un mélange lisse.
- Une fois le gâteau cuit, retournez-le sur un torchon saupoudré de sucre glace. Retirez soigneusement le papier sulfurisé et roulez-le avec le torchon à l'intérieur. Laissez-le refroidir complètement.
- Déroulez le gâteau et étalez la garniture caramel-chocolat uniformément. Roulez à nouveau le gâteau sans le torchon.
- Saupoudrez le dessus du rouleau de sucre glace et de cacao en poudre. Nappez de sauce caramel.
- Réfrigérez le rouleau pendant au moins 1 heure avant de le trancher et de le servir.