
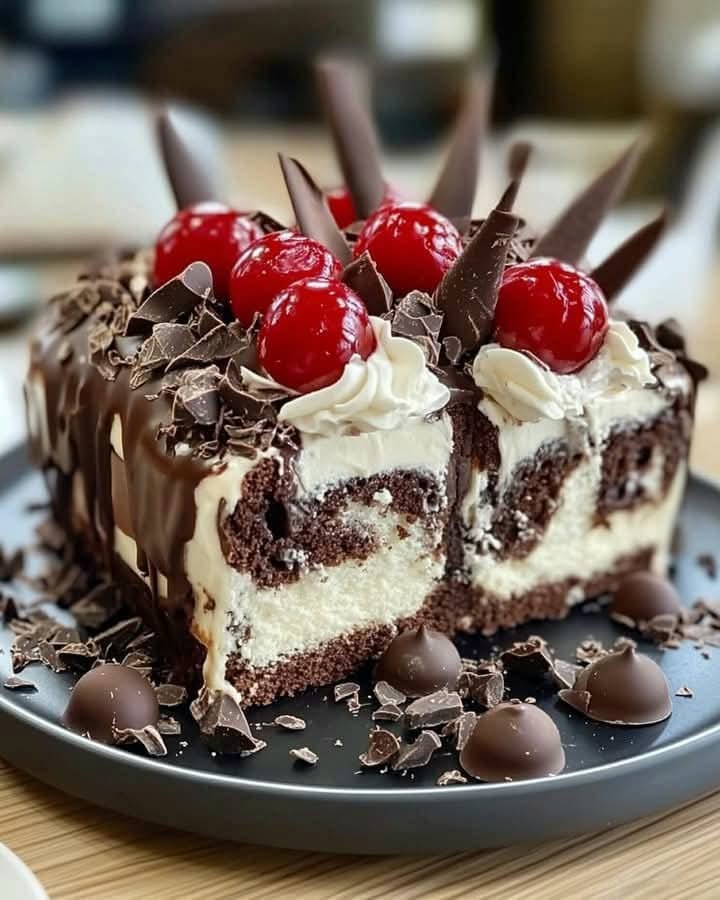
The Perfect Chocolate Cherry Roll: A Taste of Sweet Nostalgia
I still remember the first time a slice of Black Forest cake made my eyes go wide. It was at my aunt’s anniversary party, a towering masterpiece of chocolate, cream, and cherries. I’ve always wanted to capture that magic in a simpler, more playful form. That’s how my love affair with this Chocolate Cherry Roll began. It’s all the indulgent flavors of the classic, but in a fun, swirly package that’s just begging to be sliced. Trust me, one bite of this moist cocoa sponge wrapped around cherry-laced cream will transport you straight to dessert heaven.
A Slice of History: From Germany to Your Kitchen
This recipe is my personal twist on the famed Black Forest gâteau from Germany. The original hails from the Black Forest region, known for its sour cherries and Kirschwasser (cherry brandy). My version skips the alcohol but doubles down on the cherry-chocolate harmony in a handy roll. It’s a modern take that’s less fussy than layering a whole cake but just as impressive. Whether you call it a Swiss roll, a roulade, or simply a Chocolate Cherry Roll, it’s a timeless treat that brings a touch of European café charm right to your table.
Why You’ll Fall in Love With This Chocolate Swiss Roll
You’re going to adore this recipe for so many reasons! First, the contrast is everything: the rich, dark chocolate sponge against the sweet, fruity cream is a match made in pastry paradise. Second, it looks incredibly fancy but is genuinely forgiving to make—the rolling part is easier than you think! Finally, it’s a versatile crowd-pleaser. Kids love the swirl, adults adore the sophisticated flavor, and it’s always the star of the dessert table. It’s my go-to when I need a guaranteed “wow” without spending all day in the kitchen.
When to Whip Up This Showstopping Dessert
This roll is perfect for almost any gathering! It’s elegant enough for holiday dinners like Christmas or Thanksgiving. It’s a gorgeous centerpiece for birthdays or anniversaries. I love making it for potlucks because it travels well and slices neatly. Honestly, a quiet Sunday afternoon with a cup of coffee is also a perfect occasion. Anytime calls for a special, shareable treat is the right time for this Chocolate Cherry Roll.
What You’ll Need: Ingredients for Your Chocolate Cherry Roll
Let’s gather our goodies! Using room-temperature eggs is key for a fluffy sponge.
- For the Chocolate Sponge:
- 4 large eggs (room temp)
- 1/2 cup granulated sugar
- 1/4 cup all-purpose flour
- 1/4 cup cocoa powder
- 1 tsp baking powder
- Pinch of salt
- 1 tsp vanilla extract
- For the Cherry Cream Filling:
- 1 1/2 cups heavy cream (cold)
- 1/4 cup powdered sugar
- 1 tsp vanilla extract
- 1 cup canned cherries, drained and patted dry
- For the Topping & Decoration:
- Whipped cream (for piping)
- 1/2 cup chocolate chips (semi-sweet)
- 1/4 cup heavy cream (for ganache)
- Maraschino cherries
- Shaved chocolate
No Worries! Handy Ingredient Substitutions
Out of something? Don’t sweat it. Here are some easy swaps:
- Cherries: Use frozen pitted cherries (thawed and drained) or a good-quality cherry pie filling. Fresh pitted cherries work too, but chop them.
- Cocoa Powder: Dutch-processed or natural cocoa both work here.
- Heavy Cream: For the filling, a stabilized whipped cream with a bit of cream cheese can hold up longer.
- All-Purpose Flour: A 1:1 gluten-free baking blend can be used for a gluten-free Chocolate Swiss Roll.
Crafting Your Masterpiece: Step-by-Step Instructions
Step 1: Prep and Preheat
First things first, let’s get our oven ready. Preheat it to 350°F (175°C). This ensures a consistent temperature for baking. Take a 10×15-inch baking sheet or jelly roll pan and line it neatly with parchment paper. The paper should hang over the edges a bit. This little overhang will be your best friend when it’s time to lift the sponge out. A light spray of cooking oil on the pan under the paper helps it stay put. Now, your stage is set!
Step 2: Whip the Eggs and Sugar
Here’s where the magic starts. In a large, clean bowl, add your room-temperature eggs and granulated sugar. Using a hand mixer or stand mixer, beat them on medium-high speed. Watch as the mixture transforms from yellow and grainy to a pale, thick, and fluffy foam. This should take about 5-7 minutes. When you lift the beaters, the ribbon of batter that falls should hold its shape for a few seconds. This aeration is the secret to a light and springy chocolate cake base.
Pro tip: Room temperature eggs whip up much higher and give more volume. If you forgot, place cold eggs in a bowl of warm water for 5-10 minutes.
Step 3: Fold in the Dry Ingredients
Time to gently incorporate the dry goods. Sift the flour, cocoa powder, baking powder, and salt directly over the egg foam. Sifting prevents lumps and incorporates everything evenly. Using a large spatula, gently fold the mixture. Use big, sweeping motions from the bottom up. You want to keep as much of that precious air in as possible. Stop as soon as no dry streaks remain. A few tiny streaks are better than overmixing! Finally, fold in the vanilla extract for that warm, inviting aroma.
Step 4: Bake to Perfection
Pour and spread your beautiful, airy batter onto your prepared pan. Use the spatula to guide it into an even layer, reaching all the corners. Pop it into the preheated oven. The bake time is short and sweet—just 10 to 12 minutes. You’ll know it’s done when the top feels springy and set to a gentle touch. Your kitchen will smell amazing, like a chocolate factory! Avoid opening the oven door too early, as a draft can cause the delicate sponge to fall.
Step 5: The Critical Roll & Cool
This step is the key to a crack-free roll! As soon as the pan is out of the oven, have a clean kitchen towel ready. Lightly dust the towel with powdered sugar or cocoa powder. Carefully flip the warm sponge onto the towel. Peel off the parchment paper slowly. Now, starting from one of the short ends, use the towel to gently but firmly roll the sponge up. Let it cool completely rolled up like this. This “trains” the sponge to hold its rolled shape and prevents cracks when you add the filling later.
Step 6: Make the Dreamy Cherry Filling
While the sponge cools, let’s make the filling. Pour the cold heavy cream, powdered sugar, and vanilla into a chilled bowl. Whip on medium-high until you get beautiful, stiff peaks. The cream should hold its shape firmly when you lift the beaters. Gently fold in the drained cherries. I like to chop a few of them for better distribution. The filling should be thick, luscious, and dotted with sweet ruby cherries. Try not to eat it all with a spoon!
Step 7: Fill and Roll Your Chocolate Swiss Roll
Once the sponge is completely cool, it’s assembly time! Unroll it carefully on the towel. You’ll see it has a lovely curved shape already. Spread the cherry whipped cream filling evenly over the entire surface, leaving a small border at the far edge. Using the towel to help you, start rolling the sponge back up, this time without the towel inside. Keep it snug but don’t squeeze the filling out. Place the finished roll seam-side down on your serving plate.
Step 8: Drizzle with Simple Ganache
Now for the gorgeous chocolate glaze! Place the chocolate chips in a heatproof bowl. Heat the 1/4 cup of heavy cream in a small saucepan until it just begins to simmer, then pour it over the chips. Let it sit for one minute to melt the chocolate, then stir slowly until it’s completely smooth, dark, and glossy. Drizzle this simple ganache generously over the top of your roll. Let some drip charmingly down the sides.
Step 9: Add the Final Festive Touches
This is the fun part! Pipe little rosettes or dollops of extra whipped cream along the top of the roll. Place a bright red maraschino cherry on each cream peak. Finally, take a vegetable peeler to a bar of chocolate to create delicate shavings and sprinkle them over everything. It looks absolutely professional and is so simple to do. Your Chocolate Cherry Roll is now a work of art.
Step 10: Chill, Slice, and Savor
Patience is the final ingredient. Cover your roll loosely and place it in the fridge for at least one hour. This chilling time firms up the filling, sets the ganache, and lets all the flavors meld together beautifully. When you’re ready, use a sharp knife to slice it into generous portions. Wipe the knife clean between cuts for perfect slices. Then, sit back and watch everyone’s delighted faces as they take their first bite.
Chef’s tip: For super clean slices, you can briefly heat your knife under hot water, dry it, and then cut.
Your Baking Timeline
| Activity | Time |
|---|---|
| Preparation Time | 30 minutes |
| Baking Time | 12 minutes |
| Cooling & Chilling Time | 1 hour 30 minutes |
| Total Time | Approx. 2 hours 12 minutes |
My Secret Weapon: The Towel Trick
My number one secret is all in the towel. Rolling the warm sponge in a lint-free kitchen towel dusted with powdered sugar is non-negotiable. This does two crucial things: it absorbs excess steam to prevent sogginess, and it “trains” the cake’s memory to stay in a roll. If you skip this and try to roll a cold, unfilled sponge, it’s almost guaranteed to crack. The towel is your safety net for a perfect, photogenic swirl every single time.
A Cherry Fun Fact!
Did you know there are over 1,000 varieties of cherries? The ones we typically bake with, like Morello or Montmorency, are tart cherries. They have a brighter, tangier flavor that balances sweet desserts perfectly. Canned cherries in syrup are often these tart varieties, which is why they work so well in this recipe. They provide that classic punch of flavor without being overly sweet.
Gear Up: Necessary Equipment
You don’t need fancy tools! Here’s what will make the process smooth:
- 10×15-inch Jelly Roll Pan or Baking Sheet
- Parchment Paper
- Stand Mixer or Hand Mixer
- Large Mixing Bowls
- Spatula (for folding)
- Clean Kitchen Towel (lint-free)
- Whisk
- Sifter or Fine Mesh Sieve
- Piping Bag & Tip (optional, for decoration)
Keeping Your Chocolate Cherry Roll Fresh
This dessert is best enjoyed within 1-2 days of making it. Store it covered in the refrigerator. You can place it on a cake stand with a dome or wrap it gently in plastic wrap. The cool temperature keeps the whipped cream filling stable and delicious.
If you need to store it longer, you can freeze the unfilled, un-decorated sponge roll tightly wrapped for up to a month. Thaw it in the fridge, then fill and decorate as directed. I don’t recommend freezing the fully assembled roll, as the whipped cream can become watery and lose its texture when thawed.
For serving, always take it out of the fridge about 15-20 minutes before slicing. This allows the sponge to soften slightly for the perfect, tender bite.
Tips For a Flawless Roll Every Time
- Eggs are Key: Room temperature eggs whip to a much greater volume, giving you a lighter sponge.
- Don’t Overmix: Once you add the dry ingredients, fold gently. Overmixing deflates the batter and leads to a tough cake.
- Cool Completely: Make sure the rolled sponge is 100% cool before adding the filling. A warm sponge will melt the cream.
- Drain Cherries Well: Pat your canned cherries dry with a paper towel. Extra juice can make the filling runny.
Presentation Ideas to Impress Your Guests
Make your roll the star of the table!
- Serve on a long, rectangular platter for a dramatic effect.
- Dust the plate with a little cocoa powder or powdered sugar before placing the roll.
- Add fresh mint leaves beside each slice for a pop of green color.
- Drizzle individual plates with a little extra chocolate sauce or cherry syrup.
- For a holiday touch, use green-tinted whipped cream and candied cherries.
Love This Recipe? Try These Variations
This Chocolate Swiss Roll formula is a fantastic base for endless creativity! Here are six delicious twists:
- Raspberry Chocolate Dream: Swap the cherries for fresh raspberries. The tartness of the berries with dark chocolate is divine. For a similar swirled treat, check out this gorgeous Raspberry Chocolate Cake Roll for inspiration.
- Cookies & Cream Roll: Fold crushed Oreo cookies into the whipped cream filling. Use a vanilla sponge instead of chocolate for a stunning black-and-white look.
- Peppermint Mocha Roll: Add 1 tsp of espresso powder to the dry ingredients. Fold crushed peppermint candies into the filling and garnish with a white chocolate peppermint ganache.
- Tropical Pineapple-Coconut: Use a vanilla sponge. Fill with cream mixed with well-drained crushed pineapple and toasted coconut flakes.
- Salted Caramel Pecan: Fill the chocolate roll with sweetened cream and a swirl of salted caramel sauce. Roll the finished cake in chopped, toasted pecans.
- Lemon Blueberry Burst: A bright spring version! Use a vanilla sponge, and fill with lemon zest-infused cream and fresh blueberries.
Common Mistakes to Avoid
Mistake 1: Using Cold Eggs
This is probably the most common slip-up. Cold egg whites don’t whip up as well. They won’t trap as much air, resulting in a denser, flatter sponge that’s harder to roll without cracking. Always plan ahead and take your eggs out of the fridge at least 30 minutes before you start baking. If you’re in a pinch, place the whole eggs (still in their shells) in a bowl of warm water for 5-10 minutes to quickly bring them to room temperature.
Mistake 2: Overbaking the Sponge
It’s easy to think a few more minutes will make it sturdier, but an overbaked sponge is a dry sponge. A dry sponge will crack the moment you try to roll it. Bake it just until the top is set and springs back when you lightly touch it. The suggested 10-12 minutes is a great guide. Check it at the 10-minute mark. Remember, it will continue to cook a tiny bit from residual heat after it comes out of the oven.
Mistake 3: Adding Filling to a Warm Sponge
Impatience can lead to a melted mess! If the sponge is even slightly warm, the heat will instantly soften and melt the whipped cream filling. This makes a soggy cake and a filling that oozes out when you try to slice it. Let the sponge cool completely in its rolled-up towel. You can even speed this up by popping the rolled towel bundle into the refrigerator for 20-30 minutes. Touch it to be sure it’s no longer warm before unrolling and filling.
Mistake 4: Not Draining the Cherries
Pouring cherries straight from the can into your fluffy cream is a recipe for a watery filling. The extra syrup will quickly break down the whipped cream, making it loose and runny. Always drain your canned cherries in a sieve, then pat them thoroughly dry with several layers of paper towels. Taking this extra minute ensures your filling stays thick, pipeable, and delicious.
Mistake 5: Rolling Too Tightly (or Too Loosely)
Finding the perfect roll tension takes practice. Rolling too tightly will squeeze all the beautiful filling out the ends. Rolling too loosely will give you a saggy, unstable roll that falls apart when sliced. Aim for a firm, even pressure as you use the towel to guide the initial roll. When filling and re-rolling, start snugly and maintain a consistent grip all the way through. The first roll with the towel gives you the perfect guide to follow.
Frequently Asked Questions (FAQ)
Can I make this Chocolate Cherry Roll ahead of time?
Absolutely, and it’s a great strategy for stress-free entertaining. You can bake the sponge, roll it in the towel, and let it cool completely a day in advance. Wrap the cooled, towel-rolled sponge tightly in plastic wrap and keep it at room temperature overnight. The next day, make your filling, assemble, decorate, and chill. The fully assembled roll is best served within 24 hours for peak freshness and texture, so I recommend finishing it the day you plan to serve it.
Why did my cake crack when I rolled it?
Cracking usually happens for one of three reasons. First, the cake might have been overbaked and dried out. Second, you may have waited too long to roll it after taking it out of the oven. Rolling it while warm and flexible is crucial. Third, not using the towel method or rolling too tightly on the first roll can cause stress cracks. Don’t worry! Even with a few small cracks, the filling and ganache will cover them, and it will still taste amazing.
Can I use fresh cherries instead of canned?
Yes, you can, but it requires a bit more work. You’ll need to pit and cook them first. Simmer about 1.5 cups of pitted fresh or frozen tart cherries with a couple tablespoons of sugar and a splash of water or lemon juice until they soften and release their juices. Let this compote cool completely and drain off most of the liquid before folding it into your whipped cream. This ensures you get the flavor without too much extra moisture.
How do I get the chocolate ganache to be shiny and smooth?
The key is the ratio and the mixing. Use equal parts by weight of good quality chocolate chips and hot (but not boiling) heavy cream. Pour the hot cream over the chips and let it sit for a full minute without stirring. This allows the chocolate to melt evenly from the bottom up. Then, stir slowly and gently from the center outward until it becomes a velvety, glossy mixture. Avoid whisking vigorously, as that can incorporate air bubbles.
Is there a way to make this dessert less sweet?
For sure! You have a few options. You can use tart cherries packed in water instead of heavy syrup and reduce the powdered sugar in the whipped cream by a tablespoon. For the ganache, opt for a dark chocolate with 70% cocoa or higher, as it has less sugar. Remember, enjoying sweets as part of a mindful dietary balance is key, so adjusting recipes to your taste is always a smart move.
My whipped cream turned grainy or lumpy. What went wrong?
This usually means it was over-whipped. When you whip heavy cream past stiff peaks, the fat solids begin to separate from the liquid, creating butter and buttermilk. Unfortunately, you can’t fix it once it happens. To avoid this, start with a cold bowl and beaters, and whip on medium speed. Stop as soon as the cream holds a firm peak when you lift the beater. If you’re nervous, whip by hand with a whisk for more control.
Can I freeze the finished Chocolate Swiss Roll?
I don’t recommend freezing the fully assembled roll with the whipped cream filling. Whipped cream doesn’t freeze and thaw well; it becomes watery and loses its texture. However, you can absolutely freeze the unfilled, cooled sponge roll (after the initial towel roll and cooling). Wrap it tightly in plastic wrap and then in foil. It will keep for up to a month. Thaw in the refrigerator overnight, then unroll, fill, and decorate as fresh.
What can I use if I don’t have a jelly roll pan?
No problem! A standard 10×15-inch rimmed baking sheet works perfectly. If you only have an 18×13-inch half-sheet pan, you can still use it. Just spread the batter to create a 10×15-inch rectangle in the center of the pan. The cake will be slightly thinner but will still work. The key is having the parchment paper overhang to help lift the thin cake out.
How do I prevent the powdered sugar on the towel from sticking to the cake?
A light dusting is all you need. Too much powdered sugar can absorb into the warm cake and create a pasty layer. You can also use cocoa powder instead, which blends right into the chocolate cake. Make sure your towel is clean and lint-free. The light coating is just there to prevent sticking, not to cover the cake.
Can I add liqueur to this recipe for an adult version?
Of course, for a truly authentic Black Forest touch! You can add 1-2 tablespoons of Kirsch (cherry brandy) to the cherry filling. Just mix it with the drained cherries and let them marinate for 10 minutes before folding into the cream. You could also brush the unrolled sponge with a little Kirsch before adding the filling. This adds a wonderful depth of flavor for grown-up gatherings.
I hope this recipe brings as much joy to your kitchen as it has to mine. If you’re looking for more delightful baking projects, you’ll find a whole world of inspiration in our collection of cake and cupcake recipes online.
Ready, Set, Roll!
So there you have it—my ultimate guide to creating a stunning Chocolate Cherry Roll that’s sure to impress. It’s a recipe built on happy memories and a whole lot of delicious trial and error. Don’t let the rolling scare you; just trust the towel and take your time. The moment you slice into that beautiful swirl and see the layers of chocolate and cherry cream, you’ll feel like a true baking star. Gather your ingredients, preheat that oven, and get ready to make something amazing. Happy baking!
Equipment
- Grand bol
- Fouet
- Spatule
- Plaque à pâtisserie
- Papier sulfurisé
Ingredients
- 4 œufs
- 100 g sucre
- 30 g cacao en poudre
- 40 g farine tout usage
- 5 g poudre à lever
- 1 g sel
- 360 ml crème épaisse
- 15 g sucre glace pour saupoudrer
- 90 g pépites de chocolat
- 100 g cerises en conserve égouttées et séchées
Instructions
- Préchauffez votre four à 175°C et tapissez une plaque à pâtisserie de 10x15 pouces avec du papier sulfurisé.
- Dans un grand bol, battez les œufs et le sucre à vitesse moyenne-élevée pendant 5 à 7 minutes jusqu'à ce que le mélange soit épais et mousseux.
- Tamisez la farine, le cacao en poudre, la poudre à lever et le sel sur le mélange d'œufs. Incorporez délicatement jusqu'à ce que le tout soit juste combiné, puis ajoutez l'extrait de vanille.
- Étalez la pâte uniformément dans le moule préparé et faites cuire pendant 10 à 12 minutes jusqu'à ce qu'elle soit rebondissante au toucher.
- En utilisant un torchon propre saupoudré de sucre glace, retournez l'éponge et roulez-la pendant qu'elle est chaude pour former un cylindre. Laissez refroidir complètement.
- Pour préparer la garniture, fouettez la crème froide, le sucre glace et la vanille jusqu'à obtenir des pics fermes. Incorporez délicatement les cerises égouttées.
- Déroulez délicatement l'éponge refroidie et étalez la garniture crémeuse aux cerises uniformément dessus. Roulez à nouveau sans le torchon.
- Pour la ganache, chauffez la crème jusqu'à ce qu'elle frémisse et versez-la sur les pépites de chocolat. Remuez jusqu'à obtenir un mélange lisse et brillant, puis versez sur le rouleau.
- Dressez de la crème fouettée sur le dessus, ajoutez des cerises au marasquin et parsemez de copeaux de chocolat.
- Réfrigérez pendant au moins une heure avant de couper et de servir.
Notes
Nutrition

Hi, I’m Olivia Parker, the founder of BakingSecret.com and a lifelong lover of all things sweet and homemade. I grew up in a small town in Oregon, where the smell of fresh cookies in my family’s kitchen sparked my passion for baking. Over the years, I turned that passion into a mission: to help home bakers feel confident, inspired, and creative.
After studying food science and working in several artisan bakeries across the U.S., I decided to create a space where everyone from beginners to seasoned bakers can find reliable recipes, expert tips, and a warm, welcoming community. BakingSecret.com is my way of sharing the magic of baking with the world. When I’m not testing new recipes, you’ll find me exploring farmers’ markets, collecting vintage cookbooks, or perfecting my sourdough technique.