
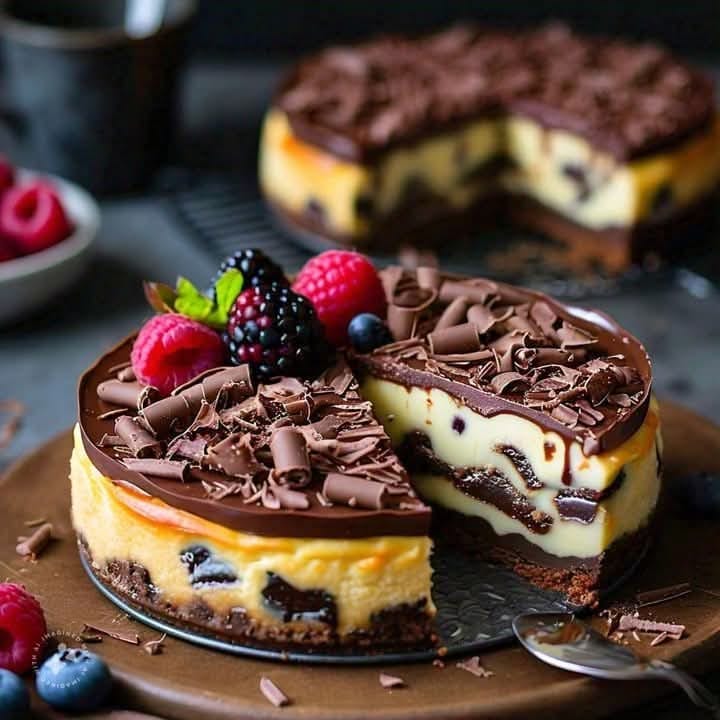
My Quest for the Ultimate Chocolate Cookie Cheesecake
You know that dream where you’re eating a brownie, a scoop of cookie dough, and a slice of cheesecake all at once? I lived it. Last year, for my husband’s “big” birthday, I decided to combine his three favorite desserts into one epic showstopper. After a few… let’s call them “learning experiences” (we don’t talk about the soupy middle incident), I perfected this Brownie Layered Cookie Dough Cheesecake. It’s the love child of all things decadent, and it never fails to make people’s eyes light up. Consider this your ticket to becoming a dessert legend in your own kitchen.
A Delicious Mash-Up of Dessert History
Cheesecake dates back to ancient Greece, brownies were a happy accident in 19th-century America, and edible cookie dough? Well, that’s a modern triumph of delicious rebellion against baking norms. This recipe is a glorious tribute to all those traditions. It takes the fudgy, dense joy of a brownie, the nostalgic, buttery bliss of safe-to-eat cookie dough, and the creamy, tangy luxury of a classic New York-style cheesecake. It layers them into one unforgettable experience. It’s not a simple treat, but for a special occasion, it’s a celebration of dessert evolution itself.
Why You’ll Fall Head Over Heels for This Dessert
Honestly, why wouldn’t you? First, it’s a texture festival. You get the chewy brownie bottom, the soft, gooey cookie dough middle, and the smooth, rich cheesecake top. Every forkful is a surprise. Second, it solves the “but I can’t decide!” problem at parties. It’s three incredible desserts in one, guaranteed to please a crowd. Finally, while it has a few steps, none are complicated. It’s mostly about mixing and layering. The “wow” factor you get is worth every minute.
The Perfect Occasion for a Showstopper
This isn’t your average Tuesday night pudding (though I won’t judge if you make it one). This is your secret weapon for milestones. Think big birthdays, anniversary dinners, holiday feasts like Thanksgiving or Christmas, or even a “you survived the week” gathering with your best friends. Bringing this out after a meal is a guaranteed way to get cheers. It turns any event into a special, memorable celebration.
What You’ll Need: The Dream Team Ingredients
Gathering your ingredients is the first step to dessert magic. Here’s the cast of characters that makes this chocolate cookie cheesecake so unforgettable.
For the Brownie Layer:
- 1 and 1/2 sticks unsalted butter, plus more for greasing
- 2 cups sugar
- 4 large eggs
- 1/2 cup unsweetened cocoa powder
- 1 and 1/4 cups all-purpose flour
- 1 teaspoon salt
- 1 cup semi-sweet chocolate chips
For the Cookie Dough Layer:
- 1/2 cup unsalted butter, softened
- 3/4 cup confectioners sugar
- 1/2 cup brown sugar
- 2 tablespoons milk
- 2 teaspoons vanilla extract
- 1 and 1/4 cups all-purpose flour
- 1/2 cup mini chocolate chips
For the Cheesecake Layer:
- 16 ounces cream cheese, softened
- 1/2 cup granulated sugar
- 4 large eggs
- 1 teaspoon vanilla extract
- 1 cup sour cream
No Stress Substitutions
Don’t panic if you’re missing something! Here are some easy swaps:
- Flour: A 1:1 gluten-free baking blend works perfectly for all layers.
- Cocoa Powder: Swap the unsweetened cocoa for dark cocoa powder for an intensely rich, almost Oreo-like flavor.
- Chocolate Chips: Use milk, dark, or even a flavored chip like mint or peanut butter.
- Sour Cream: Full-fat plain Greek yogurt is a great stand-in.
- Butter: In the cookie dough, you can use a natural, drippy peanut butter for a PB&J vibe with the jam variations later!
Let’s Build This Masterpiece: Step-by-Step
Follow these steps closely, and you’ll have a flawless layered dessert. I’ve included all my hard-learned tips!
Step 1: Prep and Brownie Base
First, preheat your oven to 350°F (175°C). Generously grease a 9-inch springform pan with butter. This is crucial for a clean release later. Now, make the brownie batter. Melt your butter and whisk it with the sugar until it looks glossy. Beat in the eggs one at a time. The mixture will become thick and pale. Sift in your cocoa powder, flour, and salt. Gently fold until just combined, then stir in those glorious chocolate chips. The batter will be thick and fudgy. Press it evenly into the bottom of your prepared pan. It forms the delicious, sturdy foundation for everything else.
Step 2: First Bake for the Brownie
Place your pan in the center of the preheated oven. Bake for 25-30 minutes. You’re not looking for a fully cooked brownie here. It should be just set on top and slightly puffed. A toothpick inserted will have some moist crumbs attached. Pro tip: Do not overbake this layer! It will continue cooking under the next layers. Let it cool on a rack for about 10 minutes while you make the cookie dough. This helps it firm up a bit.
Step 3: The Edible Cookie Dough Layer
While the brownie cools, cream the softened butter with the confectioners’ and brown sugars. This gets it wonderfully light and fluffy. Beat in the milk and vanilla. The aroma is pure childhood joy. Carefully stir in the flour until no dry streaks remain. Finally, fold in the mini chocolate chips. The dough will be soft and pillowy. Drop heaping spoonfuls of this dough all over the warm brownie base. You don’t need to spread it—just dollop it evenly. It will soften and settle as it bakes.
Step 4: Second Bake for the Cookie Dough
Pop the pan back into the oven for 15-20 minutes. Watch it closely. The cookie dough should lose its raw look and look just set, with the top still soft. It might get a very light golden color at the edges. This short bake cooks the flour (making it safe) but keeps the layer wonderfully soft and chewy, like the center of a perfect cookie.
Step 5: The Luxurious Cheesecake Topping
As the cookie dough layer bakes, make your cheesecake filling. Ensure your cream cheese is very soft. Beat it with the granulated sugar until it’s completely smooth and silky, with no lumps. Add the eggs one at a time, beating well after each. This prevents a curdled texture. Mix in the vanilla and sour cream until the batter is uniform and creamy. It should pour beautifully.
Step 6: Final Bake and the Chill
Once the cookie dough layer is out of the oven, gently pour the cheesecake batter over the top. Use a spatula to smooth it into an even layer. Bake for 50-60 minutes. The edges should be set, but the very center (about the size of a quarter) should still have a slight jiggle when you gently shake the pan. This is the secret to a creamy, not dry, cheesecake. Turn off the oven, crack the door open, and let it cool inside for an hour. This prevents cracking. Then, transfer it to the fridge to chill for at least 4-6 hours, preferably overnight. The long chill is non-negotiable for perfect slicing.
Timing is Everything
Let’s break down the clock so you can plan your dessert victory.
- Prep Time: 30 minutes
- Cook Time: 1 hour 30 minutes (total, across bakes)
- Chill Time: 6 hours (minimum)
- Total Time: 8 hours
My best advice? Make this the day before you need it. The flavors deepen, and slicing is a dream.
My #1 Chef’s Secret
For the absolute best texture, use full-fat, brick-style cream cheese. The spreadable kind in tubs has different moisture and stabilizers. It can lead to a soft, sometimes runny filling. Brick cream cheese gives you that classic, dense, luxurious cheesecake bite we all crave.
A Fun Dessert Fact
Did you know the chocolate chip cookie was invented by accident? In the 1930s, Ruth Wakefield expected her chocolate chunks to melt into her “Butter Drop Do” cookie dough. They didn’t, and a star was born. This recipe honors her happy accident by putting that iconic dough front and center!
Your Kitchen Tools
You don’t need fancy gear.
- 9-inch Springform Pan (essential!)
- Stand Mixer or Hand Mixer
- Mixing Bowls
- Whisk and Spatula
- Measuring Cups/Spoons
How to Keep Your Leftovers (If You Have Any!)
Store any leftover cheesecake covered tightly in the refrigerator. It will keep beautifully for up to 5 days. The layers hold their texture wonderfully.
For longer storage, you can freeze entire slices. Wrap them individually in plastic wrap, then place them in a freezer bag or airtight container. They’ll keep for up to 2 months.
To serve a frozen slice, simply thaw it overnight in the fridge. This dessert is surprisingly sturdy and maintains its fantastic taste and texture after freezing.
Tips for a Flawless Chocolate Cookie Cheesecake
- Room Temperature is Key: Let your cream cheese, eggs, and sour cream sit out for 30-60 minutes. This ensures a smooth, lump-free batter that bakes evenly.
- Don’t Overmix: Once you add the flour to the brownie and cookie dough batters, mix just until combined. Overmixing leads to tough layers.
- Water Bath Option: For supreme creaminess with zero risk of cracks, bake your springform pan in a water bath. Simply wrap the outside of the pan in foil and place it in a larger roasting pan filled with hot water halfway up the sides.
- Chill to Slice: Seriously, be patient. A fully chilled cheesecake slices cleanly. Run your knife under hot water and wipe it dry between each cut for pristine pieces.
Make It Look as Good as It Tastes
Presentation is the final flourish!
- Dust the top with a light shower of cocoa powder or powdered sugar just before serving.
- Add a dollop of fresh whipped cream and a drizzle of warm caramel or chocolate sauce.
- Scatter a few extra chocolate chips or chopped toasted nuts (like pecans or walnuts) around the edge of each slice.
- Serve with fresh berries on the side for a pop of color and a tart contrast.
Mix It Up! Healthier & Fun Variations
Love the idea but want to switch it up? Here are six fantastic twists.
- Peanut Butter Paradise: Swirl 1/2 cup of peanut butter into the cheesecake batter. Use peanut butter chips in the cookie dough and chopped peanut butter cups on the brownie layer.
- Mint Chocolate Chill: Add 1 teaspoon peppermint extract to the cookie dough. Use mint chocolate chips throughout all layers for a refreshing twist.
- Cookie Dough Blizzard: Stir crushed Oreos into the cookie dough layer. Or swap mini chocolate chips for mini M&Ms for a colorful surprise.
- Fruity Cheesecake Swirl: After pouring the cheesecake batter, dollop spoonfuls of strawberry or blueberry jam on top. Use a knife to gently swirl it for a marbled effect.
- Salted Caramel Sensation: Drizzle store-bought or homemade salted caramel sauce over the baked brownie layer before adding the cookie dough. Finish with a sprinkle of flaky sea salt before serving.
- Gluten-Free Glory: Simply replace the all-purpose flour in both the brownie and cookie dough layers with your favorite 1:1 gluten-free flour blend. Ensure your other ingredients (like chocolate chips) are certified gluten-free.
If you adore creative cheesecakes, you must explore our other decadent creations, like the nutty and syrupy Pistachio Baklava Cheesecake or the fruity elegance of a Chocolate Strawberry Cake. For more spice-forward treats, our Molasses Spice Cake is a cozy delight.
Common Mistakes to Avoid
Avoid these pitfalls for a perfect dessert every time.
Mistake 1: Using Cold Ingredients for the Cheesecake
This is the most common error. Cold cream cheese and eggs won’t blend smoothly. You’ll end up with a lumpy batter that can bake unevenly. Always let your dairy and eggs sit on the counter until they feel cool to the touch, not cold. This makes for a silky, homogeneous filling that bakes up perfectly creamy.
Mistake 2: Overbaking the Layers
It’s easy to think “longer is safer,” but with layered baking, it’s a disaster. The brownie bakes three times! Overbaking it first leads to a dry, crumbly base. The cookie dough only needs to set, not brown completely. And the cheesecake is done when the center is *just* set but still jiggly. Follow the visual cues, not just the timer. A slightly underdone center will set perfectly during the long chill.
Mistake 3: Skipping the Long Chill
I know it’s tempting to slice into your creation right away. Resist! The chill is what allows the cheesecake to firm up and the flavors to marry. Cutting into a warm cheesecake will give you a soupy, messy slice. Think of the chill as the final, crucial step of cooking. Plan for it, and you’ll be rewarded with clean, beautiful slices.
Mistake 4: Not Greasing the Pan Well Enough
A springform pan is your friend, but only if you treat it right. If you don’t grease it generously, the sticky brownie layer will cling for dear life. You might break your beautiful crust trying to release it. Use softened butter or non-stick spray and get it into all the crevices of the pan base and sides. This simple step ensures a stress-free release.
Your Questions, Answered!
Can I make any parts of this ahead of time?
Absolutely, and I highly recommend it! You can prepare the brownie and cookie dough layers up to a day in advance. Bake the brownie layer, let it cool, then add the unbaked cookie dough dollops. Cover the whole pan tightly with plastic wrap and refrigerate. The next day, let the pan sit at room temperature for 30 minutes before adding the cheesecake batter and baking. You can also freeze the fully assembled and baked cheesecake for up to a month. Thaw it slowly in the fridge overnight before serving.
Why did my cheesecake layer crack on top?
Cracks usually happen from a sudden temperature change or overbaking. This is why we cool the cheesecake slowly in the turned-off oven with the door ajar. The gentle cooling prevents the top from contracting too quickly and splitting. If a small crack does appear, don’t sweat it! Cover it with whipped cream, fresh fruit, or a chocolate ganache drizzle. It will still taste incredible, and no one will ever know.
Yes! The cookie dough layer gets baked for 15-20 minutes on top of the brownie. This bakes the flour, making it perfectly safe to consume. The brief bake is designed to set the layer while keeping it soft and tender, not to turn it into a crisp cookie. That soft, dough-like texture is exactly what we want.
Can I use a different size pan?
I strongly advise against it. A 9-inch springform pan is ideal. A smaller pan will cause the layers to overflow and bake unevenly. A larger pan will make the layers too thin, and they might overcook or not set properly. If you only have a different size, you’ll need to seriously adjust the baking times and may not get the same impressive layered effect.
My brownie layer is very dense. Did I do something wrong?
This brownie layer is meant to be on the fudgy and dense side. It needs to be sturdy enough to support the heavy layers above. If it’s rock-hard, you might have overmixed the batter after adding the flour, which develops gluten. For a fudgier brownie, mix the dry ingredients just until you no longer see flour streaks. A few lumps are okay.
Can I use low-fat cream cheese and sour cream?
You can, but the texture and flavor will be different. Low-fat dairy products have more water and less fat. This can result in a softer, less rich cheesecake that might be more prone to cracking or being watery. For the best, most luxurious result, full-fat dairy is the way to go. Think of it as a special occasion treat worth the indulgence, and you can find information on daily nutrient intake from trusted sources to balance your overall diet.
How do I know the cheesecake is done baking?
The best test is the “jiggle test.” Around the 50-minute mark, give the oven rack a gentle shake. The edges of the cheesecake should look set, but the very center (about the size of a quarter or a small lemon) should have a slight, jiggly movement. It should look wobbly, not liquid. Remember, it will continue to set as it cools. If the whole surface moves as one liquid mass, it needs more time.
What’s the best way to get clean slices?
Patience and a hot knife! First, ensure the cheesecake is fully chilled (overnight is best). Then, take a long, thin knife and run it under very hot water. Wipe it dry with a towel. Slice straight down—don’t saw back and forth. Clean and re-heat the knife between each cut. This method gives you professional-looking slices with clean layers.
Can I add other flavors to the cheesecake layer?
Of course! This is your canvas. Try adding the zest of one lemon or orange for a citrus twist. Mix in a tablespoon of instant espresso powder for a mocha flavor. You could even swirl in a fruit puree or caramel sauce before baking. Just be careful not to over-swirl, or you’ll lose the distinct layer look.
This likely means the brownie layer was still too hot and liquidy when you added the dough. Let the baked brownie layer cool for at least 10-15 minutes on a wire rack before dolloping on the cookie dough. It needs a few minutes to set up and form a stable base. The dollops will soften and spread a little, but they shouldn’t disappear entirely.
This Brownie Layered Cookie Dough Cheesecake is a labor of love, and trust me, the love you get back from everyone who tries it is worth it. It’s the ultimate celebration dessert. For more fantastic ideas that push the cheesecake envelope, browse our entire collection of creative cheesecake recipes.
The Final, Delicious Word
So there you have it—my masterpiece, shared with you. This cake is more than a dessert; it’s an experience. It’s the smile on your friend’s face when they see it. It’s the quiet “mmm” around the table after the first bite. It’s the recipe people will ask you for again and again. Don’t be intimidated by the layers. Take your time, follow the steps, and most importantly, have fun with it. Happy baking, and enjoy every decadent, glorious slice!
Equipment
- Mélangeur
- Fouet
- Spatule
- Moule à charnière
- Bol
Ingredients
- 4 œufs
- 300 g sucre
- 50 g cacao en poudre
- 150 g farine tout usage
- 1 cuil. à café sel
- 200 g pépites de chocolat
- 450 g fromage à la crème
- 100 g sucre glace
- 2 cuil. à soupe extrait de vanille
- 250 ml crème fraîche
Instructions
- Préchauffez votre four à 175°C et graissez un moule à charnière de 22 cm.
- Faites fondre le beurre et mélangez-le avec le sucre jusqu'à obtenir un mélange brillant, puis incorporez les œufs un par un.
- Tamisez le cacao en poudre, la farine et le sel. Incorporez délicatement, puis ajoutez les pépites de chocolat.
- Versez la pâte à brownies dans le moule préparé et faites cuire pendant 25-30 minutes.
- Laissez refroidir le brownie environ 10 minutes, puis préparez la couche de pâte à cookie : battez le beurre jusqu'à obtenir un mélange crémeux, ajoutez les sucres, le lait et la vanille.
- Incorporez délicatement la farine et les mini pépites de chocolat.
- Déposez des cuillerées de pâte à cookie sur la couche de brownie et faites cuire à nouveau 15-20 minutes.
- Puis préparez la couche de cheesecake : battez le fromage à la crème avec le sucre jusqu'à obtenir une consistance lisse. Ajoutez les œufs un à un, puis la vanille et la crème fraîche.
- Versez le mélange de cheesecake sur la couche de cookie et faites cuire pendant 50-60 minutes.
- Éteignez le four, ouvrez la porte, et laissez le cheesecake refroidir à l'intérieur pendant une heure.
- Transférez au réfrigérateur et laissez refroidir pendant au moins 4-6 heures, de préférence toute la nuit avant de servir.