
Why This Chocolate Hazelnut Brioche Will Steal Your Heart
There’s something magical about the smell of freshly baked bread swirling through the house, isn’t there? One chilly Sunday morning, I decided to try my hand at a Chocolate Hazelnut Brioche. It turned out to be one of those recipes that feels like a warm hug. The rich cocoa aroma mingling with buttery dough and crunchy hazelnuts is pure bliss. If you’ve ever thought baking brioche was intimidating, this recipe will prove you wrong. It’s a crowd-pleaser for breakfast, brunch, or dessert—and your family will rave about it!
A Little History Behind the Sweetness
Brioche has its roots in France, where it’s been a beloved treat for centuries. Traditionally, it’s known for its light, airy texture and rich flavor thanks to butter and eggs. Over time, creative bakers started experimenting, adding flavors like chocolate and nuts to create variations like the Chocolate Hazelnut Brioche. When I first made this version, I couldn’t help but picture French patisseries bustling with activity. Of course, my kitchen didn’t quite have the same charm—but the results? Totally worth it.
Why You’ll Fall in Love with This Recipe
This Chocolate Hazelnut Brioche is as easy as it is delicious. The dough comes together smoothly, and the chocolate-cocoa combo adds a decadent twist. Plus, the hazelnut topping gives it a satisfying crunch. Whether you’re a seasoned baker or a newbie, this recipe is forgiving and rewarding. And let’s not forget—it’s versatile! Serve it plain, slathered with butter, or paired with melted chocolate for dipping.
Perfect Occasions to Bake This Brioche
This brioche is perfect for lazy weekend mornings when you want something indulgent yet homemade. It’s also a showstopper at brunch parties or holiday gatherings. Imagine serving slices of this Chocolate Hazelnut Brioche alongside coffee or tea—your guests won’t stop talking about it. Even better? Pack some up as gifts for friends or neighbors. Trust me, they’ll thank you!
Ingredients You’ll Need
- 630g of all-purpose flour
- 7g of yeast
- 300ml of milk
- 60g of sugar
- 2 eggs
- 60g of butter
- A pinch of salt
- 50g of cocoa powder
- Hazelnut grains for decoration
- Butter for greasing
- Chocolate for serving
Substitution Options
Don’t stress if you’re missing an ingredient. Here are some swaps:
- Use almond flour instead of regular flour for a gluten-free option.
- Swap hazelnuts for almonds or pecans if needed.
- Replace cocoa powder with carob powder for a caffeine-free alternative.
- If you don’t have fresh milk, plant-based milk works just fine.
Step 1: Mix the Dough
In a large bowl, combine the milk, sugar, eggs, butter, yeast, flour, and a pinch of salt. Knead until the dough becomes smooth and elastic. Divide it into two parts—one will stay plain, while the other gets a cocoa boost. Adding cocoa transforms the dough into a deep, chocolatey brown hue that smells heavenly. Pro tip: Use a stand mixer with a dough hook to save time and effort.
Step 2: Shape the Layers
Divide each part of the dough into four smaller portions. Roll them out into thin cakes or discs. Stack them on top of each other, brushing each layer lightly with oil to keep them from sticking. This step creates those beautiful marbled layers once baked. Imagine peeling back a slice to reveal swirls of chocolate and vanilla—it’s almost too pretty to eat!
Step 3: Let It Rise
Shape the stacked dough into a classic brioche form. Place it in a greased loaf pan and cover it with a clean kitchen towel. Allow it to rise for an hour, or until it doubles in size. As it rests, your kitchen will fill with the comforting scent of butter and chocolate. Patience pays off here because letting the dough rise ensures a soft, pillowy texture.
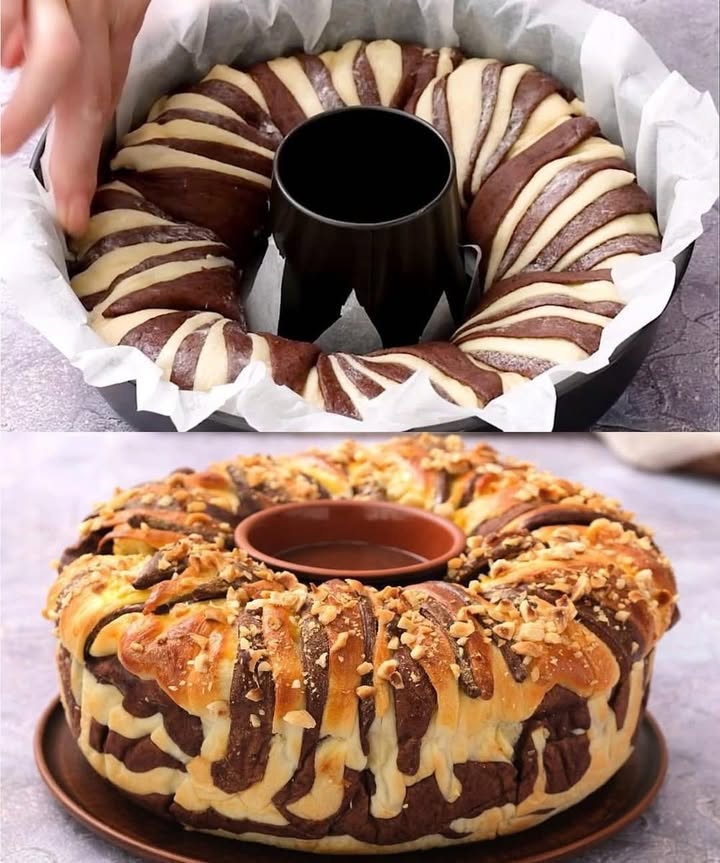
Step 4: Bake and Decorate
Preheat your oven to 180°C (350°F). Sprinkle the top generously with hazelnut grains for a nutty crunch. Pop the brioche into the oven and bake for 30 minutes, or until golden brown. The finished loaf should have a glossy sheen and a fragrant aroma that makes everyone rush to the table. Serve warm with melted chocolate for dipping—it’s irresistible!
Timing Breakdown
- Preparation Time: 30 minutes
- Rising Time: 2 hours (1 hour per rise)
- Baking Time: 30 minutes
- Total Time: Approximately 3 hours
Chef’s Secret
For extra shine, brush the baked brioche with a little melted butter right after it comes out of the oven. This not only enhances the appearance but also locks in moisture, keeping the bread softer for longer.
An Interesting Fact About Brioche
Did you know that brioche was once considered a luxury item? Its high butter and egg content made it expensive, so only the wealthy could afford it. Today, we can enjoy this treat without breaking the bank—and adding chocolate and hazelnuts makes it even more luxurious!
Necessary Equipment
- Large mixing bowl
- Stand mixer (optional)
- Rolling pin
- Loaf pan
- Parchment paper
- Baking brush
Storage Tips
To store your Chocolate Hazelnut Brioche, wrap it tightly in plastic wrap or aluminum foil. Keep it at room temperature for up to two days. For longer storage, freeze slices individually in airtight bags. When ready to enjoy, simply thaw and reheat in the oven for a few minutes. Avoid refrigerating, as this can dry out the bread.
Reheating leftovers is easy. Wrap the brioche loosely in foil and warm it in the oven at 150°C (300°F) for about 10 minutes. This restores its softness and brings back the amazing aroma.
If you’re gifting this brioche, present it in a decorative box lined with parchment paper. Add a ribbon and a handwritten note for a personal touch. Your recipient will feel truly special.
Tips and Advice
- Knead the dough thoroughly to develop gluten, which gives the brioche its signature structure.
- Let the dough rise in a warm, draft-free spot for best results.
- Don’t skip greasing the layers—it prevents sticking and enhances flavor.
- Toast leftover slices lightly before serving for extra crispiness.
Presentation Ideas
- Serve slices on a wooden board with bowls of melted chocolate and whipped cream.
- Garnish with powdered sugar or drizzle with caramel sauce.
- Pair with seasonal fruits like strawberries or bananas for a pop of color.
- Wrap individual slices in parchment paper tied with twine for a rustic look.
Healthier Alternatives
If you’re looking to lighten things up, here are six variations:
- Whole Wheat Brioche: Substitute half the flour with whole wheat for added fiber.
- Low-Sugar Option: Reduce sugar by half and use a sugar substitute like stevia.
- Vegan Version: Replace eggs with flaxseed gel and butter with coconut oil.
- Spelt Flour Twist: Use spelt flour for a nuttier taste and easier digestibility.
- No-Hazelnut Brioche: Skip the nuts entirely for a simpler, allergy-friendly option.
- Dairy-Free Delight: Swap dairy milk for almond or oat milk and use vegan chocolate.
Mistake 1: Overmixing the Dough
Overmixing can lead to tough, dense brioche instead of the light, fluffy texture we love. To avoid this, stop kneading once the dough feels smooth and slightly tacky. A good rule of thumb? Knead for about 8–10 minutes by hand or 5–7 minutes with a mixer.
Mistake 2: Skipping the Rising Step
Skipping or rushing the rising process is a common error. Proper rising allows the yeast to work its magic, creating air pockets that make the brioche airy. Always give the dough enough time to double in size.
Mistake 3: Overbaking
Overbaking dries out the brioche, making it crumbly rather than soft. Set a timer and check for doneness by tapping the bottom—if it sounds hollow, it’s ready.
Mistake 4: Using Cold Ingredients
Cold ingredients slow down the yeast activity, affecting the rise. Make sure your milk and eggs are at room temperature before starting.
Frequently Asked Questions
Can I use instant yeast instead of active dry yeast?
Yes, you can! Instant yeast doesn’t need proofing, so you can add it directly to the dry ingredients. Just reduce the amount slightly since instant yeast is stronger.
How do I know if my dough has risen enough?
Your dough should roughly double in size and feel puffy. Gently press it with your finger—if the indentation stays, it’s ready.
Can I prepare the dough ahead of time?
Absolutely! After kneading, refrigerate the dough overnight. Bring it back to room temperature before shaping and baking.
What if I don’t have a loaf pan?
No problem! Shape the dough into round rolls and bake them on a baking sheet for mini brioches.
Is this recipe kid-friendly?
Definitely! Kids adore the chocolate-hazelnut combo, and they’ll love helping shape the dough.
Can I freeze the baked brioche?
Yes, wrap it well and freeze for up to three months. Thaw at room temperature before reheating.
Why does my brioche taste eggy?
Too many eggs or undermixing can cause an eggy flavor. Stick to the recipe measurements and mix thoroughly.
How do I prevent the hazelnuts from burning?
Add the hazelnuts during the last 10 minutes of baking to ensure they toast perfectly without burning.
Can I use dark cocoa powder?
Yes, dark cocoa adds a richer flavor but may require a bit more sugar to balance the bitterness.
What’s the best way to serve this brioche?
Slice it thickly and serve warm with melted chocolate, jam, or butter. It’s also fantastic toasted with a sprinkle of sea salt.
Final Thoughts
This Chocolate Hazelnut Brioche is more than just a recipe—it’s a celebration of flavor, texture, and tradition. Whether you’re baking for yourself or sharing with loved ones, every bite promises happiness. So grab your apron, gather your ingredients, and get ready to create something truly unforgettable. Happy baking!
Equipment
- Large mixing bowl
- Rolling pin
- Loaf pan
- Baking brush
- Parchment paper
Ingredients
- 630 g all-purpose flour
- 7 g yeast
- 300 ml milk
- 60 g sugar
- 2 eggs
- 60 g butter
- 1 pinch of salt
- 50 g cocoa powder
- 100 g hazelnut grains for decoration
- 1 tbs Butter for greasing
- 100 g Chocolate for serving
Instructions
- In a large bowl, combine the milk, sugar, eggs, butter, yeast, flour, and a pinch of salt. Knead until the dough becomes smooth and elastic.
- Divide the dough into two parts—one plain and one with cocoa powder.
- Roll each part into four smaller portions, shaping them into thin discs and stacking them with oil brushed between layers.
- Shape the stacked dough into a brioche form and place it in a greased loaf pan. Cover and let it rise for an hour, or until it doubles in size.
- Preheat your oven to 180°C (350°F). Sprinkle the top with hazelnut grains.
- Bake for 30 minutes, or until golden brown and glossy. Serve warm with melted chocolate for dipping.