
Soft, Sweet, and Oh-So-Coconutty: Meet the Coconut Dulce Delight
There’s something magical about biting into a dessert that’s soft, spongy, and bursting with creamy dulce de leche. That’s exactly what you get with this Coconut Dulce Delight, a dessert that has stolen my heart—and my kitchen! I first made this for a family gathering, and let me tell you, it disappeared faster than I could say “seconds, anyone?” It’s perfect for coconut lovers, sweet tooths, and anyone who enjoys a little indulgence.
A Little History Behind the Sweetness
This dessert is inspired by traditional Latin American puddings and cakes, where coconut and dulce de leche are often paired together. Growing up, my grandma used to make a simpler version of this dish, but I’ve added my own twist to make it even more irresistible. The creamy center and the rich coconut flavor create a harmony that’s hard to resist. Whether you’re new to baking or a seasoned pro, this recipe is sure to become a favorite.
Why You’ll Love This Recipe
What’s not to love? The Coconut Dulce Delight is easy to make, uses simple ingredients, and delivers big on flavor. The grated coconut adds a tropical touch, while the dulce de leche center gives it a melt-in-your-mouth quality. Plus, it’s versatile—you can tweak it to suit your taste or dietary needs. Whether you’re baking for a crowd or just treating yourself, this dessert will impress.
Perfect Occasions to Whip Up This Dessert
This Coconut Dulce Delight is perfect for any occasion. Serve it at birthday parties, holiday gatherings, or Sunday brunches. It’s also a great option for potlucks because it travels well and always gets compliments. And let’s not forget those cozy nights when you just want something sweet to enjoy with a cup of coffee or tea.
Ingredients
- 1 cup of self-rising flour
- ½ cup of grated coconut
- ½ cup of sugar
- 100 g of cream cheese (or butter, if you prefer)
- 2 eggs
- Vanilla essence to taste
- Dulce de leche (as needed for filling)
Substitution Options
If you don’t have self-rising flour, you can use all-purpose flour with a teaspoon of baking powder. For a dairy-free version, swap the cream cheese for vegan butter or coconut oil. And if you’re out of vanilla essence, almond extract works beautifully too. Feel free to experiment—this recipe is forgiving!
Step 1: Prepare the Mixture
Start by melting the cream cheese or butter in a bowl. As it melts, imagine the rich aroma filling your kitchen—it’s like a warm hug! Once melted, add the sugar, eggs, and vanilla essence. Beat the mixture until it’s smooth and well combined. Now, fold in the self-rising flour and grated coconut. The dough should be soft and slightly sticky, with a lovely coconut scent. Pro tip: Don’t overmix; stop as soon as everything comes together.
Step 2: Refrigerate the Dough
Pop the dough into the fridge for 15 minutes. This step is crucial—it helps the dough firm up, making it easier to work with later. While you wait, take a moment to prep your workspace. Line your baking mold with nonstick paper or grease it lightly. Trust me, this small step saves a lot of headaches later!
Step 3: Assemble the Buddine
Preheat your oven to 180°C (350°F). Pour half of the chilled dough into the mold, spreading it evenly. Now comes the fun part: add a generous layer of dulce de leche right in the center. Cover it with the remaining dough, leaving some space for the cake to rise. The layers should look like a coconut-flavored sandwich with a creamy surprise inside. Chef’s tip: Use a spoon to gently spread the top layer without disturbing the dulce de leche.
Step 4: Bake to Golden Perfection
Bake the Coconut Dulce Delight for about 20 minutes, or until it’s golden brown and a toothpick inserted into the cake part comes out clean. Keep an eye on it—ovens can be unpredictable! The smell wafting through your kitchen will be heavenly, with hints of caramelized sugar and toasted coconut. Let it cool slightly before moving on to the final step.
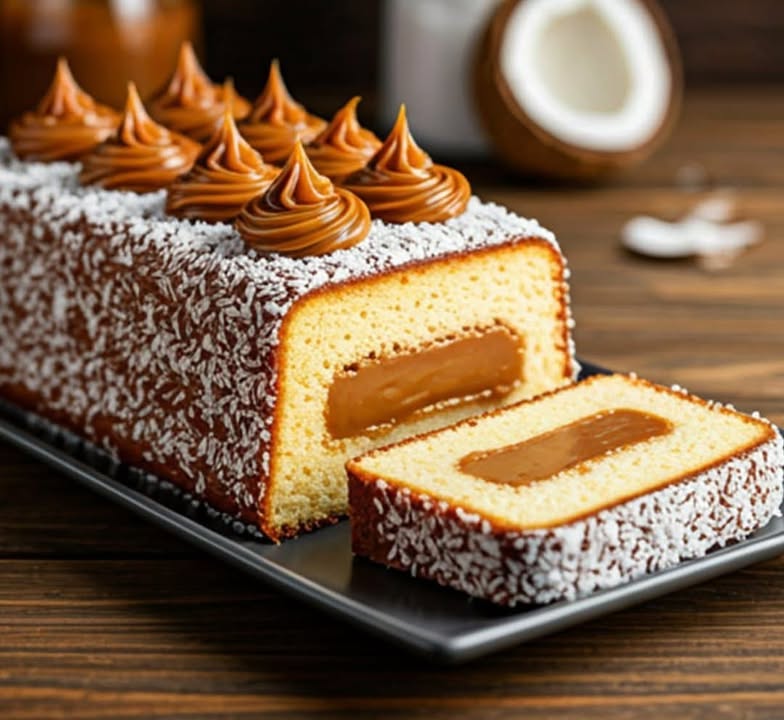
Step 5: Decorate and Enjoy
Once the cake is baked, drizzle extra dulce de leche over the top for that extra wow factor. Sprinkle some grated coconut on top for texture and presentation. Let it cool completely before slicing. Each bite will be a delightful mix of soft sponge, creamy dulce de leche, and crunchy coconut. Pure bliss!
Timing
- Preparation time: 20 minutes
- Cooking time: 20 minutes
- Total time: 40 minutes
Chef’s Secret
For an extra burst of flavor, toast the grated coconut lightly before adding it to the dough. It enhances the nuttiness and adds a subtle crunch that pairs beautifully with the creamy filling.
Extra Info
Did you know that dulce de leche is made by slowly heating sweetened milk until it caramelizes? It’s a labor of love, but nowadays, you can find ready-made versions at most grocery stores. If you’re feeling adventurous, try making your own—it’s easier than you think!
Necessary Equipment
- Mixing bowls
- Whisk or electric mixer
- Baking mold
- Oven
- Spatula
Storage
To store your Coconut Dulce Delight, wrap it tightly in plastic wrap or place it in an airtight container. It will stay fresh at room temperature for up to two days. For longer storage, refrigerate it for up to a week. Just remember to bring it back to room temperature before serving for the best texture and flavor.
If you want to freeze it, slice the cake into portions first. Wrap each slice individually in plastic wrap and then foil. Frozen slices can last up to three months. Thaw them overnight in the fridge before enjoying.
One last tip: Always label your containers with the date. It’s easy to forget how long something has been sitting in the freezer!
Tips and Advice
Don’t rush the cooling process—let the cake rest before slicing. This ensures the layers set properly. If you’re using homemade dulce de leche, strain it to remove any lumps for a smoother filling. And if you’re short on time, store-bought dulce de leche works just fine.
Presentation Tips
- Serve slices on a pretty plate garnished with extra coconut flakes.
- Add a dollop of whipped cream for a fancy touch.
- Pair with a cup of espresso or chai tea for a sophisticated dessert experience.
Healthier Alternative Recipes
Here are six ways to make this dessert a bit lighter:
- Gluten-Free Version: Swap self-rising flour for a gluten-free blend.
- Low-Sugar Option: Use a sugar substitute like stevia or monk fruit.
- Vegan Twist: Replace eggs with flaxseed meal and water, and use plant-based butter.
- Protein-Packed: Add a scoop of protein powder to the dough.
- Fruit-Filled: Substitute dulce de leche with mashed bananas or apple sauce.
- Spiced Delight: Add cinnamon or nutmeg for a warm, spiced flavor.
Mistake 1: Overfilling the Center
One common mistake is adding too much dulce de leche, which can cause the cake to split during baking. To avoid this, use just enough to create a thin, even layer. Pro tip: Chill the dulce de leche before assembling to prevent it from spreading too much.
Mistake 2: Skipping the Resting Time
Don’t skip refrigerating the dough—it helps the flavors meld and makes the dough easier to handle. Rushing this step can result in a dense texture. Patience pays off here!
Mistake 3: Overbaking
Overbaking can dry out the cake. Keep an eye on it and check for doneness early. Insert a toothpick into the cake part—not the filling—to ensure it comes out clean.
FAQ
Can I use regular flour instead of self-rising?
Absolutely! Just add 1 teaspoon of baking powder per cup of all-purpose flour to mimic self-rising flour. Easy peasy!
How do I know when the cake is done?
The cake should be golden brown, and a toothpick inserted into the cake part (not the filling) should come out clean. If it’s still gooey, give it a few more minutes.
Can I make this ahead of time?
Yes! This dessert tastes even better the next day as the flavors meld. Store it properly, and you’re good to go.
What can I use instead of dulce de leche?
If you can’t find dulce de leche, try caramel sauce or even Nutella for a different twist. Both work beautifully!
Is this recipe kid-friendly?
Definitely! Kids love the creamy center and the sweet coconut flavor. Plus, it’s easy enough for them to help assemble.
Can I double the recipe?
Of course! Just make sure your baking mold is large enough to accommodate the doubled dough.
How do I toast coconut?
Spread the coconut flakes on a baking sheet and toast them in the oven at 180°C (350°F) for 5-7 minutes, stirring occasionally. Watch closely to avoid burning.
What if I don’t have a mixer?
No worries! A whisk and some elbow grease will do the trick. It’s a great arm workout!
Can I freeze leftovers?
Yes! Wrap slices individually and freeze for up to three months. Thaw in the fridge before serving.
Why does my cake taste dry?
This could be due to overbaking or using too much flour. Measure your ingredients carefully and keep an eye on the baking time.
Final Thoughts
This Coconut Dulce Delight is more than just a dessert—it’s a celebration of flavors and textures that everyone will love. Whether you’re a seasoned baker or a beginner, this recipe is sure to become a staple in your kitchen. So grab your ingredients, preheat that oven, and get ready to wow your friends and family with this delicious treat. Happy baking!
Equipment
- Mixing Bowls
- Whisk or Electric Mixer
- Spatula
- Baking Mold
- Oven
Ingredients
- 1 cup self-rising flour
- ½ cup grated coconut
- ½ cup sugar
- 100 g cream cheese or butter, if you prefer
- 2 eggs
- q.s. vanilla essence to taste
- q.s. dulce de leche as needed for filling
Instructions
- Melt the cream cheese or butter in a bowl.
- Add the sugar, eggs, and vanilla essence; beat until smooth.
- Fold in the self-rising flour and grated coconut until combined.
- Refrigerate the dough for 15 minutes.
- Preheat the oven to 180°C (350°F) and prepare your baking mold.
- Pour half of the chilled dough into the mold.
- Add a layer of dulce de leche in the center.
- Cover with the remaining dough, leaving space for rising.
- Bake for about 20 minutes or until golden and a toothpick comes out clean.
- Drizzle extra dulce de leche on top and sprinkle with grated coconut once cooled completely.