
The Best Chocolate Chip Cookie Dough Brownies: My Ultimate Dessert Hack
You know that feeling when you can’t decide between a fudgy brownie and a scoop of raw cookie dough? I’ve been there too many times to count, usually standing in front of my fridge at midnight. That’s why I created this mash-up masterpiece. These Chocolate Chip Cookie Dough Brownies are a double dose of pure joy. They combine my two favorite treats into one incredible bar. Trust me, the first time I brought these to a book club, they disappeared in about 60 seconds flat. Now it’s my most-requested recipe!
A Sweet Story: Where Did Cookie Dough Brownies Come From?
Honestly, I think this genius idea was born from pure desperation. Someone, somewhere, looked at a pan of brownies and a bowl of cookie dough and had a lightbulb moment. While traditional brownies have a rich history, and edible cookie dough became a safe sensation, bringing them together is a modern twist. It’s the best of both baking worlds. I love that it takes a classic and makes it fun and new. In my kitchen, it’s the recipe that always gets a “wow” from both kids and adults.
Why You Will Absolutely Love This Recipe
First, the texture is pure magic. You get the dense, chocolatey crumb of a brownie topped with a soft, sweet, and slightly salty cookie dough. No baking required for that top layer! Second, it’s surprisingly simple. You’re basically making two easy recipes and stacking them. Third, they are the ultimate crowd-pleaser. Whether it’s a bake sale, birthday party, or just a Tuesday, these bars make any day special. They are the definition of a treat.
Perfect Occasions for Your Cookie Dough Brownies
These bars are your secret weapon for so many events! They’re perfect for potlucks because they travel well and serve a crowd. Pack them in school lunch boxes for a special surprise. They’re a must-have for game day gatherings or movie nights at home. I always make a batch for new neighbors as a sweet welcome gift. Basically, any time you need a guaranteed hit dessert, this is your recipe.
Gathering Your Ingredients
Let’s check the pantry! You likely have most of this already.
- For the brownie layer: 1 cup unsalted butter, 2 cups granulated sugar, 4 large eggs, 1 teaspoon vanilla extract, 1 cup all-purpose flour, 1 cup cocoa powder, 1/2 teaspoon salt.
- For the cookie dough layer: 1 cup unsalted butter (softened), 1 cup brown sugar, 1/2 cup granulated sugar, 2 teaspoons vanilla extract, 2 cups all-purpose flour, 1/2 teaspoon salt, 1/4 cup milk, 1 cup chocolate chips.
Easy Ingredient Swaps
No worries if you’re missing something! Here are my go-to swaps:
- Flour: For a gluten-free version, use a 1:1 gluten-free flour blend.
- Butter: Margarine can work in a pinch, but butter gives the best flavor.
- Milk: Any milk you have works—whole, 2%, or even a non-dairy alternative like almond milk.
- Chocolate Chips: Use chunks, M&M’s, or even chopped dark chocolate. Get creative!
- Cocoa Powder: Dutch-processed or natural cocoa both work great here.
Making Your Cookie Dough Brownies, Step-by-Step
Step 1: Preheat and Prep
Start by heating your oven to 350°F (175°C). This gives it time to reach the perfect temperature. Grab your 9×13-inch baking pan and grease it well with butter or non-stick spray. I like to line mine with parchment paper, leaving an overhang. This makes lifting out the whole slab of brownies so easy for clean cutting later.
Step 2: Make the Fudgy Brownie Base
In a medium saucepan, melt one cup of butter over low heat. The smell is already amazing! Take it off the heat and let it cool for just a minute. Whisk in the two cups of granulated sugar. The mixture will look grainy and glossy. Add the four eggs and the vanilla, whisking vigorously until it’s all smooth and combined. Now, gently stir in the flour, cocoa powder, and salt. Pro tip: Don’t overmix here; just fold until you no longer see dry flour streaks. The batter will be thick and luxurious. Pour it into your prepared pan and smooth the top.
Step 3: Bake and Cool the Brownie Layer
Slide the pan into your preheated oven. Bake for 25 to 30 minutes. You want a toothpick poked in the center to come out with a few moist crumbs attached, not completely clean. A clean toothpick means over-baked brownies! Let the pan cool completely on a wire rack. This is crucial. If you spread warm cookie dough on a hot brownie, it will melt into a mess. Patience is your friend.
Step 4: Whip Up the Edible Cookie Dough
While the brownies cool, make the magic top layer. In a large bowl, beat the softened butter with the brown and white sugars. Use a hand mixer or stand mixer for about 2-3 minutes until it’s light, fluffy, and pale. Beat in the vanilla. In a separate bowl, whisk the flour and salt together. This helps distribute the salt evenly. Gradually add the dry mix to the butter mix, alternating with the milk. Start and end with the flour. Mix until just combined. Finally, use a spatula to fold in those glorious chocolate chips.
Step 5: Layer, Chill, and Slice
Your brownie base should now be completely cool. Take big spoonfuls of the cookie dough and drop them all over the surface. Then, gently press and spread the dough with your fingers or a spatula into one even, delicious layer. Chef’s tip: If the dough is too sticky, lightly wet your fingertips or spatula. Now, cover the pan and refrigerate for at least one hour. This firms up the cookie dough, making slicing neat squares a breeze.
Step 6: The Best Part – Enjoy!
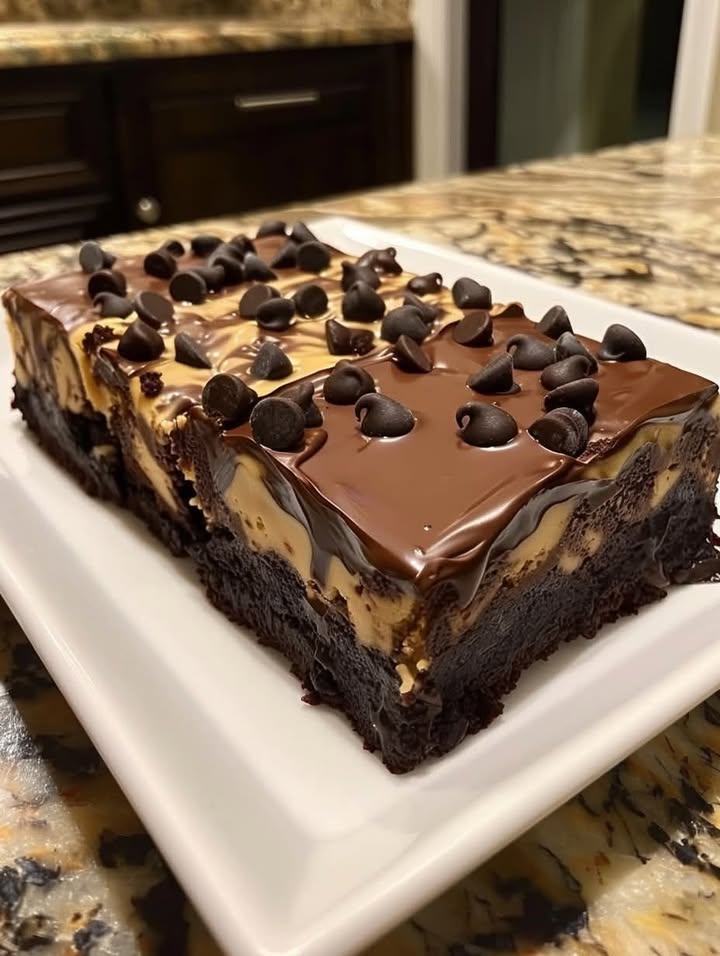
Use a sharp knife to cut the chilled slab into squares. For super clean cuts, wipe the knife with a hot, damp cloth between each slice. I like big, generous squares because, well, why not? Serve them up on a pretty plate. Be ready for the compliments to roll in!
Your Recipe Timetable
Here’s a quick breakdown of how your time will be spent:
- Prep Time: 20 minutes (for both layers)
- Baking Time: 25-30 minutes (for the brownies only)
- Cooling & Chilling Time: About 1.5 hours (very important!)
- Total Time: Approximately 2 hours, 15 minutes
- Servings: 12-16 beautiful brownie bars
My Secret Chef’s Trick
For an extra flavor boost, toast your flour for the cookie dough layer! Spread the 2 cups of flour on a baking sheet. Bake it at 350°F for about 5-7 minutes, just until it’s lightly fragrant. Let it cool completely before using. This simple step cooks the flour, enhancing its nutty flavor and making it even safer to eat. It takes your cookie dough layer from great to unforgettable.
A Little Extra Sweet Info
Did you know the reason we can eat this cookie dough safely is because there are no raw eggs in the top layer? The small amount of flour is technically raw, but toasting it (like in my secret trick above) is an extra precaution. This recipe is all about enjoying that classic “licking the spoon” feeling without any worry. It’s a win-win!
Kitchen Tools You’ll Need
You don’t need fancy gear! Here’s the list:
- 9×13-inch baking pan
- Medium saucepan
- Two mixing bowls (one large, one medium)
- Whisk and spatula
- Hand mixer or stand mixer (helpful but you can use elbow grease!)
- Measuring cups and spoons
- Wire cooling rack
How to Store Your Masterpiece
These brownies store beautifully. Keep them in an airtight container in the refrigerator. The cold keeps the cookie dough layer firm and perfect. They will stay fresh and delicious for up to 5 days this way.
If you want to keep them longer, you can freeze them. Place the cut squares in a single layer on a parchment-lined baking sheet and freeze until solid. Then, transfer them to a freezer bag or container. They’ll keep for up to 2 months.
When you’re ready for a treat, just thaw a square in the fridge for a few hours or on the counter for about 20 minutes. Some people love them straight from the freezer for a firmer, almost ice-cream-like bite!
My Top Tips for Brownie Success
- For super fudgy brownies, don’t over-bake. Pull them out when the toothpick has moist crumbs.
- Make sure your butter for the cookie dough is properly softened. It should leave a slight indentation when you press it.
- If you’re in a hurry, you can speed up brownie cooling by placing the pan in the fridge for 30 minutes.
- Use a mix of chocolate chip sizes—mini and regular—for the best texture in every bite.
Presentation Ideas to Impress
Make these bars look bakery-worthy!
- Drizzle melted chocolate or caramel sauce over the top before slicing.
- Add a tiny sprinkle of flaky sea salt on top of the cookie dough layer.
- Serve each square with a small scoop of vanilla ice cream on the side.
- Place them in cute mini cupcake liners for a party.
Healthier Twists on the Classic
Want to lighten things up? Try these fun variations:
- Whole Wheat & Coconut Sugar: Swap the all-purpose flour for whole wheat pastry flour and use coconut sugar in both layers for a deeper, caramel-like taste.
- Black Bean Brownie Base: Yes, really! For a gluten-free, protein-packed base, try using a can of pureed black beans in place of the flour in the brownie layer. You’ll be shocked at how fudgy it is.
- Avocado “Butter”: In the cookie dough, replace half the butter with ripe, mashed avocado. It adds creaminess and healthy fats.
- Protein Power Bars: Add a scoop of vanilla or chocolate protein powder to the cookie dough layer and use sugar-free chocolate chips.
- Zucchini Boost: Grate a small zucchini, squeeze out all the liquid, and fold it into the brownie batter. It adds moisture and a veggie boost you can’t taste.
- Nutty Delight: Use almond flour for half of the AP flour in the cookie dough and add chopped walnuts for crunch and healthy fats.
Dive Into More Decadent Desserts
If you loved this mash-up, you have to explore our other incredible recipes. For a stunning layered cake, our Chocolate Cake with Fresh Strawberry Filling is a showstopper. For a no-bake frozen treat, the Ferrero Rocher Ice-Cream Terrine is pure elegance. And if you’re a cheesecake fan, our Black Forest Cheesecake and our Caramel Apple Cheesecake are absolute must-tries!
Common Mistakes to Avoid
Mistake 1: Spreading Cookie Dough on Warm Brownies
This is the biggest mess-maker! If the brownie layer is even slightly warm, the cookie dough butter will melt on contact. You’ll end up with a greasy, runny layer instead of a firm, scoopable dough top. The brownie must be completely cool to the touch. Let it sit on the counter for a full hour, or pop it in the fridge for 30 minutes to speed things up safely.
Mistake 2: Overmixing the Brownie Batter
Brownies get their dense, fudgy texture from minimal mixing. Once you add the flour and cocoa, stir just until the last streaks of dry ingredients disappear. Overmixing develops the gluten in the flour. This leads to a tougher, cakier brownie instead of the rich, tender crumb you want. Fold gently with a spatula for the best results.
Mistake 3: Using Cold Butter for the Cookie Dough
Butter that’s too cold won’t cream properly with the sugars. Your cookie dough will be lumpy and difficult to spread. Your butter should be softened. To test, gently press your finger into the stick. It should leave a clear indentation but not sink all the way through. If you forget to take it out, cut it into small pieces and let it sit on the counter for 15-20 minutes.
Mistake 4: Skipping the Chill Time Before Slicing
I know, the wait is hard! But slicing right after spreading the dough is a disaster. The dough is soft and will smear, and the brownies won’t cut cleanly. That one-hour chill in the fridge is non-negotiable. It firms up the cookie dough and sets the brownies, giving you those perfect, photo-ready squares. It’s worth the patience.
Balancing Your Sweet Treats
While we all love a decadent dessert, it’s wonderful to enjoy it as part of a balanced approach to eating. Think of these brownies as a special “sometimes” food to savor and share. Pairing them with fresh fruit or a glass of milk can make your treat feel even more satisfying.
For more amazing bar cookie inspiration, from classic blondies to new twists, visit our full collection of dessert bar and brownie recipes. You’ll find your next baking project there!
Frequently Asked Questions
Can I use boxed brownie mix for the base?
Absolutely! You can definitely use a family-size boxed brownie mix to save time. Just prepare it according to the package directions for a 9×13-inch pan. Bake it and let it cool completely as directed in the recipe. Then, proceed with the homemade edible cookie dough layer. It’s a great shortcut that still yields fantastic results. Just pick a mix you know and love for that fudgy texture.
This is a very common concern. Traditionally, raw flour can carry a small risk of bacteria, just like raw eggs. In this recipe, we’ve eliminated raw eggs from the cookie dough. To make the flour completely safe, you have a great option: toast it. Spread the 2 cups of flour on a baking sheet and bake at 350°F for 5-7 minutes. Let it cool before using. This simple step “cooks” the flour, killing any potential bacteria and giving it a lovely nutty flavor. Many readers now do this step every time!
How long will these brownies last?
When stored properly in an airtight container in the refrigerator, your cookie dough brownies will stay fresh and delicious for up to 5 days. The cold is essential because it keeps the cookie dough layer from softening too much. If you want to keep them longer, they freeze beautifully for up to 2 months. Just thaw in the fridge or on the counter when you’re ready to enjoy them again.
Can I add nuts or other mix-ins?
Please do! This recipe is wonderfully adaptable. Feel free to stir 1/2 cup of chopped walnuts, pecans, or even pretzel pieces into the brownie batter for crunch. In the cookie dough layer, you can swap the chocolate chips for butterscotch chips, peanut butter chips, or white chocolate chunks. You can even add a tablespoon of instant espresso powder to the brownie batter for a mocha twist. Make it your own!
This usually happens if the butter was a bit too soft or the kitchen is very warm. Don’t worry! First, make sure your brownie base is 100% cold. A warm base will melt the dough. To handle sticky dough, lightly wet your fingertips or the back of a spoon with cold water. This will prevent it from sticking to you as you press it into an even layer. You can also briefly chill the dough in the bowl for 15 minutes before attempting to spread it.
You can, but it becomes a different dessert—a double-decker cookie-brownie bar. If you want to bake it, spread the dough on the cooled brownie base and return the pan to a 350°F oven. Bake for 15-20 minutes, until the top is golden brown. Let it cool completely before slicing. The texture will be a soft-baked cookie on top of a brownie, which is also delicious!
What’s the best way to cut clean squares?
For those perfect, professional-looking bars, use a long, sharp knife. Run the knife under very hot water and then wipe it completely dry with a towel. Make your first cut. Then, reheat and dry the knife before each subsequent cut. The heat helps the knife glide smoothly through the cold, firm layers without dragging or smearing the chocolate chips. It makes a huge difference!
Can I make these brownies ahead of time?
They are an excellent make-ahead dessert! In fact, I recommend it. Making them a day in advance allows all the flavors to meld together perfectly. Just prepare the recipe as directed, chill, and slice. Keep the squares stored in an airtight container in the fridge. They will be ready and waiting for your event, which takes the stress out of last-minute baking.
Why did my brownie layer turn out cakey?
A cakey brownie usually points to two issues: overmixing or overbaking. Remember to mix the brownie batter only until the ingredients are just combined. Also, be vigilant about the baking time. Ovens can vary. Start checking at 25 minutes. The toothpick should have a few moist crumbs, not be clean. A clean toothpick means it’s overdone. Pulling them out at the right moment is key for fudginess.
Can I use salted butter?
Yes, you can use salted butter. If you do, simply omit or reduce the added salt in each layer of the recipe. I usually cut the added salt in half when using salted butter. I prefer unsalted because it lets me control the exact amount of salt, which balances the sweetness so well. But using what you have on hand is always a smart kitchen move.
The Final Sweet Slice
There you have it! My ultimate recipe for Chocolate Chip Cookie Dough Brownies. They are fun, forgiving, and always a hit. I love how they solve that classic dessert dilemma with one incredible bite. Baking should be about joy, and these bars deliver it every single time. So, preheat that oven, soften that butter, and get ready to make something truly special. Don’t forget to share them (or hide a few for yourself!). Happy baking
Equipment
- Grand bol
- Fouet
- Spatule
- Plaque à pâtisserie
- Papier sulfurisé
Ingredients
- 1 tasse beurre non salé
- 2 tasses sucre granulé
- 4 œufs
- 1 cuil. extrait de vanille
- 1 tasse farine tout usage
- 1 tasse cacao en poudre
- 1/2 cuil. sel
- 1 tasse beurre non salé (ramolli)
- 1 tasse sucre brun
- 1/2 tasse sucre granulé
- 2 cuil. extrait de vanille
- 2 tasses farine tout usage
- 1/2 cuil. sel
- 1/4 tasse lait
- 1 tasse pépites de chocolat
Instructions
- Préchauffez votre four à 175°C et graissez un moule à pâtisserie de 23x33 cm.
- Dans une casserole moyenne, faites fondre 226 g de beurre à feu doux, puis laissez refroidir légèrement et incorporez 400 g de sucre granulé.
- Ajoutez les œufs et l'extrait de vanille, en fouettant jusqu'à ce que le mélange soit homogène.
- Incorporez délicatement la farine, le cacao en poudre et le sel jusqu'à ce que le tout soit juste mélangé, puis versez dans le moule préparé.
- Faites cuire au four pendant 25 à 30 minutes jusqu'à ce qu'un cure-dent en ressorte avec quelques miettes humides. Laissez refroidir complètement sur une grille.
- Pour la pâte à biscuits, battez le beurre ramolli avec le sucre brun et le sucre granulé jusqu'à ce que le mélange soit léger et aéré.
- Incorporez l'extrait de vanille, puis tamisez ensemble la farine et le sel dans un bol séparé.
- Ajoutez progressivement le mélange sec et le lait au mélange de beurre, en alternant et en mélangeant jusqu'à obtenir une pâte homogène. Incorporez les pépites de chocolat.
- Étalez la pâte à biscuits sur les brownies refroidis, en pressant uniformément, puis réfrigérez pendant au moins une heure.
- Coupez en carrés et servez.
Notes
Nutrition

Hi, I’m Olivia Parker, the founder of BakingSecret.com and a lifelong lover of all things sweet and homemade. I grew up in a small town in Oregon, where the smell of fresh cookies in my family’s kitchen sparked my passion for baking. Over the years, I turned that passion into a mission: to help home bakers feel confident, inspired, and creative.
After studying food science and working in several artisan bakeries across the U.S., I decided to create a space where everyone from beginners to seasoned bakers can find reliable recipes, expert tips, and a warm, welcoming community. BakingSecret.com is my way of sharing the magic of baking with the world. When I’m not testing new recipes, you’ll find me exploring farmers’ markets, collecting vintage cookbooks, or perfecting my sourdough technique.