
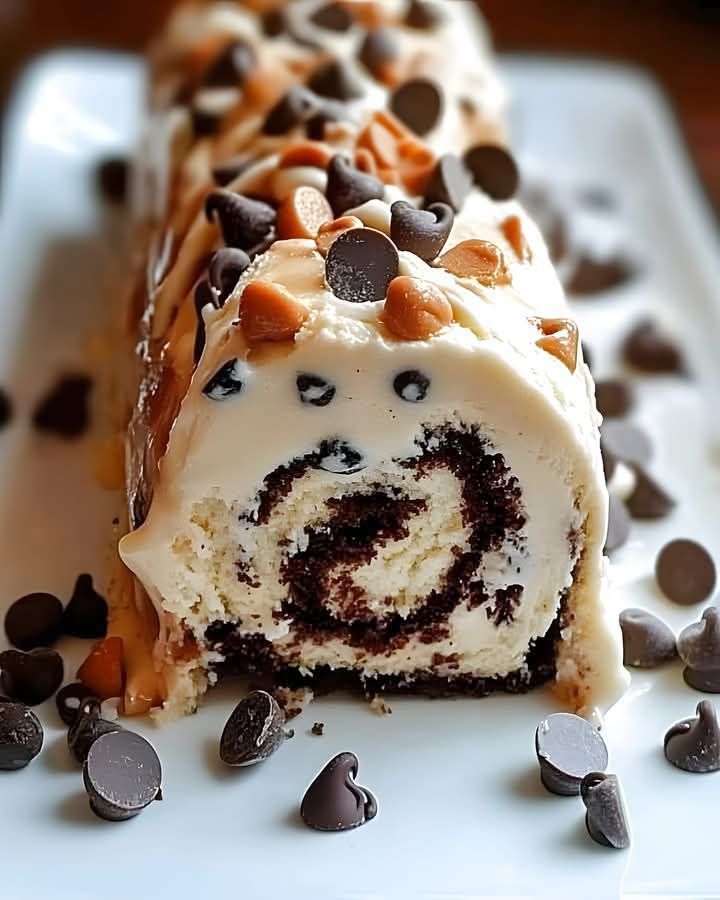
Cookie Dough Ice Cream Cake Rolls – The Ultimate Party Hero!
Have you ever had one of those dessert dreams where you couldn’t decide between cake, ice cream, and cookie dough? Yeah, me too. That’s exactly why I created this masterpiece! I tested this Cookie Dough Ice Cream Cake Rolls recipe for my niece’s birthday, and let me tell you, the crowd went wild. It’s not just a dessert; it’s an experience. Imagine rich chocolate cake hugging a creamy layer of cookie dough and vanilla ice cream, all rolled together like a delicious secret. This recipe is my happy place, and after you try it, it’ll be yours too!
From Humble Kitchens to Showstopper Cakes
While the exact origin is a bit of a mystery, this dessert is a proud member of the American potluck hall of fame. It takes the classic ice cream cake we all loved as kids and gives it a gourmet, homemade twist. The genius of the “roll” format came from my own kitchen mishap—I once tried to stack a cake that was a bit too warm, and the layers started to slide. My solution? Let’s roll with it! This version merges the nostalgic fun of cookie dough with the elegance of a rolled cake, creating something truly unique. For a more traditional layered treat, you might love our decadent Chocolate Chip Cookie Dough Ice Cream Cake.
Why You’ll Adore This Cookie Dough Cake Roll Recipe
Honestly, what’s not to love? First, it’s a textural wonderland. You get the soft crumb of chocolate cake, the chewy chunks of edible cookie dough, and the smooth, cold creaminess of ice cream in every single bite. Second, it looks incredibly impressive but is surprisingly straightforward to make. You don’t need any fancy equipment. Finally, it’s the ultimate make-ahead dessert. Just pop it in the freezer and forget about it until the party starts, giving you more time to enjoy your guests.
Perfect Occasions for Your Cookie Dough Cake Rolls
- Birthday Parties: Ditch the store-bought sheet cake. This is a guaranteed kid (and adult!) pleaser.
- Summer BBQs & Potlucks: A cool, refreshing dessert that stands out on a table full of salads and grilled meats.
- Movie Nights: Slice it into pinwheels for a fun, shareable treat better than any theater candy.
- Holiday Gatherings: It’s a festive, celebratory dessert that feels special without being overly formal.
Ingredients for Your Cookie Dough Cake Roll Creation
Gather these simple ingredients. I promise, most are already in your pantry!
For the Chocolate Cake:
- 1 cup all-purpose flour
- 1/2 cup unsweetened cocoa powder
- 1 teaspoon baking powder
- 1/2 teaspoon salt
- 1/2 cup unsalted butter, softened
- 1 cup granulated sugar
- 2 large eggs
- 1/2 cup milk
- 1 teaspoon vanilla extract
For the Cookie Dough Layer:
- 1/2 cup unsalted butter, softened
- 1/2 cup granulated sugar
- 1/2 cup packed brown sugar
- 1 large egg
- 1 teaspoon vanilla extract
- 1 1/4 cups all-purpose flour
- 1/2 teaspoon salt
- 1/2 cup chocolate chips
For the Ice Cream Layer:
- 1 quart vanilla ice cream, slightly softened
For the Frosting:
- 1/4 cup powdered sugar
- 1 tablespoon milk
Easy Ingredient Swaps & Substitutions
No worries if you’re missing something! Here’s how to adapt:
- Gluten-Free: Use a 1:1 gluten-free flour blend for both the cake and cookie dough.
- Dairy-Free: Use plant-based butter, milk, and a dairy-free vanilla ice cream.
- Egg in Cookie Dough: For peace of mind about raw flour, you can toast the flour on a baking sheet at 350°F for 5 minutes to kill any bacteria, or simply omit the egg. The dough will be a bit crumbly but still delicious.
- Ice Cream Flavor: Swap vanilla for chocolate, cookie dough, or even mint chocolate chip!
Step-by-Step Guide to Making Cookie Dough Ice Cream Cake Rolls
Follow these steps and you’ll be a dessert roll pro in no time.
Step 1: Prep and Bake the Cake
Preheat your oven to 350°F (175°C). Grease a 10×15 inch jelly roll pan, line it with parchment paper, and grease the paper too. This is our insurance policy! In a bowl, whisk the flour, cocoa, baking powder, and salt. In another bowl, cream the softened butter and sugar until it’s light and fluffy. Beat in the eggs, one at a time, then the milk and vanilla. The mixture will look creamy and pale. Gently fold the dry ingredients into the wet until you have a smooth, dark brown batter. Spread it evenly into your prepared pan. Pro tip: Use an offset spatula for a perfectly even layer.
Step 2: Make the Edible Cookie Dough
While the cake bakes, let’s make the magic layer. Cream the butter and both sugars together until super smooth. Beat in the egg and vanilla. The aroma will be heavenly. Gradually add the flour and salt. The dough will form soft, creamy clumps. Finally, stir in those glorious chocolate chips. Set this bowl aside. Chef’s tip: If you want to play it extra safe with the raw flour, spread it on a baking sheet and bake at 350°F for 5 minutes to kill any bacteria, then let it cool before using.
Step 3: Roll the Cake & Assemble the Layers
Bake the cake for 12-15 minutes, just until the top springs back. Here’s the fun part! Immediately, turn the warm cake out onto a clean kitchen towel dusted with powdered sugar. Peel off the parchment paper. Starting from a short end, carefully roll the cake up inside the towel. Let it cool completely rolled up. This “trains” it to hold its rolled shape later. Once cool, unroll the cake. Spread the cookie dough in an even layer over the cake. Then, quickly spread the slightly softened vanilla ice cream over the cookie dough.
Step 4: The Final Roll and Freeze
Now, using the towel to help you, tightly re-roll the cake, this time without the towel inside! It’s okay if it cracks a little—it adds charm. Wrap the whole roll tightly in plastic wrap or foil. Place it seam-side down on a baking sheet and freeze for at least 4-6 hours, or overnight. This is the hardest part: waiting! Before serving, whisk the powdered sugar and milk to make a simple glaze and drizzle it over the roll.
Getting the Timing Just Right
| Activity | Time Needed |
|---|---|
| Prep Time (Cake & Dough) | 25 minutes |
| Baking Time | 12-15 minutes |
| Cooling Time | 45 minutes |
| Freezing Time | Minimum 4 hours |
| Total Time (Start to Serve) | About 5.5 hours |
My Ultimate Chef’s Secret
The key to a perfect roll without cracks is the warmth of the cake. Roll it in the towel immediately after baking while it’s still warm and pliable. The residual heat creates steam, making the cake flexible. If you let it cool flat first, it will crack when you try to roll it later. Trust me on this one!
A Little Extra Sweet Info
Did you know the concept of edible cookie dough became a huge trend largely because of people’s love for sneaking spoonfuls from the mixing bowl? This recipe celebrates that guilty pleasure perfectly. It’s also a great way to explore a wonderful variety of food textures—from soft to chewy to creamy–all in one bite, showing how creative home baking can be.
What You’ll Need to Make It
- 10×15 inch Jelly Roll Pan
- Parchment Paper
- Stand Mixer or Hand Mixer
- Mixing Bowls
- Clean Kitchen Towel
- Plastic Wrap or Aluminum Foil
Storing Your Cookie Dough Cake Roll Masterpiece
This cake roll is a freezer champion! Keep it tightly wrapped in plastic wrap and then in a layer of foil to prevent freezer burn. It will stay delicious for up to 2 weeks this way.
When you’re ready to serve, let it sit at room temperature for just 5-10 minutes before slicing. This makes it easier to cut through the ice cream layer without squishing the cake.
I do not recommend storing it in the fridge for more than a few hours, as the ice cream will melt and make the cake soggy. The freezer is its happy home!
Handy Tips and Advice
- Ice Cream Consistency: Let the ice cream soften just enough to spread easily. If it’s too soft, it will melt and soak the cake. If it’s too hard, you’ll tear the cake trying to spread it.
- Work Quickly: When spreading the ice cream, be efficient to prevent melting. Have your cookie dough layer ready to go before you take the ice cream out of the freezer.
- Sharpen Your Knife: For clean slices, dip a sharp knife in hot water and wipe it dry between each cut.
Show-Stopping Presentation Ideas
- Slice and plate each roll on a drizzle of chocolate or caramel sauce.
- Top each slice with a dollop of whipped cream and a mini chocolate chip cookie.
- Roll the outside in mini chocolate chips or crushed cookies before freezing.
- Serve on a chilled platter to keep everything perfect throughout your party.
Try These Healthier & Fun Variations
Want to mix it up? Here are six delicious spins on the classic:
- Peanut Butter Cup: Use peanut butter cookie dough and chocolate ice cream. Swirl peanut butter into the dough and top with chopped peanut butter cups.
- Mint Chocolate Chip: Add 1/4 tsp peppermint extract to the cookie dough and use mint chocolate chip ice cream for a refreshing twist.
- Birthday Cake Funfetti: Use a vanilla cake instead of chocolate, add rainbow sprinkles to the cookie dough, and use cake batter ice cream.
- Cookies & Cream: Crush 5-6 Oreo cookies into the cookie dough and use cookies and cream ice cream. Decorate with more crushed cookies.
- Salted Caramel Pretzel: Add 1/2 cup crushed pretzels to the cookie dough and use salted caramel ice cream. Drizzle with caramel and a sprinkle of sea salt.
- Berry Cheesecake: Use a vanilla cake, mix 4 oz softened cream cheese into the cookie dough, and use strawberry ice cream. Serve with fresh berry compote.
If you love creative cake combinations, you’ll find so much inspiration in our full collection of delicious cake and cupcake recipes.
Common Mistakes to Avoid
Mistake 1: Using Rock-Hard Ice Cream
If your ice cream is straight from the back of the freezer, you’ll struggle to spread it and likely rip the tender cake. On the flip side, if it’s completely melted, it will make the cake soggy. The sweet spot is “slightly softened.” Let it sit on the counter for 10-15 minutes, or until you can scoop and spread it with a firm spatula without too much resistance. It should hold its shape but be pliable.
Mistake 2: Letting the Cake Cool Flat
This is the biggest cause of cracked cake rolls! The cake must be rolled while it is still warm and flexible. The heat and moisture trapped inside the towel help the cake “remember” its rolled shape. If you let it cool completely flat on a rack, it will set in that flat position and almost certainly crack when you try to roll it later with the fillings. Move fast after it comes out of the oven!
Mistake 3: Overbaking the Cake
A dry cake is a crackly cake. Since this is a thin sheet cake, it bakes quickly. Start checking at the 12-minute mark. The cake is done when the top springs back lightly when touched, and the edges just begin to pull away from the pan. A toothpick inserted should come out with a few moist crumbs, not completely clean. Overbaking will dry it out, making it brittle and difficult to roll.
Mistake 4: Skipping the Parchment Paper
Greasing the pan is not enough. You must line it with parchment paper and then grease the paper. This creates a non-stick guarantee. When it’s time to flip the hot cake onto the towel, the parchment peels off in one smooth motion, preventing any part of the soft cake from sticking and tearing. It’s a simple step that saves a lot of stress.
Frequently Asked Questions
Absolutely, and it’s a great idea for peace of mind. You have two easy options. First, you can simply omit the egg from the cookie dough recipe. The mixture will be a bit more crumbly, but it will still taste fantastic and hold together when frozen. Second, you can use a pasteurized egg or egg product. Alternatively, you can “toast” your flour by spreading it on a baking sheet and baking it at 350°F for about 5 minutes to kill any potential bacteria, then let it cool completely before using it in the dough.
You can, but with a few important notes. Many store-bought cookie doughs are formulated to spread when baked, which might give a different texture when frozen. For the best results, look for an “edible cookie dough” product specifically meant to be eaten raw. If you use regular bakeable dough, the flavor will still be good, but the texture might be a bit softer due to the higher butter content meant for spreading. Homemade is always best for controlling flavor and texture!
How do I prevent the ice cream from melting too fast while assembling?
Preparation is key! Make sure your cookie dough layer is completely ready and spread over the cooled cake before you even take the ice cream out of the freezer. Take the ice cream out to soften for just 10-15 minutes. Work in a cool kitchen, and use a firm spatula to spread the ice cream as quickly and evenly as possible. If it starts to get too melty, pop the whole pan in the freezer for 5 minutes before rolling.
My cake cracked when I rolled it. Did I ruin it?
Not at all! Small cracks are very common and don’t affect the taste one bit. You have a few fixes. First, you can simply roll it with the crack on the inside—it will be hidden. If the crack is on the outside, your simple powdered sugar glaze is a perfect “spackle” to cover it up. Once sliced and plated, no one will ever know. Consider it a sign of a homemade, lovingly made dessert.
Can I make this dessert gluten-free or dairy-free?
Yes, you can adapt this recipe quite easily. For a gluten-free version, use a reliable 1-to-1 gluten-free flour blend for both the cake and the cookie dough layers. For dairy-free, use plant-based butter and milk in both components, and choose a high-quality dairy-free vanilla ice cream. Be sure your chocolate chips are also dairy-free. The method remains exactly the same.
How far in advance can I make these Cookie Dough Cake Rolls?
This is an excellent make-ahead dessert. Once assembled and tightly wrapped, the cake roll can live happily in your freezer for up to 2 weeks. The flavors actually meld and improve over a day or two. Just add the final drizzle of glaze right before you serve it for the freshest look. This makes it perfect for stress-free entertaining.
What’s the best way to slice a frozen cake roll?
Use a long, sharp knife—a serrated bread knife works wonders. For the cleanest cuts, run the knife under very hot water for a minute, wipe it completely dry, and then slice. The heat helps the knife glide smoothly through the frozen ice cream. Wipe and re-heat the knife between each slice for picture-perfect servings every time.
Can I use a different flavor of cake or ice cream?
Please do! That’s the fun of this recipe. A vanilla or even a red velvet cake would be delightful. For the ice cream, consider flavors that pair well with chocolate and cookie dough, like chocolate, coffee, caramel, or peanut butter. Just ensure the ice cream isn’t packed with huge chunks that might make rolling difficult. A classic like this Banana Pudding Cake shows how wonderful flavor swapping can be.
Why do I roll the cake in a towel first?
The initial “training” roll while the cake is warm is a crucial step. It teaches the cake’s structure to bend into a spiral shape. As it cools rolled up in the towel, it sets in that form. When you unroll it later to add the fillings, it will easily and willingly roll back up again, minimizing cracks. Think of it like muscle memory for your dessert!
This seems complex. Do you have a simpler layered version?
If the roll feels intimidating, try a layered ice cream cake instead! You can bake the chocolate cake in two round pans, layer it with cookie dough and ice cream, and frost it. It’s just as delicious and impressive. For a fabulous layered dessert that combines brownies and cookie dough, check out our super popular Cookie Dough Brownies recipe for inspiration.
The Final, Sweet Slice
So there you have it—the secret to the most talked-about dessert at any gathering. This Cookie Dough Ice Cream Cake Rolls recipe is a labor of love that pays off with every single delicious, creamy, chocolaty bite. It’s the kind of dessert that creates memories. Whether it’s for a special birthday or just a Tuesday that needs brightening, this treat is guaranteed to bring smiles. Don’t be afraid to make it your own. Now, go preheat that oven and get ready for the applause. You’ve totally got this!
Equipment
- Grand bol
- Fouet
- Spatule
- Plaque à pâtisserie
- Papier sulfurisé
Ingredients
- 1 tasse farine tout usage
- 1/2 tasse cacao en poudre non sucré
- 1 cuil. à café poudre à lever
- 1/2 cuil. à café sel
- 1/2 tasse beurre non salé, ramolli
- 1 tasse sucre granulé
- 2 œufs
- 1/2 tasse lait
- 1 cuil. à café extrait de vanille
- 1/2 tasse beurre non salé, ramolli
- 1/2 tasse sucre
- 1/2 tasse sucre brun, tassé
- 1 œuf grand
- 1 cuil. à café extrait de vanille
- 1 1/4 tasse farine tout usage
- 1/2 cuil. à café sel
- 1/2 tasse pépites de chocolat
- 1 quart crème glacée à la vanille légèrement ramollie
- 1/4 tasse sucre glace
- 1 cuil. à soupe lait
Instructions
- Préchauffez votre four à 175°C et préparez un moule à pâtisserie de 10x15 pouces en le graissant et le tapissant de papier sulfurisé.
- Dans un bol, fouettez ensemble la farine, le cacao en poudre, la poudre à lever et le sel.
- Dans un autre bol, crémez le beurre ramolli et le sucre jusqu'à ce que le mélange soit léger et mousseux, puis ajoutez les œufs, le lait et l'extrait de vanille jusqu'à obtenir un mélange homogène.
- Incorporez délicatement les ingrédients secs aux ingrédients humides jusqu'à obtenir une pâte lisse et étalez-la dans le moule préparé.
- Faites cuire pendant 12-15 minutes ou jusqu'à ce que le dessus rebondisse au toucher. Retournez immédiatement le gâteau sur un torchon propre saupoudré de sucre glace et retirez le papier sulfurisé.
- Enroulez le gâteau chaud dans le torchon et laissez-le refroidir complètement.
- Pour la pâte à biscuits, crémez le beurre ramolli et les deux types de sucre jusqu'à obtenir un mélange homogène, puis ajoutez l'œuf et l'extrait de vanille.
- Incorporez progressivement la farine et le sel jusqu'à ce qu'une pâte douce se forme, puis ajoutez les pépites de chocolat.
- Déroulez le gâteau refroidi et étalez uniformément la pâte à biscuits sur le dessus, suivie de la crème glacée ramollie.
- Roulez à nouveau le gâteau (sans le torchon) et enveloppez-le fermement dans du film plastique ou du papier d'aluminium, en le plaçant côté couture vers le bas sur une plaque de cuisson. Congelez pendant au moins 4-6 heures.
- Avant de servir, fouettez le sucre glace et le lait pour créer un glaçage et nappez-le sur le rouleau.
Notes
Nutrition

Hi, I’m Olivia Parker, the founder of BakingSecret.com and a lifelong lover of all things sweet and homemade. I grew up in a small town in Oregon, where the smell of fresh cookies in my family’s kitchen sparked my passion for baking. Over the years, I turned that passion into a mission: to help home bakers feel confident, inspired, and creative.
After studying food science and working in several artisan bakeries across the U.S., I decided to create a space where everyone from beginners to seasoned bakers can find reliable recipes, expert tips, and a warm, welcoming community. BakingSecret.com is my way of sharing the magic of baking with the world. When I’m not testing new recipes, you’ll find me exploring farmers’ markets, collecting vintage cookbooks, or perfecting my sourdough technique.