
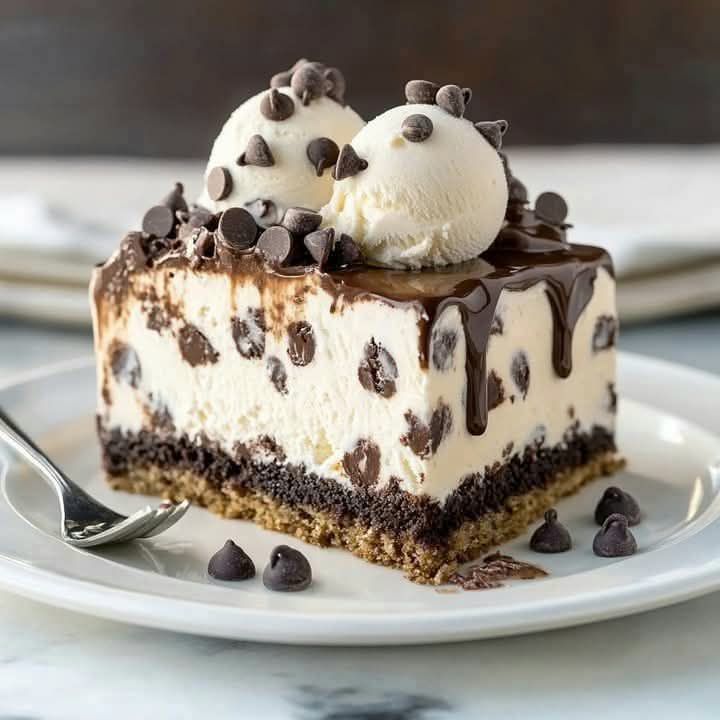
Get Ready for Your New Favorite Dessert: Chocolate Chip Cookie Dough Ice Cream Cake
You know that feeling when you can’t decide between digging into a tub of ice cream or eating the cookie dough straight from the bowl? I’ve been there too many times to count. That’s why I spent a whole weekend in my kitchen, determined to create the ultimate mash-up. The result? A Chocolate Chip Cookie Dough Ice Cream Cake that’s so dreamy, it’s guaranteed to be the star of every party. It’s cold, creamy, chewy, and chocolatey all in one slice. Let’s get your spoons ready!
The Story Behind This Cookie Dough Delight
Ice cream cakes have been a birthday party staple forever. But let’s be honest, the store-bought ones can be a bit… predictable. I wanted to capture the pure joy of sneaking spoonfuls of raw cookie dough when no one was looking. That’s the heart of this recipe. It blends the nostalgic fun of edible cookie dough with the creamy luxury of premium ice cream. It’s a modern twist on a classic, turning two beloved treats into one spectacular cookie dough dessert. It’s the kind of creation that makes my family line up by the freezer!
Why You’ll Absolutely Love This Recipe
Looking for a dessert that gets rave reviews every single time? This is it. First, it requires no baking at all. You just mix, layer, and freeze. It’s the perfect solution for hot summer days when turning on the oven feels impossible. The textures are incredible—creamy ice cream, a soft cookie dough crust, and crumbles on top. It’s also incredibly versatile. If you’re into creative no-bake ideas, you’ll find more inspiration in our collection of fantastic no-bake desserts. Plus, making it ahead of time means zero stress when your guests arrive.
Perfect Occasions for This Dreamy Cake
- Birthday Parties: Ditch the traditional cake for something everyone will remember.
- Summer BBQs: A chilly, sweet treat after a hot and smoky grill session.
- Potlucks: Be the person who brings the dessert everyone talks about for weeks.
- Movie Nights: Elevate your family film marathon with this homemade masterpiece.
- Just Because: Sometimes, a Tuesday night deserves a cookie dough ice cream celebration.
Gathering Your Ingredients for Cookie Dough Bliss
Here’s everything you need to build your frozen masterpiece. Let’s keep it simple.
- 1 cup softened butter
- 1 cup packed brown sugar
- 1/2 cup granulated sugar
- 2 tablespoons milk
- 1 teaspoon vanilla extract
- 2 cups all-purpose flour
- 1 cup mini chocolate chips
- 2 quarts (or 1.9 L) softened vanilla ice cream
- 1 quart (or 0.95 L) softened chocolate chip ice cream
- 1 cup melted chocolate chips (for the gorgeous drizzle)
Easy Ingredient Swaps and Substitutions
Don’t panic if you’re missing something! Here are some easy fixes:
- Flour: For a safe-to-eat raw cookie dough, you can heat-treat your all-purpose flour in the microwave or use a trusted edible cookie dough recipe.
- Ice Cream: Use any flavor you love! Cookie dough, mint chip, or coffee ice cream would be amazing.
- Butter: A good, salted butter works beautifully here, adding a nice contrast to the sweetness.
- Dairy-Free? Use your favorite plant-based butter and non-dairy ice cream.
- Chocolate Chips: Swap mini chips for regular, or use dark chocolate chunks for a richer flavor.
Step-by-Step Guide to Your Cookie Dough Masterpiece
Step 1: Prep Your Pan for Easy Release
Start by lining a 9-inch springform pan with parchment paper. I like to cut a circle for the bottom and a strip for the sides. This little trick is a lifesaver! It ensures your beautiful ice cream cake slides out perfectly without any messy sticking. A quick spritz of cooking spray under the paper helps it stay put. Trust me, you’ll thank yourself later when you’re presenting a flawless cake.
Step 2: Cream the Butter and Sugars
Grab a large mixing bowl and combine the softened butter, brown sugar, and granulated sugar. Use a hand mixer or a sturdy spoon. You want to beat it for a good 2-3 minutes until it’s wonderfully smooth, creamy, and fluffy. That pale, caramel color is your sign of success. This step adds air to your cookie dough, making the texture just right.
Step 3: Bring the Cookie Dough Together
Now, pour in the milk and vanilla extract. Mix until just combined. The aroma of vanilla will start to fill your kitchen. Next, gently stir in the flour until no dry pockets remain. Finally, fold in the mini chocolate chips. The dough will be thick and oh-so-tempting. Pro tip: Resist eating it all! We need half for the crust and half for the topping.
Step 4: Create the Magical Cookie Dough Crust
Take about half of your glorious cookie dough. Press it firmly and evenly into the bottom of your prepared pan. I use my fingers and then the bottom of a measuring cup to really tamp it down. You’re creating a solid, delicious foundation for all that ice cream. Think of it as the best cookie you’ve ever had, but in crust form.
Step 5: Layer on the Velvety Vanilla Ice Cream
Let your vanilla ice cream sit on the counter for 10-15 minutes until it’s spreadable but not soupy. Plop it onto your cookie dough crust and spread it into an even layer. A slightly wet spatula works wonders here. Once it’s smooth, hurry the pan into the freezer. Let it set for a solid hour. This chill time is crucial to keep the layers distinct.
Step 6: Add the Chocolate Chip Ice Cream Layer
After the first hour, soften your chocolate chip ice cream. Spread it gently over the now-firm vanilla layer. Take your time to spread it to the edges without disturbing the layer below. Smooth the top like you’re frosting a cake. Pop it back in the freezer for another hour. You’re building flavor and texture with every step!
Step 7: Add the Final Cookie Dough & Chocolate Drizzle
This is the fun part! Take the remaining cookie dough and crumble it all over the top of the cake. You want lovely, rustic chunks. Then, melt your chocolate chips in the microwave in short bursts, stirring in between. Drizzle that liquid gold over the entire cake. Let the chocolate fall in ribbons and swirls. It’s the beautiful, messy finish that makes it homestyle perfection.
Step 8: The Final Freeze (The Hardest Part!)
Now, practice patience. Your Cookie Dough Delight needs to freeze for at least 4 hours, but overnight is best. This allows everything to firm up completely so you get clean, perfect slices. Cover the pan tightly with plastic wrap to prevent any freezer odors from sneaking in. I know it’s tempting to peek, but let it work its magic.
Chef’s Tip: For the cleanest slices, dip a sharp knife in hot water and wipe it dry between each cut. It glides right through the frozen layers!
Step 9: Slice, Serve, and Swoon
The moment has arrived! Run a thin knife around the edge of the springform pan and release the collar. Carefully transfer the cake to a serving plate. Use your warmed knife to cut generous slices. Watch as each piece reveals the beautiful layers. Serve immediately and get ready for the compliments to roll in. This is pure dessert heaven on a plate.
Your Recipe Timeline
Let’s break down the clock so you can plan your day.
- Prep Time: 30 minutes (plus ice cream softening time)
- Freezing Time: 6 hours (includes the two 1-hour chills and final 4-hour freeze)
- Total Time: 6 hours 30 minutes
- Servings: 12-14 happy people
A Baker’s Secret for the Best Texture
Here’s my little secret for the creamiest ice cream layers. Don’t let the ice cream get too soft and melt. You want it just soft enough to spread easily. If it becomes liquidy, it can form icy crystals when it refreezes. The perfect consistency is like thick, smooth frosting. This guarantees a luxuriously creamy bite every single time.
A Sweet Scoop of History
Did you know the first ice cream cakes were likely just bricks of ice cream? The modern, layered versions we love became popular in the 1950s with the rise of home freezers. My recipe is a nod to that mid-century innovation but supercharged with our universal love for edible cookie dough. It’s a treat that spans generations!
Kitchen Tools You’ll Need
- 9-inch springform pan
- Parchment paper
- Large mixing bowls
- Hand mixer or sturdy wooden spoon
- Rubber spatula
- Measuring cups and spoons
- Microwave-safe bowl (for melting chocolate)
How to Store Your Frozen Masterpiece
This cake is a fantastic make-ahead dessert. After the final freeze, you can keep it in the springform pan or transfer it to an airtight container. If using a container, place the whole cake on a cardboard round first for easy moving. It will keep beautifully in the freezer for up to 2 weeks. The flavors actually meld and improve after a day or two!
To prevent freezer burn, which can dull flavors and create an unpleasant texture, ensure the cake is wrapped very well. I use two layers of plastic wrap pressed directly onto the surface, followed by a layer of heavy-duty aluminum foil.
When you’re ready to serve, let the cake sit on the counter for just 5-7 minutes before slicing. This slight softening makes it easier to cut and allows the full, creamy flavor of the cookie dough ice cream to shine through.
Tips & Advice for Guaranteed Success
- Use full-fat ice cream for the creamiest, richest texture.
- Set a timer for the softening and freezing steps. It’s easy to lose track of time!
- If your cookie dough feels too stiff when crumbling, let it sit at room temp for a few minutes.
- Get creative with toppings! Crushed cookies, sprinkles, or a caramel drizzle are all fantastic.
- Remember, baking is a creative journey. Making smart, nutritious choices about ingredients is part of the fun, even in indulgent treats.
Presentation Ideas to Wow Your Guests
- Serve each slice on a chilled plate with a dollop of whipped cream.
- Garnish with a whole cookie and a fresh mint sprig for a pop of color.
- Drizzle extra chocolate and caramel sauces on the plate before placing the slice.
- For a party, cut smaller, bite-sized squares and serve as frozen cookie dough bites.
6 Delicious Variations to Try
Once you master the classic, the world is your ice cream cake! Here are some fun twists:
- Peanut Butter Cup: Use peanut butter ice cream and swirl peanut butter into the cookie dough. Top with chopped peanut butter cups.
- Mint Chocolate Chip: Layer mint chocolate chip ice cream and add a touch of peppermint extract to the cookie dough. So refreshing!
- S’mores Style: Use a graham cracker crust, layer chocolate and marshmallow ice cream, and top with toasted marshmallows.
- Cookies & Cream: Mix crushed Oreos into the vanilla ice cream layer. It’s a double dose of cookie goodness.
- Triple Chocolate: Use chocolate ice cream, add cocoa to the cookie dough, and top with dark chocolate drizzle. For another show-stopping chocolate dessert, you must try our decadent Ferrero Rocher Ice-Cream Terrine.
- Fruity Swirl: Layer strawberry ice cream and swirl strawberry jam into the cookie dough for a berry-filled twist.
Common Mistakes to Avoid
Mistake 1: Using Rock-Hard Ice Cream
Trying to spread ice cream straight from the freezer is a recipe for frustration. You’ll tear the delicate cookie dough crust and get uneven layers. Let your ice cream sit on the counter for 10-15 minutes until it’s soft enough to scoop and spread easily with a spatula. It should have the consistency of thick frosting. This simple step makes assembly a breeze.
Mistake 2: Skipping the Parchment Paper Liner
It’s tempting to just spray the pan and hope for the best. Don’t do it! Ice cream cakes love to stick. The parchment paper creates a non-stick sling that guarantees your beautiful cake will release in one perfect piece. Take the extra minute to line the pan. Your future self will be doing a happy dance when the cake slides out effortlessly.
Mistake 3: Rushing the Freezing Steps
Patience is the most important ingredient here. If you don’t let each ice cream layer freeze solid before adding the next, they will bleed together. You’ll lose those beautiful, distinct stripes of flavor. Set a timer for each one-hour chill. The final four-hour freeze is non-negotiable for a cake you can slice cleanly. Plan to make this a day ahead for the best results.
Mistake 4: Over-Mixing the Cookie Dough
When you add the flour to the butter and sugar mix, stir just until it’s combined. Over-mixing can make the dough tough and lead to a dense crust. We want it tender and cookie-like. Gently fold in the chocolate chips at the end. A light hand ensures the perfect, melt-in-your-mouth texture for your cookie dough dessert base and topping.
Frequently Asked Questions
Can I make this cake ahead of time?
Absolutely! This cake is actually better made ahead. You can assemble it up to two weeks in advance. Just wrap it very tightly in plastic wrap and foil to prevent freezer burn. The flavors have time to meld, and it sets up perfectly, making it a stress-free dessert for any event. Thaw for just 5-10 minutes before slicing for the ideal texture.
The recipe uses all-purpose flour, which is not heat-treated. If you are concerned about consuming raw flour, you can easily make it safe. Simply spread the flour on a baking sheet and bake it at 350°F for 5-7 minutes to kill any potential bacteria. Let it cool completely before using. This gives you peace of mind without changing the delicious flavor of your Cookie Dough Delight.
Can I use a different type of pan?
A springform pan is highly recommended because the removable sides make serving so simple. If you don’t have one, a deep 9-inch round cake pan will work. You’ll need to line it with plastic wrap with plenty of overhang. Use the overhang to carefully lift the frozen cake out of the pan. A loaf pan is another great option for a taller, rectangular cake.
How do I prevent the ice cream from melting too fast when serving?
Serve on chilled plates! Pop your dessert plates in the freezer for 10-15 minutes before dishing up. Keep the cake in the freezer until the very moment you’re ready to cut and serve. Work quickly with a hot knife for clean cuts, and return the remaining cake to the freezer immediately. This keeps every slice looking and tasting its best.
Can I make this dairy-free or gluten-free?
Yes, you absolutely can! For a dairy-free version, use your favorite plant-based butter and non-dairy ice cream. For gluten-free, use a 1-to-1 gluten-free flour blend in the cookie dough and ensure your ice cream brands are certified gluten-free. The method remains exactly the same, so you can enjoy a custom ice cream cake that fits your dietary needs.
If the reserved cookie dough has been in the fridge and gotten too firm, let it sit at room temperature for about 10 minutes. You can also break it into chunks and gently knead it in your hands for a few seconds to soften it slightly. You want it pliable enough to break into nice, rustic pieces, not so soft it becomes a paste.
Can I use homemade ice cream?
Homemade ice cream would be wonderful! Just make sure it’s a sturdy, American-style ice cream that freezes quite firm. Some super-creamy homemade or French-style ice creams can be too soft for layering. Let it cure in the freezer until it’s scoopable but still very firm for the best layering results.
What’s the best way to melt chocolate for the drizzle?
The easiest method is the microwave. Place chocolate chips in a microwave-safe bowl and heat in 20-second intervals, stirring well after each, until smooth. You can also use a double boiler on the stove. The key is gentle, indirect heat to prevent the chocolate from seizing and becoming grainy.
It will firm up in the freezer, but it shouldn’t be rock-hard. The high butter and sugar content keeps it somewhat soft. If it’s too hard, you may have over-packed it. Next time, just press it in gently. Also, letting the cake sit out for 5-7 minutes before serving allows the crust to soften to the perfect chewy texture.
Go for it! This recipe is a fantastic canvas. Try adding 1/2 cup of chopped nuts, toffee bits, or even crushed pretzels for a sweet-and-salty kick. Just fold them in with the chocolate chips. If you love the combo of cookie dough and brownies, you’ll adore our recipe for Chocolate Chip Cookie Dough Brownies for another irresistible treat.
Your New Go-To Celebration Dessert
And there you have it! The ultimate Chocolate Chip Cookie Dough Ice Cream Cake. It’s honestly easier than it looks and so much more rewarding than anything from the store. Whether it’s for a birthday, a summer get-together, or just because you deserve something amazing, this cake delivers pure joy in every bite. It brings together the comfort of homemade cookie dough and the cool delight of ice cream. I can’t wait for you to make it, share it, and hear all the “oohs” and “aahs.” Happy baking (or rather, happy no-baking!). Don’t forget to check out our other frozen wonders like the Black Forest Cheesecake or the cozy Caramel Apple Cheesecake for your next dessert adventure!
Equipment
- Grand bol
- Fouet
- Spatule
- Moule à charnière de 9 pouces
- Papier sulfurisé
Ingredients
- 1 tasse beurre ramolli
- 1 tasse sucre brun tassé
- 1/2 tasse sucre granulé
- 2 cuillères à soupe lait
- 1 cuillère à café extrait de vanille
- 2 tasses farine tout usage
- 1 tasse pépites de chocolat mini
- 2 quarts glace à la vanille ramollie
- 1 quart glace aux pépites de chocolat ramollie
- 1 tasse pépites de chocolat fondues pour le drizzle
Instructions
- Tapissez un moule à charnière de 9 pouces de papier sulfurisé et vaporisez-le avec un spray de cuisson.
- Dans un grand bol, mélangez le beurre ramolli, le sucre brun et le sucre granulé ; mixez jusqu'à consistance lisse et crémeuse pendant 2-3 minutes.
- Ajoutez le lait et l'extrait de vanille au mélange et mixez jusqu'à ce que tout soit bien mélangé.
- Incorporez la farine jusqu'à ce qu'il n'y ait plus de poches sèches, puis incorporez doucement les pépites de chocolat mini.
- Enfoncez la moitié de la pâte à biscuits uniformément au fond du moule préparé pour former la croûte.
- Laissez la glace à la vanille ramollir pendant 10-15 minutes, puis étalez-la sur la croûte de pâte à biscuits et congelez pendant 1 heure.
- Ramollissez la glace aux pépites de chocolat et étalez-la sur la couche de vanille, en lissant le dessus, puis congelez pendant une autre heure.
- Émiettez le reste de la pâte à biscuits sur le dessus et arrosez avec les pépites de chocolat fondues.
- Congelez le gâteau pendant au moins 4 heures, de préférence toute la nuit, pour de meilleurs résultats avant de servir.
Notes
Nutrition

Hi, I’m Olivia Parker, the founder of BakingSecret.com and a lifelong lover of all things sweet and homemade. I grew up in a small town in Oregon, where the smell of fresh cookies in my family’s kitchen sparked my passion for baking. Over the years, I turned that passion into a mission: to help home bakers feel confident, inspired, and creative.
After studying food science and working in several artisan bakeries across the U.S., I decided to create a space where everyone from beginners to seasoned bakers can find reliable recipes, expert tips, and a warm, welcoming community. BakingSecret.com is my way of sharing the magic of baking with the world. When I’m not testing new recipes, you’ll find me exploring farmers’ markets, collecting vintage cookbooks, or perfecting my sourdough technique.