
The Ultimate Luxurious Caramel Apple Cheesecake Recipe
There’s a certain magic in the air when fall arrives. The leaves turn, the air gets crisp, and my kitchen becomes a stage for apple-inspired creations. My quest for the perfect autumn dessert ended when I combined two beloved classics: creamy cheesecake and cozy apple pie. This Luxurious Caramel Apple Cheesecake is the result. It’s my family’s most requested treat for Thanksgiving, and I’ve perfected it through many happy (and messy) trials. Let me share this winning recipe with you.
From Classic Cheesecake to a Caramel Apple Dream
Cheesecake has a rich history, from ancient Greece to New York delis. Adding fruit is a timeless twist. My version leans into the American tradition of apple pie filling and the sweet joy of caramel sauce. It’s a modern take that feels totally classic. I love how it balances sophisticated cheesecake texture with the playful, familiar flavors of a caramel apple. It’s a dessert that connects generations at the table.
Why You’ll Love This Luxurious Caramel Apple Cheesecake
This recipe is a winner for so many reasons. First, the flavor is incredible. Sweet caramel, tart apples, and rich cheesecake create a perfect harmony. Second, it’s surprisingly straightforward. The steps are clear, and most of the time is just letting it chill. Finally, it’s stunning. The layers look beautiful, and the garnishes make it a showstopper. It’s a dessert that impresses without causing chef-level stress.
Perfect Occasions for This Showstopping Dessert
This cheesecake isn’t just for holidays! It’s perfect for any gathering where you want to make people feel special. Think family potlucks, dinner parties with friends, or even a cozy weekend treat. It shines at autumn birthdays, Halloween parties, and, of course, as the grand finale to your Thanksgiving feast. Bringing this to an event guarantees you’ll leave with empty plates and happy smiles.
Ingredients for Your Luxurious Caramel Apple Cheesecake
Gathering your ingredients is the first step to success. Using quality components makes a big difference. Here’s everything you’ll need:
- 1 1/2 cups graham cracker crumbs
- 1/4 cup granulated sugar
- 1/2 cup unsalted butter, melted
- 24 oz cream cheese, softened
- 1 cup granulated sugar
- 3 large eggs
- 1 tsp vanilla extract
- 1 cup sour cream
- 1/2 cup caramel sauce plus extra for topping
- 1 cup apple pie filling
- 1 apple, chopped for garnish
- Crumbled graham crackers for garnish
Simple Substitutions to Make It Your Own
Don’t worry if you’re missing an item! Here are easy swaps:
- Graham Cracker Crust: Use digestive biscuits or vanilla wafer crumbs.
- Apple Pie Filling: Swap with homemade sautéed apples with cinnamon.
- Sour Cream: Plain full-fat yogurt works in a pinch.
- Caramel Sauce: A good store-bought brand is fine, but homemade salted caramel adds a special touch.
How to Make Your Luxurious Caramel Apple Cheesecake
Follow these steps for a flawless cheesecake. Remember, patience is key!
Step 1: Prepare Your Pan and Crust
Start by preheating your oven to 325°F (163°C). Grease a 9-inch springform pan well. In a medium bowl, mix the graham cracker crumbs and 1/4 cup sugar. Pour in the melted butter. The mixture will look like wet sand and smell wonderfully toasty. Press it firmly into the bottom of the pan. A flat-bottomed glass helps create an even, compact layer. This crust is your cheesecake’s foundation, so make it sturdy!
Step 2: Create the Creamy Cheesecake Batter
In a large bowl, beat the softened cream cheese and 1 cup sugar until perfectly smooth. No lumps should remain! Add eggs one at a time, beating well after each. This prevents a cracked top. Then mix in the vanilla and sour cream. The batter will become gloriously creamy, pale, and slightly shiny. Pro tip: All ingredients must be at room temperature. This ensures a silky, homogeneous batter without overbeating.
Step 3: Build the Luxurious Layers
Pour half of the cheesecake batter over your crust. It will pool into a smooth, white lake. Now, spoon your apple pie filling over this layer. Try to distribute it evenly. Drizzle your 1/2 cup of caramel sauce over the apples. The golden caramel will sink into the filling, promising sweet pockets of flavor. Finally, pour the remaining batter over everything. It will cover the apple-caramel layer like a delicious blanket.
Step 4: Bake With Care and Patience
Place the pan in the preheated oven. Bake for 50-60 minutes. The edges should be lightly browned and the center should be set but still have a slight jiggle. Do not overbake! Turn off the oven. Let the cheesecake cool inside with the door slightly open for 1 hour. This gradual cooling prevents sudden temperature changes that cause sinking or cracks. It’s the secret to a perfect texture.
Step 5: Chill, Garnish, and Serve
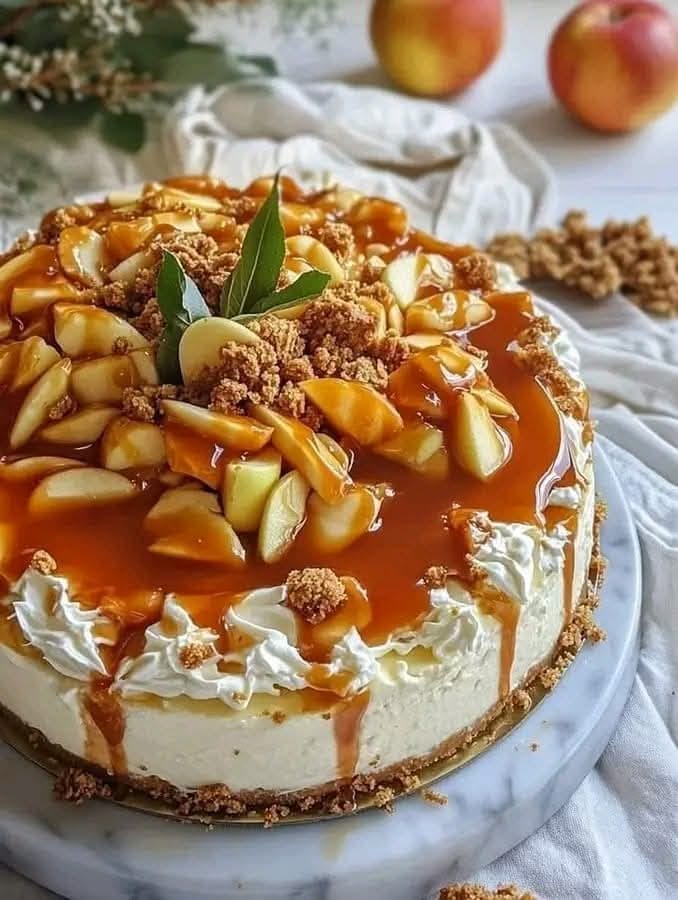
Remove the cheesecake from the oven. Let it cool completely on the counter. Then refrigerate it for at least 4 hours, or overnight. This long chill sets the structure and flavor. Before serving, run a knife around the edge and release the springform pan. Garnish with chopped fresh apple, crumbled graham crackers, and lavish swirls of extra caramel sauce. The final look is rustic, luxurious, and utterly inviting.
Chef’s tip: For clean slices, dip your knife in hot water and wipe it dry between each cut.
Timing Your Luxurious Caramel Apple Cheesecake
Planning is crucial for cheesecake success. Here’s a breakdown:
- Prep Time: 25 minutes
- Cook Time: 55 minutes (average)
- Cooling in Oven: 1 hour
- Chilling Time: 4 hours (minimum), overnight is best
- Total Time: About 6 hours 20 minutes (plus chilling)
My Secret for the Perfect Cheesecake Texture
The real secret is the long, slow chill. Overnight refrigeration allows the fats in the cream cheese and sour cream to fully set. This gives you that iconic dense-yet-creamy slice that holds its shape beautifully. Rushing this step leads to a softer, almost runny center. Trust me, the wait is worth it!
A Fun Fact About Cheesecake’s Journey
While we think of cheesecake as a modern dessert, its roots are ancient! Basic versions were served to athletes in ancient Greece. Over centuries, it evolved through Europe before arriving in America. New York-style cheesecake, with its rich cream cheese base, became iconic. Our caramel apple version is a delicious nod to both tradition and American autumn flavors.
Equipment You’ll Need
You don’t need fancy tools. Here’s the list:
- 9-inch springform pan
- Large and medium mixing bowls
- Electric mixer (hand or stand)
- Measuring cups and spoons
- Spatula
- Oven
Storing Your Luxurious Caramel Apple Cheesecake
Proper storage keeps your cheesecake delicious. Once served, cover any leftovers tightly with plastic wrap or place in an airtight container. Keep it in the refrigerator. It will stay fresh and tasty for up to 5 days. The flavors actually deepen a bit after a day!
If you need to store it longer, you can freeze it. Wrap the whole cheesecake (or individual slices) tightly in plastic wrap, then in aluminum foil. Freeze for up to 2 months. Thaw it overnight in the refrigerator before serving.
A note on the garnish: If you’ve added fresh apple garnish, it’s best to store it without that or add fresh apple just before serving. The fresh apple pieces can brown and soften in the fridge.
Tips and Advice for Cheesecake Success
- Room Temperature is Key: Softened cream cheese, eggs, and sour cream blend smoothly and prevent overmixing.
- Don’t Overbeat: After adding eggs, mix just until combined. Overbeating incorporates too much air and can cause cracking.
- Use a Water Bath if Nervous: For extra insurance against cracks, wrap the springform pan bottom in foil and place it in a roasting pan with 1 inch of hot water while baking.
- Test for Doneness: The center should be set but still have a slight wobble when the pan is gently nudged.
Presentation Ideas to Wow Your Guests
Make your dessert table stunning with these ideas:
- Serve each slice on a plate with a drizzle of warm caramel and a sprinkle of cinnamon.
- Add a small scoop of vanilla ice cream or a dollop of whipped cream alongside.
- For a party, create a “cheesecake bar” with bowls of extra caramel, chopped nuts, and whipped cream for guests to customize their slice.
- Place the whole cheesecake on a cake stand surrounded by fall leaves or small pumpkins for a seasonal centerpiece.
Healthier and Creative Variations
You can adapt this recipe to suit different tastes or diets. Here are six fun ideas:
- Gluten-Free Caramel Apple Cheesecake: Use gluten-free graham-style crackers for the crust. Ensure your apple pie filling is also gluten-free.
- Low-Sugar Version: Reduce sugar in the batter by 1/4 cup. Use a sugar-free caramel sauce and unsweetened apple filling.
- Pumpkin Spice Twist: Replace the apple pie filling with pumpkin pie filling. Add 1 tsp of pumpkin spice to the cheesecake batter.
- Chocolate Caramel Apple Cheesecake: Add 1/2 cup of mini chocolate chips to the batter. Use a chocolate caramel sauce for topping.
- Nutty Crunch Addition: Add 1/2 cup of finely chopped pecans or walnuts to the graham cracker crust for extra texture.
- Individual Mini Cheesecakes: Use a muffin tin with liners. Press crust into each, fill with batter and a spoonful of filling, and bake for 20-25 minutes. Perfect for parties!
More Inspired Baking Recipes
If you love this decadent dessert, you might also enjoy other rich, layered treats. For instance, a Molasses Spice Cake offers deep, warm flavors perfect for fall. Or, try a Chocolate Strawberry Cake for a fruity chocolate combination. For another cheesecake adventure, this Brownie Cookie Dough Cheesecake is a chocolate lover’s dream. And if you’re a fan of fruit and nuts, a Vanilla Banana Walnut Cake is a delightful option.
Common Mistakes to Avoid
Mistake 1: Using Cold Ingredients
This is the most common error. Using cold cream cheese, eggs, or sour cream leads to a lumpy batter. You then overbeat to try to smooth it out. Overbeating adds too much air. This can cause the cheesecake to rise and fall drastically, leading to cracks. Always let your dairy ingredients sit out on the counter for at least an hour before starting. They should feel cool but not cold to the touch.
Mistake 2: Overbaking the Cheesecake
Many bakers think a cheesecake should be firm like a cake in the center when done. That’s wrong! An overbaked cheesecake becomes dry, grainy, and often cracks badly. The perfect sign is a set but slightly jiggly center when you gently nudge the pan. The edges will be slightly puffed and light brown. Trust the jiggle! It will set during the long cooling and chilling process.
Mistake 3: Skipping the Slow Cooling Step
Taking a hot cheesecake straight from the oven to a cold counter is a shock. The sudden temperature drop can cause the center to sink and the top to crack. Always use the “turn off the oven and let it cool with the door open” method. This gentle cooldown protects your beautiful texture. If your oven light is bright, you can close the door a bit more to use the light’s heat.
Mistake 4: Not Chilling Long Enough
Impatience is a cheesecake enemy. After the oven cool-down, the cheesecake needs hours in the fridge to fully set. Cutting into it after only 2 hours often results in a soft, almost gooey slice that doesn’t hold its shape. For the perfect firm, creamy texture, chill for at least 4 hours. Overnight is truly best. Plan your baking day ahead of your serving day.
Mistake 5: A Weak or Uneven Crust
If you don’t press the graham cracker mixture firmly into the pan, it crumbles when you cut the cheesecake. An uneven crust also leads to uneven baking. Use a flat-bottomed glass or measuring cup to press the crumbs down hard and evenly. Make sure you get it compacted all the way to the edges of the pan. A solid crust is a great foundation.
FAQ: Your Luxurious Caramel Apple Cheesecake Questions
Can I make this cheesecake without a springform pan?
A springform pan is highly recommended because it allows you to release the cheesecake easily without damaging it. If you don’t have one, you can use a regular 9-inch cake pan. You will need to line it very well with parchment paper that overhangs the sides. This creates a “lift” to help you pull the cheesecake out after chilling. It’s trickier, but possible. Be extra gentle when removing it.
How do I prevent my cheesecake from cracking on top?
Cracks are often caused by sudden temperature changes or overbeating. Follow three key rules: use room temperature ingredients, don’t overbeat after adding eggs, and always cool the cheesecake slowly in the turned-off oven. A water bath is an extra precaution. Wrap your springform pan bottom in foil, place it in a larger pan, and add 1 inch of hot water around it before baking. The steam creates a gentler baking environment.
Can I use homemade apple pie filling?
Absolutely! Homemade filling adds a wonderful personal touch. Simply sauté thin slices of 2-3 tart apples (like Granny Smith) with a tablespoon of butter, 2 tablespoons of sugar, and a pinch of cinnamon until softened. Let it cool completely before using it in the cheesecake layer. This prevents adding extra heat that might affect the batter. It’s a great way to control the sweetness and texture.
Why is sour cream used in cheesecake?
Sour cream adds two important things: tanginess and moisture. The tang balances the sweetness of the sugar and caramel. The extra moisture helps create a creamy, dense texture rather than a dry one. It’s a classic ingredient in many cheesecake recipes for these reasons. You can learn more about how ingredients interact in baking by exploring general culinary techniques.
How long can I store this cheesecake?
In the refrigerator, properly covered, it lasts up to 5 days. The flavor remains great. You can also freeze it for up to 2 months. Wrap it tightly in plastic wrap then foil to prevent freezer burn. Thaw overnight in the fridge. Do not thaw at room temperature, as this can make the texture soggy. Add fresh garnishes like apple pieces and extra caramel sauce after thawing.
Can I make this recipe gluten-free?
Yes, it’s easy to adapt. Use a gluten-free graham cracker alternative for the crust. Many brands make them. Also, check your caramel sauce and apple pie filling labels to ensure they are gluten-free. The cheesecake batter itself is naturally gluten-free as it contains no flour. This makes it a fantastic dessert option for guests with gluten sensitivities.
My caramel sauce sank to the bottom. What happened?
This usually happens if the caramel sauce is too warm or thin when added. Use a thick, room-temperature caramel sauce. Drizzle it gently over the apple layer, but don’t pour a huge amount in one spot. Also, make sure your first cheesecake batter layer is thick enough to support the filling. A thicker batter acts as a better base to hold the caramel and apples in the middle.
What’s the best type of apple for the garnish?
For the fresh chopped apple garnish on top, choose a firm, crisp apple that won’t brown too quickly. Honeycrisp, Fuji, or Granny Smith are excellent choices. Their tartness also balances the sweet caramel. To prevent browning, you can toss the chopped pieces in a tiny bit of lemon juice. But for the best look and taste, garnish just before serving.
Can I add nuts to this cheesecake?
Nuts add a lovely crunch and flavor. Consider mixing 1/2 cup of chopped toasted pecans or walnuts into the graham cracker crust. You could also sprinkle toasted nuts on top as part of the garnish alongside the crumbled crackers. If adding to the crust, just mix them in with the crumbs before adding the butter. Ensure they are finely chopped so the crust still presses together well.
Is this recipe suitable for beginner bakers?
Yes, it is! While cheesecakes require attention to detail, this recipe breaks it down into clear steps. The key is following the instructions on temperature, mixing, and cooling precisely. Don’t rush. If you’re new to baking, read the “Common Mistakes” section first to know what to watch for. Many beginners find that mastering a beautiful cheesecake like this is a rewarding and confidence-building baking project. For more cheesecake inspiration, check out our full collection of delicious cheesecake recipes.
Final Thoughts on Your Baking Adventure
Making this Luxurious Caramel Apple Cheesecake is a joyful baking project. It brings together comforting flavors in an elegant way. Remember, the slow bake and long chill are your friends. They deliver that perfect slice. Share it with people you love. Seeing their delight is the best part of baking. I hope this recipe becomes a treasured part of your fall traditions, just like it is for my family. Happy baking!
Equipment
- Grand bol
- Fouet
- Spatule
- Moule à charnière de 9 pouces
- Papier sulfurisé
Ingredients
- 1 1/2 tasse miettes de biscuits Graham
- 1/4 tasse sucre granulé
- 1/2 tasse beurre non salé, fondu
- 24 oz fromage à la crème, ramolli
- 1 tasse sucre granulé
- 3 grand œufs
- 1 cuil. à café extrait de vanille
- 1 tasse crème aigre
- 1/2 tasse sauce caramel + extra pour le dessus
- 1 tasse garniture de tarte aux pommes
- 1 pomme, hachée pour la garniture
- q.s. miettes de biscuits Graham pour la garniture
Instructions
- Préchauffez le four à 163°C et graissez un moule à charnière de 9 pouces.
- Dans un bol moyen, mélangez les miettes de biscuits Graham et 1/4 de tasse de sucre, puis ajoutez le beurre fondu.
- Enfoncez le mélange fermement au fond du moule à charnière.
- Dans un grand bol, battez le fromage à la crème ramolli et 1 tasse de sucre jusqu'à consistance lisse.
- Ajoutez les œufs un par un, en battant bien après chaque ajout.
- Mélangez l'extrait de vanille et la crème aigre jusqu'à consistance crémeuse.
- Versez la moitié du mélange de cheesecake sur la croûte.
- Déposez la garniture de tarte aux pommes sur le mélange, puis ajoutez 1/2 tasse de sauce caramel en filet.
- Versez le reste du mélange de cheesecake sur la couche de pommes-caramel.
- Cuire au four pendant 50-60 minutes jusqu'à ce que les bords soient légèrement dorés et le centre légèrement tremblotant.
- Éteignez le four et laissez refroidir le cheesecake à l'intérieur avec la porte légèrement ouverte pendant 1 heure.
- Laissez le cheesecake refroidir complètement sur le comptoir avant de le réfrigérer pendant au moins 4 heures (ou toute la nuit).
- Avant de servir, passez un couteau autour du bord et retirez le moule à charnière. Décorez avec des pommes hachées, des miettes de biscuits Graham et de la sauce caramel supplémentaire.