
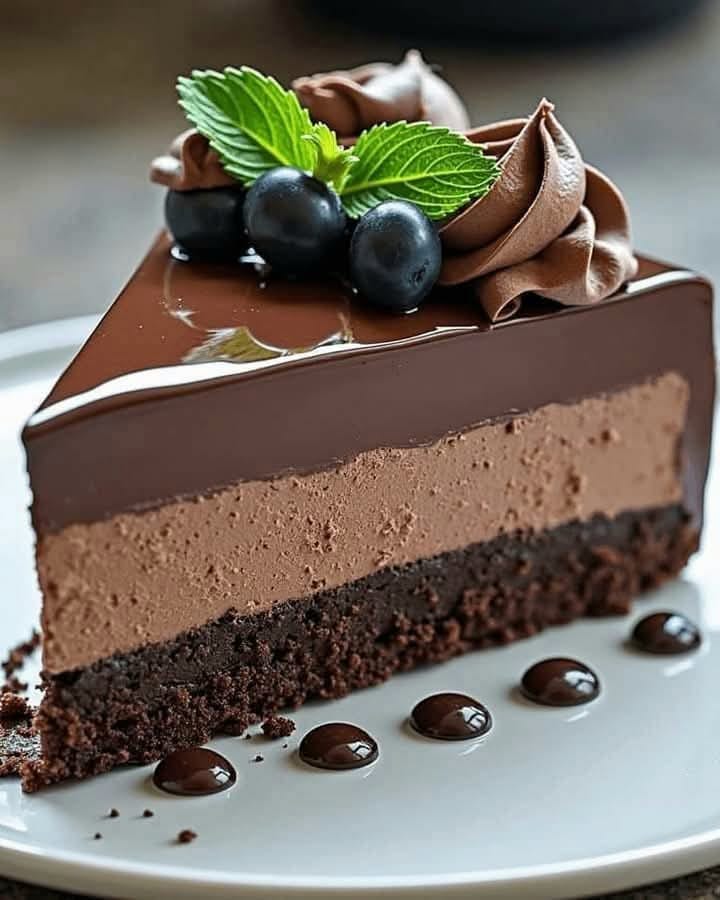
Triple Chocolate Mousse Cake: The Decadent Chocolate Delight of Your Dreams
You know that feeling when you dream about the perfect dessert? I had it for weeks. A vision of three glorious chocolate layers, each lighter than air, all sitting on a soft, chocolatey cake base. I baked, I whipped, I tested… and let me tell you, friends, when this beauty came out of the fridge, it was a true dream come true. This is more than a cake. It’s a chocolate experience. Let’s make a Decadent Chocolate Delight that will have everyone begging for the recipe!
A Bite of Happiness: The Story of This Chocolate Masterpiece
This cake feels fancy, but its heart is pure home baking joy. The classic mousse cake has roots in French patisserie, but my version is all about love, not fuss. I wanted to create a show-stopper for my family’s big anniversary dinner. It had to be elegant, unbelievably creamy, and, of course, deeply chocolaty. The “triple” idea came from my son, who simply asked, “Why not all the chocolates, Mom?” Smart kid. The blend of dark, milk, and silky glaze creates a symphony of cocoa flavors. It’s a modern twist on a classic that will turn any Tuesday into a celebration.
Why You’ll Fall in Love With This Decadent Chocolate Delight
This recipe is your secret weapon. It looks like you spent a fortune at a fancy bakery, but it’s just you, some good chocolate, and a mixer. The textures are pure magic—the tender base, the cloud-like mousse, the shiny glaze. It’s not overly sweet; it’s deeply rich. Best of all, you make it ahead of time! No last-minute stress. Just pull it from the fridge, garnish, and accept the compliments.
Perfect Occasions for Your Chocolate Showstopper
- Birthdays & Anniversaries: Far more special than a store-bought cake.
- Dinner Parties: Impress your guests with your patisserie skills.
- Holidays: It’s a stunning centerpiece for Christmas or Valentine’s Day.
- Just Because: Sometimes, a Tuesday needs a Decadent Chocolate Delight.
Gathering Your Ingredients for Success
For the Base:
- 1 cup all-purpose flour
- 3/4 cup unsweetened cocoa powder
- 1 tsp baking powder
- 1/4 tsp salt
- 1/2 cup unsalted butter, softened
- 1 cup granulated sugar
- 2 large eggs
- 1 tsp vanilla extract
- 1/2 cup milk
For the Mousse Layers:
- 200g dark chocolate, chopped
- 200g milk chocolate, chopped
- 600ml heavy cream, divided
- 2 tsp unflavored gelatin powder
- 4 tbsp water
For the Chocolate Glaze:
- 100g dark chocolate, chopped
- 100ml heavy cream
For Decoration: Chocolate curls and fresh mint leaves.
No Stress Substitutions
- Flour: A 1:1 gluten-free flour blend works perfectly.
- Cocoa Powder: Use Dutch-process for a deeper color and flavor.
- Gelatin: For a vegetarian option, use agar-agar (follow package instructions).
- Heavy Cream: For a lighter mousse, you can use half whipping cream and half full-fat coconut cream (chilled). The texture will be slightly softer.
Crafting Your Triple Chocolate Mousse Cake Dream
Step 1: Bake the Chocolate Cake Base
Start by heating your oven to 350°F (175°C). Grease an 8-inch springform pan. In a bowl, whisk together the flour, cocoa powder, baking powder, and salt. Watch the cocoa powder puff into a little cloud—it smells amazing! In another bowl, beat the softened butter and sugar until it’s pale and fluffy. This takes about 3 minutes. Beat in the eggs, one at a time, then the vanilla. Now, add your dry ingredients and milk in turns, starting and ending with the dry mix. The batter will be thick and fudgy. Spread it into your pan and bake for 20-25 minutes. A toothpick should come out clean. Let this chocolate base cool completely in the pan. Pro tip: Level the top with a knife if it domes slightly so your mousse layers sit flat.
Step 2: Create the Dark & Milk Chocolate Mousses
This is where the magic happens! First, sprinkle the gelatin over the 4 tablespoons of water in a small dish. Let it sit and “bloom” for 5 minutes. Chop your dark and milk chocolates and place them in separate bowls. Heat 300ml of the heavy cream just until it’s warm. Pour half over the bloomed gelatin and stir until it’s completely dissolved. Now, pour this creamy gelatin mixture over the dark chocolate. Stir slowly until you have a smooth, glossy pool of chocolate. Let it cool to room temp. While it cools, whip the remaining 300ml of cold cream to firm peaks. Gently fold a big spoonful of whipped cream into the dark chocolate to loosen it, then fold in the rest. Be gentle to keep it airy! Spread this dark mousse over your cooled cake base. Rinse your bowl and repeat the exact process with the milk chocolate. Spread the milk chocolate mousse over the dark layer. Chill for at least 2 hours to set.
Step 3: The Final Chocolate Glaze
For the shiny crown, chop the 100g of dark chocolate and place it in a heatproof bowl. Heat the 100ml of cream until it just starts to simmer. Pour the hot cream over the chocolate and let it sit for one minute. Then, stir gently from the center out until you have a perfect, silky glaze. Let it cool for a few minutes so it’s slightly thickened but still pourable. Take your cake from the fridge. Pour the glaze into the center and use a spatula to gently guide it to the edges, letting it drip down the sides beautifully. The contrast between the matte mousse and the glossy glaze is stunning.
Step 4: The Grand Finale – Decoration & Serving
Let the glaze set for about 10 minutes, then chill the whole cake for at least 4 more hours (overnight is best). When you’re ready to serve, run a thin knife under hot water, dry it, and slide it around the edge of the pan before releasing the springform. I love to pile high chocolate curls on top and add a few bright green mint leaves. It makes it look like it came from a Parisian window! Use a hot, clean knife to slice each piece for perfect, clean layers.
Chef’s tip: For perfect chocolate curls, use a vegetable peeler on a room-temperature block of chocolate. Warm chocolate in your hands first for pretty curls.
Your Baking Timeline
- Prep Time: 45 minutes
- Baking Time: 25 minutes
- Setting/Chilling Time: 6 hours (minimum)
- Total Time: About 7 hours 10 minutes (mostly inactive chilling)
Chef’s Secret for the Ultimate Mousse
Temperature is everything! Make sure your melted chocolate mixture is cool to the touch before folding in the whipped cream. If it’s too warm, it will melt the cream and you’ll lose that light, airy texture. Patience is your best friend here.
A Little Chocolate Extra
Did you know the type of cocoa powder changes the game? Natural cocoa is acidic and gives a brighter, fruitier chocolate flavor. Dutch-process cocoa is alkalized, making it milder and darker. I use Dutch-process here for that deep, sophisticated color. It’s a simple swap with a big impact!
Tools You’ll Need
- 8-inch springform pan
- Mixer (hand or stand)
- Heatproof bowls
- Rubber spatula
- Sifter
- Small saucepan
Storing Your Masterpiece
This cake lives in the refrigerator. Keep it covered with a cake dome or loosely with plastic wrap. It will stay perfect for up to 4 days. The mousse layers might firm up a bit more over time, but the flavor just gets better.
Can you freeze it? Yes, but with care. Freeze the unglazed cake for up to a month. Wrap it tightly in several layers of plastic wrap and foil. Thaw overnight in the fridge before adding the glaze. The glaze itself doesn’t freeze well, so always add it fresh after thawing.
Serving leftovers is never a problem! Just slice with a warm knife. If the glaze cracks a little, don’t worry. It’s homemade charm. No one will care once they taste it.
Tips for a Flawless Decadent Chocolate Delight
- Use good quality chocolate you enjoy eating. It’s the star!
- Chill your mixing bowl and beaters before whipping the cream. It whips faster and higher.
- If you’re in a rush, pop the cake in the freezer for 1.5-2 hours to set faster, then move to fridge.
- For clean slices, dip your knife in hot water and wipe it dry between each cut.
Presentation Ideas to Wow Your Guests
- Serve on a white or dark slate platter for drama.
- Add edible gold dust to the chocolate curls for a festive touch.
- Place a fresh raspberry next to each slice of cake on the plate.
- Drizzle a little extra melted chocolate or caramel on the plate before placing the slice.
Love This Decadent Chocolate Delight? Try These!
If the idea of creamy chocolate mousse has you hooked, you absolutely must explore my other show-stopping desserts. For a coffee lover’s dream, my Caramel Chocolate Coffee Cheesecake combines rich layers in a stunning way. Or, if fruit and chocolate is your passion, the Cherry Chocolate Mousse Cake is a beautiful, fruity twist. For a roll cake with classic flavors, the Black Forest Roll Cake is always a hit. And for a touch of French elegance, don’t miss the sophisticated Raspberry Chocolate Mousse Entremet.
Common Mistakes to Avoid
Mistake 1: Using Warm Chocolate for the Mousse
This is the #1 reason for a runny mousse. If your melted chocolate mixture is too warm when you fold in the whipped cream, it will melt the cream instantly. You’ll lose all that lovely air. Always let the chocolate-cream-gelatin mixture cool to room temperature. Test it by touching a dab on your wrist—it should feel neutral, not warm.
Mistake 2: Over-whipping or Under-whipping the Cream
The cream needs to be at just the right stage: firm peaks. Under-whipped cream is too soft and won’t hold the mousse’s shape, leading to a slumpy cake. Over-whipped cream is grainy and butter-like, which ruins the smooth texture. Whip on medium speed until the cream holds its shape when you lift the beaters. Stop just when it looks thick and holds a peak that tips over slightly.
Mistake 3: Rushing the Chilling Steps
Patience is a key ingredient! If you try to add the next layer before the previous one is set, they’ll bleed together. If you pour the glaze on a warm mousse, it will melt and make a mess. Respect the chill times. The cake base must be cool. Each mousse layer needs at least 2 hours to set before adding the next. The final cake needs a solid 4 hours, preferably overnight.
Mistake 4: Skimping on Chocolate Quality
Since chocolate is the main flavor, the quality matters. Baking chips often have stabilizers that can affect the smooth melting and texture of the mousse and glaze. Use good quality chocolate bars or baking couverture, chopped. The flavor will be deeper, richer, and worth every penny.
Frequently Asked Questions
Can I make this cake dairy-free?
You can make some swaps! Use plant-based butter for the base and full-fat coconut cream (the kind in a can, chilled) for whipping the mousse and glaze. Be sure to use dairy-free chocolate. The texture of the mousse will be a bit different but still delicious. Gelatin is not vegetarian, so use agar-agar as a substitute for a fully plant-based version.
Why did my glaze turn out dull or streaky?
A dull glaze usually means it was over-stirred or got air bubbles in it. Stir the hot cream and chocolate just until smooth, don’t whisk vigorously. A streaky glaze can happen if the mousse layer underneath wasn’t completely set and cold. Make sure your cake is fully chilled before glazing. Letting the glaze cool and thicken slightly before pouring also helps it coat smoothly.
My mousse layer is lumpy. What went wrong?
Lumps usually mean the gelatin didn’t dissolve fully, or the chocolate seized when the hot cream was added. For gelatin, always “bloom” it in cold water first, then ensure it’s fully dissolved in the warm cream before mixing with chocolate. When adding hot cream to chocolate, make sure all your bowls are dry, as even a little water can make chocolate seize up into lumps.
How far in advance can I make this Triple Chocolate Mousse Cake?
This cake is a fantastic make-ahead dessert! You can prepare the entire cake, including the glaze, up to 2 days in advance. Store it covered in the refrigerator. In fact, the flavors meld and improve overnight. Add fresh garnishes like mint or berries right before serving so they look their best.
Can I use a different size pan?
Absolutely, but it changes the layer thickness and baking time. A 9-inch pan will give you thinner, wider layers. Bake the base for a few minutes less. A 7-inch pan will make taller, thicker layers, and you may need to increase the mousse quantities slightly. The springform is essential for easy removal, so stick with that style of pan.
Is there a way to make this without gelatin?
Yes, for a non-gelled mousse, you can use a stabilized whipped cream method. Dissolve 1 tablespoon of cornstarch in 2 tablespoons of milk for each mousse layer. Heat a small portion of the cream with this slurry until thick, then cool it before folding into the melted chocolate and remaining whipped cream. The texture will be softer and must be eaten sooner.
What’s the best way to cut this cake cleanly?
A hot, dry knife is your best friend. Run a long, sharp knife under very hot water, wipe it completely dry with a towel, and make your slice in one smooth, decisive motion. Wipe the blade clean and reheat for each slice. This gives you those gorgeous, restaurant-quality layers in every piece.
Can I use white chocolate for one of the layers?
For sure! You can create a white chocolate mousse layer instead of milk or dark. Be aware that white chocolate is sweeter and more delicate. Use the same weight (200g) but make sure your heavy cream is just warm, not hot, when you pour it over the white chocolate to prevent it from seizing.
My cake base is dry. How can I prevent that?
Dry cake usually comes from over-measuring flour or over-baking. Spoon your flour into the measuring cup and level it off; don’t scoop directly from the bag. Also, check your cake a few minutes before the timer goes off. Ovens vary. The cake is done when a toothpick inserted comes out with a few moist crumbs, not completely clean.
Is this cake very sweet?
It’s rich, but not overly sugary. Using dark chocolate (which has less sugar than milk chocolate) for two of the layers balances the sweetness. The unsweetened cocoa in the base also adds a bittersweet note. If you’re mindful of added sugars, you can refer to resources like the FDA’s guidelines on nutritional information to better understand how to balance treats in your diet. You can also slightly reduce the sugar in the cake base by a quarter cup if you prefer.
If you’re looking for more inspiration for stunning layered desserts, explore all my other creations in the cakes and cupcakes category on the site.
Your Dream Cake Awaits!
So there you have it, friends. Your guide to a truly magical, Triple Chocolate Mousse Cake. It’s a project of love that pays off in every silky, chocolaty bite. Don’t be intimidated by the layers. Take your time, follow the steps, and trust the process. The look on your family’s face when you bring this Decadent Chocolate Delight to the table? That’s the real dream come true. Now go preheat that oven and get your chocolate ready. Happy baking!
Equipment
- Plat à tarte
- Mixeur
- Spatule
- Casserole
- Gobelet doseur
Ingredients
- 1 tasse farine tout usage
- 3/4 tasse cacao en poudre non sucré
- 1 cuil. à café poudre à lever
- 1/4 cuil. à café sel
- 1/2 tasse beurre non salé, ramolli
- 1 tasse sucre granulé
- 2 œufs
- 1 cuil. à café extrait de vanille
- 1/2 tasse lait
- 200 g chocolat noir, haché
- 200 g chocolat au lait, haché
- 600 ml crème épaisse, divisée
- 2 cuil. à café gelatine en poudre
- 4 cuil. à soupe eau
- 100 g chocolat noir, haché (pour le glaçage)
- 100 ml crème épaisse (pour le glaçage)
Instructions
- Préchauffez votre four à 175°C (350°F) et graissez un moule à charnière de 20 cm (8 pouces).
- Mélangez dans un bol la farine, le cacao en poudre, la poudre à lever et le sel.
- Dans un autre bol, battez le beurre ramolli et le sucre jusqu'à ce que le mélange soit pâle et aéré, environ 3 minutes.
- Ajoutez les œufs un à un, puis incorporez la vanille.
- Ajoutez alternativement les ingrédients secs et le lait, en commençant et en terminant par les ingrédients secs.
- Étalez la pâte dans le moule préparé et faites cuire pendant 20 à 25 minutes. Laissez refroidir complètement.
- Sprinkle the gelatin powder over the water in a small bowl and let it bloom for 5 minutes.
- Chauffez 300 ml de crème jusqu'à ce qu'elle soit chaude, puis versez-en la moitié sur la gélatine et remuez jusqu'à ce qu'elle soit dissoute.
- Versez le mélange de gélatine sur le chocolat noir haché et remuez jusqu'à obtenir une préparation lisse, puis laissez refroidir à température ambiante.
- Montez le reste de la crème froide en pics fermes.
- Incorporez une grande cuillère de crème fouettée dans le chocolat noir, puis incorporez délicatement le reste.
- Étalez la mousse noire sur la base du gâteau refroidie et répétez le processus avec le chocolat au lait. Étalez par-dessus la mousse noire.
- Réfrigérez pendant au moins 2 heures pour que cela prenne.
- Pour le glaçage, chauffer 100 ml de crème jusqu'à ébullition, verser sur le chocolat noir haché et remuer jusqu'à obtenir une préparation lisse.
- Laissez légèrement refroidir le glaçage et versez-le sur le gâteau, en le dirigeant vers les bords avec une spatule.
- Laissez le glaçage prendre pendant 10 minutes et réfrigérez le gâteau pendant au moins 4 heures.
- Décorez avec des copeaux de chocolat et des feuilles de menthe avant de servir.