
My Dreamiest Treat: White Chocolate Cheesecake Perfection
You know that feeling when you want a dessert that feels like a warm hug and a fancy party all at once? That’s this Dreamy White Chocolate Cheesecake. I made it for my best friend’s birthday last year, and the silence that fell over the table—broken only by happy sighs—told me everything. It’s not just a cheesecake; it’s a creamy, buttery, melt-in-your-mouth experience.
From Humble Beginnings to My Favorite Plate
Cheesecake has been around since ancient Greece, but the rich, no-bake styles we love took off in America. This white chocolate version is my modern twist on a classic. It takes the luxurious feel of a New York cheesecake and marries it with the sweet, vanilla-like flavor of white chocolate. It’s a dessert that feels both timeless and totally special.
Why You’ll Fall Head Over Heels for This Recipe
This isn’t a fussy, complicated dessert. It’s straightforward but feels incredibly luxurious. The buttery crust crackles under your fork, giving way to the silky, impossibly creamy filling. The white chocolate ganache on top is like the final, glossy seal of deliciousness. It’s a guaranteed crowd-pleaser that looks like you spent all day in the kitchen (shhh, our secret).
When to Whip Up This Dreamy White Chocolate Cheesecake
This cake shines for celebrations. Think bridal showers, Mother’s Day brunch, or a fancy ending to a holiday dinner. It’s also my secret weapon for potlucks—it always disappears first! Honestly, sometimes I make it just for a “Tuesday is a good day” treat.
What You’ll Need: Dreamy White Chocolate Cheesecake Ingredients
Gathering everything before you start is the key to a smooth baking session.
- For the Crust: 1 1/2 cups graham cracker crumbs, 1/4 cup granulated sugar, 6 tbsp unsalted butter (melted).
- For the Cheesecake Filling: 12 oz white chocolate (chopped), 24 oz cream cheese (softened), 3/4 cup granulated sugar, 3 large eggs, 1 tsp vanilla extract, 1 cup heavy cream.
- For the White Chocolate Ganache: 8 oz white chocolate (chopped), 1/2 cup heavy cream.
No Panic Substitutions!
Out of something? No worries! Here are easy swaps:
- Graham Crackers: Digestive biscuits or vanilla wafers work great.
- White Chocolate: Use high-quality baking bars, not chips (they have stabilizers). For a different twist, try semisweet chocolate.
- Heavy Cream: Full-fat sour cream can be used in the filling for a slight tang.
- Need a nut-free crust? Just skip any added nuts and use the straight crumbs.
Crafting Your Dreamy White Chocolate Cheesecake: Step-by-Step
Step 1: Building the Buttery Foundation
First, preheat your oven to 350°F (175°C). Grab a medium bowl and mix your graham cracker crumbs and sugar. Pour in that glorious melted butter. Stir it until it looks like wet sand and smells like toasty goodness. Press this mixture firmly and evenly into the bottom of a greased 9-inch springform pan. I use the bottom of a measuring cup to pack it down tight. Bake for 10 minutes until it’s just set, then let it cool on a rack. This quick bake makes the crust extra crisp.
Pro tip: For a taller crust that goes up the sides, use 2 cups of crumbs and 7 tbsp of butter.
Step 2: Melting the White Chocolate Magic
Place your chopped white chocolate in a microwave-safe bowl. Heat it in 20-second bursts, stirring well after each. Stop when it’s just smooth and melted. Overheating will ruin it! Let it cool for a few minutes so it doesn’t cook the eggs when we add it later. The glossy, pale gold liquid is your ticket to creamy richness.
Step 3: Creating the Luxurious Filling
In a large bowl, beat the softened cream cheese and sugar together on medium speed until it’s completely smooth. No lumps allowed! Add the eggs one at a time, beating well after each. This patience prevents a cracked top. Now, mix in the vanilla and heavy cream until just combined. Finally, pour in your slightly cooled white chocolate. Fold it gently until the whole mixture is a uniform, pale ivory color. It will be gloriously smooth and thick.
Chef’s tip: All ingredients must be at room temperature! This is the #1 rule for a smooth, lump-free filling.
Step 4: The Grand Assembly and Bake
Pour your luscious filling over the cooled crust. Smooth the top with a spatula. Now, reduce your oven temperature to 325°F (160°C). This lower, gentler heat is key for a creamy center. Bake for 55-60 minutes. It’s done when the edges are puffed and lightly golden, but the center still has a slight jiggle—like Jell-O. Turn the oven off, crack the door open, and let it cool inside for a full hour. This slow cooling prevents dramatic sinking.
Step 5: The Essential Chill Time
Patience is a virtue here! Move the cheesecake to the refrigerator. Let it chill for at least 4 hours, but overnight is truly best. This waiting period lets the flavors meld and the texture firm up into that perfect, sliceable creaminess. It’s hard to wait, but so worth it.
Step 6: The Glossy Ganache Finale
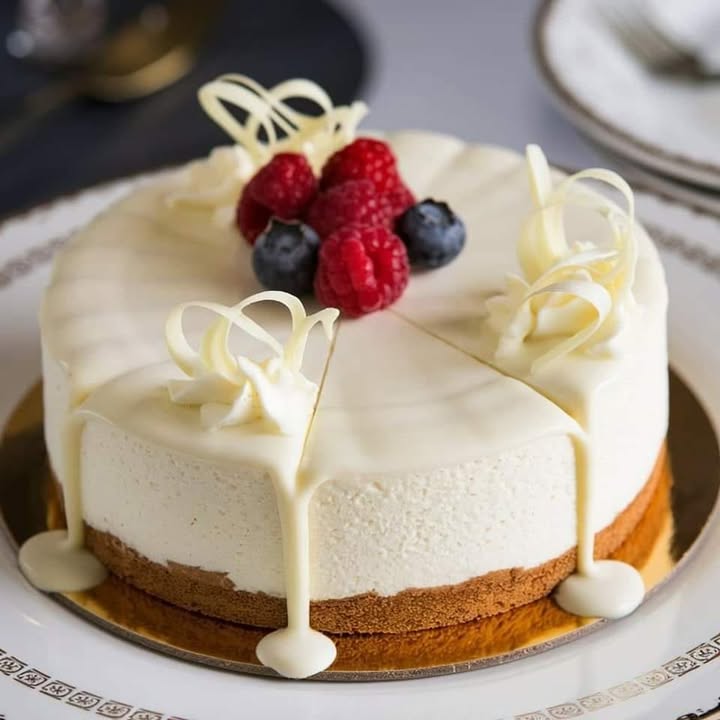
Place your chopped white chocolate for the ganache in a heatproof bowl. Heat the heavy cream in a small saucepan until it just starts to simmer around the edges. Pour the hot cream over the chocolate and let it sit for one minute. Then, stir slowly from the center outwards until you have a glossy, silky-smooth ganache. Let it cool for 5-10 minutes to thicken slightly, then pour it over your fully chilled cheesecake. Spread it gently, letting some drip deliciously down the sides.
Your Dreamy White Chocolate Cheesecake Timeline
- Prep Time: 25 minutes
- Cook Time: 60 minutes
- Cooling Time: 1 hour (in oven)
- Chilling Time: At least 4 hours (overnight best)
- Total Time: About 6.5 hours (mostly hands-off)
- Calories: Approximately 550 per slice
- Servings: 8-10 happy people
My Personal Secret for the Silkiest Texture
After mixing your filling, give the bowl a few solid taps on the counter. This brings any hidden air bubbles to the surface. Pop them with a toothpick or gently run a knife through the batter. This little trick helps ensure you get that famously smooth, crack-free cheesecake surface.
A Sweet Slice of Trivia
Did you know the world’s most expensive cheesecake was priced at a staggering $5,000? It was covered in edible gold and featured rare ingredients. Our version is rich in love and white chocolate, making it priceless in my book!
Gear You’ll Need
You don’t need fancy tools! A 9-inch springform pan is essential. You’ll also want a large mixing bowl, a hand mixer or stand mixer, a medium bowl for the crust, a small saucepan for the ganache, and a spatula. A fine-mesh sieve can be handy for dusting with powdered sugar later.
Storing Your Dreamy Creation
Once sliced (or whole), keep your cheesecake covered in the refrigerator. It will stay fresh and delicious for up to 5 days. Make sure it’s in an airtight container or well-wrapped with plastic wrap to keep it from absorbing other fridge odors.
For longer storage, you can freeze it. Wrap individual slices or the whole cake (without ganache topping for best results) tightly in plastic wrap, then in foil. It will keep for up to 2 months. Thaw overnight in the refrigerator before serving.
If you’ve already added the ganache, freezing is still possible. The ganache may develop small sugar beads (bloom) upon thawing, but the flavor will still be fantastic. A quick swipe with a warm knife can smooth it out.
Tips for Cheesecake Success
- Room Temp is Key: Let your cream cheese, eggs, and even the sour cream sit out for an hour. This prevents lumps.
- Don’t Over-mix: Once you add the eggs, mix just until combined. Too much air causes cracks.
- Water Bath Option: For ultimate insurance against cracks, wrap your springform pan bottom in foil and place it in a roasting pan with hot water halfway up the sides.
- Clean Cuts: Dip your knife in hot water and wipe it clean between each slice for beautiful, clean pieces.
Making It Look Like a Masterpiece
Presentation is half the fun! Try these ideas:
- Top with fresh raspberries, mint sprigs, or edible gold flakes.
- Drizzle with a little raspberry coulis or salted caramel for a flavor contrast.
- Add a dusting of powdered sugar through a stencil for a pretty design.
- Serve with a dollop of lightly sweetened whipped cream on the side.
Love This? Try These Other Dreamy Recipes!
If you adore this decadent dessert, our site is full of other incredible treats. For a taste of fall, you must try this Luxurious Caramel Apple Cheesecake. When summer fruits are in season, this Peach Raspberry Cheesecake is pure sunshine. Chocolate lovers will swoon for this rich Chocolate Peanut Delight cake. And for a quick, no-oven treat, my Strawberry No-Bake Ice Cream is always a hit with the kids.
Common Mistakes to Avoid
Mistake 1: Using Cold Ingredients
This is the biggest culprit for a lumpy filling. Cold cream cheese doesn’t blend smoothly with sugar and eggs. It creates tiny bits of cheese that never fully incorporate. Always plan ahead and let your cream cheese, eggs, and heavy cream sit on the counter for about an hour before you start baking. The difference in smoothness is night and day.
Mistake 2: Over-beating the Batter After Adding Eggs
Once you add the eggs, you need to switch to a gentler approach. Beating too vigorously incorporates too much air. This air expands in the oven and then collapses, leading to cracks on the surface of your beautiful cheesecake. Just mix on low speed until each egg is combined, and stop as soon as the last bit of white disappears.
Mistake 3: Skipping the Slow Cool-Down
Pulling a hot cheesecake out of the oven and plopping it on the counter is a shock. The sudden temperature change makes it contract quickly, which almost always causes a big crack right down the middle. Always turn the oven off, crack the door, and let it cool gradually inside for a full hour. This gentle cooling is non-negotiable for a flawless top.
Mistake 4: Slicing Before It’s Fully Chilled
It’s so tempting to cut into it after a few hours! But a cheesecake needs that long, slow chill in the fridge to fully set its structure. Cutting into a warm cheesecake will result in a messy, almost runny slice. For clean, picture-perfect slices that hold their shape, patience is your best ingredient. Overnight chilling is truly ideal.
Frequently Asked Questions
Can I use white chocolate chips instead of baking bars?
I really don’t recommend it. White chocolate chips are designed to hold their shape when baked. They contain stabilizers and less cocoa butter, so they often don’t melt as smoothly. For the silky, rich texture you want in both the filling and the ganache, a good-quality baking bar is the way to go. Look for one that lists cocoa butter as the first fat.
My cheesecake cracked on top! What did I do wrong?
Don’t worry, it still tastes amazing! Cracks usually happen from a sudden temperature change (cooling too fast) or from over-mixing the batter after adding the eggs. Next time, try the water bath method or be extra careful with your cooling routine. Remember, a cracked cheesecake is just an excuse to cover it with extra ganache, whipped cream, or fruit!
How do I know it’s done baking if the center is still jiggly?
This is the trick! The center should have a slight jiggle, like Jell-O, when you gently shake the pan. The edges will be puffed and set, but about a 2-3 inch circle in the middle will shimmy. It will firm up perfectly during the long, slow cooling and chilling process. If the center is completely firm like the edges in the oven, it’s likely overbaked and may become dry.
Can I make this cheesecake ahead of time?
Absolutely, and I actually encourage it! Cheesecakes are a make-ahead dream. Bake it the day before you need it. Let it cool completely, then cover and refrigerate overnight. Add the ganache topping up to a few hours before serving. This extended chill time only improves the flavor and texture, making it creamier and easier to slice cleanly.
Why is my ganache too runny or too thick?
The thickness depends on the chocolate-to-cream ratio and cooling time. For a pourable glaze that sets softly, use the 1/2 cup cream to 8 oz chocolate ratio here. If it’s too runny, let it cool a bit longer to thicken. If it’s too thick and won’t pour, you can gently re-warm it over a double boiler with a tiny splash of extra cream. The perfect ganache should coat the back of a spoon.
Can I freeze this white chocolate cheesecake?
Yes, you can! Freeze it without the ganache topping for best results. Wrap the chilled cheesecake tightly in plastic wrap, then in foil. It will keep for up to 2 months. Thaw it overnight in the refrigerator. Add your fresh ganache after it’s thawed. Freezing with ganache can cause it to “bloom” or get a speckled look, but it’s still safe to eat.
What’s the best way to get clean slices?
Use a thin, sharp knife. Dip it in a tall glass of very hot water and wipe it clean with a towel between every single cut. This melts through the cleanly, giving you gorgeous, professional-looking slices without dragging the filling or crumb layer.
My crust stuck to the pan bottom. How can I prevent this?
Around the sides is easy with a springform, but the bottom can stick. For foolproof release, cut a round of parchment paper to fit the bottom of your pan before you press in the crust. After chilling, you can run an offset spatula under the parchment to lift the whole cheesecake off the pan base for easy transfer to a serving plate.
Is there a way to make this recipe lighter?
You can try some swaps, but they will change the texture. Use light cream cheese and reduced-fat graham crackers. For the filling, some people have success substituting half the heavy cream with Greek yogurt. Be aware the result will be less rich and potentially denser. Sometimes, a richer dessert eaten in moderation can be more satisfying and support healthy satiety signals than a larger portion of a less satisfying alternative.
Can I add fruit or other flavors to this base recipe?
Definitely! This is a wonderful base. Try folding in 1 cup of fresh raspberries or chopped roasted strawberries into the filling before baking. You could also add a tablespoon of citrus zest (like lemon or orange) to the crust or filling for a bright note. Just be mindful that very watery fruit can affect the bake time and texture.
For even more creamy, dreamy inspiration, be sure to browse our entire collection of fabulous cheesecake recipes. From classic New York style to fun seasonal twists, we’ve got a slice for every craving.
Go Ahead, Indulge Your Dream
This Dreamy White Chocolate Cheesecake is more than just a dessert. It’s a moment of pure, creamy joy. It’s the cake you make when you want to say “I love you,” “Congratulations,” or simply “Today deserves something special.” So gather your ingredients, channel your inner pastry chef, and get ready for the compliments. Don’t forget to save a slice for yourself—you’ve earned it! Happy baking.
Equipment
- Grand bol
- Fouet
- Spatule
- Moule à charnière 9 pouces
- Casserole
Ingredients
- 1 1/2 tasse chapelure de biscuits Graham
- 1/4 tasse sucre
- 6 cuillère à soupe beurre non salé, fondu
- 12 oz chocolat blanc, haché
- 24 oz fromage à la crème, ramolli
- 3/4 tasse sucre
- 3 grand œufs
- 1 cuillère à café extrait de vanille
- 1 tasse crème épaisse
- 8 oz chocolat blanc, haché (pour la ganache)
- 1/2 tasse crème épaisse (pour la ganache)
Instructions
- Préchauffez votre four à 175°C.
- Mélangez la chapelure de biscuits Graham et le sucre dans un bol moyen.
- Incorporez le beurre fondu jusqu'à obtenir une texture de sable mouillé.
- Beurrez un moule à charnière de 9 pouces et pressez le mélange au fond.
- Faites cuire pendant 10 minutes puis laissez refroidir.
- Faites fondre le chocolat blanc au micro-ondes par intervalles de 20 secondes.
- Dans un grand bol, battez le fromage à la crème et le sucre jusqu'à obtenir une texture lisse.
- Ajoutez les œufs un à un, en mélangeant bien après chaque ajout.
- Incorporez la vanille et la crème épaisse jusqu'à ce que le mélange soit homogène.
- Incorporez le chocolat blanc légèrement refroidi.
- Versez le mélange sur la croûte et égalisez le dessus.
- Réduisez la température du four à 160°C et faites cuire pendant 55-60 minutes.
- Éteignez le four et laissez la porte entrouverte jusqu'à ce que le cheesecake refroidisse pendant 1 heure.
- Transférez au réfrigérateur et laissez reposer pendant au moins 4 heures (idéalement toute la nuit).
- Pour la ganache, chauffez la crème épaisse dans une casserole jusqu'à frémissement.
- Versez la crème chaude sur le chocolat blanc haché et laissez reposer pendant 1 minute.
- Mélangez jusqu'à obtenir une texture lisse puis versez sur le cheesecake refroidi.