
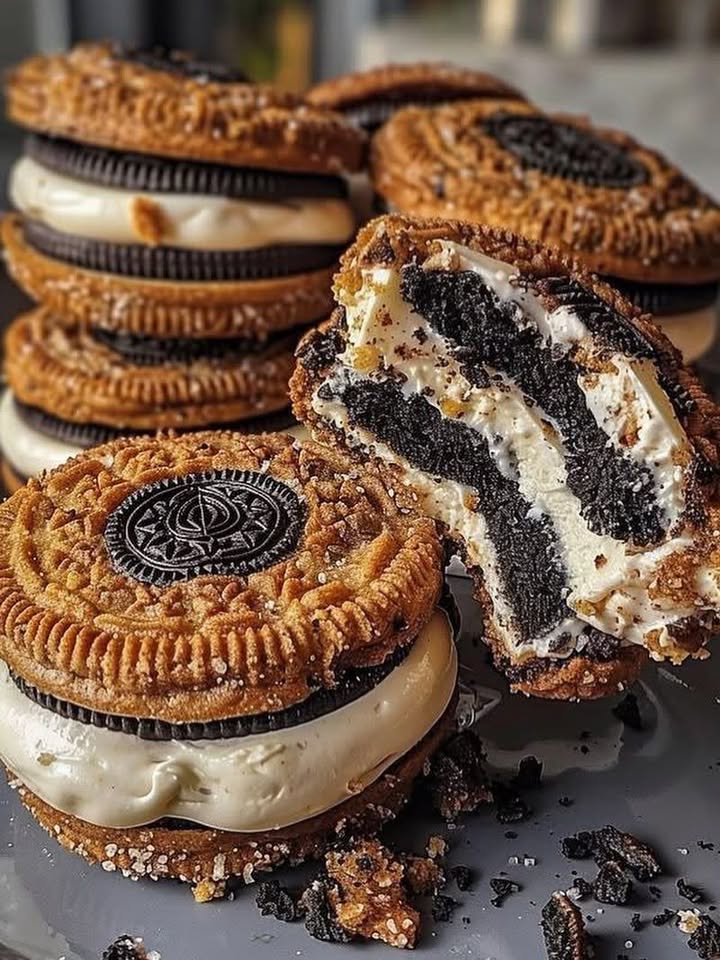
Imagine biting into a warm, crispy treat with a creamy cheesecake surprise inside
I’ll never forget the first time I made these Fried Oreo Cheesecake Delights. It was for my niece’s birthday party. She’s a dessert fanatic, and I wanted to create something unforgettable. The moment I served them, golden brown on the outside and oozing with cheesecake filling, everyone went wild. These treats are not just delicious—they’re conversation starters. Crispy, creamy, and downright irresistible, they’re perfect for anyone who loves indulgent desserts.
A little history behind this sweet sensation
The idea of stuffing and frying Oreos isn’t entirely new. Deep-fried Oreos have been a staple at fairs and carnivals for years, but adding a cheesecake filling takes it to a whole new level. I stumbled upon this twist while experimenting in my kitchen one lazy Sunday afternoon. It combines the nostalgia of Oreos with the rich decadence of cheesecake. Trust me, once you try this modern version, there’s no going back!
Why you’ll fall head over heels for Fried Oreo Cheesecake Delights
What makes this recipe so special? First, it’s surprisingly easy to make. You don’t need fancy equipment or hours of prep time. Plus, the combination of textures—crispy batter, soft cookies, and creamy cheesecake—is pure magic. It’s also versatile. Whether you’re hosting a party or craving something sweet, this dish fits the bill. And let’s not forget how fun it is to make. Kids love helping stuff the Oreos, and adults can’t resist sneaking a bite before they’re fully done.
When to whip up these delightful treats
Fried Oreo Cheesecake Delights are perfect for celebrations like birthdays, game nights, or holiday parties. They’re also great as a weekend treat when you want to spoil your family. I’ve even brought them to potlucks, and they disappear faster than anything else on the table. Pair them with ice cream and melted chocolate, and you’ve got a dessert that’s guaranteed to impress.
Ingredients you’ll need
- For the cheesecake filling:
- 225 g of cream cheese
- 1/4 cup of sugar
- 1 teaspoon of vanilla extract
- 1/4 cup crushed graham crackers
- For the battering and frying:
- 1 cup of all-purpose flour
- 1/4 cup of sugar
- 1 teaspoon of baking powder
- 1/4 teaspoon of salt
- 1 egg
- 1 cup of milk
- Vegetable oil for frying
- 12 Oreo cookies
- To decorate:
- Powdered sugar
- Crushed graham crackers (optional)
Ingredient substitutions for dietary needs
If you’re looking to tweak the recipe, here are some ideas. Swap cream cheese for a dairy-free alternative if you’re vegan. Use almond milk instead of regular milk for a lactose-free option. For gluten-free fans, replace wheat flour with a gluten-free blend. You can also use coconut oil for frying to add a hint of tropical flavor. And if you’re out of graham crackers, crushed cookies or biscuit crumbs work just fine.
Step 1: Prepare the cheesecake filling
In a mixing bowl, beat the cream cheese, sugar, and vanilla until smooth and creamy. Fold in the crushed graham crackers. This mixture should be thick yet spreadable. Pro tip: Let the cream cheese sit at room temperature for 10 minutes before mixing. It blends easier and creates a silkier filling. Once ready, set it aside while you prep the cookies.
Step 2: Assemble your Oreo sandwiches
Take an Oreo cookie and spoon a generous dollop of the cheesecake filling onto it. Press another Oreo on top to form a sandwich. Repeat until all 12 cookies are paired up. Be gentle to avoid breaking the cookies. Chef’s tip: Chill the sandwiches in the fridge for 10 minutes. This helps the filling firm up, making them easier to handle during frying.
Step 3: Prepare the batter
In a bowl, whisk together the flour, sugar, baking powder, and salt. In a separate bowl, beat the egg and milk until combined. Gradually add the dry ingredients to the wet mixture, stirring until smooth. The batter should be thick enough to coat the sandwiches evenly. If it’s too thin, add a bit more flour. Too thick? A splash of milk will fix it.
Step 4: Coat and fry the sandwiches
Dredge each Oreo sandwich in flour, dip it in the batter, and coat it again in flour. Heat vegetable oil in a deep pan to 175°C (350°F). Carefully place the coated sandwiches in the hot oil and fry for 2-3 minutes, turning occasionally, until golden brown. Use a slotted spoon to remove them and drain on paper towels. The aroma of frying batter mingling with the sweet scent of Oreos is heavenly!
Timing breakdown
- Prep time: 20 minutes
- Cooking time: 15 minutes
- Resting time: 10 minutes (optional chilling)
- Total time: 45 minutes
Chef’s secret to elevate your dish
Here’s a little trick I learned: Add a pinch of cinnamon to the batter. It enhances the sweetness and adds a subtle warmth that pairs beautifully with the cheesecake filling. Another idea? Serve the delights with a side of raspberry coulis for a tangy contrast.
An interesting tidbit about the recipe
Did you know that Oreos are one of the best-selling cookies in the world? With over 40 billion sold annually, it’s no wonder they’re a favorite base for creative desserts. Adding cheesecake to the mix just takes their popularity to new heights!
Necessary equipment
You’ll need a few basic tools: a mixing bowl, a whisk, a deep frying pan, a slotted spoon, and paper towels for draining excess oil. A candy thermometer is helpful to monitor the oil temperature, but if you don’t have one, a small piece of bread can test the heat. If it browns in 60 seconds, the oil is ready.
Storage tips for leftovers
Let’s talk storage. While these treats are best enjoyed fresh, you can store leftovers in an airtight container at room temperature for up to a day. Beyond that, the coating may lose its crispiness. For longer storage, refrigerate them for up to three days. Reheat gently in the oven to restore some crunch.
If you’re freezing them, wrap each delight individually in plastic wrap and place them in a freezer-safe bag. They’ll last up to a month. Thaw overnight in the fridge before reheating. Keep in mind that frozen versions won’t be as crispy as freshly made ones.
Pro tip: Don’t stack the treats without separating layers with parchment paper. This prevents sticking and keeps them intact.
Tips and advice to perfect your recipe
- Use room-temperature cream cheese for a smoother filling.
- Don’t overcrowd the pan while frying. Cook in batches to ensure even browning.
- Pat the fried delights dry with paper towels to reduce greasiness.
- Serve immediately for maximum crispiness and flavor impact.
Presentation ideas to wow your guests
- Dust with powdered sugar for an elegant touch.
- Drizzle with melted chocolate or caramel sauce.
- Add a scoop of vanilla ice cream for a classic pairing.
- Garnish with fresh berries for a pop of color.
Healthier alternatives to try
Looking for lighter options? Here are six variations:
- Baked version: Skip frying and bake the coated sandwiches at 180°C (350°F) for 10-12 minutes. They’ll still be crispy but lower in fat.
- Gluten-free: Use gluten-free Oreos and flour for a celiac-friendly treat.
- Vegan: Substitute dairy products with plant-based alternatives.
- Low-sugar: Opt for sugar substitutes in both the filling and batter.
- Mini delights: Cut the Oreos in half before stuffing for smaller portions.
- Yogurt dip: Serve with Greek yogurt instead of ice cream for a protein boost.
Mistake 1: Overfilling the Oreos
One common mistake is adding too much cheesecake filling, which causes the cookies to break apart during frying. To avoid this, use a teaspoon-sized amount of filling per sandwich. Pro tip: Press gently when assembling to keep the filling contained.
Mistake 2: Frying at the wrong temperature
If the oil is too hot, the coating burns before the inside heats through. Too cold, and the treats absorb excess oil. Aim for a steady 175°C (350°F). Test the oil with a small piece of bread—it should turn golden in about 60 seconds.
Mistake 3: Skipping the chilling step
Chilling the stuffed Oreos firms up the filling, preventing leaks during frying. Don’t skip this step, even if you’re short on time. It makes a huge difference!
Frequently Asked Questions
Can I make these ahead of time?
Absolutely! You can assemble the stuffed Oreos and store them in the fridge for up to a day before frying. Just keep them covered to prevent drying out.
What type of oil is best for frying?
Vegetable oil is ideal because it has a neutral flavor and high smoke point. Canola or sunflower oil works well too.
Can I use homemade Oreos?
Yes, but store-bought Oreos hold up better during frying due to their sturdier structure.
How do I know when the oil is ready?
Use a candy thermometer or drop a small piece of bread into the oil. If it browns in 60 seconds, the oil is at the right temperature.
Can I freeze these treats?
Yes, wrap them individually and freeze for up to a month. Reheat in the oven for best results.
What’s the best way to serve these?
Pair them with ice cream and drizzle with chocolate or caramel sauce for an extra indulgent experience.
Do I have to use graham crackers?
No, crushed cookies or biscuit crumbs work just as well. Experiment to find your favorite combo!
Can I bake instead of fry?
Yes, bake at 180°C (350°F) for 10-12 minutes. The texture will differ slightly but still be delicious.
How many servings does this recipe make?
This recipe yields 12 delights, perfect for sharing or enjoying over a few days.
Are these suitable for kids?
Kids love them! Just supervise younger ones during frying for safety.
Final thoughts
Fried Oreo Cheesecake Delights are more than just a dessert—they’re a celebration of flavors and textures. Whether you’re making them for a special occasion or simply treating yourself, they’re sure to bring joy to anyone lucky enough to taste them. So grab your ingredients, roll up your sleeves, and get ready to create a dessert masterpiece. Your family and friends will thank you!
Equipment
- Mixing bowl
- Whisk
- Deep frying pan
- Slotted spoon
- Paper towels
Ingredients
- 225 g cream cheese
- 1/4 cup sugar
- 1 teaspoon vanilla extract
- 1/4 cup crushed graham crackers
- 1 cup all-purpose flour
- 1/4 cup sugar
- 1 teaspoon baking powder
- 1/4 teaspoon salt
- 1 large egg
- 1 cup milk
- q.s. vegetable oil for frying
- 12 unit Oreo cookies
Instructions
- In a mixing bowl, beat the cream cheese, sugar, and vanilla until smooth and creamy. Fold in the crushed graham crackers and set aside.
- Spoon a dollop of cheesecake filling onto an Oreo and press another Oreo on top to form a sandwich. Repeat for all 12 cookies and chill in the fridge for 10 minutes.
- In a bowl, whisk together the flour, sugar, baking powder, and salt. In another bowl, beat the egg and milk, then stir in the dry ingredients until smooth.
- Dredge each Oreo sandwich in flour and dip into the batter. Heat vegetable oil in a deep pan to 175°C (350°F) and fry the sandwiches for 2-3 minutes until golden brown. Drain on paper towels.