
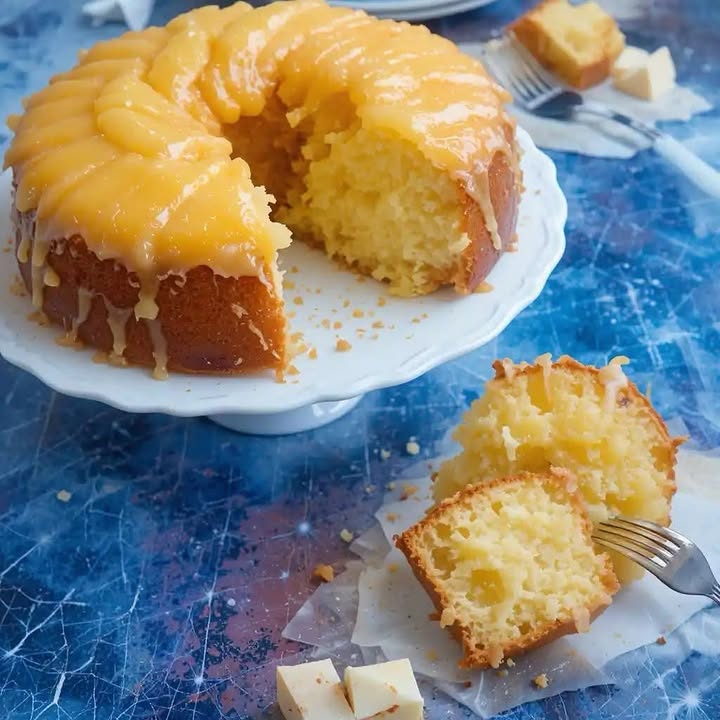
Get Ready for a Juicy Pineapple Delight – Spongy, Sweet, and Irresistible!
Imagine a warm, spongy cake bursting with the tropical sweetness of pineapple. It’s not just any cake; it’s a Juicy Pineapple Delight! I first tried this recipe at a friend’s luau party, and it was love at first bite. The combination of moist, fluffy cake and juicy pineapple pieces is simply heavenly. This dessert is perfect for any occasion, from family gatherings to potlucks. Let’s dive into what makes this recipe so special and how you can make it at home.
The History and Background of the Juicy Pineapple Delight
Pineapple cakes have their roots in tropical regions, where pineapples are abundant. The original versions were often simple, using fresh pineapple and basic ingredients. Over time, bakers added their own twists, incorporating more flavors and textures. This modern version, with its rich, creamy butter and sweet pineapple juice, is a delightful fusion of tradition and innovation. It’s a perfect example of how a classic dessert can be elevated to new heights.
Why You’ll Love This Recipe
This Juicy Pineapple Delight is a true crowd-pleaser. The tropical flavor is both refreshing and satisfying, making it a hit with kids and adults alike. The best part? It’s incredibly easy to make, even for beginners. The ingredients are simple, and the steps are straightforward. Plus, the end result is a cake that’s moist, flavorful, and sure to impress.
Perfect Occasions to Prepare This Recipe
From birthdays to summer barbecues, this Juicy Pineapple Delight fits perfectly. Serve it at a pool party, a beach gathering, or a casual weekend brunch. It’s also a great choice for a themed party, like a Hawaiian luau. The vibrant flavors and tropical vibe make it an ideal addition to any festive menu.
Ingredients for the Juicy Pineapple Delight
- 250 g of wheat flour
- 200 g of sugar
- 150 g of butter at room temperature
- 3 eggs
- 1 teaspoon vanilla extract
- 1 teaspoon baking powder
- 1/2 teaspoon sodium bicarbonate
- 1 pinch of salt
- 200 ml of pineapple juice
- 200 g of pineapple in pieces
For the Syrup:
- 150 ml of pineapple juice
- 50 g of sugar
Substitution Options
If you don’t have all the ingredients, here are some substitutes:
- Butter: You can use margarine or coconut oil.
- Pineapple juice: Orange juice or any other fruit juice can work well.
- Fresh pineapple: Canned pineapple or even mango can be used.
Preparation Section
Step 1: Preheat the Oven
Start by preheating your oven to 180°C (350°F). Grease a cake mold to ensure the cake doesn’t stick. As the oven warms up, the kitchen fills with a cozy, inviting aroma, setting the stage for a delicious treat.
Step 2: Cream the Butter and Sugar
In a large mixing bowl, beat the butter and sugar together until the mixture becomes light and creamy. This step is crucial for creating a smooth, fluffy texture in the cake. The butter should be at room temperature for the best results.
Step 3: Add the Eggs and Vanilla
One by one, add the eggs to the butter-sugar mixture, beating well after each addition. Stir in the vanilla extract. The mixture will become silky and smooth, with a rich, custard-like consistency. This step adds depth and flavor to the cake.
Step 4: Mix the Dry Ingredients
In a separate bowl, combine the flour, baking powder, sodium bicarbonate, and a pinch of salt. Sift these dry ingredients to remove any lumps. This step ensures that the cake will be light and airy, without any dense spots.
Step 5: Combine Wet and Dry Ingredients
Alternately add the dry ingredients and pineapple juice to the wet mixture. Start and end with the dry ingredients. This method helps to create a well-blended batter. The pineapple juice adds a burst of tropical flavor and moisture to the cake.
Step 6: Add the Pineapple Pieces
Gently fold in the pineapple pieces. The chunks of juicy pineapple will disperse throughout the batter, adding a delightful texture and a burst of flavor. Be careful not to overmix, as this can make the cake tough.
Step 7: Bake the Cake
Pour the batter into the prepared cake mold and smooth the top. Bake for 35-40 minutes, or until a toothpick inserted into the center comes out clean. The cake will rise and turn a golden brown, filling your kitchen with a sweet, fruity aroma.
Step 8: Prepare the Syrup
While the cake is baking, prepare the syrup. Heat the pineapple juice and sugar in a small saucepan until the sugar dissolves. This syrup will be poured over the hot cake, making it extra moist and flavorful. The syrup adds a beautiful, glistening finish to the cake.
Step 9: Pour the Syrup and Cool
Once the cake is done, remove it from the oven. Immediately pour the hot syrup over the cake, allowing it to soak in. Let the cake cool completely before unmolding. The syrup will seep into the cake, making it extra juicy and delicious.
Chef’s Tip: Enhance the Flavor
To add an extra layer of flavor, you can sprinkle a little bit of cinnamon on top of the cake before baking. This subtle spice complements the sweetness of the pineapple beautifully.
Timing
Here’s a quick breakdown of the timing for this recipe:
- Prep Time: 15 minutes
- Baking Time: 35-40 minutes
- Resting Time: 15 minutes
- Total Time: 1 hour 10 minutes
Chef’s Secret
For an extra touch of luxury, brush the cake with a bit of rum or coconut milk before pouring the syrup. This adds a subtle, exotic flavor that takes the Juicy Pineapple Delight to the next level.
Extra Info
Did you know that pineapples are not actually a single fruit but a cluster of many small fruits? Each diamond on the skin is an individual fruit, or “berry.” This unique structure adds to the complexity and depth of flavor in our Juicy Pineapple Delight.
Necessary Equipment
Here are the essential tools you’ll need to make this recipe:
- Mixing bowls
- Electric mixer or whisk
- Cake mold
- Saucepan
- Toothpick or cake tester
Storage
To keep your Juicy Pineapple Delight fresh, store it in an airtight container at room temperature for up to 3 days. If you live in a humid climate, it’s best to refrigerate the cake to prevent it from becoming too moist. For longer storage, you can freeze the cake. Wrap it tightly in plastic wrap and then in aluminum foil. It will keep in the freezer for up to 2 months. When you’re ready to enjoy it, simply thaw it in the refrigerator overnight.
Tips and Advice
For a more intense pineapple flavor, you can use pineapple essence instead of vanilla. Make sure to measure the pineapple juice accurately to achieve the right balance of moisture and flavor. If you find the cake a bit too sweet, you can reduce the sugar in the syrup by half.
Presentation Tips
To make your Juicy Pineapple Delight look extra special, garnish it with a few slices of fresh pineapple and a sprinkle of powdered sugar. For an elegant touch, serve it with a scoop of vanilla or coconut ice cream. The contrast of the cold, creamy ice cream and the warm, spongy cake is a match made in heaven.
Healthier Alternative Recipes
If you’re looking for healthier variations, here are some ideas:
- Cinnamon Apple Delight: Swap the pineapple for apples and add a dash of cinnamon for a fall-inspired treat.
- Banana Cream Cake: Use mashed bananas and a touch of cream cheese for a rich, creamy alternative.
- Cherry Chocolate Delight: Incorporate cherries and dark chocolate for a decadent and antioxidant-rich option.
- Lemon Cream Cheese Delight: Add a zesty twist with lemon zest and a layer of cream cheese frosting.
- Carrot Pineapple Cake: Combine grated carrots and pineapple for a naturally sweet and healthy version.
- Zucchini Pineapple Bread: Use zucchini and pineapple for a moist, lightly sweet bread that’s perfect for breakfast or a snack.
Common Mistakes to Avoid
Mistake 1: Overmixing the Batter
Overmixing the batter can lead to a tough, dense cake. To avoid this, mix the wet and dry ingredients gently, just until they are combined. A few lumps are okay; they will disappear while baking. Pro tip: Use a spatula to fold in the pineapple pieces to maintain the cake’s delicate texture.
Mistake 2: Not Using Room Temperature Butter
Using cold butter can result in an uneven and lumpy batter. Make sure the butter is at room temperature before starting. This allows it to blend smoothly with the sugar, creating a light and fluffy base for your cake. Pro tip: If you forget to take the butter out, you can quickly soften it by microwaving it for a few seconds at low power.
Mistake 3: Overbaking the Cake
Overbaking can make the cake dry and crumbly. Keep an eye on the cake and test it with a toothpick. If the toothpick comes out clean, the cake is done. Pro tip: If the top is browning too quickly, cover it loosely with aluminum foil to prevent over-browning.
Mistake 4: Not Allowing the Syrup to Absorb
Pouring the syrup over a cool cake won’t allow it to absorb properly. Make sure the cake is still warm when you pour the syrup. This way, the cake will soak up the syrup, making it extra moist and flavorful. Pro tip: Poke a few holes in the cake with a toothpick before pouring the syrup to help it penetrate deeper.
Mistake 5: Not Using Fresh Pineapple
While canned pineapple can be a convenient substitute, fresh pineapple has a superior flavor and texture. If possible, use fresh pineapple for the best results. Pro tip: If you do use canned pineapple, make sure to drain it well to avoid excess liquid in the cake.
FAQ
Can I use canned pineapple instead of fresh pineapple?
Yes, you can use canned pineapple, but make sure to drain it well. Fresh pineapple provides a better flavor and texture, but canned pineapple works in a pinch. Just be mindful of the added liquid in the cake.
What can I use if I don’t have pineapple juice?
If you don’t have pineapple juice, you can use orange juice or any other fruit juice. This will still give your cake a nice, fruity flavor. Just keep in mind that the taste will be slightly different.
How long does the cake need to cool before unmolding?
Let the cake cool for about 15-20 minutes before unmolding. This allows it to set and makes it easier to remove from the pan without breaking. Cooling also helps the cake absorb the syrup better.
Can I add a glaze to the cake?
A glaze can be a nice addition, but it’s not necessary. If you choose to add a glaze, wait until the cake is completely cool. A simple glaze made with powdered sugar and a bit of milk or cream can add a lovely, sweet finish.
Is this cake suitable for those with gluten allergies?
As written, this cake is not gluten-free. However, you can substitute the wheat flour with a gluten-free flour blend. Just make sure to use a blend that includes xanthan gum or another binding agent to help the cake hold together.
Can I freeze the cake?
Yes, you can freeze the cake. Wrap it tightly in plastic wrap and then in aluminum foil. It will keep in the freezer for up to 2 months. When you’re ready to serve, thaw it in the refrigerator overnight.
Can I make this cake in a bundt pan?
Yes, you can use a bundt pan for this recipe. Just make sure to grease it well to prevent sticking. The baking time may vary slightly, so keep an eye on it and test with a toothpick to ensure it’s done.
How can I make this cake less sweet?
If you find the cake too sweet, you can reduce the amount of sugar in the cake and the syrup. Start by reducing the sugar in the cake by 1/4 cup and the sugar in the syrup by half. Taste the batter and adjust as needed.
Can I use a different type of fruit?
Yes, you can experiment with other fruits like apples, peaches, or even cherries. Just make sure the fruit is cut into small, manageable pieces and that you adjust the amount of juice accordingly to keep the cake moist.
What’s the best way to store the cake?
Store the cake in an airtight container at room temperature for up to 3 days. If you live in a humid climate, it’s best to refrigerate the cake to prevent it from becoming too moist. For longer storage, you can freeze the cake. Wrap it tightly in plastic wrap and then in aluminum foil. It will keep in the freezer for up to 2 months.
Conclusion
I hope you enjoy making and savoring this Juicy Pineapple Delight. It’s a dessert that brings joy and a taste of the tropics to any table. Whether you’re celebrating a special occasion or just craving something sweet, this cake is sure to please. Don’t forget to explore our other delightful recipes, like the Cinnamon Apple Delight and Banana Cream Cake, for more baking inspiration. Happy baking!
Equipment
- Mixing bowls
- Electric mixer or whisk
- Cake mold
- Saucepan
- Toothpick or cake tester
Ingredients
- 250 g wheat flour
- 200 g sugar
- 150 g butter at room temperature
- 3 eggs
- 1 tsp vanilla extract
- 1 tsp baking powder
- 1/2 tsp sodium bicarbonate
- 1 pinch salt
- 200 ml pineapple juice
- 200 g pineapple in pieces
Instructions
- Preheat your oven to 180°C (350°F) and grease a cake mold.
- Beat the butter and sugar together until light and creamy.
- Add the eggs one by one, beating well after each addition, then stir in the vanilla extract.
- In a separate bowl, sift together the flour, baking powder, sodium bicarbonate, and a pinch of salt.
- Alternately add the dry ingredients and pineapple juice to the wet mixture, starting and ending with dry ingredients.
- Gently fold in the pineapple pieces.
- Pour the batter into the prepared cake mold and smooth the top. Bake for 35-40 minutes or until a toothpick comes out clean.
- While the cake is baking, heat the pineapple juice and sugar in a saucepan until the sugar dissolves to make the syrup.
- Once the cake is done, pour the hot syrup over it and let it cool completely before unmolding.
Notes
Nutrition

Hi, I’m Olivia Parker, the founder of BakingSecret.com and a lifelong lover of all things sweet and homemade. I grew up in a small town in Oregon, where the smell of fresh cookies in my family’s kitchen sparked my passion for baking. Over the years, I turned that passion into a mission: to help home bakers feel confident, inspired, and creative.
After studying food science and working in several artisan bakeries across the U.S., I decided to create a space where everyone from beginners to seasoned bakers can find reliable recipes, expert tips, and a warm, welcoming community. BakingSecret.com is my way of sharing the magic of baking with the world. When I’m not testing new recipes, you’ll find me exploring farmers’ markets, collecting vintage cookbooks, or perfecting my sourdough technique.