
The Perfect Bite: Mini Lemon Blackberry Cheesecakes
Do you ever find yourself at a party, eyeing that massive cheesecake and thinking, “I really shouldn’t… but I really want to”? I’ve been there too! That’s why I fell in love with the idea of Mini Lemon Blackberry Cheesecakes. They offer all the creamy, tangy joy of a full-sized dessert in one perfect, guilt-free(ish) package. The bright lemon zing dancing with sweet, jammy blackberry is a flavor combo that just sings of spring and summer. It’s like sunshine and berry picking in every single bite!
From Big to Bite-Sized: A Cheesecake Story
Cheesecake itself is ancient, dating back to ancient Greece! But the modern, creamy version we adore got its start here in America with the invention of cream cheese. The real magic of these mini versions is their convenience. No water bath, no cracked top anxieties, and everyone gets their own adorable individual treat. I love making them for my book club because they look so fancy but are secretly simple. The lemon blackberry twist is my personal ode to my grandma’s backyard bush, which always seemed to gift us more berries than we knew what to do with.
Why You’ll Adore This Mini Cheesecake Recipe
First, they are incredibly forgiving. Unlike their larger cousin, these little guys bake quickly and evenly, minimizing the chance of a sunken center. Second, the flavor balance is absolutely divine. The lemon isn’t too sour, and the blackberry isn’t too sweet—they just get each other. Finally, they are the ultimate make-ahead dessert. Whip them up in the morning, let them chill all day, and you’re a star hostess by dinner time. No last-minute fuss required!
When to Whip Up These Sweet Little Treats
These mini cheesecakes are versatile little champions! They shine at bridal or baby showers arranged on a tiered stand. They are perfect for potlucks and picnics—no plates or forks needed! I always make a double batch for holiday gatherings like Easter or Mother’s Day. Their cheerful colors just brighten up the table. Honestly, a quiet Tuesday night after the kids are in bed is also a perfectly good occasion. You deserve a mini celebration, too.
Gathering Your Ingredients for Lemon Blackberry Cheesecakes
Let’s gather our flavor players! Using room-temperature ingredients is the secret key to a silky smooth filling.
- For the Graham Cracker Crust:
- 1 ½ cups graham cracker crumbs
- 2 tablespoons sugar
- ⅓ cup unsalted butter, melted
- For the Cheesecake Filling:
- 2 (8 oz) packages cream cheese, softened
- ⅔ cup sugar
- ½ cup sour cream
- 1 teaspoon pure vanilla extract
- ¼ teaspoon kosher salt
- 2 large eggs
- Zest of 2 large lemons
- 2 tablespoons freshly squeezed lemon juice
- 1 cup fresh blackberries
- 1 (8 oz) can of blackberry pie filling (for topping)
Easy Ingredient Swap-Outs
Don’t panic if you’re missing something! Here are my favorite swaps:
- Crust: Use digestive biscuits, vanilla wafers, or even crushed ginger snaps for a spicy twist.
- Sour Cream: Plain, full-fat Greek yogurt works beautifully.
- Fresh Blackberries: Frozen berries are fine! Don’t thaw them; fold them in straight from the freezer to avoid dyeing your batter purple.
- Pie Filling Topping: Gently warm some seedless blackberry jam with a splash of lemon juice for a glossy homemade topping.
Let’s Make These Mini Lemon Blackberry Cheesecakes!
Ready to create some magic? Put on some music, clear your counter, and let’s bake.
Step 1: Preheat and Prep
Start by preheating your oven to 325°F (160°C). This lower temperature is crucial for a gentle, even bake without cracks. Line a standard 12-cup muffin pan with paper or foil cupcake liners. I love the foil ones for extra stability. This simple step makes cleanup an absolute dream and ensures your mini cheesecakes pop out perfectly.
Step 2: Make the Crust
In a medium bowl, combine the graham cracker crumbs and sugar. Pour in the golden, melted butter. Use a fork to mix until the mixture resembles wet sand and holds together when pinched. The aroma is already heavenly! Use a tablespoon to divide the mixture evenly among the liners. Pro tip: Use a small, flat-bottomed glass or a tamper to press the crumbs into a firm, compact layer. This creates a solid base that won’t crumble when you bite into it.
Step 3: Prepare the Cheesecake Filling
In the bowl of a stand mixer fitted with the paddle attachment (a hand mixer works too!), beat the softened cream cheese and sugar on medium speed. Beat for a good 2-3 minutes until it’s completely smooth and free of any lumps. Scrape down the bowl. Add the sour cream, vanilla, lemon zest, lemon juice, and salt. Mix on low until just combined. The bright yellow zest will speckle the creamy white filling beautifully. Now, add the eggs one at a time, mixing on low after each until just blended. Overmixing at this stage incorporates too much air, which can cause your cheesecakes to puff and fall.
Step 4: Fold and Fill
Take your fresh blackberries and give them a gentle rinse and pat dry. Using a spatula, carefully fold them into the cheesecake batter. Try not to burst them, as you want whole berry surprises. Using a cookie scoop or a ¼ cup measure, scoop the batter over the crusts, filling each liner about ¾ of the way full. They don’t rise much, so it’s okay to go nearly to the top.
Step 5: Bake to Perfection
Place the pan in the center of your preheated oven. Bake for 17-21 minutes. You’re looking for the very edges to turn a light golden brown and the centers to be set but still have a slight jiggle—like Jell-O. They will firm up as they cool. Pro tip: Avoid opening the oven door during baking. A sudden temperature drop can make them sink.
Step 6: Cool Completely
Once baked, remove the pan from the oven and place it on a wire rack. This is the hardest part: let them cool completely right in the pan. Rushing this step can lead to condensation and sogginess. Once at room temperature, you can transfer the whole pan to the refrigerator to chill and set fully, at least 2 hours, though overnight is best.
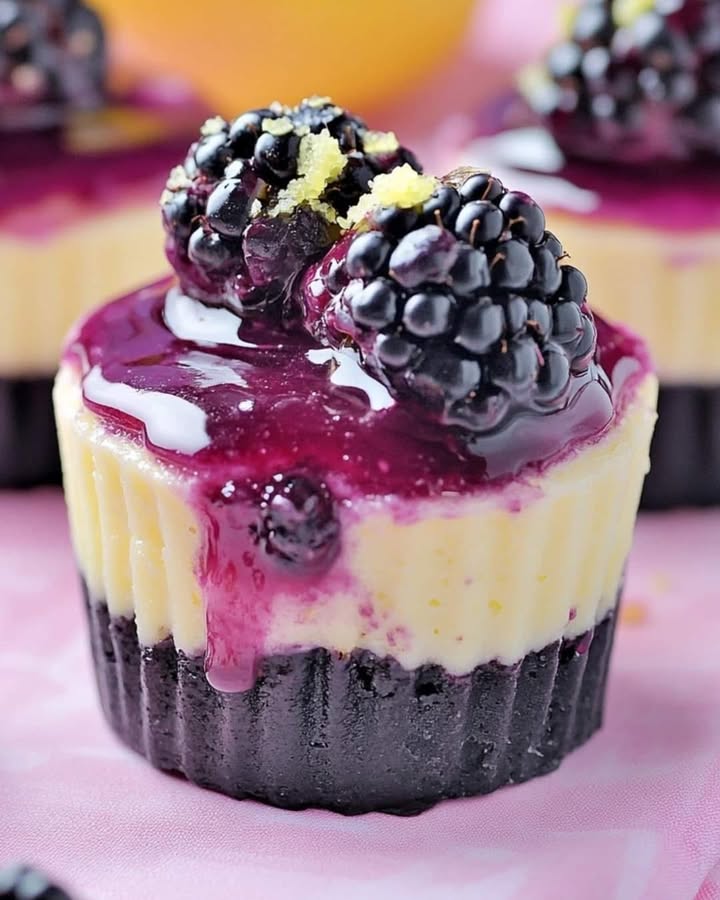
Step 7: The Grand Finale – Topping!
Just before serving, spoon a generous dollop of the glossy blackberry pie filling onto the center of each cheesecake. For a final touch, sprinkle a little extra crushed graham cracker on top for texture and visual appeal. The deep purple topping against the pale yellow cheesecake is simply stunning.
Chef’s Secret
For an extra burst of blackberry lemon flavor, simmer a handful of fresh blackberries with a teaspoon of sugar and a squeeze of lemon juice until syrupy. Drizzle this over the pie filling topping for a gorgeous, gourmet-looking garnish that tastes incredible.
Timing Your Mini Cheesecake Creation
| Prep Time: | 25 minutes |
| Cook Time: | 20 minutes |
| Cooling/Chill Time: | 4 hours (minimum) |
| Total Time: | 4 hours 45 minutes |
| Yield: | 12 perfect mini cheesecakes |
A Berry Interesting Fact!
Did you know blackberries aren’t actually berries in the botanical sense? They are “aggregate fruits” made up of many tiny drupelets, each containing its own seed. This unique structure is why they have such a wonderful, complex texture. Plus, their deep color comes from anthocyanins, powerful antioxidants that are great for you. So, you’re basically eating a health food. (Let’s go with that!)
Tools You’ll Need
- Standard 12-cup muffin pan
- Cupcake liners (foil recommended)
- Stand mixer or hand mixer
- Mixing bowls (medium and large)
- Microplane or zester
- Juicer or fork for lemon juice
- Spatula
- Cookie scoop or ¼ cup measure
- Wire cooling rack
Storing Your Mini Masterpieces
Once topped, these cheesecakes are best enjoyed within 24 hours. You can store them in a single layer in an airtight container in the refrigerator. If you need to stack them, place a layer of parchment paper between layers to protect the beautiful toppings.
For longer storage, freeze them without the topping. Place the cooled, unfilled cheesecakes on a baking sheet and flash-freeze until solid. Then, transfer them to a freezer-safe bag or container for up to 2 months. Thaw overnight in the fridge and add your pie filling just before serving.
Letting them sit in the fridge for a day actually allows the flavors of your lemon blackberry cheesecakes to meld and deepen. The lemon becomes more pronounced, and the crust softens just slightly into the filling, creating an even more harmonious bite.
Pro Tips for Success
- Room Temp is Key: Ensure your cream cheese, eggs, and sour cream are at room temperature. This prevents a lumpy batter and ensures a silky texture.
- Don’t Overmix Eggs: Mix just until the eggs disappear into the batter. Overbeating incorporates too much air, leading to cracks and puffiness.
- Pat Berries Dry: Moisture from wet berries can seep into the batter. Always pat your fresh blackberries thoroughly dry before folding them in.
- Use a Scoop: A cookie scoop ensures even filling, which means all your cheesecakes will bake at the same rate.
Presentation that Wows
- Serve on a slate board or a pastel-colored platter for a rustic, charming look.
- Place each mini cheesecake in a gold or silver foil liner for a festive holiday feel.
- Garnish with a single fresh blackberry, a tiny mint leaf, and a twist of lemon zest on top of the pie filling.
- For a baby shower, use blue or pink sprinkles on the whipped cream or around the plate’s rim.
More Delicious Cheesecake Adventures
If you love this format, you have to explore the wonderful world of mini cheesecakes. Here are six tasty twists to try next:
- Chocolate Raspberry: Swap the crust for chocolate wafer crumbs. Use raspberry extract in the filling and top with fresh raspberries and chocolate ganache.
- Salted Caramel Apple: Fold in finely chopped, sautéed apples with cinnamon into the filling. Top with homemade salted caramel sauce and a sprinkle of sea salt.
- Key Lime: Replace the lemon zest and juice with Key lime. Use a ginger snap crust and top with sweetened whipped cream and lime zest.
- Cookies and Cream: Use an Oreo cookie crust. Chop whole Oreos into the plain cheesecake batter. Top with whipped cream and more cookie crumbs.
- Pumpkin Spice: Perfect for fall! Add ½ cup of pumpkin puree and a teaspoon of pumpkin pie spice to the filling. Top with cinnamon-spiced whipped cream.
- White Chocolate Strawberry: Melt 4 oz of white chocolate into the cream cheese mixture. Top with fresh, sliced strawberries macerated in a little sugar.
Looking for other show-stopping cheesecake ideas? You might adore the rich, dramatic layers of a Red Velvet Cookie Dough Cheesecake or the sweet-and-salty perfection of a Salted Honey Pie. For no-bake options, a Chocolate Orange Pie is a citrus dream, and for a fun, crunchy treat, you can’t beat classic Christmas Crack Saltine Cracker Toffee.
Common Mistakes to Avoid
Mistake 1: Using Cold Ingredients
This is the number one cause of a lumpy, uneven cheesecake filling. Cold cream cheese doesn’t blend smoothly with sugar, and cold eggs can cause the fat in the cheese to seize up. Always take your cream cheese, eggs, and sour cream out of the fridge at least an hour before you start baking. The cream cheese should feel soft and pliable to the touch. This simple step guarantees that velvety texture we all crave.
Mistake 2: Overmixing the Batter After Adding Eggs
Once you add the eggs, your mixing should become gentle and brief. Beating too much air into the batter at this stage is like building a tiny, unstable bubble house. It will puff up dramatically in the oven and then collapse as it cools, leading to cracks and a dense texture. Mix on low speed and stop as soon as the egg yolk streaks disappear. A few gentle folds with a spatula to finish is perfect.
Mistake 3: Overbaking the Mini Cheesecakes
Because they are so small, these cheesecakes bake fast and continue to set as they cool. Baking them until the center is completely firm will result in a dry, crumbly dessert. The key is to look for that “set but jiggly” center. When you gently shake the pan, the very middle should have a slight, gelatin-like wobble. Remember, they will firm up perfectly on the cooling rack and in the fridge. Set a timer for the minimum bake time and check from there.
Mistake 4: Skipping the Proper Chill Time
I know, the wait is torture! But rushing the cooling and chilling process is a recipe for disaster. If you top a warm cheesecake, the filling will melt and get messy. Structurally, they need that slow chill to fully set their creamy interior. Let them cool to room temperature in the pan, then transfer, still in the pan, to the refrigerator for at least 4 hours, but ideally overnight. The patience pays off in perfect texture and flavor.
Once you master these adorable mini cheesecakes, you’ll find yourself coming back to this easy recipe again and again. I have a whole collection of other delicious cheesecake recipes waiting for you to explore, from classic New York-style to wild and creative flavor fusions.
Your Mini Lemon Blackberry Cheesecake Questions, Answered
Can I make these mini cheesecakes ahead of time?
Absolutely, and I highly recommend it! You can bake the cheesecakes (without the pie filling topping) up to two days in advance. Just store them in an airtight container in the refrigerator. Add the blackberry pie filling topping within a few hours of serving to prevent the crust from getting too soft. They also freeze beautifully for up to two months. Thaw them overnight in the fridge before topping and serving. Making them ahead actually makes the flavors even better.
Can I use frozen blackberries instead of fresh?
Yes, you can use frozen blackberries. The key is to use them straight from the freezer. Do not thaw them first. Thawed berries release a lot of juice and will turn your beautiful cheesecake batter a purple-grey color and make it runny. Gently fold the frozen berries into the batter just before filling the liners. You may need to add 1-2 extra minutes to the bake time since you’re starting with a colder ingredient.
Why did my cheesecakes crack on top?
A few small cracks are normal and will be covered by topping, but large cracks usually come from overmixing (adding too much air), overbaking, or a rapid temperature change. To avoid this, mix gently after adding eggs, bake until just set with a wobbly center, and let them cool slowly in the pan on a rack instead of moving them while hot. Don’t open the oven door during baking!
How do I know when they are done baking?
Look for visual clues, not just the timer. The edges of the cheesecakes will turn a light golden brown and will look set. The very center (about the size of a quarter) should still look a bit soft and will jiggle slightly when you gently shake the pan. It will firm up as it cools. If the center is completely firm and doesn’t move, they are likely overbaked.
Can I use a different fruit topping?
Of course! The lemon cheesecake base is wonderfully versatile. You can use cherry, blueberry, or raspberry pie filling straight from the can. For a fresh topping, toss 1 ½ cups of any berry with 2 tablespoons of sugar and let it sit for 30 minutes to create a syrupy sauce. A simple dollop of lemon curd or whipped cream with fresh fruit is also divine.
My cream cheese filling is lumpy. What can I do?
This usually happens if the cream cheese was too cold. To fix it, you can try to beat it longer on medium speed to smooth it out. If there are still a few tiny lumps, you can pass the finished batter through a fine-mesh sieve before folding in the berries. It’s a bit of extra work, but it guarantees a silky texture. For next time, remember to soften that cream cheese completely!
Can I make these without a mixer?
You can, but it will take some elbow grease. Use a large bowl and a sturdy, flexible spatula. Mash the softened cream cheese against the side of the bowl with the spatula to soften it further before adding the sugar. Mix vigorously until smooth. For the eggs, switch to a whisk and whisk them in one at a time until fully incorporated. The goal is to mix well without whipping in too much air.
Is there a way to make a gluten-free version?
Easily! For the crust, use certified gluten-free graham crackers or gluten-free vanilla cookies crushed into crumbs. Ensure all your other ingredients (like vanilla extract) are gluten-free. The cheesecake filling itself is naturally gluten-free. Follow all other steps as written for a delicious gluten-free dessert everyone can enjoy.
Can I use a different size pan?
For mini cheesecakes, a standard muffin pan is best. If you only have a mini muffin pan, the yield will be higher (about 24), and the bake time will be shorter—start checking at 12 minutes. You could also make this in a 9-inch springform pan for one large cheesecake. The bake time would increase to about 50-60 minutes, and you would need to use a water bath for best results to prevent cracking.
How long do they last in the fridge?
Once assembled with the topping, they are best eaten within 1-2 days, as the crust can soften. Without the topping, the baked cheesecake base will keep beautifully in an airtight container in the fridge for up to 5 days. The flavor actually improves after a day or two. Always store them in a single layer or with parchment between layers to protect them.
The Final, Delicious Slice
I hope these Mini Lemon Blackberry Cheesecakes bring as much joy to your table as they have to mine. They are little bites of happiness that prove fancy doesn’t have to be fussy. The bright, sunny lemon and the sweet, dark berry are a match made in dessert heaven. So gather your ingredients, put on that apron, and bake up a batch. Your friends and family will be so impressed, and you’ll have a new go-to recipe for every sweet occasion. Now, go enjoy your well-deserved treat!
Equipment
- Mélangeur sur socle
- Grand bol
- Spatule
- Plaque à muffins
- Papiers de cuisson
Ingredients
- 1.5 tasse crumbles de crackers Graham
- 2 cuillère à soupe sucre
- 1/3 tasse beurre non salé, fondu
- 2 paquets fromage à la crème, ramolli
- 2/3 tasse sucre
- 1/2 tasse crème aigre
- 1 cuillère à café extrait de vanille
- 1/4 cuillère à café sel casher
- 2 grands œufs
- Zeste de 2 grands citrons
- 2 cuillère à soupe jus de citron fraîchement pressé
- 1 tasse mûres fraîches
- 1 boîte garniture de tarte aux mûres pour le dessus
Instructions
- Préchauffez le four à 160 °C et tapissez une plaque à muffins de 12 cavités avec des caissettes en papier.
- Dans un bol moyen, mélangez les crumbules de crackers Graham et le sucre. Ajoutez le beurre fondu et mélangez jusqu'à obtenir une consistance de sable mouillé.
- Divisez le mélange de croûte également entre les caissettes et pressez fermement.
- Dans un mélangeur sur socle, battez le fromage à la crème ramolli et le sucre à vitesse moyenne jusqu'à consistance lisse. Ajoutez la crème aigre, la vanille, le zeste de citron, le jus de citron et le sel ; mélangez jusqu'à ce que le tout soit combiné.
- Ajoutez les œufs un à un, en mélangeant à basse vitesse jusqu'à ce que cela soit juste mélangé.
- Incorporez délicatement les mûres fraîches, en prenant soin de ne pas les éclater.
- Remplissez chaque croûte à environ ¾ plein avec le mélange de cheesecake.
- Faites cuire au four pendant 17-21 minutes jusqu'à ce que les bords deviennent dorés et que les centres gigotent légèrement.
- Laissez refroidir complètement dans la plaque, puis réfrigérez pendant au moins 2 heures (de préférence toute la nuit).
- Avant de servir, garnissez chaque cheesecake de garniture de tarte aux mûres et de crackers Graham écrasés.