
Why This Maxi-King Delight Cake Will Make You Feel Like Royalty
Picture this: a slice of cake so rich, creamy, and decadent that it feels like a warm hug in dessert form. That’s exactly what happened when I first made the Maxi-King Delight Cake for my family. It was one of those moments where everyone stopped mid-conversation to savor every bite. The layers of buttery crust, velvety mascarpone cream, and gooey caramel sauce are pure magic. If you’re looking for a show-stopping dessert that’s surprisingly easy to make, this is your golden ticket.
A Little History Behind the Maxi-King Delight Cake
I stumbled upon this recipe while trying to recreate a dessert I had at a café in Europe. The café called it a “royal treat,” but once I brought it home and added my own twist, it became the Maxi-King Delight Cake. This cake has roots in classic European desserts, where layering textures and flavors is an art form. Over time, I’ve modernized it by using mascarpone and cream cheese for a lighter yet indulgent cream filling. It’s become a family favorite, especially during holidays or when we want to impress guests.
Why You’ll Love This Recipe
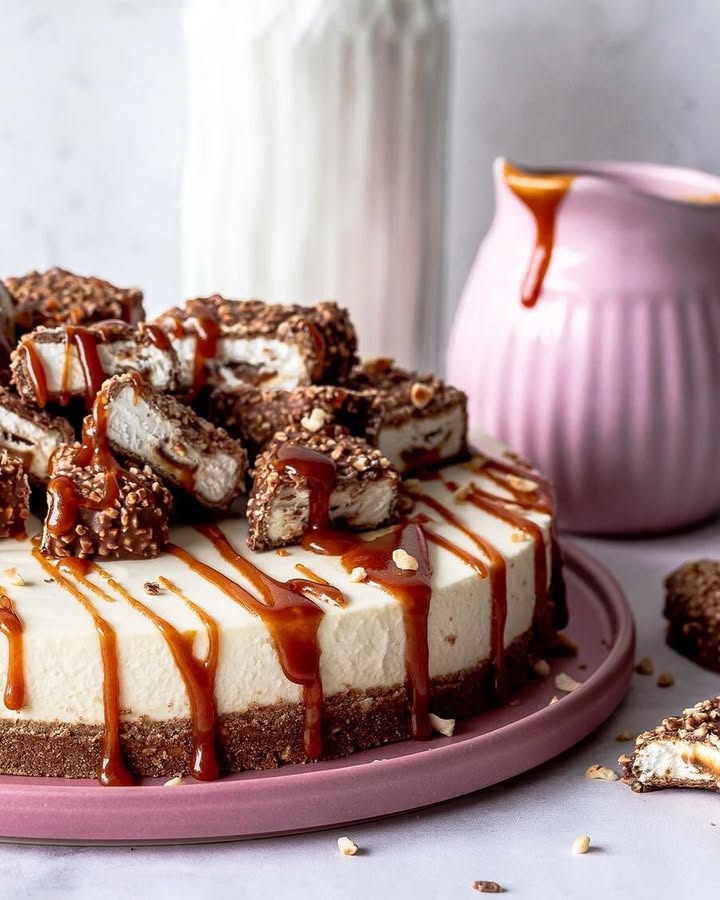
This Maxi-King Delight Cake is all about balance. The crunchy hazelnut crust contrasts beautifully with the silky cream layer, while the caramel sauce adds just the right amount of sweetness. Plus, it’s surprisingly simple to make—no fancy techniques required! Whether you’re a seasoned baker or a beginner, this recipe will make you feel like a pastry chef. And trust me, the compliments will roll in.
Perfect Occasions to Prepare This Recipe
This cake is perfect for birthdays, anniversaries, or any celebration where you want to wow your guests. I’ve also served it at casual dinner parties, and it always steals the show. It’s versatile enough for formal events but cozy enough for family gatherings. Honestly, I’ve even made it just because—it’s that good.
Ingredients
- For the crust:
- 200 g butter cookies
- 100 g butter
- 50 g whole milk chocolate
- 50 g chopped hazelnuts
- For the cream:
- 500 g mascarpone
- 200 g cream cheese
- 200 g sugared condensed milk
- 200 g cream
- 5 leaves gelatin
- For the caramel sauce:
- 100 g sugar
- 100 g cream
- 70 g butter
- For the decoration:
- 4-5 chocolate bars with milk cream filling
- 1 tablespoon chopped hazelnuts
Substitution Options
If you can’t find mascarpone, use full-fat cream cheese for a similar texture. For a nut-free version, swap the hazelnuts with crushed pretzels or cookies. If you’re out of gelatin, agar-agar works as a vegetarian alternative. And if caramel sauce isn’t your thing, try drizzling melted chocolate instead.
Preparation
Step 1: Create the Perfect Crust
Start by lining a springform pan (Ø 24 cm) with baking paper. Crush the butter cookies into fine crumbs—I love using a food processor for this, but a rolling pin works just as well. Melt the butter and chocolate together, then mix them with the cookie crumbs and hazelnuts. Press the mixture firmly into the bottom of the pan. It should look like a sandy beach before you pop it in the fridge to chill. Pro tip: Use the back of a spoon to press the crust evenly for a professional finish.
Step 2: Whip Up the Cream Filling
In a large bowl, combine mascarpone, cream cheese, and condensed milk until smooth. Soak the gelatin leaves in cold water, then gently heat them in a small saucepan until dissolved. Mix a few tablespoons of the cream into the gelatin to temper it before folding it into the rest of the cream. Whip the remaining cream until stiff peaks form, then fold it into the cream mixture. The result? A cloud-like filling that’s both light and luscious.
Step 3: Assemble and Chill
Pour the cream filling over the chilled crust and smooth it out with a spatula. Pop the cake back into the fridge for at least 3 hours. While it chills, make the caramel sauce by melting sugar in a pan until it turns a golden amber color. Stir in the cream and butter for a glossy, decadent sauce. Let it cool slightly before drizzling over the cake. Decorate with chocolate bars and a sprinkle of hazelnuts for that final touch.
Chef’s Tip
To make the caramel sauce foolproof, keep the heat low and stir constantly. If it starts to smell burnt, it’s gone too far! Adding a pinch of salt enhances the flavor and balances the sweetness.
Timing
- Prep time: 30 minutes
- Cooking time: 10 minutes
- Resting time: 3 hours
- Total time: 3 hours 40 minutes
Extra Info
Did you know that mascarpone originated in Italy and was traditionally used in tiramisu? Its creamy texture makes it a dream ingredient for cakes like this Maxi-King Delight Cake. Fun fact: the name “mascarpone” might come from the word “mascherpa,” which means ricotta in Lombard dialect.
Necessary Equipment
You’ll need a springform pan, a food processor or rolling pin, a small saucepan, a whisk, and a spatula. Don’t forget the baking paper to line the pan!
Storage
The Maxi-King Delight Cake stores beautifully in the fridge. Cover it with plastic wrap or place it in an airtight container to keep it fresh. It can last up to 3 days, though I doubt it’ll stay untouched for that long!
If you live in a warm climate, keep the cake in the coldest part of your fridge to prevent the cream from softening. For longer storage, freeze the cake without the caramel sauce. Thaw it overnight in the fridge before serving.
Always bring the cake to room temperature for 15-20 minutes before slicing. This allows the flavors to shine and makes it easier to cut clean slices.
Tips and Advice
Use high-quality ingredients for the best results. Fresh cream and premium chocolate make a noticeable difference. When folding the whipped cream into the filling, do it gently to keep the airy texture intact. And don’t rush the chilling process—it’s key to setting the layers perfectly.
Presentation Tips
- Drizzle the caramel sauce in a zigzag pattern for a professional look.
- Break chocolate bars into shards and arrange them artistically on top.
- Add a dusting of cocoa powder or powdered sugar for extra flair.
Healthier Alternative Recipes
Here are six ways to make this cake healthier:
- Low-sugar version: Use sugar-free cookies and sweeteners in the cream and caramel.
- Vegan option: Substitute mascarpone with cashew cream and use plant-based butter and gelatin.
- Gluten-free: Swap regular cookies with gluten-free ones.
- Lighter cream: Replace some of the cream with Greek yogurt.
- Fruit topping: Add fresh berries instead of chocolate bars.
- Nut-free: Skip the hazelnuts and use seeds like sunflower or pumpkin.
Common Mistakes to Avoid
Mistake 1: Overheating the Gelatin
Gelatin can lose its setting power if overheated. Always dissolve it gently over low heat and avoid boiling. Pro tip: Stir continuously to distribute the heat evenly.
Mistake 2: Skipping the Chilling Time
Rushing the chilling process will leave you with a soggy cake. Patience is key here—let the layers set properly for the best texture.
Mistake 3: Burning the Caramel Sauce
Caramel burns quickly, so keep an eye on it. If it smells burnt, start over. Lowering the heat and stirring constantly prevents disasters.
FAQ
Can I make this cake ahead of time?
Absolutely! This cake tastes even better the next day. Just store it in the fridge and decorate it before serving.
What can I use instead of mascarpone?
Full-fat cream cheese or a mix of cream cheese and sour cream works well as a substitute.
How do I know when the caramel is ready?
The caramel should be a deep amber color and have a rich, nutty aroma. Test it by dropping a small amount onto a plate—it should harden slightly as it cools.
Can I freeze this cake?
Yes, but freeze it without the caramel sauce. Wrap it tightly in plastic wrap and foil, then thaw it in the fridge overnight.
Why is my cream not setting?
This could happen if the gelatin wasn’t dissolved properly or if the cream wasn’t chilled enough. Double-check your technique next time.
What size pan should I use?
A 24 cm springform pan is ideal. If you don’t have one, adjust the quantities accordingly.
Can I use different nuts?
Of course! Almonds, pecans, or walnuts work beautifully in place of hazelnuts.
Is this cake kid-friendly?
Definitely! Kids love the creamy filling and chocolate decorations. Just skip the coffee if you’re adding any.
How do I get clean slices?
Dip your knife in hot water, wipe it dry, and then slice. Repeat for each cut for picture-perfect slices.
Can I add fruit to this cake?
Yes! Berries or sliced bananas pair wonderfully with the creamy filling.
Final Thoughts
The Maxi-King Delight Cake is more than just a dessert—it’s an experience. From the crunchy crust to the creamy filling and the sticky caramel drizzle, every bite is a celebration. Whether you’re making it for a special occasion or just because, this cake is sure to become a family favorite. So grab your apron, gather your ingredients, and let’s create something truly unforgettable!
Equipment
- Food processor or rolling pin
- Whisk
- Spatula
- Springform pan
- Small saucepan
Ingredients
- 200 g butter cookies
- 100 g butter
- 50 g whole milk chocolate
- 50 g chopped hazelnuts
- 500 g mascarpone
- 200 g cream cheese
- 200 g sugared condensed milk
- 200 g cream
- 5 leaves gelatin
- 100 g sugar
- 100 g cream
- 70 g butter
- 4-5 bars chocolate bars with milk cream filling
- 1 tablespoon chopped hazelnuts
Instructions
- Line a springform pan (Ø 24 cm) with baking paper.
- Crush the butter cookies into fine crumbs.
- Melt the butter and chocolate together, then mix with the cookie crumbs and hazelnuts.
- Press the mixture firmly into the bottom of the prepared pan and chill it in the fridge.
- Combine mascarpone, cream cheese, and condensed milk in a large bowl until smooth.
- Soak the gelatin leaves in cold water, then heat gently to dissolve.
- Mix a few tablespoons of the cream into the dissolved gelatin and fold it into the cream mixture.
- Whip the remaining cream until stiff peaks form, then fold it gently into the cream mixture.
- Pour the cream filling over the chilled crust and smooth it out.
- Chill the cake in the fridge for at least 3 hours.
- To make the caramel sauce, melt sugar until golden, then stir in cream and butter.
- Let the caramel cool slightly before drizzling over the cake.
- Decorate the cake with chocolate bars and sprinkle with chopped hazelnuts.
Notes
Nutrition

Hi, I’m Olivia Parker, the founder of BakingSecret.com and a lifelong lover of all things sweet and homemade. I grew up in a small town in Oregon, where the smell of fresh cookies in my family’s kitchen sparked my passion for baking. Over the years, I turned that passion into a mission: to help home bakers feel confident, inspired, and creative.
After studying food science and working in several artisan bakeries across the U.S., I decided to create a space where everyone from beginners to seasoned bakers can find reliable recipes, expert tips, and a warm, welcoming community. BakingSecret.com is my way of sharing the magic of baking with the world. When I’m not testing new recipes, you’ll find me exploring farmers’ markets, collecting vintage cookbooks, or perfecting my sourdough technique.