
Get Ready for a Sweet Treat: No-Bake Banana Cream Mini Pies
There’s something magical about a dessert that comes together without turning on the oven. Imagine the joy of a creamy, dreamy No-Bake Banana Cream Mini Pie that’s as easy to make as it is delicious. This recipe has become a favorite in my household, and I’m excited to share it with you!
A Little History Behind the No-Bake Banana Cream Pie
These mini pies have a rich history, tracing back to classic American desserts. The no-bake concept gained popularity in the 1950s when busy homemakers needed quick and easy recipes. Today, this modern twist on a classic is a hit at any gathering, blending the nostalgia of traditional banana cream pie with the convenience of a no-bake treat.
Why You’ll Love This No-Bake Banana Cream Pie Recipe
The beauty of this No-Bake Banana Cream Mini Pie lies in its simplicity and delectable flavors. The graham cracker crust provides a perfect crunch, while the creamy banana filling is smooth and comforting. Plus, the no-bake method means less time in the kitchen and more time enjoying your creation with family and friends.
Perfect Occasions to Prepare This No-Bake Banana Cream Pie
These mini pies are perfect for a variety of occasions. Whether you’re hosting a casual get-together, a birthday party, or just craving a sweet treat, these little pies always steal the show. They’re also a great option for potlucks and picnics, where you need a dessert that travels well and doesn’t require refrigeration until serving.
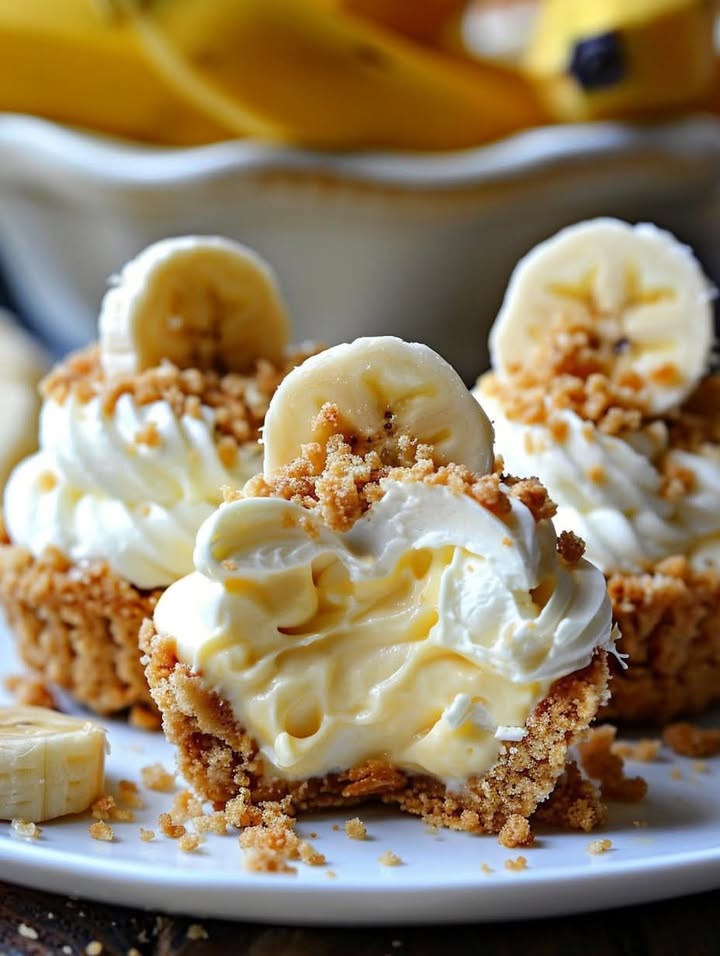
Ingredients for No-Bake Banana Cream Mini Pies
- For the crust:
- 1 1/2 cups graham cracker crumbs
- 1/3 cup granulated sugar
- 1/2 cup unsalted butter, melted
- For the filling:
- 2 ripe bananas, sliced
- 1 package (3.4 oz) instant banana cream pudding mix
- 1 3/4 cups whole milk
- 1 cup whipped cream
- For topping:
- Whipped cream
- Sliced bananas
- Crushed graham crackers
Substitution Options
- Graham cracker crumbs: Use cookie crumbs or crushed pretzels for a different texture.
- Banana cream pudding mix: Substitute with vanilla pudding mix and add a mashed banana for flavor.
- Whole milk: Use almond milk or coconut milk for a dairy-free version.
Preparation Section
Step 1: Make the Crust
In a mixing bowl, combine the graham cracker crumbs, sugar, and melted butter. Stir until the mixture resembles wet sand. Press this mixture into the bottom and up the sides of mini pie dishes. The crust should be firm and even. Chill the crusts in the refrigerator while you prepare the filling. Pro tip: Use the back of a spoon to press the crust firmly for a neat finish.
Step 2: Prepare the Filling
In another mixing bowl, whisk together the instant banana cream pudding mix and whole milk until the mixture thickens. Gently fold in the whipped cream until fully combined. The filling should be light and creamy. Pro tip: For an extra burst of flavor, add a teaspoon of vanilla extract to the filling.
Step 3: Assemble the Pies
Layer sliced bananas on the bottom of the chilled crusts. Pour the banana cream filling over the bananas, spreading it evenly. The filling should be smooth and cover the bananas completely. Refrigerate the mini pies for at least 2 hours to set. Pro tip: Cover the pies with plastic wrap to prevent a skin from forming on the top.
Step 4: Add the Toppings
Just before serving, top each mini pie with a dollop of whipped cream, a few slices of fresh banana, and a sprinkle of crushed graham crackers. The toppings add a delightful textural contrast and a burst of flavor. Pro tip: Garnish with a sprinkle of cinnamon for a warm, cozy touch.
Timing
Prep Time: 20 minutes
Chilling Time: 2 hours
Total Time: 2 hours 20 minutes
Servings: 6 mini pies
Chef’s Secret
To enhance the flavor and texture of your No-Bake Banana Cream Mini Pies, try adding a layer of caramel sauce between the crust and the banana slices. This adds a rich, gooey element that complements the creamy filling perfectly.
Extra Info
Did you know that bananas are not only delicious but also packed with nutrients? They are a great source of potassium, vitamin B6, and fiber, making them a healthy addition to your dessert. Plus, the natural sweetness of bananas means you can reduce the amount of added sugar in your recipes.
Necessary Equipment
- Mixing bowls
- Measuring cups and spoons
- Mini pie dishes
- Whisk
- Spatula
Storage
To store your No-Bake Banana Cream Mini Pies, cover them with plastic wrap and keep them in the refrigerator. They will stay fresh for up to 3 days. If you want to freeze them, place the pies in an airtight container and store them in the freezer for up to 2 months. Thaw them in the refrigerator overnight before serving. Pro tip: To prevent the crust from getting soggy, store the crust and filling separately and assemble just before serving.
Tips and Advice
- Use very ripe bananas for the best flavor and texture.
- Make sure the pudding mix is well combined with the milk to avoid lumps.
- Chill the pies for at least 2 hours to ensure they set properly.
Presentation Tips
- Add a drizzle of chocolate or caramel sauce for a decorative touch.
- Top with a dusting of powdered sugar for a elegant look.
- Arrange the pies on a tiered stand for a beautiful display.
Healthier Alternative Recipes
- Dairy-Free Version: Use coconut milk instead of whole milk and a dairy-free whipped cream alternative.
- Gluten-Free Option: Substitute graham cracker crumbs with gluten-free cookie crumbs.
- Low-Sugar Version: Use a sugar-free banana cream pudding mix and a natural sweetener like stevia.
- Fruit-Topped Pies: Add a variety of fresh fruits like strawberries, blueberries, and kiwi for a colorful and nutritious twist.
- Chocolate Chip Delight: Mix in some dark chocolate chips into the filling for a decadent treat.
- Coconut Cream Bliss: Add shredded coconut to the crust and use coconut cream in the filling for a tropical twist.
Common Mistakes to Avoid
Mistake 1: Overworking the Crust
Pressing the crust too hard can make it tough and difficult to cut. Aim for a firm but not overly compacted crust. Pro tip: Use the back of a measuring cup to press the crust evenly and gently.
Mistake 2: Not Chilling the Pies Long Enough
If the pies are not chilled long enough, the filling may not set properly and could be runny. Make sure to chill the pies for at least 2 hours to ensure they hold their shape. Pro tip: For best results, chill the pies overnight.
Mistake 3: Using Unripe Bananas
Unripe bananas lack the natural sweetness and creamy texture that make this dessert so delicious. Always use very ripe bananas for the best flavor and consistency. Pro tip: Let your bananas ripen at room temperature until the peels are speckled and the flesh is soft.
Mistake 4: Adding Too Much Whipped Cream
While whipped cream is a delightful topping, too much can overpower the delicate flavors of the banana and cream filling. Add a modest dollop to each pie and save the rest for garnishing. Pro tip: Use a piping bag to add a decorative swirl of whipped cream on top.
Mistake 5: Not Storing Properly
Improper storage can lead to a soggy crust and a watery filling. Store the pies in an airtight container in the refrigerator. Pro tip: Place a piece of parchment paper between the pies if stacking to prevent sticking.
FAQ
Can I use a different type of pudding mix?
Yes, you can use a different flavor of pudding mix, such as vanilla or butterscotch. Just add a mashed banana to the filling for a banana flavor. This allows you to customize the taste to your preference.
How do I make the crust gluten-free?
To make the crust gluten-free, substitute the graham cracker crumbs with gluten-free cookie crumbs or crushed gluten-free pretzels. This way, everyone can enjoy the dessert, regardless of dietary restrictions.
Can I make this recipe dairy-free?
Absolutely! Use almond milk or coconut milk instead of whole milk and a dairy-free whipped cream alternative. This makes the dessert suitable for those with dairy allergies or preferences.
How long can I store the pies?
The pies can be stored in the refrigerator for up to 3 days. For longer storage, you can freeze them for up to 2 months. Thaw in the refrigerator overnight before serving.
What can I use if I don’t have graham cracker crumbs?
If you don’t have graham cracker crumbs, you can use crushed cookies, such as digestive biscuits or vanilla wafers. These alternatives will give you a similar texture and flavor.
Can I make this recipe in one large pie dish?
Yes, you can make this recipe in a single 9-inch pie dish. Adjust the chilling time to 4-6 hours or overnight to ensure the pie sets properly. This is a great option for serving a larger group.
Is there a way to make the filling thicker?
If you prefer a thicker filling, you can use less milk or add a tablespoon of cornstarch to the pudding mix. This will help thicken the filling and give it a more substantial texture.
Can I add other fruits to the filling?
Definitely! You can add other fruits like sliced strawberries, blueberries, or kiwi to the filling for a colorful and flavorful twist. Just make sure to pat the fruits dry to avoid excess moisture in the filling.
What can I use instead of whipped cream?
If you don’t have whipped cream, you can use a stabilized whipped cream alternative or a non-dairy whipped topping. Another option is to use a dollop of Greek yogurt or a sprinkle of powdered sugar for a lighter touch.
How do I prevent the bananas from browning?
To prevent the bananas from browning, toss them in a mixture of lemon juice and water before adding them to the pies. This will help preserve their color and freshness. Alternatively, you can add the bananas just before serving.
Wrap Up Your Sweet Adventure
With this No-Bake Banana Cream Mini Pie recipe, you’ve got a simple yet impressive dessert that’s sure to delight. Whether you’re a seasoned baker or a beginner, this recipe is a winner. Enjoy the process, savor the flavors, and share the joy with your loved ones. Happy baking—well, happy no-baking!
Equipment
- Bol à mélanger
- Fouet
- Spatule
- Mini plats à tarte
- Cuillère à mesurer
Ingredients
- 1 1/2 tasse chapelure de biscuits Graham
- 1/3 tasse sucre cristallisé
- 1/2 tasse beurre non salé, fondu
- 2 bananes mûres, tranchées
- 1 paquet mélange de pudding à la banane instantané
- 1 3/4 tasse lait entier
- 1 tasse crème fouettée
- Crème fouettée (pour la garniture)
- Bananes tranchées (pour la garniture)
- Chapelure de biscuits Graham (pour la garniture)
Instructions
- Dans un bol, mélangez la chapelure de biscuits Graham, le sucre et le beurre fondu; remuez jusqu'à obtenir une texture semblable à du sable humide.
- Appuyez le mélange dans des mini plats à tarte; mettez au frais.
- Dans un autre bol, fouettez le mélange de pudding à la banane et le lait entier jusqu'à épaississement; incorporez délicatement la crème fouettée.
- Disposez les bananes tranchées au fond des croûtes refroidies; versez la garniture de crème à la banane sur les bananes.
- Réfrigérez les mini tartes pendant au moins 2 heures pour qu'elles prennent.
- Juste avant de servir, garnissez de crème fouettée, de tranches de bananes et de chapelure de biscuits Graham.
Notes
Nutrition

Hi, I’m Olivia Parker, the founder of BakingSecret.com and a lifelong lover of all things sweet and homemade. I grew up in a small town in Oregon, where the smell of fresh cookies in my family’s kitchen sparked my passion for baking. Over the years, I turned that passion into a mission: to help home bakers feel confident, inspired, and creative.
After studying food science and working in several artisan bakeries across the U.S., I decided to create a space where everyone from beginners to seasoned bakers can find reliable recipes, expert tips, and a warm, welcoming community. BakingSecret.com is my way of sharing the magic of baking with the world. When I’m not testing new recipes, you’ll find me exploring farmers’ markets, collecting vintage cookbooks, or perfecting my sourdough technique.