
A Cake That’ll Make You Forget the Oven Exists
Let me tell you a little story. Last summer, during one of those scorching heatwaves, my oven felt like enemy number one. I wanted something sweet, creamy, and chocolatey—but turning on the oven? No way. That’s when I stumbled upon this gem: No-Bake Chocolate Delight. This recipe is pure magic. Layers of crunchy graham cookies, velvety vanilla pudding, fluffy whipped cream, and rich chocolate glaze come together in a snap. It’s fast, easy, and so addictive that my family begged me to make it again the next day. Let me take you through this no-fuss wonder!
The Roots of This Creamy Treat
This dessert reminds me of classic French éclairs but in cake form—and without all the fuss. Éclairs are traditionally made with choux pastry filled with cream and topped with chocolate. Our No-Bake Chocolate Delight simplifies that concept into a layered cake. Graham crackers mimic the pastry shell, while the creamy layers nod to the filling. The result? A modern twist on tradition that’s perfect for busy home cooks. My kids call it “lazy-day cake” because it’s ready in no time and requires zero baking.
Why You’ll Love This Recipe
There’s so much to adore about this dessert. First, it’s so simple. No need to measure flour or worry about oven temperatures. Second, its flavors are spot-on. The buttery crunch of graham cookies pairs beautifully with the cool, creamy pudding mixture. And let’s not forget the chocolate glaze—it’s the crowning glory that ties everything together. Plus, it’s a crowd-pleaser. Whether it’s a casual family dinner or a fancy gathering, this No-Bake Chocolate Delight will earn rave reviews.
Perfect Occasions for This Dessert
This cake shines at potlucks, picnics, and summer barbecues—anytime you want a dessert that doesn’t require heating up the kitchen. It’s also a lifesaver during holidays like Thanksgiving or Christmas when oven space is at a premium. I’ve even served it at birthday parties as a fun alternative to traditional cakes. Honestly, though, you don’t need a special occasion. A random Tuesday night works just fine!
Ingredients
- 1 box of graham crackers
- 2 cups of cold milk
- 1 box (3.4 oz) of instant vanilla pudding mix
- 1 container (8 oz) of Cool Whip whipped cream
- 1 can (16 oz) of chocolate glaze
Substitution Options
If you’re feeling adventurous—or your pantry is running low—here are some swaps:
- Graham crackers: Substitute digestive biscuits or vanilla wafers.
- Cool Whip: Use homemade whipped cream if you prefer fresh ingredients.
- Vanilla pudding: Swap for cheesecake-flavored pudding for a tangy twist.
- Chocolate glaze: Melt chocolate chips with a splash of milk for a DIY version.
Preparation Section
Step 1: Prepare the Pudding Mixture
In a large bowl, whisk together the cold milk and instant vanilla pudding mix until it thickens. Watch how the liquid transforms into a smooth, creamy texture right before your eyes! This step only takes about two minutes, making it super quick. Pro tip: Use an electric mixer for extra fluffiness. Set the mixture aside while you prep the other components.
Step 2: Fold in the Whipped Cream
Now comes the fun part—adding the Cool Whip! Gently fold the whipped cream into the pudding mixture using enveloping motions. Be careful not to overmix; we want to keep that light, airy texture. As you stir, notice how the color lightens slightly, creating a cloud-like consistency. Trust me, this layer is what makes the cake irresistibly creamy.
Step 3: Build the First Layer
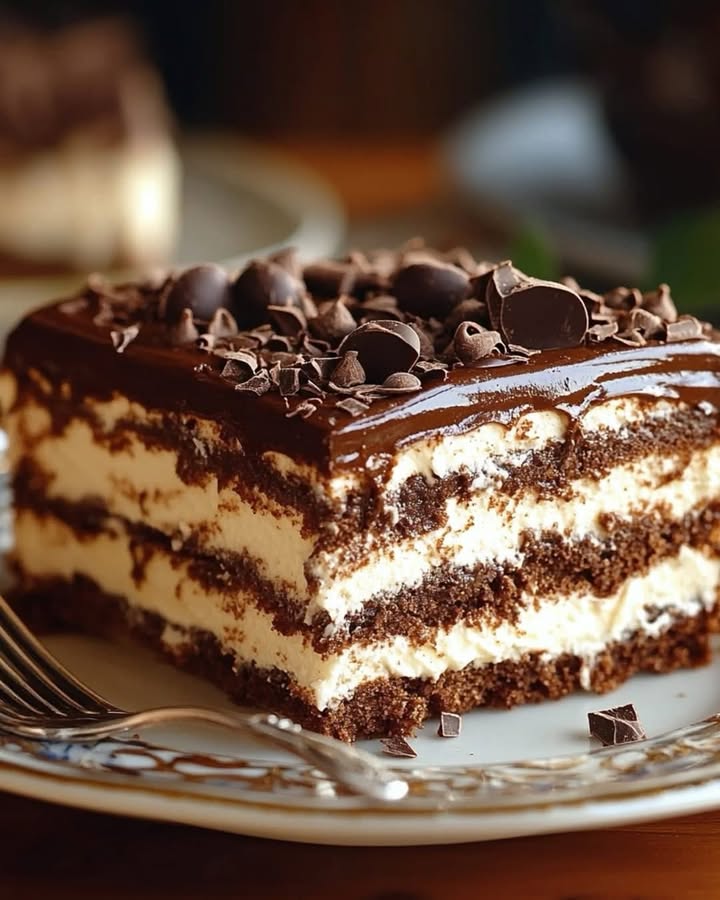
Grab a 9×13-inch pan and start assembling. Lay down a single layer of graham crackers on the bottom. These golden squares provide the perfect crunch against the soft layers above. Spread half of the pudding mixture evenly over the crackers. Take your time here—the smoother the layer, the better the final slices will look.
Step 4: Repeat the Layers
Add another layer of graham crackers, followed by the remaining pudding mixture. Finish with a final layer of crackers on top. Think of it as building a delicious sandwich of textures and flavors. At this point, your kitchen will smell amazing from the buttery aroma of the crackers.
Step 5: Add the Chocolate Glaze
Microwave the chocolate glaze for 15–20 seconds to loosen it up, then pour it over the top layer of crackers. Use a spatula to spread it evenly, ensuring every corner is covered. The glossy finish looks almost too good to eat—but don’t worry, you’ll dive in soon enough!
Step 6: Chill and Wait
Cover the pan with plastic wrap and pop it into the fridge. Let it chill for at least four hours, though overnight is ideal. This resting period allows the flavors to meld and the crackers to soften slightly. Patience pays off—you’ll be rewarded with clean, neat slices.
Chef’s Tip
To enhance the presentation, sprinkle shaved chocolate or crushed nuts on top of the glaze before serving. It adds a touch of elegance and extra texture.
Timing
- Prep Time: 20 minutes
- Cooking Time: None (no-bake!)
- Resting Time: 4 hours (or overnight)
- Total Time: Approximately 4 hours and 20 minutes
Extra Info
Did you know graham crackers were originally created in the 1800s as a health food? They’ve come a long way since then, especially in desserts like this one! Isn’t it funny how “healthy” foods often end up starring in our favorite treats?
Necessary Equipment
- 9×13-inch baking pan
- Whisk or electric mixer
- Spatula
- Microwave-safe bowl
- Plastic wrap
Storage
Leftovers? Lucky you! Store this cake in the refrigerator, tightly covered with plastic wrap or aluminum foil. It stays fresh for up to three days. If you’re bringing it to an event, transport it in the same pan to avoid disturbing the layers. For longer storage, freeze individual slices wrapped in parchment paper and stored in a freezer-safe bag. They’ll last up to a month.
When reheating frozen slices, let them thaw in the fridge overnight. Avoid microwaving, as the texture might become soggy. Serve chilled for the best experience.
One more thing: Always label leftovers with the date. This helps ensure you enjoy the cake at its peak flavor and freshness.
Tips and Advice
- Use a sharp knife dipped in hot water for clean cuts.
- Double-check the expiration dates on your dairy products for optimal taste.
- If you prefer less sweetness, reduce the amount of glaze or opt for dark chocolate.
Presentation Tips
- Garnish with fresh berries for a pop of color.
- Dust powdered sugar lightly over the top for a rustic look.
- Serve on colorful plates to highlight the dessert.
Healthier Alternative Recipes
Want to lighten things up? Here are six variations:
- Low-Sugar Option: Use sugar-free pudding mix and glaze.
- Dairy-Free Delight: Replace milk with almond milk and use coconut whipped cream.
- Gluten-Free Goodness: Swap graham crackers for gluten-free cookies.
- Protein-Packed Version: Add a scoop of vanilla protein powder to the pudding mixture.
- Fruit Infusion: Stir chopped bananas or strawberries into the pudding layer.
- Vegan Twist: Use plant-based whipped cream and dairy-free chocolate.
Common Mistakes to Avoid
Mistake 1: Skipping the Resting Time
Rushing the chilling process is a common mistake. The layers need time to set properly, otherwise, the cake falls apart when sliced. Give it at least four hours—or better yet, let it sit overnight.
Mistake 2: Overmixing the Pudding
Overmixing can deflate the whipped cream, leaving you with a dense filling instead of a light, airy texture. Fold gently and stop once everything is combined.
Mistake 3: Uneven Layers
An uneven distribution of ingredients leads to awkward slices. Use a spatula to smooth out each layer carefully. Practice makes perfect!
FAQ
Can I use homemade whipped cream?
Absolutely! Homemade whipped cream works beautifully. Just make sure it’s stiff enough to hold its shape when folded into the pudding.
How do I prevent the crackers from getting soggy?
Make sure the pudding mixture isn’t too runny. Also, don’t assemble the cake too far in advance unless you plan to serve it within a few hours.
What can I substitute for chocolate glaze?
You can melt chocolate chips with a tablespoon of milk or heavy cream for a homemade glaze.
Can I freeze this cake?
Yes, wrap individual slices in parchment paper and store them in a freezer-safe bag. Thaw in the fridge before serving.
Is this recipe kid-friendly?
Definitely! Kids love helping assemble the layers and drizzling the chocolate glaze.
Can I use different flavors of pudding?
Of course! Try cheesecake, banana, or pistachio pudding for a unique twist.
How many servings does this recipe make?
This recipe serves 12–15 people, depending on how generously you slice it.
Do I have to use Cool Whip?
No, you can use homemade whipped cream if you prefer fresher ingredients.
Can I add alcohol to the glaze?
For adults-only versions, stir in a teaspoon of rum or liqueur into the glaze for added depth.
What size pan should I use?
A standard 9×13-inch pan works best. Avoid smaller pans, as they won’t fit all the layers comfortably.
Final Thoughts
This No-Bake Chocolate Delight has earned a permanent spot in my recipe book. It’s a testament to how simple ingredients can create something extraordinary. Whether you’re a seasoned baker or a newbie in the kitchen, this dessert is foolproof and oh-so-delicious. So go ahead, whip up a batch, and watch everyone devour it. After all, life’s too short to skip dessert!
Equipment
- Large bowl
- Whisk or electric mixer
- Spatula
- 9x13-inch baking pan
- Microwave-safe bowl
Ingredients
- 1 box graham crackers
- 2 cups cold milk
- 1 box instant vanilla pudding mix (3.4 oz)
- 1 container (8 oz) Cool Whip whipped cream
- 1 can (16 oz) chocolate glaze
Instructions
- In a large bowl, whisk together the cold milk and instant vanilla pudding mix until thickened.
- Gently fold the Cool Whip into the pudding mixture using enveloping motions.
- Lay down a single layer of graham crackers in a 9x13-inch pan.
- Spread half of the pudding mixture evenly over the graham crackers.
- Add another layer of graham crackers followed by the remaining pudding mixture.
- Top with a final layer of graham crackers.
- Microwave the chocolate glaze for 15–20 seconds and spread it evenly over the top layer of crackers.
- Cover the pan with plastic wrap and refrigerate for at least four hours, or overnight.