
Why This No-Bake Fruit Cheesecake is a Game Changer
Picture this: it’s a scorching summer afternoon, and the last thing you want to do is turn on your oven. But you’re craving something sweet, creamy, and refreshing. Enter my No-Bake Fruit Cheesecake—a dessert so delightful, it feels like a hug for your taste buds. I first made this cheesecake for a family gathering when my oven decided to take an unexpected vacation. Everyone raved about it, and since then, it’s become my go-to recipe for hot days or when I need a quick treat to impress friends. With its buttery cookie base, velvety cream cheese filling, and vibrant topping of peaches and raspberries, this dessert is as beautiful as it is delicious.
A Little History Behind the Magic
Cheesecakes have been around for centuries, with the earliest versions dating back to ancient Greece. Back then, they were made with honey and soft cheese, nothing like the decadent desserts we enjoy today. Over time, cheesecakes evolved into countless variations, from New York-style to Italian ricotta-based versions. My No-Bake Fruit Cheesecake combines the best of both worlds: the simplicity of no-bake methods and the freshness of fruit toppings. It’s a modern twist that’s perfect for anyone who loves light, fruity desserts without the hassle of baking.
Why You’ll Love This Recipe
This No-Bake Fruit Cheesecake is a dream come true for dessert lovers. First, it’s incredibly easy to make—even if you’re a beginner in the kitchen. Second, it’s refreshingly light yet indulgent, thanks to the creamy filling and juicy fruit topping. Plus, it’s versatile! You can swap out the fruits or adjust the sweetness to suit your preferences. Whether you’re hosting a summer BBQ or just treating yourself after a long day, this cheesecake is sure to bring joy to your table.
Perfect Occasions for This Cheesecake
This dessert is perfect for any occasion where you want to serve something impressive but don’t want to sweat over a hot stove. Think birthday parties, picnics, or casual get-togethers with friends. It’s also ideal for holidays like Fourth of July, where the red raspberries and golden peaches add a festive touch. And let’s not forget those random Tuesday nights when you just want to indulge in something sweet and satisfying!
Ingredients
- 200 g vanilla cookies
- 100 g melted butter
- 400 g cream cheese
- 200 ml whipping cream
- 100 g powdered sugar
- 2 teaspoons vanilla extract
- 3 peaches, thinly sliced
- 150 g fresh raspberries
- 2 envelopes of unflavored gelatin
- 1/2 cup hot water
Substitution Options
If you’re feeling adventurous or need to adapt the recipe, here are some ideas:
- Cookies: Use graham crackers or digestive biscuits instead of vanilla cookies.
- Fruits: Swap peaches and raspberries for strawberries, blueberries, or mango slices.
- Sweetener: Replace powdered sugar with honey or maple syrup for a natural twist.
- Gelatin: For a vegetarian option, use agar-agar instead of gelatin.
Preparation Steps
Step 1: Create the Cookie Base
Start by crushing the vanilla cookies into fine crumbs. I like to use a food processor, but a ziplock bag and rolling pin work just as well. Mix the crumbs with melted butter until the texture resembles wet sand. Press the mixture firmly into the bottom of a removable tart pan or springform mold. This will form the crunchy, buttery base that holds everything together. Pro tip: Use the back of a spoon or a flat-bottomed glass to press the crumbs evenly.
Step 2: Whip Up the Creamy Filling
In a large mixing bowl, beat the cream cheese, whipping cream, powdered sugar, and vanilla extract until smooth and fluffy. The mixture should be light and airy, almost like a cloud. This step is where the magic happens—the cream cheese adds richness, while the whipped cream brings a silky texture. Take your time here; the smoother the mixture, the better your cheesecake will taste.
Step 3: Prepare the Gelatin
Dissolve the gelatin in hot water, stirring until completely smooth. Let it cool slightly before adding it to the cream cheese mixture. Beat everything together one more time to ensure the gelatin is evenly distributed. This step gives the cheesecake its firm yet melt-in-your-mouth consistency. Chef’s tip: If the gelatin starts to set too quickly, gently warm it in the microwave for a few seconds.
Step 4: Assemble the Cake
Pour the creamy filling over the cookie base and smooth it out with a spatula. Make sure the surface is even for a professional-looking finish. This is the moment when your cheesecake starts to take shape. Take a deep breath and admire your handiwork—it’s already looking amazing!
Step 5: Add the Fruit Topping
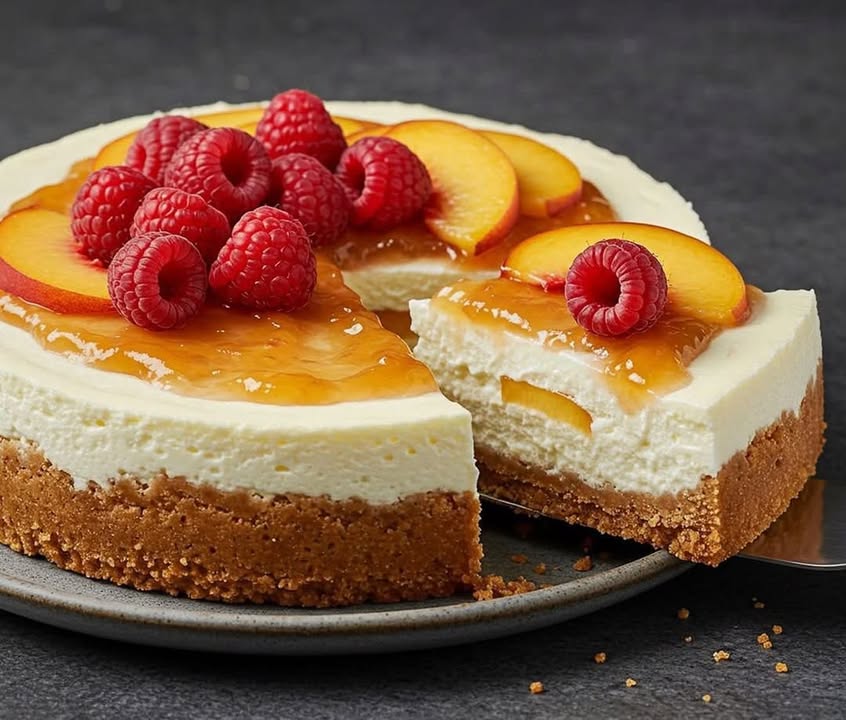
Arrange the peach slices and raspberries on top of the filling in any pattern you like. I love creating a spiral design with the peaches and scattering the raspberries for pops of color. Not only does this step make the cheesecake visually stunning, but it also adds a burst of freshness to every bite.
Step 6: Chill and Set
Place the cheesecake in the refrigerator for at least 4 hours, though overnight is best. This resting period allows the flavors to meld and the gelatin to set properly. Patience is key here—trust me, the wait is worth it!
Timing
Here’s a quick breakdown of the timing:
- Prep Time: 20 minutes
- Resting Time: 4–8 hours (or overnight)
- Total Time: Approximately 5 hours
Chef’s Secret
To make the fruit topping extra shiny and Instagram-worthy, brush a thin layer of apricot jam mixed with a splash of water over the peaches and raspberries. It adds a subtle sweetness and makes the colors pop.
Extra Info
Did you know that raspberries are packed with antioxidants? They’re not just delicious—they’re good for you too! Pairing them with peaches creates a perfect balance of tartness and sweetness.
Necessary Equipment
You’ll need the following tools to make this recipe:
- Food processor or ziplock bag and rolling pin
- Mixing bowls
- Electric mixer or whisk
- Removable tart pan or springform mold
- Spatula
Storage Tips
Once your cheesecake is ready, keep it refrigerated to maintain its texture. Cover it with plastic wrap or place it in an airtight container to prevent it from absorbing odors from the fridge. It should stay fresh for up to 3 days. If you need to store it longer, freeze individual slices wrapped in parchment paper and foil. Thaw them in the fridge before serving.
For leftovers, consider repurposing them into parfait glasses. Layer crumbled cheesecake with yogurt or more fresh fruit for a quick breakfast or snack.
Never leave your cheesecake at room temperature for more than 2 hours, as the cream cheese and gelatin can spoil quickly in warm environments.
Tips and Advice
Here are a few tips to elevate your cheesecake:
- Use full-fat cream cheese for a richer flavor.
- Chill your mixing bowl and whisk before whipping the cream for extra volume.
- Experiment with different fruits based on the season.
Presentation Ideas
Make your cheesecake stand out with these creative touches:
- Serve slices on colorful plates with a sprig of mint for garnish.
- Dust the edges with powdered sugar using a small sieve.
- Drizzle a bit of caramel or chocolate sauce over the top for added flair.
Healthier Alternatives
If you’re looking to lighten up this recipe, try these variations:
- Low-Sugar Version: Use a sugar substitute like stevia or erythritol instead of powdered sugar.
- Vegan Option: Replace cream cheese with cashew cream and use coconut cream instead of whipping cream.
- Gluten-Free Base: Use gluten-free cookies or almond flour for the crust.
- Protein-Packed: Add a scoop of vanilla protein powder to the filling.
- Dairy-Free Delight: Opt for dairy-free cream cheese and coconut oil instead of butter.
- Fruit-Only Topping: Skip the gelatin and use only fresh fruit for a lighter finish.
Common Mistakes to Avoid
Mistake 1: Skipping the Gelatin
The gelatin is what gives the cheesecake its structure. Without it, the filling may remain too soft and won’t hold its shape. Always dissolve the gelatin completely in hot water to avoid lumps.
Mistake 2: Overmixing the Filling
Overmixing can cause the filling to become too dense. Stop beating once the mixture is smooth and fluffy. Remember, less is more!
Mistake 3: Rushing the Chilling Process
Patience is crucial. Skipping the chilling step will result in a messy, un-set cheesecake. Plan ahead and let it rest overnight for the best results.
Mistake 4: Using Stale Cookies
Stale cookies won’t crush easily and may affect the texture of your base. Always use fresh cookies for the best outcome.
FAQs
Can I use frozen fruit?
Yes, but thaw and drain the fruit first to prevent excess liquid from making the filling soggy.
How do I know when the gelatin is ready?
The gelatin should be fully dissolved and clear. If it’s grainy, heat it slightly and stir again.
Can I make this ahead of time?
Absolutely! This cheesecake can be made up to 2 days in advance and stored in the fridge.
What if I don’t have a tart pan?
A regular pie dish or square baking pan works fine. Just line it with parchment paper for easy removal.
Is this cheesecake kid-friendly?
Definitely! Kids love the creamy texture and fruity topping. Plus, it’s fun to decorate together.
Can I double the recipe?
Yes, just make sure you have a larger pan or two smaller ones to accommodate the increased quantity.
How do I fix a lumpy filling?
Strain the mixture through a fine mesh sieve to remove any lumps. Then, continue whisking until smooth.
What’s the best way to slice it?
Use a sharp knife dipped in hot water and wiped dry between cuts for clean slices.
Can I freeze this cheesecake?
Yes, wrap individual slices tightly and freeze for up to 1 month. Thaw in the fridge before serving.
Why is my cheesecake too sweet?
You might have used sweetened cookies or added too much sugar. Adjust accordingly next time.
Final Thoughts
This No-Bake Fruit Cheesecake is more than just a dessert—it’s a celebration of simplicity, flavor, and creativity. Whether you’re a seasoned baker or a newbie in the kitchen, this recipe is sure to become a favorite. So grab your ingredients, roll up your sleeves, and let’s make something delicious together. Trust me, your taste buds will thank you!
Equipment
- Mixing Bowls
- Electric Mixer or Whisk
- Spatula
- Removable Tart Pan or Springform Mold
- Food Processor or Ziplock Bag and Rolling Pin
Ingredients
- 200 g vanilla cookies
- 100 g melted butter
- 400 g cream cheese
- 200 ml whipping cream
- 100 g powdered sugar
- 2 teaspoons vanilla extract
- 3 peaches thinly sliced
- 150 g fresh raspberries
- 2 envelopes unflavored gelatin
- 1/2 cup hot water
Instructions
- Crush the vanilla cookies into fine crumbs and mix with melted butter until resembling wet sand.
- Press the mixture firmly into the bottom of a removable tart pan or springform mold.
- In a large mixing bowl, beat the cream cheese, whipping cream, powdered sugar, and vanilla extract until smooth and fluffy.
- Dissolve the gelatin in hot water, let it cool slightly, then add it to the cream cheese mixture and beat until evenly distributed.
- Pour the creamy filling over the cookie base and smooth it out with a spatula.
- Arrange the peach slices and raspberries on top of the filling in any desired pattern.
- Chill the cheesecake in the refrigerator for at least 4 hours, preferably overnight.
Notes
Nutrition

Hi, I’m Olivia Parker, the founder of BakingSecret.com and a lifelong lover of all things sweet and homemade. I grew up in a small town in Oregon, where the smell of fresh cookies in my family’s kitchen sparked my passion for baking. Over the years, I turned that passion into a mission: to help home bakers feel confident, inspired, and creative.
After studying food science and working in several artisan bakeries across the U.S., I decided to create a space where everyone from beginners to seasoned bakers can find reliable recipes, expert tips, and a warm, welcoming community. BakingSecret.com is my way of sharing the magic of baking with the world. When I’m not testing new recipes, you’ll find me exploring farmers’ markets, collecting vintage cookbooks, or perfecting my sourdough technique.