
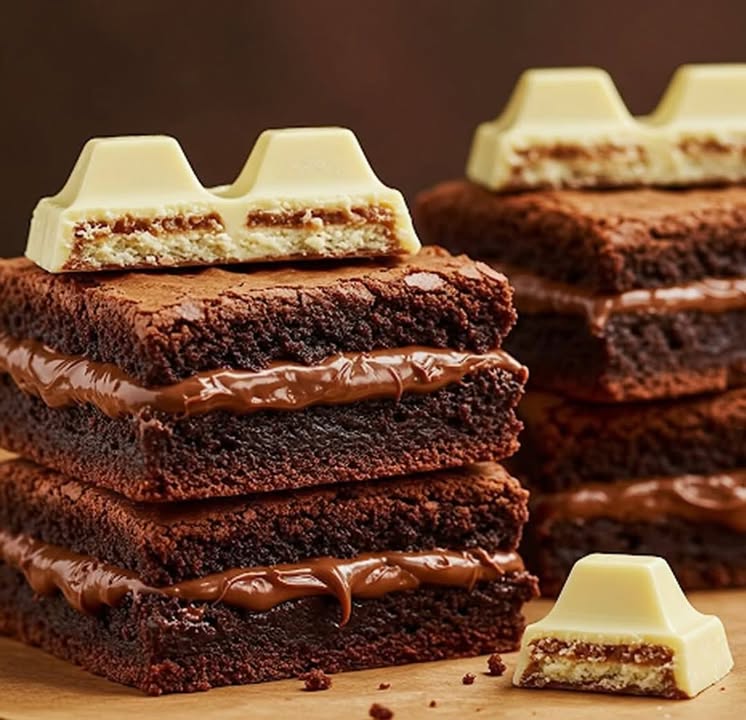
Why Nutella Kinder Brownies Are Pure Temptation
There’s something magical about biting into a warm, gooey brownie. Now imagine that brownie is swirled with creamy Nutella and topped with crunchy Kinder pieces. Sounds like heaven, right? I first made these Nutella Kinder Brownies for a family gathering last winter. My nieces couldn’t stop raving about them, and my brother-in-law even asked for the recipe! This dessert is rich, indulgent, and oh-so-easy to whip up. Whether you’re baking for a party or just treating yourself, this recipe will quickly become your go-to.
The Sweet History Behind These Brownies
Brownies have been around since the late 1800s, but they’ve come a long way from their humble beginnings. The original recipes were simple chocolate squares, but over time, bakers started experimenting with flavors and textures. Adding Nutella and Kinder pieces takes brownies to a whole new level of decadence. When I first tried this combo, it was love at first bite. The creamy hazelnut spread pairs perfectly with the rich chocolate base, while the Kinder pieces add a playful crunch. It’s a modern twist on a classic treat that feels both nostalgic and exciting.
Why You’ll Love This Recipe
This Nutella Kinder Brownies recipe is a winner for so many reasons. First, it’s incredibly easy to make—no fancy techniques required. Second, the combination of flavors is downright irresistible. The Nutella swirl adds a silky layer of hazelnut goodness, while the Kinder pieces bring a delightful surprise in every bite. Plus, the texture is spot-on: fudgy in the middle, slightly crisp on the edges. Whether you’re a seasoned baker or a newbie, this recipe guarantees success.
Perfect Occasions to Bake These Brownies
These brownies are perfect for any occasion—or no occasion at all! Whip them up for a birthday party, holiday gathering, or cozy movie night at home. They’re also a hit at potlucks because everyone loves a good brownie. I once brought these to a friend’s brunch, and they disappeared within minutes. Trust me, these Nutella Kinder Brownies are crowd-pleasers wherever they go.
Ingredients You’ll Need
- 140 g (10 tablespoons) unsalted butter
- 1 cup (250 g) sugar
- ¼ cup (65 g) unsweetened cocoa powder
- ½ teaspoon salt
- 1 teaspoon vanilla extract
- 2 large cold eggs
- ½ cup (65 g) all-purpose flour
- ½ cup (75 g) chopped nuts
- Hot Nutella for topping
- Kinder pieces for decoration
Substitution Options
If you want to tweak this recipe, here are some ideas:
- Butter: Use salted butter and skip the extra salt.
- Sugar: Swap white sugar for brown sugar for a deeper flavor.
- Nuts: Replace chopped nuts with chocolate chips or omit them entirely if you prefer nut-free brownies.
- Kinder Pieces: Substitute with other candies like M&Ms or chopped peanut butter cups.
Step 1: Prepare the Oven and Mold
Start by preheating your oven to 160°C (325°F). While the oven heats up, prepare your baking pan. I like to grease mine lightly and line it with parchment paper for easy removal later. Pro tip: Use a square pan for evenly baked brownies. If you don’t have one, a rectangular pan works too, but keep an eye on the edges—they might bake faster.
Step 2: Melt and Mix
In a heat-resistant bowl, combine the butter, sugar, cocoa powder, and salt. Place the bowl over a pot of simmering water (a double boiler setup) and stir until the butter melts completely. The mixture will look sandy and crumbly—that’s normal! Remove it from the heat and let it cool slightly. This step ensures the eggs won’t scramble when added later.
Step 3: Add the Eggs and Vanilla
Once the mixture has cooled, stir in the vanilla extract. Then, crack in the eggs one at a time, beating vigorously after each addition. This step is crucial—it incorporates air into the batter, giving the brownies their signature fudgy texture. Don’t rush this part; take your time to mix thoroughly.
Step 4: Integrate Flour and Nuts
Sift the flour into the bowl to avoid lumps, then fold it gently into the batter. Mix just until combined—overmixing can make the brownies tough. Next, stir in the chopped nuts. I love using walnuts for their earthy flavor, but pecans or almonds work beautifully too. Pro tip: Toast the nuts beforehand for an extra layer of flavor.
Step 5: Swirl Nutella and Bake
Pour the batter into your prepared pan and smooth the top. Now comes the fun part: drizzling hot Nutella over the batter. Use a knife to create a marbled effect—it’s easier than it sounds! Pop the pan into the oven and bake for 20–25 minutes. You’ll know they’re done when a toothpick inserted in the center comes out with a few moist crumbs clinging to it.
Step 6: Cool, Decorate, and Enjoy
Let the brownies cool completely before slicing. Trust me, patience pays off here. Once cooled, decorate with melted Nutella or additional Kinder pieces for a finishing touch. Serve them as-is or pair with a scoop of vanilla ice cream for an extra indulgent treat.
Chef’s Tip
To enhance the Nutella flavor, warm it slightly in the microwave before swirling it into the batter. This makes it easier to spread and creates those beautiful, gooey swirls we all love.
Timing Breakdown
- Prep Time: 15 minutes
- Cooking Time: 20–25 minutes
- Cooling Time: 30 minutes
- Total Time: About 1 hour 5 minutes
Chef’s Secret
For an extra-rich flavor, use dark cocoa powder instead of regular unsweetened cocoa. It gives the brownies a deeper chocolate taste that pairs wonderfully with the Nutella.
Extra Info
Did you know Nutella was invented in Italy during World War II? Cocoa and chocolate were scarce, so a pastry maker named Pietro Ferrero mixed hazelnuts with cocoa to stretch his supplies. Today, Nutella is enjoyed worldwide, and its creamy texture makes it a dream ingredient for desserts like these brownies.
Necessary Equipment
- 9×9-inch baking pan
- Parchment paper or nonstick spray
- Mixing bowls
- Whisk or electric mixer
- Spatula
- Double boiler or heatproof bowl
Storage Tips
Store your Nutella Kinder Brownies in an airtight container at room temperature for up to 3 days. If you live in a warm climate, pop them in the fridge to prevent the Nutella from melting. For longer storage, freeze the brownies in a sealed bag for up to 2 months. Thaw them at room temperature before serving.
To refresh frozen brownies, warm them briefly in the microwave or oven. This restores their gooey texture and makes them taste freshly baked.
Avoid stacking the brownies without parchment paper between layers, as they can stick together. Proper storage keeps them tasting amazing for days.
Tips and Advice
- Don’t overbake the brownies—they should be slightly underdone in the center for maximum fudginess.
- Use high-quality cocoa powder for the best flavor.
- If you’re short on time, skip the marbling and simply dollop Nutella on top before baking.
Presentation Ideas
- Dust the brownies with powdered sugar for a chic finish.
- Serve them on a rustic wooden board for a cozy vibe.
- Arrange them on a tiered dessert stand alongside other treats.
Healthier Alternatives
Here are six ways to make this recipe healthier:
- Gluten-Free Option: Swap all-purpose flour for almond flour or a gluten-free blend.
- Low-Sugar Version: Use a sugar substitute like stevia or monk fruit.
- Vegan Twist: Replace eggs with flax eggs and use dairy-free butter.
- Protein Boost: Add a scoop of chocolate protein powder to the batter.
- Less Fat: Cut the butter in half and replace it with applesauce.
- No Kinder Pieces: Decorate with fresh berries instead.
Mistake 1: Overcooking the Brownies
Overcooked brownies turn dry and lose their fudgy charm. To avoid this, check them early with a toothpick. Look for moist crumbs—not wet batter—to ensure they’re perfectly baked. Pro tip: Start checking at the 20-minute mark.
Mistake 2: Skipping the Cooling Step
Cutting into warm brownies can ruin their texture. They need time to set, so resist the urge to dig in right away. Cooling also enhances the flavors, making them even more delicious.
Mistake 3: Using Cold Nutella
Cold Nutella is hard to swirl and won’t blend smoothly into the batter. Warm it slightly in the microwave to achieve those gorgeous, Instagram-worthy swirls.
Mistake 4: Overmixing the Batter
Overmixing leads to dense brownies. Mix just until the ingredients are combined, then stop. Gentle folding preserves the airy texture we all crave.
Mistake 5: Not Lining the Pan
Skipping parchment paper makes cleanup a nightmare and risks breaking the brownies when removing them. Always line your pan for stress-free slicing.
FAQ: Can I Double This Recipe?
Absolutely! Doubling the recipe is a great idea for larger gatherings. Just use a bigger pan or divide the batter between two smaller pans. Adjust the baking time slightly if needed, but keep an eye on the edges to prevent burning.
FAQ: Can I Make These Without Nuts?
Yes, you can omit the nuts entirely. The brownies will still be delicious, though the nuts do add a nice crunch. Consider adding chocolate chips instead for extra texture.
FAQ: What Kind of Pan Should I Use?
A 9×9-inch square pan works best for this recipe. If you only have a rectangular pan, increase the baking time slightly and monitor closely to avoid overcooking.
FAQ: How Do I Store Leftovers?
Keep leftover brownies in an airtight container at room temperature for up to 3 days. For longer storage, freeze them in a sealed bag for up to 2 months. Thaw at room temperature before serving.
FAQ: Can I Use Milk Chocolate Instead of Cocoa?
While cocoa provides a richer flavor, you can melt milk chocolate and mix it into the batter for a sweeter option. Just reduce the sugar slightly to balance the sweetness.
FAQ: Why Is My Batter Grainy?
A grainy batter usually means the sugar hasn’t dissolved properly. Ensure the butter mixture cools slightly before adding the eggs, and whisk thoroughly to incorporate everything smoothly.
FAQ: Can I Add Other Toppings?
Of course! Get creative with toppings like crushed cookies, sprinkles, or caramel drizzle. The possibilities are endless, so feel free to experiment.
FAQ: Can I Make These Ahead of Time?
Yes, these brownies taste even better the next day. Make them a day in advance, store them properly, and serve when ready. They’re perfect for stress-free entertaining.
FAQ: What If I Don’t Have a Double Boiler?
No problem! Place your heat-resistant bowl over a pot of simmering water to create a makeshift double boiler. Just make sure the bowl doesn’t touch the water directly.
FAQ: Why Did My Brownies Sink in the Middle?
Sinking often happens if the brownies are underbaked or if too much leavening agent was used. Stick to the recipe measurements and bake until a toothpick comes out with moist crumbs.
FAQ: Can I Use Salted Butter?
Yes, but reduce or omit the added salt in the recipe. Salted butter adds flavor, but too much salt can overpower the sweetness of the brownies.
Final Thoughts
These Nutella Kinder Brownies are pure indulgence in every bite. With their rich chocolate base, creamy Nutella swirls, and crunchy Kinder toppings, they’re sure to impress anyone lucky enough to try them. Whether you’re baking for a special occasion or just craving something sweet, this recipe delivers big-time satisfaction. So grab your apron, gather your ingredients, and get ready to fall in love with the ultimate brownie experience!
Equipment
- Mixing bowls
- Whisk or electric mixer
- Spatula
- 9x9-inch baking pan
- Double boiler or heatproof bowl
Ingredients
- 140 g unsalted butter
- 250 g sugar
- 65 g unsweetened cocoa powder
- 0.5 tsp salt
- 1 tsp vanilla extract
- 2 large cold eggs
- 65 g all-purpose flour
- 75 g chopped nuts
- q.s. hot Nutella for topping
- q.s. Kinder pieces for decoration
Instructions
- Preheat your oven to 160°C (325°F) and prepare your baking pan by greasing it and lining it with parchment paper.
- In a heat-resistant bowl, combine the butter, sugar, cocoa powder, and salt, then melt over a double boiler and stir until combined.
- Let the mixture cool slightly, then stir in the vanilla extract.
- Add the eggs one at a time, beating vigorously after each addition to incorporate air into the batter.
- Sift the flour into the mixture and gently fold it in, then stir in the chopped nuts.
- Pour the batter into the prepared pan and drizzle hot Nutella on top, swirling with a knife.
- Bake for 20–25 minutes, until a toothpick comes out with moist crumbs.
- Let the brownies cool completely before slicing and decorating with melted Nutella or additional Kinder pieces.
Notes
Use high-quality cocoa powder for the best flavor.
For a twist, try using chocolate chips instead of nuts, or add toppings like crushed cookies or caramel.
Store in an airtight container for up to 3 days, or freeze for up to 2 months. Reheat briefly in the microwave for best texture.
Nutrition

Hi, I’m Olivia Parker, the founder of BakingSecret.com and a lifelong lover of all things sweet and homemade. I grew up in a small town in Oregon, where the smell of fresh cookies in my family’s kitchen sparked my passion for baking. Over the years, I turned that passion into a mission: to help home bakers feel confident, inspired, and creative.
After studying food science and working in several artisan bakeries across the U.S., I decided to create a space where everyone from beginners to seasoned bakers can find reliable recipes, expert tips, and a warm, welcoming community. BakingSecret.com is my way of sharing the magic of baking with the world. When I’m not testing new recipes, you’ll find me exploring farmers’ markets, collecting vintage cookbooks, or perfecting my sourdough technique.