
Nutter Butter Chocolate Cupcakes: Your New Favorite Sweet Treat
Picture this: you’re staring into your pantry, craving something sweet, chocolaty, and a little bit nutty. There’s a box of cake mix and a package of Nutter Butter cookies staring back at you. It was this exact moment in my own kitchen that sparked the idea for these cupcakes. My kids love anything peanut butter, and I love anything easy and delicious. This recipe is the happy marriage of both. It’s a shortcut to pure joy, perfect for when you need a show-stopping dessert but don’t have hours to spend baking.
The Story Behind the Sweetness
I grew up with the classic combination of chocolate and peanut butter. It’s a timeless American duo. The Nutter Butter cookie, with its iconic peanut-shaped design and creamy filling, is a pantry staple for many families. I wanted to bring that familiar, comforting flavor into a cupcake. This isn’t a traditional recipe passed down through generations. It’s a modern, fun twist born from a busy mom’s desire to create something special quickly. It takes a simple box mix and elevates it into something uniquely delicious and personal.
Why You’ll Fall in Love With These Cupcakes
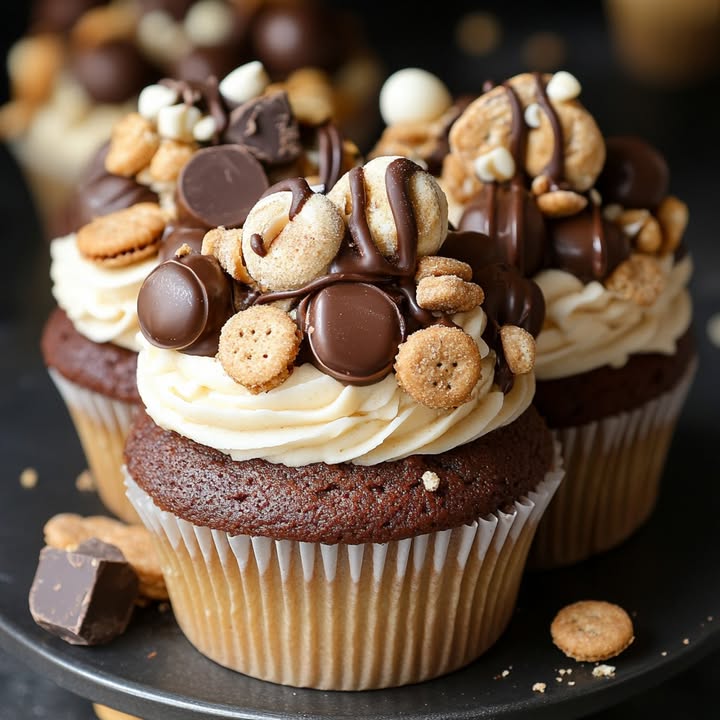
First, they are ridiculously easy. Starting with a cake mix saves so much time and stress. Second, the flavor is incredible. The chocolate cake gets a deep, rich boost from a hint of espresso. The crushed cookies inside add little bursts of peanut butter and a slightly crunchy texture. The frosting is creamy, dreamy, and packed with peanut butter flavor. Finally, they look gorgeous! The drizzle of chocolate and extra cookie crumbs on top make them look professional. They taste homemade and look bakery-fancy.
The Perfect Occasion for Nutter Butter Chocolate Cupcakes
These cupcakes are versatile stars. They’re perfect for birthday parties, especially for kids (or adults!) who love peanut butter. Bring them to a potluck or picnic—they travel well and always get compliments. They make a wonderful after-school snack or a fun weekend baking project with the family. Honestly, any day that needs a little extra sweetness is the right day for these cupcakes.
What You Need: The Ingredients
Gathering your ingredients is the first step to baking success. Here’s your shopping list:
- For the Cupcakes:
- 1 box chocolate cake mix (plus the ingredients listed on the box, like eggs, oil, and water)
- 1/2 cup crushed Nutter Butter cookies
- 1/2 teaspoon instant espresso powder (optional, but it really enhances the chocolate flavor)
- For the Frosting:
- 1/2 cup unsalted butter, softened
- 1/2 cup creamy peanut butter
- 2 cups powdered sugar
- 2-3 tablespoons milk or heavy cream
- A pinch of salt
- Optional toppings: extra crushed Nutter Butters, mini cookies for decoration, and melted chocolate for drizzling
Smart Substitutions You Can Try
Don’t worry if you’re missing an item! Baking is flexible.
- Cookie Swap: If you don’t have Nutter Butters, use any similar peanut butter sandwich cookie.
- Espresso Powder: If you skip it, the cupcakes will still be great. A teaspoon of strong brewed coffee can work too.
- Peanut Butter: Use smooth or crunchy based on your preference. For a nut-free version, try using sunflower seed butter.
- Milk/Cream: Any milk you have works—whole, skim, or even a non-dairy alternative like almond milk.
How to Make Nutter Butter Chocolate Cupcakes
Follow these simple steps for perfect cupcakes every time.
Step 1: Get Your Oven Ready
Start by preheating your oven to 350°F (175°C). This ensures it’s perfectly hot when your batter is ready. Line a muffin tin with 12 cupcake liners. I love using fun, colorful liners to make them extra cheerful. Pro tip: Give those liners a quick spritz of non-stick cooking spray. This helps prevent any cake from sticking to the paper after baking.
Step 2: Make the Cake Batter
Prepare your chocolate cake mix exactly as the package directs. Usually, you’ll whisk together the mix with eggs, water, and oil. As you mix, watch the batter turn into a smooth, dark, and inviting chocolate pool. Now, stir in your 1/2 cup of crushed Nutter Butter cookies. The pieces will speckle the batter with lovely peanut butter bits. If you’re using the espresso powder, add it now. It dissolves into the wet ingredients and deepens the chocolate flavor without tasting like coffee.
Step 3: Fill and Bake
Divide the batter evenly among your 12 lined cups. I use a large spoon or a measuring cup for consistency. Fill each about two-thirds full. This gives them room to rise into perfect domes without overflowing. Slide the tin into your preheated oven. Bake for 18-20 minutes. The smell wafting through your kitchen will be amazing! Check them with a toothpick inserted into the center. If it comes out clean or with a few dry crumbs, they’re done.
Step 4: Cool Completely
This step is crucial! Remove the cupcakes from the oven and let them cool in the tin for about 5 minutes. Then, transfer them to a wire rack. Let them cool completely, which might take an hour. Trying to frost warm cupcakes is a disaster—the frosting will melt and slide right off. Patience here makes for a beautiful final product.
Step 5: Create the Peanut Butter Frosting
In a mixing bowl, beat together the softened butter and creamy peanut butter. Use an electric mixer for best results. Beat them until they are completely combined, creamy, and pale. Gradually add the powdered sugar and a pinch of salt. The salt balances the sweetness perfectly. Start with 2 tablespoons of milk or cream and beat. Add a third tablespoon if needed to get a light, fluffy, and spreadable consistency. The frosting should be dreamy smooth.
Step 6: Frost and Decorate
Once the cupcakes are cool, it’s time for the fun part! Spread or pipe your peanut butter frosting onto each cupcake. I like a simple swirl with a knife or offset spatula. Then, sprinkle the tops with your extra crushed Nutter Butter cookies. Finally, drizzle a little melted chocolate over each one. The combination of textures—creamy frosting, crunchy cookie bits, and slick chocolate drizzle—is pure magic.
Chef’s Tip: To easily drizzle chocolate, melt a small amount of chocolate chips in the microwave. Let it cool slightly, then use the tip of a spoon or a small fork to create thin, elegant lines over your cupcakes.
Timing Your Baking Success
This recipe is a friend to busy schedules.
- Prep Time: 15 minutes (crushing cookies, mixing batter)
- Cook Time: 20 minutes
- Cooling Time: 60 minutes (essential for frosting)
- Total Time: About 1 hour 35 minutes
- Servings: 12 delicious cupcakes
- Each cupcake is roughly 490 kcal, a truly indulgent treat.
A Little Extra Secret From My Kitchen
For an extra surprise inside, try stuffing your cupcakes! Before baking, place a whole mini Nutter Butter cookie or a small ball of peanut butter filling into the center of each portion of batter. It creates a hidden treasure that makes every bite even more exciting.
Fun Fact: The Power of Peanut Butter
Peanut butter isn’t just tasty; it’s nutritious too. It provides protein and contains heart-healthy unsaturated fats. While our cupcakes are a dessert, knowing that one of the main flavors brings some good nutrients makes enjoying them feel a tiny bit better!
Grab Your Tools
You don’t need fancy equipment.
- Standard muffin tin
- Cupcake liners
- Mixing bowls
- Electric mixer or whisk
- Measuring cups and spoons
- Spoon or spatula for mixing
- Wire cooling rack
- Knife or offset spatula for frosting
Storing Your Nutter Butter Chocolate Cupcakes
If you have leftovers (a rare event in my house!), storing them correctly keeps them fresh. First, let the decorated cupcakes sit at room temperature until the chocolate drizzle is fully set. This prevents smudging.
For short-term storage, place them in an airtight container. They can stay at room temperature for up to 2 days. The frosting and cake will remain soft and enjoyable. If your kitchen is very warm, you might want to refrigerate them.
For longer storage, you can freeze them. Place the cupcakes in a single layer in a freezer-safe container. They can freeze for up to a month. Thaw them in the refrigerator overnight or for a few hours at room temperature before serving.
Tips and Advice for the Best Cupcakes
- Crush your cookies by placing them in a zip-top bag and using a rolling pin. This gives you nice, uneven pieces for great texture.
- Make sure your butter for the frosting is truly softened. If it’s too cold, your frosting will be lumpy. If it’s melted, it will be greasy.
- Use high-quality creamy peanut butter for the frosting. The natural, oily kinds can sometimes make the frosting too soft.
- For a truly overload effect, mix some mini chocolate chips into the cake batter along with the cookie crumbs.
Presentation Ideas to Impress
Make your cupcakes look even more special!
- Place them on a tiered stand for a party.
- Use a variety of topping sizes—some with finely crushed cookies, some with larger chunks.
- Add a tiny whole Nutter Butter cookie standing up in the center of the frosting.
- Serve them with a side of cold milk or a hot cup of coffee for the adults.
Healthier & Fun Variations to Try
Love this idea but want to tweak it? Here are six fantastic variations:
- Protein-Packed Cupcakes: Use a protein-enriched chocolate cake mix. Swap the frosting for a blend of Greek yogurt, peanut butter powder, and a touch of honey.
- Gluten-Free Nutter Butter Cupcakes: Use a gluten-free chocolate cake mix and gluten-free peanut butter cookies. All the flavor, none of the gluten.
- Dark Chocolate & Sea Salt Version: Use a dark chocolate cake mix. Add a sprinkle of flaky sea salt on top of the chocolate drizzle for a sophisticated sweet-and-salty bite.
- Mini Cupcake Bites: Bake the batter in a mini muffin tin. These are perfect for large gatherings or kids’ parties where smaller portions are better.
- Nutter Butter Cupcake Cake: Bake the batter in a 9×13 inch pan instead of a muffin tin. Frost and decorate the whole sheet like one giant cake. It’s easier to serve to a big crowd.
- Banana-Peanut Butter Twist: Add 1 mashed ripe banana to the cake batter. It adds moisture and a wonderful flavor combo with the peanut butter.
If you adore creative cupcakes, you’ll find a whole world of inspiration in our collection of cake and cupcake recipes. From classic vanilla to outrageous chocolate creations, there’s something for every baker.
Common Mistakes to Avoid
Mistake 1: Frosting Warm Cupcakes
This is the biggest error! Frosting melts on warm cake. It becomes a slippery, messy puddle. Your beautiful swirls will disappear. Always let your cupcakes cool on a wire rack until they are no longer warm to the touch. This can take a full hour. Rushing this step ruins your hard work.
Mistake 2: Overfilling the Cupcake Liners
Too much batter leads to overflow. The cupcakes bake into weird mushroom shapes. They can also stick to the top of the pan. Fill each liner only about two-thirds full. Use a measuring cup or spoon for consistency. This ensures even, beautiful domes that are easy to remove.
Mistake 3: Using Cold Butter for Frosting
Cold butter won’t blend smoothly with the peanut butter. Your frosting will have hard little lumps of butter. It won’t be creamy. Your butter should be softened. Leave it out on the counter for 30-60 minutes before you start. It should be slightly soft to the touch but not melted.
Mistake 4: Not Crushing the Cookies Enough (or Too Much)
Big, chunky cookie pieces can sink to the bottom of the batter during baking. Powder-fine crumbs just vanish into the cake. Aim for a coarse crush. You want pieces small enough to stay suspended in the batter but big enough to provide a noticeable texture and flavor burst when eaten.
Mistake 5: Skipping the Salt in the Frosting
Peanut butter and powdered sugar are very sweet. A pinch of salt is not optional—it’s essential! It balances the flavors and cuts the cloying sweetness. It makes the peanut butter flavor shine. Always add that little pinch. You won’t taste saltiness; you’ll taste a better, more rounded frosting.
Your Nutter Butter Chocolate Cupcakes Questions Answered
Can I make these cupcakes without a cake mix?
Absolutely! You can use your favorite homemade chocolate cake recipe. Just ensure it’s a recipe that makes about 12 cupcakes. Substitute the dry cake mix with your homemade dry ingredients. Then, simply follow the same process: stir in the crushed Nutter Butters and espresso powder into your wet batter before baking. The rest of the recipe stays the same.
What does the espresso powder do?
Instant espresso powder is a magic ingredient for chocolate baking. It doesn’t make things taste like coffee. Instead, it enhances and deepens the chocolate flavor. It makes the chocolate taste richer and more complex. It’s a tiny trick used by professional bakers. If you have it, use it. If you don’t, your cupcakes will still be delicious, just a little less intensely chocolaty.
My frosting is too thick or too runny. How can I fix it?
Frosting consistency is easy to adjust. If it’s too thick and stiff, add more liquid. Add another tablespoon of milk or cream, one teaspoon at a time, until it reaches a fluffy, spreadable state. If it’s too runny and soft, add more dry ingredients. Gradually add a little more powdered sugar until it thickens up. The key is to make adjustments slowly and mix thoroughly after each addition.
Can I use natural peanut butter for the frosting?
You can, but be cautious. Natural peanut butter (the kind with just peanuts, often oilier) can sometimes make frosting too soft or greasy. It also tends to separate. For best results, use a standard creamy peanut butter like Jif or Skippy. These are stabilized and give a reliable, creamy frosting texture every time.
How do I get a smooth, professional-looking drizzle?
Melt your chocolate (chips or chopped bar) slowly. Use a microwave or double boiler. Let it cool for a minute so it’s not super hot. Transfer it to a small bowl. Dip the tip of a spoon, a fork, or a small offset spatula into the chocolate. Hold it over the cupcake and let the chocolate run off the tip in a thin stream. Move your hand across the cupcake to create lines. Practice makes perfect!
Can I make these ahead of time for a party?
Yes, they are great for making ahead. Bake and cool the cupcakes completely. Frost and decorate them. Then, store them in an airtight container at room temperature (if cool) or in the refrigerator overnight. The flavors will hold beautifully. They are best served within 24 hours of being decorated for the freshest texture.
Are there nut-free alternatives?
For a nut-free version, you need to swap two things. First, use a cookie that isn’t peanut-based. Try a butter cookie or a shortbread cookie to crush and add to the batter. Second, for the frosting, replace the peanut butter with a nut-free spread like sunflower seed butter. The color and flavor will be different but still delicious and safe for allergies.
Why do my cupcakes sink in the middle after baking?
Sinking usually means the cupcakes were underbaked or the batter was overmixed. Ensure you bake them until a toothpick test comes out clean. Also, when mixing the cake batter (from the box), mix just until the ingredients are combined. Overmixing can incorporate too much air, which then collapses during cooling, causing a sink.
Can I freeze the unfrosted cupcakes?
Freezing unfrosted cupcakes is a fantastic time-saving trick. Bake and cool them completely. Wrap each cupcake tightly in plastic wrap, then place them in a freezer bag. Freeze for up to 2 months. Thaw at room temperature, then frost and decorate as usual. The cake texture remains very good.
The easiest method is the bag-and-rolling-pin technique. Put your cookies in a sturdy zip-top plastic bag. Seal it. Use a rolling pin to roll over the bag, applying pressure. You can also gently pound it. This gives you control over the crush size and keeps mess contained. You can also pulse them briefly in a food processor, but be careful not to turn them into dust.
The Final Sweet Word
These Nutter Butter Chocolate Cupcakes are more than just a recipe. They are a happy kitchen experiment that turned into a family favorite. They combine the ease of a box mix with the fun of personal touches. The result is a decadent, crowd-pleasing dessert that looks like you spent hours baking. I hope you try them and share them with people you love. The mix of chocolate and peanut butter, the crunch of cookie, and the creamy frosting is a combination that never fails to bring smiles. Happy baking!
Equipment
- Plaque à muffins
- Caissettes à cupcakes
- Bol à mélanger
- Fouet électrique ou fouet
- Cuillère ou spatule pour mélanger
Ingredients
- 1 boîte mélange de gâteau au chocolat avec les ingrédients indiqués sur la boîte, comme les œufs, l'huile et l'eau
- 125 g biscuits Nutter Butter écrasés
- 1/2 cuillère à café poudre d'espresso instantanée facultatif
- 115 g beurre non salé, ramolli
- 125 g beurre de cacahuète crémeux
- 250 g sucre glace
- 2-3 cuillères à soupe lait ou crème épaisse
- une pincée sel
- q.s. biscuits Nutter Butter supplémentaires pour la garniture
Instructions
- Préchauffez le four à 175°C et tapissez un moule à muffins de 12 caissettes à cupcakes.
- Préparez le mélange de gâteau au chocolat selon les instructions de la boîte, en mélangeant les œufs, l'eau et l'huile.
- Incorporez les biscuits Nutter Butter écrasés et la poudre d'espresso, si désiré.
- Répartissez la pâte uniformément dans les caissettes à cupcakes, en remplissant chaque caissette aux deux tiers.
- Faites cuire au four pendant 18-20 minutes, ou jusqu'à ce qu'un cure-dent inséré en ressorte propre.
- Laissez les cupcakes refroidir dans le moule pendant 5 minutes, puis transférez-les sur une grille pour un refroidissement complet.
- Dans un bol, battez ensemble le beurre ramolli et le beurre de cacahuète jusqu'à obtenir une consistance crémeuse. Ajoutez progressivement le sucre glace et une pincée de sel, puis incorporez le lait ou la crème jusqu'à l'obtention d'un mélange lisse.
- Une fois les cupcakes refroidis, garnissez-les avec le glaçage au beurre de cacahuète et saupoudrez de biscuits Nutter Butter écrasés et arrosez de chocolat fondu, si désiré.
Notes
Nutrition

Hi, I’m Olivia Parker, the founder of BakingSecret.com and a lifelong lover of all things sweet and homemade. I grew up in a small town in Oregon, where the smell of fresh cookies in my family’s kitchen sparked my passion for baking. Over the years, I turned that passion into a mission: to help home bakers feel confident, inspired, and creative.
After studying food science and working in several artisan bakeries across the U.S., I decided to create a space where everyone from beginners to seasoned bakers can find reliable recipes, expert tips, and a warm, welcoming community. BakingSecret.com is my way of sharing the magic of baking with the world. When I’m not testing new recipes, you’ll find me exploring farmers’ markets, collecting vintage cookbooks, or perfecting my sourdough technique.