
A Little Slice of Sunshine: My Raw Orange and Double Chocolate Cake
You know that feeling when you crave something decadently chocolatey but also want a burst of fresh, zesty sunshine? I created this Orange and Double Chocolate Raw Cake for exactly those moments. It all started when my friend, who avoids processed sugars, was coming over for a birthday celebration. I wanted to make something spectacular she could enjoy guilt-free. After a few kitchen experiments (and a couple of happy taste-testers, aka my kids), this no-bake masterpiece was born. It’s rich, creamy, and has the most wonderful citrusy aroma that fills your kitchen.
The Story Behind This No-Bake Orange Chocolate Delight
Raw desserts have a magic all their own. They’re like edible alchemy, transforming simple nuts, fruits, and seeds into something truly extraordinary. This Orange Chocolate Delight pulls inspiration from classic flavor pairings—think a chocolate orange from your Christmas stocking, but elevated to a whole new level of gourmet. It’s a modern twist on raw cheesecake, skipping the oven entirely to preserve all the natural enzymes and vibrant flavors. The double hit of raw cacao powder and creamy cacao butter gives it a depth that rivals any baked chocolate torte, while the fresh orange keeps it bright and surprising.
Why You’ll Fall in Love With This Recipe
First, it’s incredibly delicious. The fusion of rich chocolate and tangy orange is a match made in dessert heaven. Second, it’s surprisingly simple—no baking, just blending and freezing. Third, it’s a nutrient-packed treat. You’re getting healthy fats from the nuts and seeds, antioxidants from the raw cacao, and natural sweetness from dates and agave. It’s the kind of dessert that makes you feel good about indulging. Plus, it’s a total showstopper on any table!
Perfect Occasions for Your Citrus Chocolate Creation
This cake is your secret weapon for impressive yet stress-free entertaining. It’s perfect for summer parties, as it’s refreshing and served chilled. Bring it to a potluck to wow everyone. It makes a stunning centerpiece for birthdays or anniversaries, especially for friends with dietary preferences. I love making it for weekend family gatherings—it feels like a special celebration, even if we’re just celebrating a sunny Saturday.
Gathering Your Ingredients for Orange Chocolate Delight
Using high-quality ingredients makes all the difference in raw desserts. Here’s what you’ll need for a 20cm round tin:
- For the Base: Almonds, walnuts, sunflower seeds, raw cacao powder, cocoa beans, orange zest, salt, cinnamon, agave syrup, liquid aminos or tamari, dates, natural vanilla & orange extracts, coconut oil, water.
- For the Chocolate Layer: Raw cashews (soaked), raw cacao powder, natural orange extract, fresh orange juice, cinnamon, salt, agave syrup, melted cocoa butter, water.
- For the Chocolate Frosting: Cacao powder, agave syrup, melted coconut oil.
Smart Swaps: No-Stress Substitutions
Don’t have a specific ingredient? No problem! Here are some easy swaps:
- Nuts & Seeds: Almonds can swap for pecans. Sunflower seeds can be replaced with pepitas (pumpkin seeds).
- Sweeteners: Maple syrup works perfectly in place of agave syrup.
- For Cocoa Butter: If you can’t find it, use an extra 1/4 cup of melted coconut oil, though the flavor will be slightly different.
- Liquid Aminos/Tamari: A tiny pinch of sea salt can be used instead to enhance the savory depth.
Crafting Your Masterpiece: Step-by-Step Method
Step 1: Creating the Nutty, Zesty Base
First, grab your food processor. Pulse all the dry base ingredients—almonds, walnuts, sunflower seeds, cacao, cocoa beans, orange zest, salt, and cinnamon—until they form a fine, fragrant flour. It will smell like a chocolate-orange forest! Now, add in all the sticky, wet ingredients: the pitted dates, agave, extracts, coconut oil, and water. Process again until the mixture starts clumping together beautifully. You should be able to pinch it and have it hold its shape. Pro tip: If your dates are a little dry, soak them in warm water for 10 minutes first to soften them up.
Step 2: Pressing the Perfect Crust
Transfer your crumbly, chocolaty base mixture into your prepared cake tin. I find using the back of a spoon or a flat-bottomed glass is the best way to press it down firmly and evenly. You want a solid, compact layer that will hold the creamy filling. Take your time here! A well-pressed base is the foundation of a perfect slice. Work it up the sides just a little for that professional tart-like edge.
Step 3: Blending the Silky Chocolate Orange Layer
This is where the magic happens! Drain your soaked cashews and add them to a high-speed blender. Toss in the cacao powder, orange extract, fresh orange juice, cinnamon, salt, agave, and water. Blend on high until the mixture is completely smooth, creamy, and lump-free. You may need to stop and scrape down the sides a few times. The color will be a deep, luxurious brown and the aroma will be absolutely intoxicating.
Step 4: Incorporating the Cocoa Butter
Ensure your cocoa butter is gently melted and liquid, but not hot. With the blender on a low setting, slowly stream the melted cocoa butter into the cashew mixture. This step is crucial for giving the filling its firm, sliceable texture once frozen. Blend just until it’s fully combined and the mixture looks glossy and uniform.
Step 5: Reserving Garnish and Setting the Filling
Before you pour everything out, grab a small bowl and scoop out about 4 tablespoons of the chocolate filling. Cover this and pop it in the fridge overnight. You’ll use this later for piping a pretty garnish. Now, pour the remaining velvety filling over your prepared base. Gently tap the tin on the counter to release any air bubbles. Place it level in your freezer to set overnight, or for at least 6-8 hours.
Step 6: Whipping Up the Simple Chocolate Frosting
The next day, make the glossy frosting. In a small bowl, whisk together the cacao powder and agave syrup into a thick, dark paste. Then, whisk in the melted coconut oil until it’s silky and pourable. Again, set aside about 4 tablespoons of this frosting for your decoration. Now, work quickly! The frosting sets fast as the coconut oil cools.
Step 7: The Grand Finale: Frosting and Thawing
Take your rock-solid cake from the freezer. Immediately pour the remaining frosting over the top. Use a spatula or the back of a spoon to smooth it over the surface in a swift, fluid motion. It will start to thicken as it hits the cold cake, creating a beautiful, firm coating. Once frosted, carefully remove the cake from the tin. Let it sit at room temperature for 30-40 minutes before slicing. This allows it to soften to the perfect creamy, mousse-like texture. Chef’s tip: Run a warm knife under hot water and dry it between each cut for beautifully clean slices.
Your Recipe Timetable
Active Prep Time: 30 minutes
Soaking Time (Cashews): 6 hours
Setting/Freezing Time: Overnight (8+ hours)
Thawing Time: 30-40 minutes
Total Time: About 9.5 hours (mostly hands-off)
My Secret Star Ingredient
The splash of liquid aminos or tamari in the base. I know it sounds strange for a dessert! But trust me, this tiny amount doesn’t make it taste salty or savory. Instead, it deepens the chocolate flavor incredibly, making it taste more complex and rich, just like a pinch of salt in chocolate chip cookies. It’s my not-so-secret weapon for a truly gourmet base.
A Sweet Fact About Raw Cacao
Raw cacao powder is processed at much lower temperatures than regular cocoa powder. This helps it retain more of its natural enzymes and antioxidants, like magnesium and flavonoids. So when you indulge in this cake, you’re getting a little boost of minerals and mood-enhancing compounds. It’s a treat that loves you back! For more on the journey of quality ingredients, learning about responsible food sourcing can be a fascinating next step.
Essential Equipment Checklist
- 20cm round springform or loose-bottom cake tin
- Food processor
- High-speed blender (like a Vitamix or Blendtec)
- Measuring cups and spoons
- Small whisk and mixing bowls
- Spatula
- Two piping bags (or small zip-top bags) for garnish
Keeping Your Orange Chocolate Delight Fresh
Once assembled and sliced, this cake stores beautifully. Place any leftover slices in an airtight container. You can keep it in the fridge for up to one week. The flavors actually meld and get even better after a day or two.
For longer storage, the freezer is your best friend. Wrap individual slices tightly in plastic wrap and place them in a freezer-safe container. They will keep their fantastic texture and taste for up to two months.
When you’re ready to enjoy a frozen slice, simply transfer it to the refrigerator for a few hours to thaw, or let it sit at room temperature for about 20-30 minutes. This makes it a fantastic make-ahead dessert for busy weeks or unexpected guests.
My Top Tips for Guaranteed Success
- Soak those cashews! A full 6-hour soak (or overnight) is non-negotiable. It’s what gives the filling its unbelievably smooth, creamy texture without any graininess.
- Use freshly squeezed orange juice. The bottled stuff just doesn’t give the same bright, vibrant flavor that makes this cake sing.
- When melting coconut oil or cocoa butter, do it gently over a double boiler or in short bursts in the microwave. You want it liquid, but not scalding hot, which could affect the texture of your fillings.
- Patience is key with the thawing. Cutting into a still-frozen cake can cause it to crumble. Wait until it yields gently to a light press.
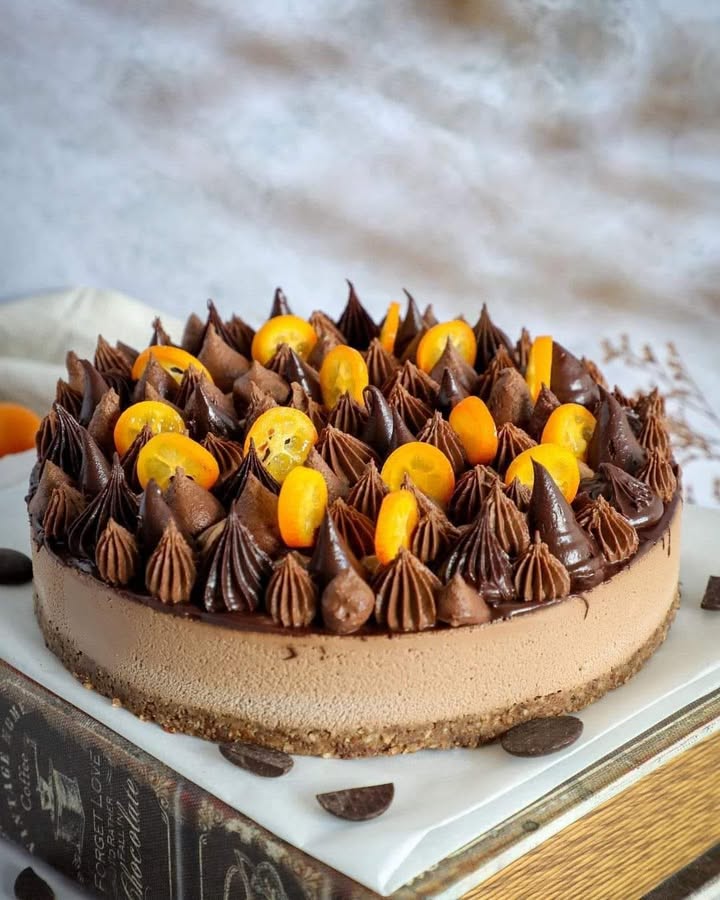
Presentation Ideas to Make it Shine
- Use the reserved fillings in piping bags to create elegant swirls, dots, or lines on top of the cake.
- Garnish with thin slices of fresh orange, candied orange peel, or kumquats for a pop of color.
- A sprinkle of crushed cocoa beans or cacao nibs adds wonderful crunch and visual texture.
- Serve on a beautiful cake stand with a dusting of extra cacao powder just before bringing it to the table.
Mix It Up! Healthier Recipe Variations
Love this concept? Here are six ways to play with the flavors:
- Berry Bliss: Swap the orange juice and extract for mixed berry puree (like raspberry or strawberry) and a dash of lemon juice for a tart, red-velvet-like cake.
- Mint Chocolate Refresher: Replace the orange flavors with 1 tsp of peppermint extract. Add a handful of fresh spinach to the filling for a fun green color without changing the taste!
- Superfood Booster: Blend a tablespoon of maca powder or spirulina into the chocolate layer for an extra nutrient kick.
- Tropical Twist: Use lime zest and juice instead of orange, and add a handful of shredded coconut to the base for a key lime pie vibe.
- Nut-Free Version: For the base, use sunflower seeds and oats. For the filling, try soaked sunflower seeds as a cashew alternative (you may need to add a touch more sweetener).
- Espresso Infusion: Add a shot of cold brew concentrate or 2 tsp of instant espresso powder to the chocolate layer for a mocha orange delight.
If you adore no-bake treats, you’ll find so many more ideas in our full collection of easy no-bake dessert recipes.
Common Mistakes to Avoid With Your Raw Cake
Mistake 1: Not Soaking the Cashews Long Enough
This is the number one reason for a grainy, not-smooth filling. Raw cashews are quite hard, and soaking them softens them so they blend into a silky cream. If you skip this step or cut it short, you’ll end up with tiny nut pieces in your layer, no matter how powerful your blender is. Set a reminder and soak them for the full 6 hours, or better yet, just leave them in a bowl of water in the fridge overnight.
Mistake 2: Pouring Hot Melted Oils Into the Filling
If your melted coconut oil or cocoa butter is too hot when you add it to the blended cashew mixture, it can cause the fats to separate or even begin to “cook” the delicate ingredients, ruining the smooth emulsion. Always let your melted oils cool to just warm or room temperature before streaming them in. A quick test is to dip your finger in—it should feel comfortably warm, not hot.
Mistake 3: Rushing the Thawing Process
I know it’s tempting to dig right in, but slicing a frozen raw cake is a recipe for disaster. The cake will be too hard, your knife will get stuck, and you’ll likely crack the beautiful layers. The texture also won’t be right—it should be firm yet creamy, like a chilled mousse. Plan ahead and give it a solid 30-40 minutes on the counter after removing it from the freezer. The wait is absolutely worth it for the perfect slice.
Mistake 4: Over-Processing the Base
When making the crust, you want to stop processing once the mixture holds together when pinched. If you blend it for too long, the natural oils from the nuts can start to release excessively, turning your base from a perfect crumbly texture into a greasy, heavy paste. Pulse in short bursts and check the consistency often. It’s better to be slightly under-processed and have a few small chunks than to overdo it.
Your Orange Chocolate Delight Questions, Answered
Can I use regular cocoa powder instead of raw cacao?
Yes, you can, but there will be a difference. Regular cocoa powder is roasted at a high temperature, giving it a deeper, more familiar “baked” chocolate flavor. Raw cacao powder has a fruitier, slightly more bitter taste and retains more nutrients. The cake will still work perfectly with regular cocoa powder, so use what you have! Just know the flavor profile will be a bit more traditional and less “raw” tasting.
My frosting got hard too fast and wasn’t pourable. What went wrong?
This happens when the cake is too cold or your kitchen is cool. Coconut oil solidifies at around 76°F. If your frosted cake is straight from the freezer, the frosting will set almost on contact. The trick is to work very quickly. Have your frosting ready in a liquid state, remove the cake, and frost immediately. If it does thicken, you can gently warm the bowl of frosting in a warm water bath to re-liquify it slightly. Smooth it as fast as you can with a spatula—imperfections look homemade and charming!
I don’t have a high-speed blender. Can I still make this?
A high-speed blender is recommended for the smoothest, creamiest filling, but a standard blender or a very good food processor can work in a pinch. You will likely need to blend for much longer, stopping frequently to scrape down the sides. You may also need to add an extra tablespoon or two of water to help get things moving. The final texture might be slightly less velvety, but the flavor will still be fantastic.
How do I know when the cake is properly thawed and ready to slice?
The best test is the gentle press test. Lightly press the top of the cake with your fingertip. It should yield softly but still feel firm, like a cheesecake straight from the fridge. It shouldn’t feel rock-hard or icy. The sides may also look slightly less matte and more glossy. When you insert a warm knife, it should slide through with steady pressure, not require sawing.
Can I make this recipe vegan?
It already is! This entire Orange Chocolate Delight recipe is naturally vegan. All the sweetness comes from plant-based sources like dates and agave, and the creamy texture comes from nuts. Just double-check that your chocolate extracts and cocoa powder don’t contain any dairy products, as most pure versions do not.
What can I use instead of agave syrup?
Maple syrup is the best one-to-one substitute and works perfectly. You could also use date syrup or a brown rice syrup for a different flavor note. If you prefer a liquid stevia blend, you’ll need to experiment with the amount, as it’s much sweeter. Start with a few drops and taste the filling (before adding the oils) until it’s sweet enough for you.
Why is there tamari or liquid aminos in a dessert?
This is my favorite “chef’s secret” ingredient! A tiny amount of umami-rich liquid aminos or tamari (which is wheat-free soy sauce) enhances and deepens the chocolate flavor in the base, much like a pinch of salt in brownie batter. It doesn’t make the cake taste salty or savory at all—it just makes the chocolate taste more complex and rich. If you’re wary, you can simply omit it and add an extra tiny pinch of salt.
Can I make this into individual servings, like jars or cups?
Absolutely! This is a fantastic idea for parties. Simply press the base mixture into the bottom of small glasses or jars. Blend the filling as directed, then pour it over the base. You can layer them right away and freeze. They will set faster than a whole cake. Top with a dollop of the frosting and a sprinkle of zest for a beautiful personal dessert.
How far in advance can I make this cake?
This cake is an excellent make-ahead dessert. You can assemble and freeze the complete cake (without the fresh garnish) for up to two months. When you’re ready to serve, let it thaw as directed, then add your fresh orange slices or piping garnish. You can also make it 2-3 days ahead and keep it stored in the refrigerator until your event.
My base is too crumbly and won’t hold together. How can I fix it?
This usually means the mixture needs a bit more “binder.” The easiest fix is to add 1-2 more pitted dates, or an extra teaspoon of agave syrup and/or coconut oil. Process it again until it starts to clump. The mixture should hold together firmly when you press it into the tin. If it’s still dry, a tiny splash of water (just a teaspoon at a time) can help bring it together.
Ready to Create Your Own Slice of Heaven?
This Orange and Double Chocolate Raw Cake is more than just a dessert. It’s a celebration of pure, vibrant flavors and a testament to how delicious healthy ingredients can be. It’s the cake that makes everyone ask for the recipe. So gather your nuts, zest that orange, and get ready to blend up something truly special. Trust me, one bite of this creamy, dreamy, citrus-kissed chocolate delight, and you’ll be hooked. Happy no-baking!
Equipment
- Robot culinaire
- Mixeur haute vitesse
- Spatule
- Moule à gâteau rond de 20 cm
- Cuilières à mesurer
Ingredients
- 150 g amandes
- 150 g noix
- 100 g graines de tournesol
- 50 g cacao en poudre cru
- 50 g fèves de cacao
- 1 cuilière zeste d'orange
- 1 pincée sel
- 1 cuilière cannelle
- 60 ml sirop d'agave
- 1 cuilière aminos liquides ou tamari
- 10 cuilières dattes
- 1 cuilière extrait de vanille naturel
- 1 cuilière extrait d'orange naturel
- 2 cuilières huile de coco
- 125 ml eau
- 200 g anacardiers trempés
- 30 g beurre de cacao fondu
- 125 ml eau
- 30 g cacao en poudre
- 50 ml sirop d'agave
- 30 g huile de coco fondue
Instructions
- Pulvériser tous les ingrédients secs de base dans un robot culinaire jusqu'à obtenir une farine fine.
- Ajouter les ingrédients humides au mélange sec dans le robot culinaire et mélanger jusqu'à obtenir une consistance homogène.
- Transférer le mélange dans un moule à gâteau et presser fermement pour former la base.
- Égoutter les noix de cajou trempées et mélanger avec les ingrédients restants de la couche de chocolat jusqu'à obtenir une texture lisse.
- Ajouter lentement le beurre de cacao fondu au mélange de noix de cajou tout en mélangeant à basse vitesse jusqu'à bien incorporé.
- Réserver une partie de la garniture chocolatée pour la décoration, puis verser le reste sur la base et congeler.
- Préparer le glaçage en fouettant le cacao en poudre avec le sirop d'agave et l'huile de coco fondue.
- Garnir le gâteau après qu'il ait pris et laisser décongeler pendant 30 à 40 minutes avant de couper en tranches.