
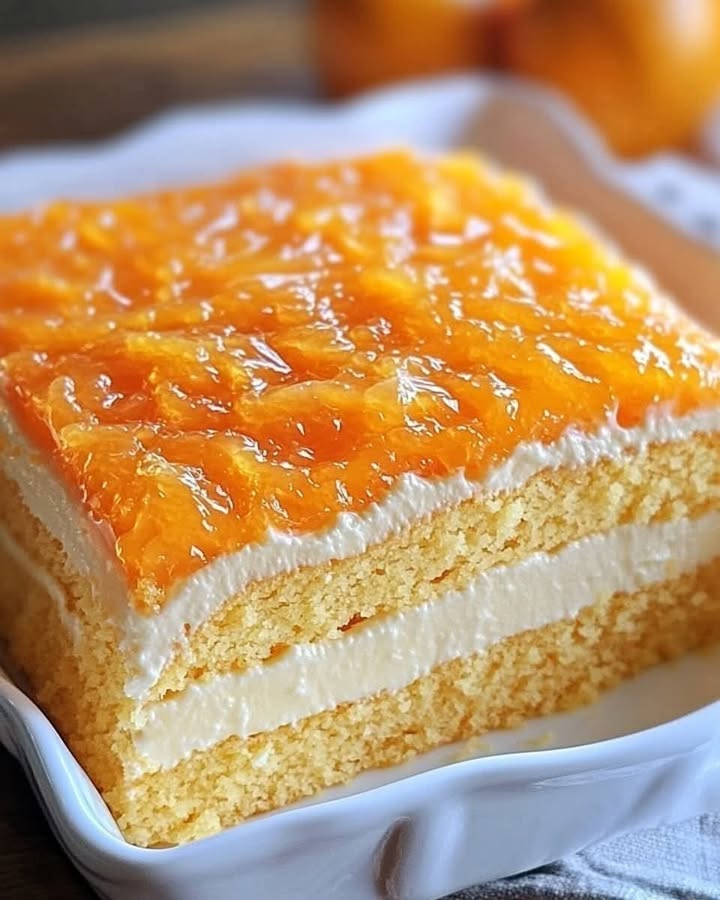
The Ultimate Orange Jello Cake: A Sunny, Zesty Delight
Have you ever wished you could bottle up the bright, happy feeling of a perfect summer orange? This cake does just that. My first bite of Orange Jello Cake transported me straight back to my grandma’s kitchen, where the air was always sweet with the promise of something wonderful baking. It’s more than a dessert; it’s a slice of sunshine, a guaranteed mood-lifter, and the easiest way I know to make any Tuesday feel like a celebration. Let me show you how to make this wonderfully simple, flavor-packed cake that’s become a non-negotiable request for every family gathering.
A Slice of Citrus History
This cake is a beautiful blend of old-fashioned baking and a touch of mid-century convenience. While gelatin cakes have been around since the 1950s, using the dry gelatin powder right in the batter is a clever trick. It intensifies the orange flavor in a way that just juice or zest alone can’t achieve. I’ve played with this recipe for years, tweaking it from my aunt’s handwritten card. My version leans into that fresh citrus punch by using real orange juice and zest, balancing the sweet, nostalgic Jello flavor with a modern, homemade touch. It’s a beautiful marriage of tradition and a little kitchen magic.
Why You’ll Absolutely Love This Orange Jello Cake
Honestly, what’s not to love? First, the texture is pure magic. The gelatin gives the cake an incredibly moist, tender crumb that stays soft for days. Second, the flavor is an irresistible one-two punch: real, zesty orange layered with that sweet, familiar Jello taste. It’s a crowd-pleaser that feels special but is deceptively simple to throw together. No fancy techniques are needed here. Finally, it’s incredibly versatile. Dress it up with a glossy glaze for a potluck, or slather it with creamy frosting for a birthday. It always works.
Perfect Occasions for This Zesty Cake
This cake is your secret weapon for almost any event. Its cheerful color and flavor make it a star at spring and summer picnics and barbecues. It’s a fantastic after-school treat that will disappear in minutes. Need a dessert for a baby shower or birthday party? The bright orange hue is naturally festive. I love bringing it to potlucks because it travels like a champ and always earns me recipe requests. Honestly, it’s also the perfect “just because” cake for when you need a little sunshine on a cloudy day.
Gathering Your Sunshine Ingredients
Here’s everything you’ll need to create this burst of citrus happiness. Using fresh orange juice and zest makes a world of difference, so don’t skip it!
- Cake Base:
- 2 cups all-purpose flour
- 1 1/2 tsp baking powder
- 1/2 tsp salt
- 1/2 cup unsalted butter, softened
- 1 cup granulated sugar
- 1/2 cup sour cream
- 1/2 cup orange juice (freshly squeezed if possible)
- 4 large eggs
- 2 tsp orange zest
- 1 package (3 oz) orange-flavored gelatin (Jello)
Smart Substitutions If You’re in a Pinch
No worries if you’re missing something! Here are my tested swaps:
Sour Cream: Full-fat plain yogurt or even buttermilk will work in a 1:1 ratio.
Orange Juice: Bottled juice is fine, but reduce the sugar by a tablespoon if it’s sweetened. For a fun twist, try half orange and half lemon juice.
All-purpose flour: A 1:1 gluten-free baking blend can be used successfully.
Orange Gelatin: Any citrus flavor like lemon, lime, or even tropical punch will create a different but equally delicious cake!
Step-by-Step: Baking Your Sunshine
Follow these simple steps for a perfectly moist and flavorful cake every single time.
Step 1: Preheat Oven & Prep Your Pan
Start by preheating your oven to 350°F (175°C). This ensures it’s perfectly hot and ready when your batter is. Now, take your 9×13-inch baking pan (or two 9-inch rounds) and give it a good greasing with butter or non-stick spray. A light dusting of flour over the grease helps the cake release like a dream. There’s nothing sadder than a beautiful cake stuck in the pan! Set your prepared pan aside and let’s start mixing.
Step 2: Whisk Your Dry Ingredients
In a medium bowl, grab your whisk and combine the 2 cups of flour, 1 1/2 teaspoons of baking powder, and 1/2 teaspoon of salt. Whisking not only mixes them but also aerates the flour, which leads to a lighter cake texture. See those tiny specks of orange zest we’ll add later? These dry ingredients will cradle them perfectly. Set this bowl aside. It’s like prepping your mise en place—it makes the whole process smooth and joyful.
Step 3: Cream Butter and Sugar to Fluffy Perfection
In a large mixing bowl, attack the softened butter and granulated sugar with your mixer. Beat them on medium-high speed for a solid 2-3 minutes. You’ll see the mixture transform from grainy and yellow to pale, fluffy, and almost white. This step is crucial! It incorporates tiny air bubbles that act as leavening agents, giving your Orange Jello Cake a tender, fine crumb. Don’t rush this—good creaming is the foundation of a great cake.
Step 4: Incorporate Eggs and Zest
Now, with your mixer on medium, add your eggs one at a time. Beat well after each addition until the yolk is fully blended in before adding the next egg. This prevents the batter from curdling and ensures a smooth, emulsified mixture. Now, add those 2 precious teaspoons of freshly grated orange zest. The room will instantly fill with the most incredible, vibrant citrus aroma. This zest holds the essential oils, which is where the real orange flavor lives.
Step 5: Blend in the Sour Cream and Juice
Lower your mixer speed and pour in the 1/2 cup of sour cream and the 1/2 cup of fresh orange juice. The batter might look a little curdled at this point—that’s perfectly okay! The acidity from the juice and the richness of the sour cream are working their magic. Just mix until everything is mostly combined. This wet mixture adds incredible moisture and a lovely tang that balances the sweetness of the cake beautifully.
Step 6: Gently Fold in Dry Ingredients & Gelatin
It’s time to bring it all together. With your mixer on low, gradually add the flour mixture you set aside earlier. Mix just until you no longer see streaks of flour. Overmixing now would develop gluten and make the cake tough. Now for the secret weapon: sprinkle the entire packet of dry orange gelatin over the batter. Mix for just another 30 seconds until the vibrant orange powder is fully incorporated. The batter will become a beautiful, sunny orange hue.
Step 7: Bake Until Golden and Springy
Carefully pour your bright batter into your prepared pan. Use a spatula to smooth the top evenly. Slide it into your preheated oven. The smell that will float through your kitchen is absolutely divine. Bake for 30-35 minutes. You’ll know it’s done when the top is golden, the edges pull away from the pan, and a toothpick inserted in the center comes out clean with just a few moist crumbs.
Step 8: Cool Completely for the Best Texture
Patience is key here! Let the cake cool in its pan on a wire rack for about 10 minutes. This allows it to set slightly so it won’t fall apart. Then, if you’re using a rectangular pan, you can frost it right in the pan. For layer cakes, run a knife around the edges and carefully invert them onto the rack to cool completely. A warm cake will melt your frosting, so let it get completely cool to the touch.
Optional Glaze or Frosting Ideas
This cake is delicious plain, but a little dressing up makes it spectacular.
Simple Orange Glaze: Whisk 1 cup of powdered sugar with 2-3 tablespoons of fresh orange juice until smooth. Drizzle it artfully over the cooled cake for a shiny, sweet-tart finish.
Cream Cheese Frosting: Beat together 8 oz of softened cream cheese, 1/4 cup softened butter, 2 cups powdered sugar, and 1 tsp vanilla until smooth and spreadable. This tangy frosting is a match made in heaven with the orange flavor.
Timing Your Sunshine Creation
Here’s a quick breakdown so you can plan your baking session:
- Prep Time: 20 minutes
- Cook Time: 35 minutes
- Cooling Time: 1 hour
- Total Time: About 1 hour 55 minutes
Most of the “work” is just waiting for it to bake and cool. Perfect for a leisurely weekend bake!
Chef’s Secret: Zest is Best!
My number one trick for an unforgettable Orange Jello Cake? Zest your oranges before you juice them. It’s infinitely easier to grate a whole, firm fruit than a slippery, juiced-out rind. And always use a fine microplane zester—it gives you the fluffy, fragrant zest without any bitter white pith. This simple step packs more real orange flavor into every single bite.
A Little Citrus Fun Fact
Did you know the orange gelatin in this cake gets its vibrant color and flavor from beta-carotene and natural (or artificial) flavors? It’s a fun reminder of how modern convenience (Jello) can blend beautifully with traditional ingredients (real fruit) to create something uniquely delicious. For more on understanding what goes into your food, the FDA provides helpful resources on reading an ingredient list.
Equipment You’ll Need
You don’t need any fancy gear! Just gather:
- 9×13-inch baking pan or two 9-inch round cake pans
- Medium and large mixing bowls
- Electric hand mixer or stand mixer
- Whisk
- Spatula
- Microplane or fine grater for zesting
- Wire cooling rack
- Measuring cups and spoons
Storing Your Orange Jello Cake
If your cake is unfrosted or has a simple glaze, you can keep it covered at room temperature for up to 2 days. The gelatin helps it retain moisture beautifully.
For cakes with cream cheese frosting (or if your kitchen is very warm), store it in the refrigerator. Cover it well with plastic wrap or keep it in a cake carrier. It will stay fresh and moist for up to 5 days.
This cake also freezes wonderfully. Wrap individual slices or the whole cooled, unfrosted cake tightly in plastic wrap and then foil. Freeze for up to 3 months. Thaw overnight in the fridge and frost before serving.
Tips for a Foolproof Cake Every Time
- Room Temperature is Key: Using room temperature eggs, butter, and sour cream helps them emulsify better, creating a smoother, more uniform batter.
- Don’t Overmix: Once you add the flour, mix only until just combined. Overworked flour leads to a dense cake.
- Fresh Juice Matters: Squeezing your own oranges makes a noticeable difference in flavor. About 1-2 large oranges should give you enough juice and zest.
- Check for Doneness Early: Ovens vary. Start checking your cake with a toothpick at the 30-minute mark to avoid over-baking.
Presentation Ideas to Make it Shine
Make your cake the star of the table!
- Top a glazed cake with thin, curled ribbons of fresh orange zest.
- For a layer cake with cream cheese frosting, decorate the top with a ring of fresh orange slices or mandarin segments.
- Serve each slice with a dollop of freshly whipped cream and a mint leaf.
- For a party, bake the batter in a Bundt pan for a stunning, elegant shape.
Loving Citrus Cakes? Try These Other Favorites!
If this Orange Jello Cake hits the spot, you might be in the mood for more citrusy treats. For a show-stopping layered dessert, you must try the Velvet Cheesecake Delight. If you love the ease of no-bake desserts, my Tropical Pineapple Cheesecake brings a taste of the islands. For a classic with a twist, the Exquisite Lemon Raspberry Cheesecake is always a winner. And when you need something incredibly quick, the 10-Minute Easy Tiramisu is your best friend. For more sweet inspiration, you can always browse our full collection of cakes and cupcakes.
Common Mistakes to Avoid
Mistake 1: Using Cold Ingredients
Pulling eggs, butter, and sour cream straight from the fridge is a common pitfall. Cold ingredients don’t blend together smoothly. This can result in a dense, curdled-looking batter and a cake that doesn’t rise properly. To avoid this, set your dairy and eggs on the counter about 30-60 minutes before you start baking. Your butter should be soft to the touch but not melted.
Mistake 2: Overmixing the Batter After Adding Flour
It’s tempting to keep the mixer running until every lump is gone. But once you add flour, gluten development begins. Overmixing makes the gluten strands strong, which leads to a tough, chewy cake instead of a tender crumb. Mix on low speed and stop as soon as you no longer see dry streaks of flour. A few small lumps are perfectly fine.
Mistake 3: Skipping the Fresh Zest
Thinking the orange Jello packet is flavor enough is a mistake. The dry gelatin provides sweetness and aroma, but the fresh zest provides the bright, true essence of orange. It adds a layer of complex, authentic flavor that makes the cake taste homemade. Always zest your oranges before juicing them for the best result.
Mistake 4: Not Testing for Doneness Properly
Relying solely on the timer or just the color of the top can lead to an overbaked or underbaked cake. Ovens have hot spots. The best method is to use a toothpick or thin skewer. Insert it into the center of the cake. It should come out clean or with a few moist crumbs attached, not wet batter. Check a couple of spots to be sure.
Orange Jello Cake FAQs
Can I make this Orange Jello Cake ahead of time?
Absolutely! This cake is actually better the next day as the flavors have more time to meld. You can bake the cake layers up to two days in advance. Let them cool completely, then wrap them tightly in plastic wrap and store at room temperature. Frost or glaze the cake the day you plan to serve it. For longer storage, the unfrosted cake freezes beautifully for up to three months.
Can I use a different flavor of Jello?
Yes, you can! This recipe is very adaptable. Using lemon Jello with fresh lemon juice and zest makes a fantastic lemon cake. Strawberry or raspberry Jello would also work wonderfully; just pair it with a corresponding fruit puree or juice instead of the orange juice. Keep the amount of dry gelatin the same (one 3 oz box) for consistent texture.
Why did my cake sink in the middle?
A sunken cake usually points to two issues. First, the cake might be underbaked. The center hadn’t set fully before you took it out of the oven. Second, it could be from overmixing after adding the flour, which weakens the cake’s structure. Always check for doneness with a toothpick and mix dry ingredients just until combined. Also, avoid opening the oven door frequently during baking.
My batter seemed very thick. Did I do something wrong?
Not necessarily. This Orange Jello Cake batter is typically thicker than a box-mix batter because of the sour cream and the dry gelatin powder. It should be thick but pourable, like a heavy muffin batter. If it seems excessively thick and dry, you may have measured the flour incorrectly (scooping directly from the bag packs it down). Always spoon flour into your measuring cup and level it off.
Can I make this into cupcakes?
You sure can! This recipe makes about 24 standard cupcakes. Line your muffin tins, fill the cups about 2/3 full, and bake at the same temperature (350°F) for 18-22 minutes, or until a toothpick comes out clean. They’ll be adorable, perfectly portioned bites of orange sunshine.
Can I reduce the sugar in this recipe?
You can try reducing the granulated sugar by up to 1/4 cup, but be mindful. Sugar doesn’t just add sweetness; it contributes to moisture, tenderness, and browning. A significant reduction might make the cake drier and less tender. The gelatin powder also adds sweetness, so the overall flavor might become less balanced.
What can I use instead of sour cream?
Full-fat plain Greek yogurt is the best 1:1 substitute. It provides the same tang and moisture. You could also use an equal amount of buttermilk, but the batter will be a bit thinner. In a pinch, regular whole milk yogurt will work, but the fat content in sour cream really helps with richness.
Do I have to use a mixer?
A hand mixer or stand mixer is recommended for properly creaming the butter and sugar, which is vital for texture. However, if you’re determined and strong-armed, you could do it by hand with a sturdy wooden spoon. Just be prepared to cream for a lot longer to get that fluffy, pale consistency.
How do I get my orange glaze to be perfectly smooth?
The secret is to sift your powdered sugar! This removes any little lumps. Then, add your orange juice one tablespoon at a time, whisking vigorously until smooth. You want a consistency that slowly drips off your whisk—thick enough to coat but thin enough to drizzle. If it gets too thin, add a bit more sifted sugar.
Is there a way to make this cake more “adult”?
For a sophisticated twist, add a tablespoon of Grand Marnier, Cointreau, or a simple orange liqueur to the batter along with the orange juice. You can also brush the warm cake layers with a thin syrup made of equal parts liqueur and orange juice before frosting. It adds a wonderful depth of flavor.
Your New Go-To Happy Cake
And there you have it—my absolute favorite Orange Jello Cake recipe. It’s the cake that never fails to bring smiles, the one that fills the house with the most incredible citrusy-buttery smell, and the dessert that gets empty plates every single time. It’s proof that sometimes the simplest ideas, like adding a packet of sunshine to your batter, are the very best ones. I hope this recipe becomes a source of as much joy in your kitchen as it has been in mine. Now go grab those oranges and get baking. A slice of pure happiness is waiting for you!
Equipment
- Grand bol
- Fouet
- Spatule
- Plaque à pâtisserie
- Papier sulfurisé
Ingredients
- 2 tasses farine tout usage
- 1.5 cuil. à café poudre à lever
- 0.5 cuil. à café sel
- 0.5 tasse beurre non salé, ramolli
- 1 tasse sucre granulé
- 0.5 tasse crème aigre
- 0.5 tasse jus d'orange
- 4 œufs
- 2 cuil. à café zeste d'orange
- 1 paquet gelée au goût d'orange (Jello)
Instructions
- Préchauffez votre four à 175°C et graissez un moule à pâtisserie de 23x33 cm (ou deux moules ronds de 23 cm).
- Dans un bol moyen, mélangez la farine, la poudre à lever et le sel.
- Dans un grand bol, battez le beurre ramolli et le sucre jusqu'à obtenir un mélange léger et crémeux.
- Ajoutez les œufs un par un, en battant bien après chaque ajout, puis incorporez le zeste d'orange.
- Incorporez la crème aigre et le jus d'orange jusqu'à ce que le mélange soit homogène.
- Incorporez doucement les ingrédients secs et la gelée d'orange jusqu'à ce qu'ils soient juste mélangés.
- Versez la pâte dans le moule préparé et lissez le dessus.
- Faites cuire pendant 30-35 minutes jusqu'à ce que le gâteau soit doré et qu'un toothpick en ressorte propre.
- Laissez le gâteau refroidir dans le moule pendant environ 10 minutes, puis laissez-le refroidir complètement sur une grille.