
Is There Anything More Summery Than This Peach Raspberry Cheesecake?
Let me tell you, I knew this Peach Raspberry Cheesecake was a winner before it even left my oven. The smell was pure sunshine! It wafted through the house, and my family drifted into the kitchen like cartoon characters following a delicious scent. My son peeked in and said, “Mom, are we having summer for dessert?” That’s exactly the magic of this recipe. It captures all the best feelings of a warm day—the sweet, juicy peaches, the little tangy pop of raspberry—all wrapped up in the creamiest, dreamiest cheesecake you can imagine.
I’ve been making cheesecakes for years now, for book clubs, baby showers, and just-because-Tuesdays. This particular recipe holds a special place. I created it for a friend’s backyard wedding, where they wanted something beautiful but not too heavy. This cheesecake was the star! It’s a harmonious blend of classic comfort and bright, fresh flavors. It feels fancy, but I promise you, it’s approachable. If you can beat cream cheese, you can absolutely master this stunning Summer Peach Cheesecake.
A Sweet Slice of History: From New York to Your Backyard
Cheesecake itself has been around for centuries, with variations popping up everywhere from ancient Greece to New York delis. The modern, creamy version we adore, with its cream cheese base, really found its footing in America. This Peach and Raspberry Cheesecake recipe is my own little twist on that classic. It’s inspired by those glorious late-summer days when the farmers’ market is overflowing with perfect peaches and jewel-toned raspberries. This version celebrates seasonal produce, letting those natural flavors shine against the rich, velvety canvas of the cheesecake. It’s about bringing a touch of rustic, farm-fresh elegance right to your dessert table.
Why You’ll Love This Perfectly Creamy Cheesecake
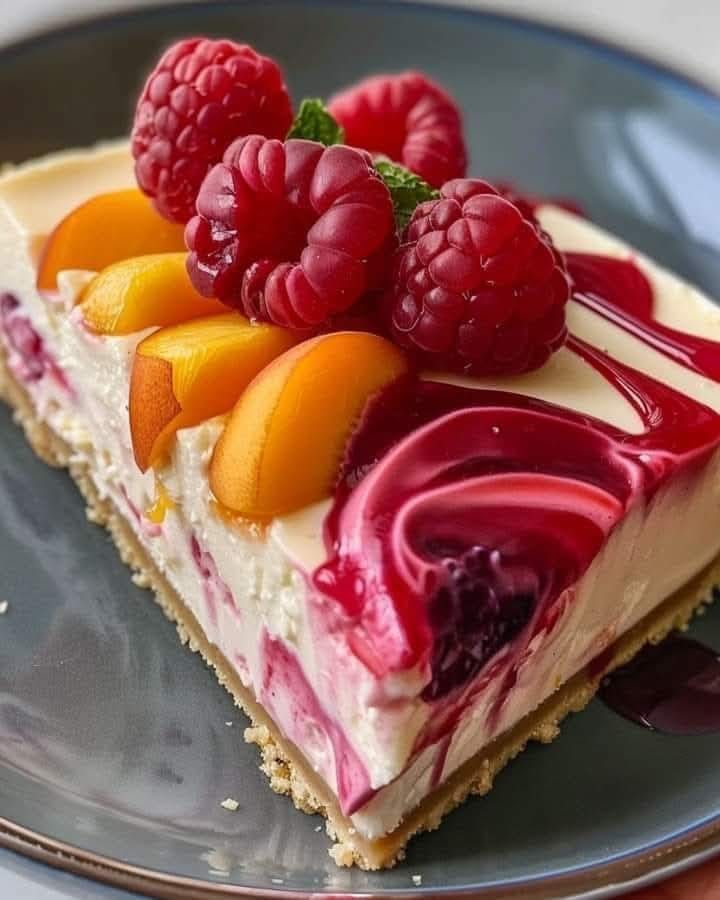
This isn’t just another dessert; it’s an experience. You’ll love it because it balances rich and light so perfectly. The creamy, decadent texture of the filling is beautifully cut by the bright, fresh fruit topping. It’s also incredibly versatile! Don’t have fresh peaches? Use canned. Want more raspberry flavor? Swirl the preserves right into the batter before baking. It’s a forgiving recipe that encourages you to make it your own. Plus, it looks absolutely stunning with very little effort. The swirl of ruby-red raspberry preserves over the golden peaches is pure dessert artistry.
Perfect Occasions for This Showstopping Dessert
This Peach Raspberry Cream Cheese Dessert is perfect for any gathering. It’s an ideal centerpiece for a summer barbecue, a Fourth of July celebration, or a bridal shower. I love serving it for Sunday family dinners to make the meal feel extra special. It’s also a fantastic make-ahead dessert. Since it needs to chill overnight, you can knock it out the day before an event, leaving you stress-free to enjoy your company. Trust me, whether it’s a casual picnic or a fancy dinner party, this cheesecake fits right in.
Gathering Your Ingredients for Peachy Success
Using quality ingredients makes all the difference. Let’s build our masterpiece from the bottom up! The crust is a simple, sweet mix that provides the perfect crunchy foundation. The filling is where the magic lives—creamy, tangy, and rich. And the topping is pure, vibrant summer.
- Crust:
- 1 1/2 cups graham cracker crumbs
- 1/4 cup granulated sugar
- 1/2 cup unsalted butter, melted
- Cheesecake Filling:
- 24 oz (three 8-oz blocks) cream cheese, softened
- 1 cup granulated sugar
- 3 large eggs, at room temperature
- 1 tsp pure vanilla extract
- 1 cup sour cream, at room temperature
- 1/2 cup heavy cream
- Easy Fruit Topping:
- 2 cups fresh peaches, peeled and sliced
- 1/2 cup raspberry preserves
No-Stress Substitution Options
Don’t sweat it if you’re missing an item! Here are some easy swaps that keep the spirit of the recipe alive. For a different crunch, try digestive biscuits or vanilla wafers instead of graham crackers. No fresh peaches? A cup of high-quality canned peaches (well-drained) or even a simple peach jam will work in a pinch. If raspberry isn’t your jam (see what I did there?), feel free to use strawberry or apricot preserves instead. For a slightly lighter take, you can swap the sour cream for full-fat Greek yogurt, though the texture may be a touch denser.
Step-by-Step: Crafting Your Masterpiece
Step 1: Building the Base
Preheat your oven to 325°F (163°C). This temperature is crucial for a slow, even bake that prevents cracks. Generously grease your 9-inch springform pan. Now, let’s make the crust. In a medium bowl, stir together the graham cracker crumbs and sugar until they’re best friends. Pour in that glorious melted butter. The mixture will look like wet sand and smell like buttery, sugary heaven. Press it firmly and evenly into the bottom of your prepared pan. A flat-bottomed glass or measuring cup helps get it nice and compact. Bake this for just 10 minutes, then let it cool completely on a wire rack. This short bake sets the crust, so it doesn’t get soggy later.
Pro tip: For a taller crust that climbs the sides a bit, use the full 1 1/2 cups of crumbs. For a thinner base, use about 1 1/4 cups. Both are delicious!
Step 2: Creating the Dreamy Filling
This is the most important step—patience is key! In a large bowl, beat your softened cream cheese with the sugar for a good 2-3 minutes. You want it to be completely smooth, with no lumps in sight. Scrape down the bowl often. Now, add the eggs, one at a single time. Beat well after each addition, but don’t overdo it once all eggs are in. Over-beating incorporates too much air, which can cause the cheesecake to puff and collapse, leading to cracks. Finally, gently stir in the vanilla, sour cream, and heavy cream until the mixture is silky and uniform in color. It will be lusciously thick and creamy.
Step 3: The Patient Bake
Place your springform pan on a sheet of aluminum foil and wrap the foil up the sides. This is your leak insurance policy! Pour the creamy filling over your completely cooled crust. Smooth the top with a spatula. Place the pan in the center of your preheated oven. Bake for about 1 hour. The edges should look set, but the very center (about the size of a silver dollar) should still have a slight, gentle jiggle when you tap the pan. This is perfect—it will firm up as it cools. This gentle, slow bake is the secret to that creamy texture.
Step 4: The Crucial Cool Down
When the timer goes off, turn off the oven. Crack the oven door open with a wooden spoon handle. Let the cheesecake cool slowly inside the oven for about an hour. This gradual temperature change is the #1 trick to prevent cracks. Then, move it to a wire rack to cool completely to room temperature. Once cooled, cover it and refrigerate for at least 4 hours, but overnight is truly the best. The flavor deepens, and the texture becomes perfectly sliceable.
Chef’s tip: Even if a small crack appears, don’t panic! That’s what the gorgeous fruit topping is for. It covers a multitude of sins and makes everything beautiful.
Step 5: The Grand Finale – The Topping
Right before serving, arrange your beautiful peach slices in concentric circles on top of the chilled cheesecake. Gently warm the raspberry preserves for about 15 seconds in the microwave to make them saucy. Using a spoon, drizzle the glossy red preserve all over the peaches, letting some drip down the sides artfully. This last-minute topping keeps the peaches fresh and vibrant and adds that perfect sweet-tart finish. Slice, serve, and wait for the “oohs” and “aahs.”
Timing It Right: A Chill Recipe
This recipe is all about patience, but the active work is minimal. Your prep time is about 20 minutes of hands-on mixing. The baking time totals 1 hour and 10 minutes (including the crust). The real investment is the chilling time—a minimum of 4 hours, but I plan for overnight. So, from start to glorious finish, you’re looking at about 5 hours and 30 minutes, with most of that being unattended cooling and chilling. Plan ahead, and you’ll be rewarded!
A Cheesecake Secret from My Kitchen to Yours
Here’s my non-negotiable secret for the perfect creamy texture every time: room temperature ingredients. I take my cream cheese, eggs, and sour cream out of the fridge at least an hour before I start. Room-temperature ingredients blend together smoothly without overmixing. Overmixing is the enemy of a dense, velvety cheesecake. It whips in air bubbles that expand and contract during baking, leading to a cracked surface. Smooth blending is the goal!
Peachy Facts for Fun
Did you know peaches and raspberries are botanical cousins? They both belong to the Rosaceae family. This family connection might be why their flavors pair together so harmoniously. It’s like a delicious family reunion on a plate! Georgia might be famous for its peaches, but did you know the US has over 2,000 varieties? For this recipe, look for freestone peaches—they’re much easier to slice.
The Tools You’ll Need
You don’t need fancy equipment, but a few key items make life easier: a 9-inch springform pan (this is essential for clean slices), a stand mixer or hand mixer, a couple of mixing bowls, a spatula, and your trusty measuring cups and spoons. I also like using a pastry brush to grease the springform pan thoroughly to ensure no sticking.
Storing Your Summer Peach Cheesecake
This cheesecake stores beautifully, making it the ultimate make-ahead dessert. Once it’s fully chilled and topped, you can loosely cover it with plastic wrap or a cake dome. It will keep happily in the refrigerator for up to 5 days. The flavors actually continue to meld and improve over the first day or two.
If you want to freeze it, do so before adding the fresh fruit topping. Wrap the completely chilled, bare cheesecake tightly in plastic wrap and then a layer of aluminum foil. You can freeze it for up to 2 months.
When ready to serve a frozen cheesecake, thaw it overnight in the refrigerator. Then, add your fresh peach slices and raspberry drizzle right before serving. This keeps the topping fresh and prevents a soggy crust.
Pro Tips for a Foolproof Dessert
- Prevent Sticking: For extra insurance, line the bottom of your springform pan with a round of parchment paper after greasing.
- Easy Slicing: Dip your knife in hot water and wipe it clean between each slice for perfectly neat, clean cuts.
- Fruit Prep: To prevent peach slices from browning, toss them in a tiny bit of lemon juice or the juice from the raspberry preserves.
- Test for Doneness: Use the jiggle test, not a toothpick! A toothpick will come out wet from a perfect, creamy cheesecake. The center should jiggle like Jell-O, not like liquid.
Presentation Ideas to Wow Your Guests
Make your Raspberry Peach Cheesecake look like it came from a patisserie! Serve each slice with a dollop of freshly whipped cream and a single perfect raspberry. Drizzle individual plates with a little extra raspberry preserves. For a dinner party, garnish each slice with a fresh mint leaf. You could also serve it with a small scoop of vanilla bean ice cream for an extra-decadent treat.
Love Cheesecake? Try These Variants!
Once you’ve mastered this creamy base, a world of cheesecakes opens up! For more amazing inspiration, be sure to browse our entire collection of decadent cheesecake recipes. Here are six delicious twists on the classic to spark your creativity:
- Mixed Berry Bliss: Swap the peaches for a mix of fresh blueberries, blackberries, and sliced strawberries. Use a mixed berry preserve for the drizzle.
- Gingersnap Peach: Use crushed gingersnap cookies for the crust for a warm, spicy note that complements the peaches beautifully.
- Lemon-Raspberry Swirl: Add the zest of one lemon to the cheesecake filling. Before baking, dollop raspberry preserves on top and use a knife to swirl it into the batter.
- Bourbon Caramel Peach: Omit the raspberry drizzle. Simmer the peach slices in a pan with a tablespoon of butter and a splash of bourbon, then top the cheesecake with the glazed peaches and a generous drizzle of salted caramel sauce.
- No-Bake Version: Use a no-bake cheesecake filling and set it in the fridge. Top with the fresh fruit for a quick, cool summer dessert with no oven required.
- Mini Cheesecakes: Make individual servings by using a muffin tin lined with liners. Press crust into the bottom, fill 3/4 full with batter, and bake for 18-22 minutes. Top each one with a peach slice and a dab of preserve.
If you love stunning layered desserts, you might also be tempted by the dramatic look of a Brownie Layered Cookie Dough Cheesecake, which combines three incredible treats in one pan. For fruit lovers, a Luscious Vanilla Banana Walnut Cake is another crowd-pleasing option that celebrates fresh produce.
Common Mistakes to Avoid for the Perfect Peach Raspberry Cheesecake
Mistake 1: Using Cold Ingredients Straight from the Fridge
This is the most common mistake and a surefire way to get a lumpy filling. Cold cream cheese doesn’t blend smoothly with sugar. You’ll end up over-mixing to try to beat out the lumps, which adds too much air. This air expands and then contracts in the oven, often causing the dreaded cheesecake crack. How to avoid it: Plan ahead! Take your cream cheese, eggs, and sour cream out of the fridge at least one hour before you start baking. The cream cheese should feel soft and slightly warm to the touch.
Mistake 2: Over-Baking the Cheesecake
We’re used to baking cakes until a toothpick comes out clean. Doing that with a cheesecake will give you a dry, crumbly texture instead of a creamy, luxurious one. An over-baked cheesecake can also crack badly as it cools and contracts. How to avoid it: Use the “jiggle test.” At the end of the bake time, gently shake the pan. The edges should look set and firm, but the center (about the size of a silver dollar) should have a slight, pudding-like jiggle. It will firm up perfectly during the slow cooling process.
Mistake 3: Skipping the Slow Cool-Down
Pulling a hot cheesecake out of the oven and plopping it on the counter is a huge shock to its delicate structure. The sudden temperature drop makes it contract too quickly, which almost always causes a large crack right down the middle. How to avoid it: Be patient! After baking, simply turn off the oven and crack the door open with a wooden spoon. Let the cheesecake cool inside the cooling oven for an hour before moving it to a wire rack. This gentle cooldown is your best defense against cracks.
Mistake 4: Not Greasing the Springform Pan Well Enough
There’s nothing sadder than a beautiful cheesecake that won’t release cleanly from the pan. Even with a springform, a little sticking can ruin your slices and your presentation. How to avoid it: Be generous with the butter or non-stick spray. I grease the bottom and sides thoroughly. For extra insurance, you can cut a round of parchment paper to fit the bottom after greasing. This guarantees a perfect, crumb-free release every single time.
Mistake 5: Adding the Topping Too Early
Arranging those beautiful peach slices and drizzling the raspberry sauce on the cheesecake right after it comes out of the fridge sounds right, but if you do it hours before serving, you risk a soggy crust and weeping fruit. The moisture from the fresh peaches will slowly seep down. How to avoid it: Treat the topping like a garnish. Prepare your peaches and warm your preserves, but wait to assemble the final masterpiece just before you’re ready to serve. It looks fresher, tastes better, and keeps the crust delightfully crisp.
Your Peach Raspberry Cheesecake Questions, Answered
Can I use frozen peaches for this recipe?
You absolutely can use frozen peaches! Just make sure to thaw them completely first. Place the frozen slices in a colander over a bowl to drain all the excess liquid. Pat them very dry with paper towels before arranging them on the cheesecake. Using frozen peaches while they are still wet will make your topping runny and could make the cheesecake soggy. This is a great year-round option when fresh peaches are out of season.
How do I know when the cheesecake is fully set and ready to slice?
The cheesecake needs to be completely chilled to slice cleanly. After its overnight rest in the fridge, it should feel very firm to a gentle touch in the center. For the cleanest slices, take your long, thin knife and dip it in a tall glass of very hot water. Wipe the blade dry with a towel, then make your cut. Repeat the hot water and wipe process for every single slice. This little bit of extra work gives you those picture-perfect, restaurant-style slices.
My cream cheese filling is lumpy. Can I fix it?
If you have small lumps after mixing, there is a fix! Pour your entire filling mixture through a fine-mesh sieve into another bowl. Use a spatula to press it through. This will catch any stubborn bits of un-softened cream cheese and give you a perfectly silky texture. It’s a bit of an extra step, but it’s a great rescue technique. To avoid this next time, remember to let your cream cheese soften fully and beat it with the sugar until completely smooth before adding anything else.
Can I make this a low-sugar cheesecake?
You can reduce the sugar, but it will change the texture and flavor. The sugar in the filling does more than just sweeten; it helps create the structure and creamy mouthfeel. A significant reduction might make the cheesecake denser and less pleasant. For a healthier approach, you might explore other dessert options. For general guidance on reducing sodium and sugar in your diet, the CDC offers great resources on following a low sodium diet and other healthy eating tips.
Why did my cheesecake crack in the middle?
Cracks usually happen from a sudden temperature change or from over-mixing. If you pulled it straight from the oven to a cool counter, that shock can cause it. Over-beating the batter incorporates too much air, which rises and then falls, creating cracks. Don’t worry! It’s still delicious. The beautiful peach and raspberry topping will cover it right up. Follow the tips for room temp ingredients, gentle mixing, and the slow oven cool-down to prevent it next time.
Can I use a different size pan?
I strongly recommend using the 9-inch springform pan specified. Using a smaller pan will make the filling too deep, requiring a much longer bake time and risking an undercooked center or overdone edges. Using a larger, shallow pan will make the filling too thin, and it will bake very quickly, leading to a dry, rubbery texture. For consistent results, stick with the 9-inch size. It’s the standard for a reason!
How far in advance can I make this cheesecake?
This cheesecake is an excellent make-ahead dessert. You can bake and chill it completely (without the fresh fruit topping) up to two days in advance. Keep it covered in the fridge. In fact, the flavor gets even better after a day! Add the fresh peach slices and raspberry drizzle the day you plan to serve it, ideally within a few hours of serving for the best texture and appearance.
What’s the difference between this and a no-bake cheesecake?
A baked cheesecake, like this one, has a rich, dense, and creamy texture that is firm yet velvety. It uses eggs which set during baking. A no-bake cheesecake relies on gelatin or whipped cream to set in the fridge. It’s lighter and airier, almost mousse-like. Both are delicious! This baked version has a more classic, decadent feel. If you love no-bake styles, consider our other layered creations like the Luxurious Caramel Apple Cheesecake which offers a similar fruit-and-cream combo.
Can I use homemade raspberry sauce instead of preserves?
Yes, a homemade sauce is a fantastic idea! Simply simmer fresh or frozen raspberries with a little sugar and a squeeze of lemon juice until they break down. Strain it through a sieve to remove the seeds if you want a smooth drizzle. Let it cool completely before using. A homemade sauce will have a fresher, less sweet flavor than store-bought preserves. It’s a wonderful way to highlight seasonal berries.
My graham cracker crust is soggy. What happened?
A soggy crust usually means the filling was poured onto a warm crust. The crust must be completely cool to room temperature after its initial 10-minute bake. If it’s even slightly warm, the butter in the crust will melt further when it touches the filling, leading to sogginess. Also, make sure your springform pan is well-sealed with foil during the water bath step to prevent any water from seeping in during the bake, which is another common culprit.
Go Forth and Bake Something Beautiful!
So there you have it—my ultimate guide to a Peach Raspberry Cheesecake that’s as joyful to make as it is to eat. Remember, baking is about sharing love and creating memories. Don’t get stressed over a little crack or a lump. The golden, creamy filling and that burst of summer fruit will make everyone at your table smile. I hope this recipe becomes a staple in your home, just like it has in mine. Now, go preheat that oven and get ready for the compliments to roll in! And if you’re looking for more chocolate-centric decadence, you can’t go wrong with a classic Chocolate Cake with Strawberry Sauce for your next baking adventure.
Equipment
- Grand bol
- Fouet
- Spatule
- Moule à charnière de 9 pouces
- Papier sulfurisé
Ingredients
- 1 1/2 tasse miettes de biscuits Graham
- 1/4 tasse sucre
- 1/2 tasse beurre non salé, fondu
- 24 oz fromage à la crème, ramolli
- 1 tasse sucre
- 3 œufs, à température ambiante
- 1 cuil. à café extrait de vanille
- 1 tasse crème aigre, à température ambiante
- 1/2 tasse crème épaisse
- 2 tasse pêches fraîches, pelées et tranchées
- 1/2 tasse confiture de framboises
Instructions
- Préchauffez votre four à 163°C (325°F) et graissez un moule à charnière de 9 pouces.
- Dans un bol moyen, mélangez les miettes de biscuits Graham et le sucre. Ajoutez le beurre fondu et pressez le mélange au fond du moule préparé. Faites cuire pendant 10 minutes et laissez refroidir complètement.
- Dans un grand bol, battez le fromage à la crème ramolli et le sucre jusqu'à consistance lisse.
- Ajoutez les œufs un par un, en mélangeant délicatement après chaque ajout. Ajoutez l'extrait de vanille, la crème aigre et la crème épaisse, en mélangeant jusqu'à obtenir un mélange homogène.
- Versez la préparation sur la croûte refroidie et lissez le dessus. Faites cuire pendant environ 1 heure, jusqu'à ce que les bords soient pris mais que le centre soit légèrement tremblotant.
- Après la cuisson, éteignez le four et laissez la porte entrouverte. Laissez le cheesecake refroidir à l'intérieur du four pendant environ 1 heure.
- Déplacez le cheesecake sur une grille pour le refroidir à température ambiante, puis réfrigérez pendant au moins 4 heures, de préférence toute la nuit.
- Avant de servir, disposez les tranches de pêche sur le dessus et chauffez la confiture de framboises au micro-ondes. Arrosez sur les pêches avant de servir.