
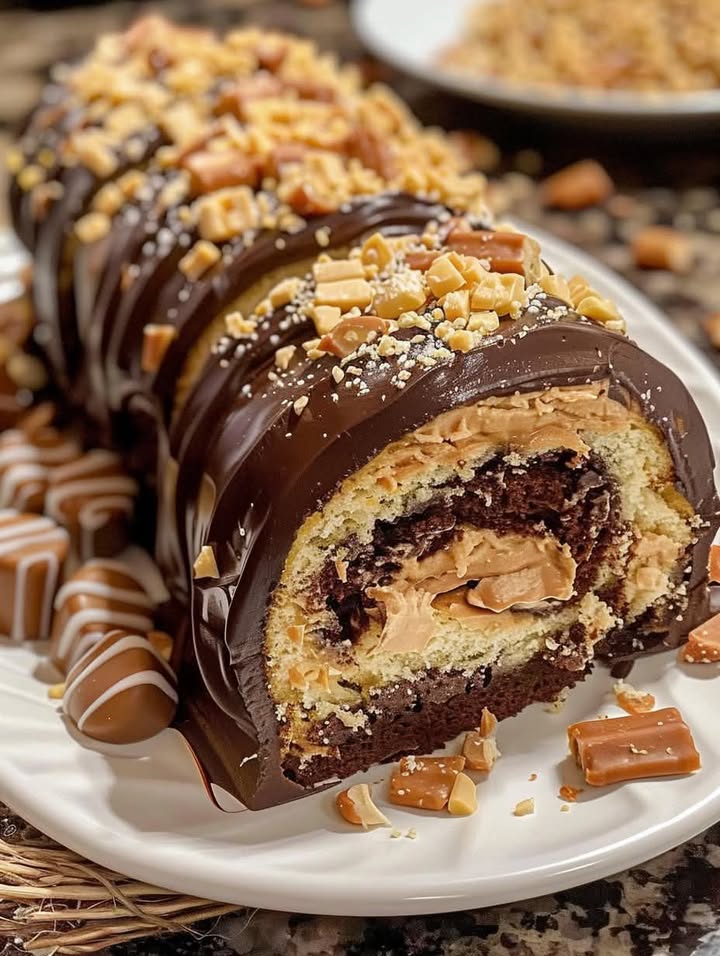
A Roll Cake That’s a Peanut Butter Delight
Imagine a rich, chocolatey cake rolled up with a creamy peanut butter filling and topped with a luscious chocolate ganache. This Peanut Butter Delight is not just a dessert; it’s a sweet symphony of flavors that will make your taste buds sing! I first tried this recipe at a friend’s birthday party, and it was love at first bite. Now, I’m excited to share it with you.
The Story Behind the Peanut Butter Delight
This delightful roll cake has its roots in traditional Swiss rolls, but with a twist that makes it uniquely American. The combination of chocolate and peanut butter is a classic pairing that never gets old. I’ve made this for family gatherings, potlucks, and even as a special treat for my kids. It’s a modern take on a timeless favorite, and it always brings smiles to everyone’s faces.
Why You’ll Love This Recipe
This Peanut Butter Delight is a crowd-pleaser for several reasons. First, the flavors are a perfect match—rich chocolate and creamy peanut butter are a match made in heaven. Second, it’s surprisingly easy to make. Even if you’re not a seasoned baker, you can whip up this cake with minimal effort. Lastly, it’s versatile. Whether you’re hosting a party or just want a special treat, this cake fits the bill.
Perfect Occasions to Prepare This Recipe
This Peanut Butter Delight is perfect for any occasion where you want to impress. It’s a hit at birthdays, holidays, and even casual get-togethers. I’ve also found it to be a great choice for potlucks and school events. The combination of flavors and the elegant presentation make it a standout dessert.
Ingredients
- For the cake:
- 3/4 cup all-purpose flour
- 1/4 cup cocoa powder
- 1 teaspoon baking powder
- 1/4 teaspoon salt
- 4 large eggs
- 3/4 cup granulated sugar
- 1 teaspoon vanilla extract
- 1/4 cup milk
- 1 cup creamy peanut butter
- 1/2 cup powdered sugar
- 1/4 cup unsalted butter, softened
- 1/2 teaspoon vanilla extract
- 1/2 cup mini chocolate chips
- 1 cup semi-sweet chocolate chips
- 1/2 cup heavy cream
- Crushed peanuts (optional)
Substitution Options
- If you don’t have all-purpose flour, you can use cake flour for a lighter texture.
- For a dairy-free version, use almond milk instead of regular milk and vegan butter for the filling.
- If you prefer a less sweet filling, reduce the amount of powdered sugar.
Preparation Section
Step 1: Preheat and Prepare the Pan
Preheat your oven to 350°F (175°C). Grease a 10×15-inch jelly roll pan and line it with parchment paper. This step is crucial for easy removal and a perfect roll.
Step 2: Mix the Dry Ingredients
In a small bowl, sift together the flour, cocoa powder, baking powder, and salt. Sifting helps to remove any lumps and ensures a smooth batter. Set this mixture aside.
Step 3: Beat the Eggs and Add Sugar
In a large bowl, beat the eggs on high speed for about 5 minutes until they are thick and lemon-colored. Gradually add the granulated sugar and vanilla extract while continuing to beat. This step gives the cake its light and airy texture.
Step 4: Fold in the Flour Mixture and Milk
Gently fold in the flour mixture into the egg mixture. Be careful not to overmix, as this can make the cake tough. Once the flour is incorporated, fold in the milk. The batter should be smooth and pourable.
Step 5: Bake the Cake
Pour the batter evenly into the prepared pan and spread it out. Bake for 12-15 minutes or until the cake springs back when lightly touched. The aroma of baking chocolate will fill your kitchen, making it hard to wait!
Step 6: Prepare the Rolling Towel
While the cake is baking, prepare a clean kitchen towel and sprinkle it with powdered sugar. This will prevent the cake from sticking to the towel when you roll it.
Step 7: Roll the Cake
When the cake is done, immediately turn it onto the prepared towel. Gently peel off the parchment paper and roll the cake with the towel from the short end. Let it cool completely. This step is key to getting a perfect roll without cracks.
Step 8: Make the Filling
In a bowl, mix the peanut butter, powdered sugar, softened butter, and vanilla extract until smooth. Stir in the mini chocolate chips. The filling should be creamy and spreadable.
Step 9: Unroll and Fill the Cake
Carefully unroll the cooled cake and spread the peanut butter filling evenly over the cake. Re-roll the cake without the towel. The filling will hold the cake together and add a delicious layer of flavor.
Step 10: Prepare the Topping
In a microwave-safe bowl, heat the semi-sweet chocolate chips and heavy cream in 30-second intervals, stirring until smooth. Spread this ganache over the cake roll. If you like, sprinkle some crushed peanuts on top for added texture and flavor.
Timing
Prep Time: 30 minutes
Baking Time: 12-15 minutes
Total Time: Approximately 2 hours
Servings: 8-10 slices
Chef’s Secret
To enhance the flavor, try adding a pinch of sea salt to the peanut butter filling. The saltiness complements the sweetness and adds a nice balance to the overall taste.
Extra Info
Did you know that peanut butter and chocolate were first combined in the early 20th century? The combination quickly became a favorite, and it’s no wonder why. The rich, creamy texture of peanut butter pairs perfectly with the deep, indulgent flavor of chocolate.
Necessary Equipment
- Jelly roll pan
- Parchment paper
- Electric mixer or stand mixer
- Whisk
- Mixing bowls
- Kitchen towel
- Microwave-safe bowl
Storage
Store the Peanut Butter Delight in an airtight container in the refrigerator. It will keep well for up to 5 days. The cold temperature helps to set the filling and keeps the cake fresh. If you want to freeze it, wrap the cake tightly in plastic wrap and then in aluminum foil. It can be stored in the freezer for up to 2 months. Just thaw it in the refrigerator before serving.
Tips and Advice
- Make sure the cake is completely cool before rolling it to avoid cracking.
- Use room-temperature ingredients for the filling to ensure a smooth and creamy texture.
- Don’t overmix the batter; this can make the cake dense and tough.
Presentation Tips
- Slice the cake into even rounds and arrange them on a platter.
- Garnish with a few extra mini chocolate chips and a sprinkle of powdered sugar for a festive look.
- Add a dollop of whipped cream on the side for an extra touch of indulgence.
Healthier Alternative Recipes
- Whole Wheat Version: Substitute whole wheat flour for all-purpose flour. Use natural peanut butter and reduce the amount of sugar for a healthier option.
- Vegan Version: Use almond milk, vegan butter, and a flax egg (1 tablespoon ground flaxseed + 3 tablespoons water) as a substitute for the eggs. Choose dairy-free chocolate chips for the filling and topping.
- Low-Sugar Version: Reduce the amount of granulated sugar in the cake and use a low-sugar peanut butter. You can also use a sugar substitute like stevia for the filling.
- Gluten-Free Version: Use a gluten-free flour blend and make sure all other ingredients are certified gluten-free. This is a great option for those with dietary restrictions.
- No-Bake Version: Make a no-bake crust using crushed cookies and melted butter. Layer it with the peanut butter filling and top with a chocolate ganache. Chill in the refrigerator until set.
- Fruit-Infused Version: Add a layer of sliced bananas or strawberries to the filling for a fresh and fruity twist. The natural sweetness of the fruit complements the rich flavors of the cake.
Common Mistakes to Avoid
Mistake 1: Overbeating the Eggs
Overbeating the eggs can lead to a tough and dry cake. Beat the eggs until they are thick and lemon-colored, but stop there. This will give you a light and airy texture.
Mistake 2: Not Cooling the Cake Before Rolling
Rolling the cake while it’s still warm can cause it to crack. Make sure the cake is completely cool before you start rolling. This will help you achieve a perfect, crack-free roll.
Mistake 3: Overfilling the Cake
Using too much filling can make the cake difficult to roll and may cause it to break. Spread the filling evenly and in a thin layer. This will ensure a neat and tidy roll.
Mistake 4: Not Using Parchment Paper
Not lining the pan with parchment paper can make it difficult to remove the cake. The parchment paper helps to prevent sticking and ensures a clean release from the pan.
Mistake 5: Overcooking the Cake
Baking the cake for too long can make it dry and tough. Keep an eye on it and test for doneness by gently touching the center. It should spring back when lightly pressed.
FAQ
Can I use natural peanut butter for the filling?
Yes, you can use natural peanut butter, but make sure it’s well-stirred and not too runny. Natural peanut butter can sometimes be oilier, so you might need to adjust the consistency by adding a bit more powdered sugar.
How do I store the leftover cake?
Store the leftover cake in an airtight container in the refrigerator. It will keep well for up to 5 days. For longer storage, you can freeze it for up to 2 months. Just thaw it in the refrigerator before serving.
Can I make this recipe gluten-free?
Absolutely! You can use a gluten-free flour blend in place of all-purpose flour. Make sure all other ingredients are certified gluten-free to ensure there’s no cross-contamination.
What can I use instead of heavy cream for the topping?
If you don’t have heavy cream, you can use coconut cream or a non-dairy alternative like almond or soy creamer. Just make sure it has a similar consistency to heavy cream for the best results.
Is it possible to make this recipe without eggs?
Yes, you can make this recipe without eggs by using a flax egg (1 tablespoon ground flaxseed + 3 tablespoons water) or a commercial egg replacer. This is a great option for those with egg allergies or following a vegan diet.
Can I add other flavors to the filling?
Absolutely! You can add a variety of flavors to the filling. Try adding a tablespoon of maple syrup, a dash of cinnamon, or even a teaspoon of instant coffee for a mocha twist. The possibilities are endless!
How do I prevent the cake from sticking to the towel?
To prevent the cake from sticking, make sure to sprinkle the towel generously with powdered sugar before rolling. This creates a barrier between the cake and the towel, making it easier to unroll later.
Can I use a different type of nut butter?
Yes, you can use other types of nut butter like almond, cashew, or even sunflower seed butter. Each will bring a unique flavor to the filling, so feel free to experiment and find your favorite.
What if I don’t have a jelly roll pan?
If you don’t have a jelly roll pan, you can use a regular baking sheet or a 9×13-inch pan. Just make sure the pan is large enough to accommodate the cake and has a rim to contain the batter.
Can I make this recipe ahead of time?
Yes, you can make this recipe ahead of time. Prepare the cake and filling, roll it up, and store it in the refrigerator. Add the topping just before serving to ensure it looks fresh and appetizing.
Enjoy Your Peanut Butter Delight
There you have it—a delectable Peanut Butter Delight that’s sure to be a hit with everyone. Whether you’re a seasoned baker or a beginner, this recipe is easy to follow and always delivers. So, grab your apron, preheat your oven, and get ready to create a sweet masterpiece. Happy baking! 🍰🥜🍫
Equipment
- Plat à pâtisserie
- Fouet
- Spatule
- Plaque à pâtisserie
- Papier sulfurisé
Ingredients
- 4 œufs
- 150 g sucre
- 30 g cacao en poudre
- 65 g farine tout usage
- 5 g poudre à lever
- 1 g sel
- 240 ml crème épaisse
- 120 ml beurre de cacahuète crémeux
- 90 g pépites de chocolat
- q.s. sucre glace pour saupoudrer
- q.s. cacao en poudre pour saupoudrer
- q.s. pistaches concassées pour le décor
Instructions
- Préchauffez votre four à 175°C. Graissez une plaque à pâtisserie de 15x10 pouces et tapissez-la de papier sulfurisé.
- Dans un grand bol, battez les œufs et le sucre jusqu'à obtenir un mélange épais et pâle. Tamisez le cacao en poudre, la farine, la poudre à lever et le sel. Incorporez délicatement jusqu'à obtenir une pâte lisse.
- Versez la pâte dans le moule préparé et étalez-la uniformément. Faites cuire au four pendant 12-15 minutes ou jusqu'à ce que le gâteau rebondisse au toucher.
- Préparez un torchon propre et saupoudrez-le de sucre glace.
- Une fois le gâteau cuit, retournez-le sur le torchon préparé. Retirez délicatement le papier sulfurisé et enroulez le gâteau avec le torchon à partir du côté court. Laissez refroidir complètement.
- Dans un bol, mélangez le beurre de cacahuète, le sucre glace, le beurre ramolli et l'extrait de vanille jusqu'à obtenir une consistance lisse. Incorporez les pépites de chocolat.
- Déroulez le gâteau refroidi et étalez la garniture en beurre de cacahuète uniformément. Enroulez à nouveau le gâteau sans le torchon.
- Dans un bol allant au micro-ondes, faites chauffer les pépites de chocolat et la crème épaisse par intervalles de 30 secondes, en remuant jusqu'à obtenir un mélange lisse. Étalez le ganache sur le gâteau et saupoudrez de pistaches concassées si désiré.
Notes
Nutrition

Hi, I’m Olivia Parker, the founder of BakingSecret.com and a lifelong lover of all things sweet and homemade. I grew up in a small town in Oregon, where the smell of fresh cookies in my family’s kitchen sparked my passion for baking. Over the years, I turned that passion into a mission: to help home bakers feel confident, inspired, and creative.
After studying food science and working in several artisan bakeries across the U.S., I decided to create a space where everyone from beginners to seasoned bakers can find reliable recipes, expert tips, and a warm, welcoming community. BakingSecret.com is my way of sharing the magic of baking with the world. When I’m not testing new recipes, you’ll find me exploring farmers’ markets, collecting vintage cookbooks, or perfecting my sourdough technique.