
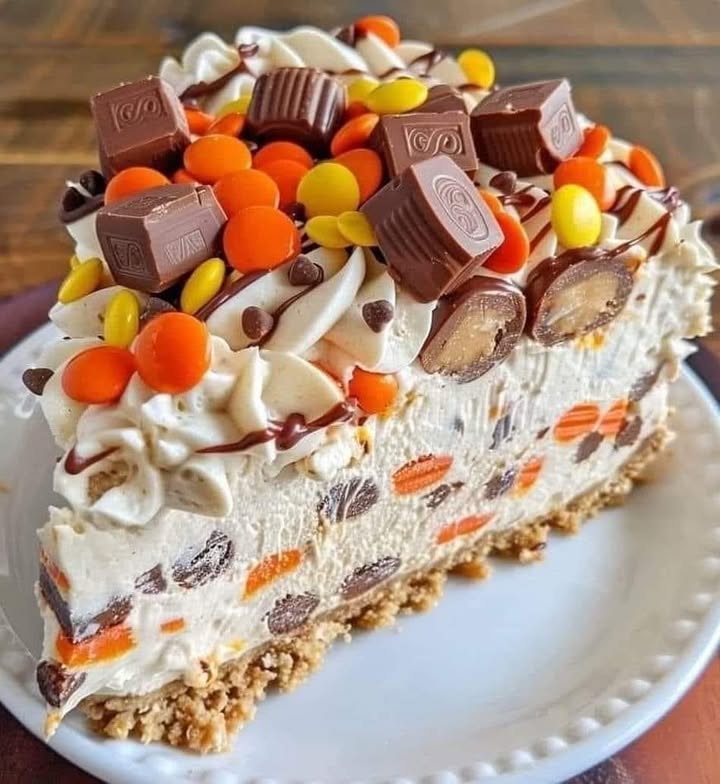
Unwrap the Ultimate Party Pleaser: Peanut Butter Delight Cheesecake
Picture this: you bring a dessert to a family picnic, and suddenly, it’s the only thing anyone is talking about. That’s exactly what happened with this Peanut Butter Delight. I created it for my niece’s birthday, blending her two favorite things—cheesecake and Reese’s cups. The moment she took a bite, her eyes lit up. Now, it’s the most requested treat in my kitchen. It’s more than just a dessert; it’s a memory maker, and I can’t wait for you to experience the same joy.
The Story Behind the Peanut Butter Dream
Cheesecake has been a classic for centuries, but the peanut butter twist is a modern American love story. It’s born from our national obsession with that creamy, nutty spread. My version is a no-bake wonder, inspired by lazy summer days when turning on the oven feels impossible. It combines the rich tradition of cheesecake with the playful, candy-bar fun we all adore. It’s a perfect example of how a simple ingredient can transform a familiar favorite into something spectacularly new.
Why This Peanut Butter Cheesecake Recipe is a Keeper
You will fall head over heels for this recipe. First, it requires zero baking, making it perfect for hot days or kitchen beginners. The flavors are insane—salty peanut butter, sweet cream cheese, and crunchy chocolate candy all in one creamy bite. It’s also incredibly versatile. You can dress it up for a fancy dinner or keep it simple for a weeknight treat. Best of all, it’s a guaranteed crowd-pleaser that looks like you spent all day in the kitchen, even though the secret is how easy it really is.
When to Serve Your Peanut Butter Delight Masterpiece
This cheesecake is your secret weapon for any gathering. It’s a superstar at birthday parties, especially for the peanut butter lover in your life. Bring it to potlucks and watch it disappear first. It makes holidays like the Fourth of July or Thanksgiving extra special with its red, brown, and gold candy colors. Honestly, any day that calls for a little celebration is the right day for this Peanut Butter Delight.
Gathering Your Ingredients for Success
Let’s talk about what you’ll need. Using quality ingredients makes all the difference here, especially for the creamy cheesecake filling.
- For the Crust: Graham cracker crumbs, melted butter, granulated sugar.
- For the Filling: Cream cheese (full-fat for best texture), heavy cream, creamy peanut butter, powdered sugar, vanilla extract, chocolate chips, Reese’s Pieces.
- For the Topping: More heavy cream, powdered sugar, mini chocolate chips, Reese’s Pieces, assorted chocolate candies (like chopped Reese’s cups), and chocolate syrup.
Smart Swaps: Your Peanut Butter Cheesecake Substitution Guide
Don’t worry if you’re missing an item! Here are some easy swaps:
- Graham Cracker Crumbs: Use crushed vanilla wafers, Oreo cookies (filling removed), or pretzels for a salty twist.
- Heavy Cream: For the whipped cream layers, full-fat coconut cream can be a dairy-free alternative.
- Peanut Butter: Any nut or seed butter works. Try almond butter or sunflower seed butter for a different flavor.
- Reese’s Pieces/Candies: Swap for chopped Snickers, Butterfingers, or just extra chocolate chips.
Crafting Your No-Bake Peanut Butter Delight
Follow these simple steps to create your masterpiece.
Step 1: The Crispy, Buttery Foundation
Start by making your crust. Combine the graham cracker crumbs, melted butter, and sugar in a medium bowl. Mix it until the crumbs look like wet sand and hold together when you pinch them. Pour this mixture into your springform pan. Use the bottom of a glass or a measuring cup to press it down firmly and evenly across the bottom. A solid, compact crust is key—it needs to support that luscious filling! Pro tip: Let the crust chill in the fridge for 10 minutes while you make the filling. This helps it set and prevents it from crumbling when you add the filling.
Step 2: The Dreamy, Creamy Filling
This step is where the magic happens. First, pour your heavy cream into a large, cold bowl. Beat it with a mixer until you see stiff peaks form. Set this fluffy cloud aside. In another bowl, beat the softened cream cheese until it’s completely smooth. Add the peanut butter and powdered sugar, and beat again until creamy and dreamy. Now, gently fold the whipped cream into the peanut butter mixture. Use a spatula and a light hand to keep the air in the whipped cream. Finally, fold in the chocolate chips and Reese’s Pieces. The filling will be thick, speckled with colors, and smell amazing.
Step 3: The Decadent Finale: Topping & Decoration
Pour your beautiful filling over the chilled crust and smooth the top with your spatula. Now, make another batch of whipped cream with the remaining heavy cream and powdered sugar. Spread or pipe this on top of the filling. This is your canvas! Decorate with a generous sprinkle of mini chocolate chips, more Reese’s Pieces, and any other chocolate candies you love. Finish it all with a artistic drizzle of chocolate syrup. Let your creativity run wild—there’s no wrong way to decorate this beauty.
Step 4: The Patient Chill
This is the hardest part: waiting. Your cheesecake needs time to firm up. Carefully cover the pan with plastic wrap and place it in the refrigerator. Let it chill for at least 6 hours, but overnight is truly best. This long rest allows all the flavors to marry and the texture to become perfectly sliceable. When you’re ready to serve, run a thin knife under hot water, dry it, and slide it around the edge of the pan before releasing the springform ring for a clean, stunning presentation.
Chef’s Tip
Let this cake be the star of your next event and prepare for the compliments! For an extra “wow” factor, serve each slice with a tiny side cup of warm chocolate sauce for dipping.
Your Peanut Butter Cheesecake Timeline
Good things take time, but this recipe is mostly hands-off!
- Prep Time: 25 minutes
- Chill Time: 6 hours (or overnight)
- Total Time: 6 hours 25 minutes
- Servings: 12 happy people
My Secret for the Perfect Slice
Here’s my little secret: after the cheesecake has set overnight, I pop the entire pan (without the ring) into the freezer for about 20 minutes before slicing. This firms it up just enough to get razor-sharp, clean cuts with a hot knife. No messy, crumbly slices! Your dessert plate will look professionally styled every single time.
A Sweet Nugget of Food History
Did you know cream cheese was invented in New York in 1872? A dairyman named William Lawrence was actually trying to make a French cheese called Neufchâtel when he accidentally created a richer, creamier version. He called it “Philadelphia” brand cream cheese. This happy accident paved the way for the creamy base of our beloved American cheesecakes, including this Peanut Butter Delight. It’s a great reminder that sometimes the best recipes come from a little kitchen luck!
Tools You’ll Need for the Job
You likely have most of this gear already!
- 9-inch springform pan (essential for easy removal)
- Electric hand mixer or stand mixer
- Two large mixing bowls
- Rubber spatula
- Measuring cups and spoons
Storing Your Peanut Butter Delight Creation
To keep your cheesecake tasting fresh, proper storage is key. First, if there are any leftovers (a rare event in my house!), leave the cake on the pan’s base. Cover it tightly with plastic wrap or place a large bowl over the top. You can also transfer individual slices to an airtight container.
This cheesecake will stay perfect in the refrigerator for up to 4-5 days. The flavors actually deepen a bit on day two, making it even more delicious. The crust may soften slightly over time, but it will still be wonderfully tasty.
For longer storage, you can freeze this dessert. Wrap the whole cheesecake or individual slices tightly in plastic wrap, then again in aluminum foil. It will keep well for up to 2 months. Thaw it overnight in the fridge before serving.
Pro Tips for a Flawless Dessert
- Make sure your cream cheese is fully softened at room temperature. This prevents lumps in your filling.
- Use a “no-stir” creamy peanut butter for the smoothest, most consistent filling texture.
- Chill your mixing bowl and beaters before whipping the heavy cream. It whips faster and holds peaks better.
- When folding, use a gentle “figure-eight” motion with your spatula to keep the filling light and airy.
Presentation Ideas to Impress Your Guests
Make your serving moment as special as the dessert itself!
- Place a whole mini Reese’s cup on top of each plated slice.
- Drizzle the plate with both chocolate and caramel sauce before setting down the slice.
- Serve with a small scoop of vanilla ice cream on the side for an over-the-top treat.
- For a party, make mini cheesecakes in a muffin tin lined with cupcake liners!
Six Fantastic Flavor Twists to Try
Love this recipe? Here are six ways to change it up for a new experience every time.
1. Chocolate Lover’s Dream: Use an Oreo cookie crust. Add 1/2 cup of cocoa powder to the filling and use dark chocolate chips.
2. Salty Caramel Swirl: After adding the filling to the pan, dollop with 1/2 cup of salted caramel sauce and swirl with a knife before chilling.
3. Banana Bliss: Layer slices of fresh banana over the crust before adding the filling. It’s like a cheesecake version of a peanut butter-banana sandwich!
4. Espresso Infusion: Dissolve 2 tablespoons of instant espresso powder into the vanilla before adding it to the filling for a mocha-peanut butter buzz.
5. Berry Burst: Top the finished cheesecake with a layer of sweetened, mashed fresh strawberries or raspberries before adding the final whipped cream.
6. Cookie Dough Delight: Fold 1 cup of edible chocolate chip cookie dough pieces into the filling instead of the standard chips and candies.
Common Mistakes to Avoid
Mistake 1: Using Cold Cream Cheese
This is the number one reason for a lumpy filling. Straight-from-the-fridge cream cheese will not blend smoothly with the other ingredients. No matter how long you beat it, little lumps will remain. To avoid this, take the cream cheese out of the fridge at least one hour before you start. Let it sit on the counter until it’s soft to the touch. You should be able to easily poke a finger into it. This ensures a silky, perfectly smooth Peanut Butter Delight filling every single time.
Mistake 2: Not Beating the Whipped Cream Enough (or Beating Too Much)
The whipped cream gives the filling its light, mousse-like texture. Under-beating it means it’s too soft and won’t hold its structure, leading to a runny cheesecake. Over-beating it turns it grainy and can lead to butter! The perfect whipped cream has stiff peaks that hold their shape firmly when you lift the beaters. A pro tip is to start on medium speed and finish on high, stopping to check often as you get close. It’s better to stop a little early than to go too far.
Mistake 3: Skipping the Long Chill
Impatience is the enemy of no-bake cheesecakes. If you try to slice it after just two or three hours, it will be a soupy, delicious mess on the plate. The chilling time is not a suggestion—it’s a requirement for the structure. The fats need time to firm up. For the absolutely perfect sliceable texture that makes this dessert so impressive, you must let it chill for the full 6 hours, ideally overnight. Plan ahead and make it the day before your event.
Mistake 4: A Soggy Crust
A crust that turns to mush can ruin the perfect bite. This usually happens if the butter isn’t mixed in properly, or if the crumb layer is pressed in too loosely. Make sure every crumb is coated with the melted butter—it acts as the glue. Then, press, press, press! Use firm, even pressure with the bottom of a glass to compact it into a solid layer. A dense crust will stand up proudly against the creamy filling and provide that essential crunchy contrast.
Frequently Asked Questions
Can I make this Peanut Butter Cheesecake ahead of time?
Absolutely! That’s one of the best things about this recipe. You should make it at least one day ahead of when you need it. The long chill in the refrigerator is crucial for the perfect texture and flavor. In fact, making it ahead takes the stress out of party day. Just decorate it with the final whipped cream and candies a few hours before serving. It will keep beautifully in the fridge for up to 5 days, so it’s a fantastic make-ahead dessert for any busy schedule.
What’s the best peanut butter to use for the filling?
For the creamiest, smoothest results, use a standard commercial creamy peanut butter, not a natural one where the oil separates. Brands like Jif or Skippy work perfectly. The stabilizers in them help keep the filling consistent and prevent it from becoming oily. If you only have natural peanut butter, be sure to stir it incredibly well until it’s completely homogenous before measuring it out. The texture might be a bit different, but the flavor will still be fantastic.
Can I freeze Peanut Butter Delight Cheesecake?
Yes, you can freeze it very successfully. To freeze the whole cheesecake, let it set completely in the fridge first. Then, do not add the final whipped cream topping. Wrap the entire pan tightly in plastic wrap, then in a layer of aluminum foil. Freeze for up to 2 months. Thaw it overnight in the refrigerator before you plan to serve it, then add your fresh whipped cream and decorations. You can also freeze individual slices for a quick sweet treat anytime.
My filling is too runny. What did I do wrong?
A runny filling usually points to one of two issues. First, the heavy cream may not have been whipped to stiff enough peaks. Soft peaks will deflate and make the mixture loose. Second, the cheesecake likely didn’t chill long enough. Remember, this dessert sets in the fridge, not while you’re mixing it. If it’s still too soft after the full chilling time, you can try placing it in the freezer for an hour to firm up more before serving. Next time, ensure your cream is stiff and be patient with the chilling step.
Can I use a different type of pan?
A springform pan is highly recommended because the removable sides make it easy to get the cheesecake out without damaging it. However, you can use a regular 9-inch pie dish or a square 9×9 baking dish. You will just serve it directly from the dish. Be aware that a deeper dish like a pie plate might not fit all the filling, so you could have a little extra. You can also make mini cheesecakes in a muffin tin lined with parchment liners for adorable individual portions.
Is there a way to make this recipe healthier?
You can make some swaps for a lighter version. Use reduced-fat cream cheese and a light whipped topping instead of whipping heavy cream. Choose a natural peanut butter with no added sugar and use a sugar substitute approved for baking in place of the powdered sugar. For the crust, you can mix the graham crumbs with a lighter butter spread or even a bit of applesauce to bind it. Keep in mind that changing ingredients will affect the final texture and richness. For more on balancing treats with everyday nutrition, always check trusted resources.
How do I get clean slices when cutting the cheesecake?
The secret to a clean slice is a hot, clean knife. Fill a tall glass with very hot water. For each slice, dip a sharp, thin-bladed knife into the hot water, wipe it completely dry with a towel, and then make a clean, swift cut. Repeat this process—dip, wipe, cut—for every single slice. The heat helps the knife glide through the cold, creamy filling and the firm chocolate candies without dragging or sticking, giving you beautiful, professional-looking pieces.
Can I add other mix-ins besides Reese’s Pieces?
Of course! This recipe is a wonderful base for your favorite candy bar. Try chopped Snickers for caramel and nougat bits, crushed Butterfingers for a toffee-like crunch, or mini M&M’s for a colorful pop. You could also fold in crushed pretzel pieces for a sweet-and-salty vibe or swirl in some fruit jam. Think of the basic filling as your playground. Just be mindful of adding very wet ingredients, as they can affect the setting quality of the cheesecake.
Why did my whipped cream topping deflate or get watery?
Whipped cream can deflate or “weep” if it’s over-whipped, if the bowl was not cold, or if it sits for too long on top of the moist filling. To prevent this, ensure everything is cold when you whip it. Stabilize your topping by adding a tablespoon of powdered sugar or a teaspoon of instant pudding mix (vanilla or cheesecake flavor) to the cream before whipping. This helps it hold its shape for days. Only add the final whipped cream layer a few hours before serving, not before the long overnight chill.
I don’t have an electric mixer. Can I make this by hand?
You can, but it will be a serious workout! The most challenging part will be whipping the heavy cream to stiff peaks by hand. Use a large, cold metal bowl and a balloon whisk. It will take several minutes of vigorous whisking. For the cream cheese, make sure it is exceptionally soft so you can beat it smooth with a sturdy whisk or a wooden spoon. While not impossible, an electric mixer makes the process much quicker and easier, especially for achieving that light, airy filling texture.
Ready to Create Your Own Peanut Butter Delight?
There you have it—everything you need to make a show-stopping, unforgettable Peanut Butter Delight cheesecake. This recipe is all about joy, from the simple process of making it to the happy faces of everyone who gets a taste. It has earned its permanent spot in my recipe box, and I know it will in yours too. Don’t forget to explore our entire collection of decadent cheesecake recipes for more inspiration. Now, go grab that peanut butter and get mixing. Your new favorite dessert is waiting!
Equipment
- Grand bol
- Fouet
- Spatule
- Moule à charnière de 9 pouces
- Cul de poule
Ingredients
- 1 1/2 tasse chapelure de biscuits Graham
- 1/2 tasse beurre fondu
- 2 cuillère à soupe sucre granulé
- 450 g fromage à la crème
- 1 tasse crème épaisse
- 1/2 tasse beurre de cacahuète crémeux
- 1/2 tasse sucre glace
- 1 cuillère à café extrait de vanille
- 100 g pépites de chocolat
- 100 g pépites de Reese's
Instructions
- Mélangez les chapelures de biscuits Graham, le beurre fondu et le sucre dans un bol jusqu'à obtenir une consistance de sable humide. Pressez dans un moule à charnière et réfrigérez pendant 10 minutes.
- Dans un bol froid, battez la crème épaisse jusqu'à obtenir des pics fermes. Dans un autre bol, battez le fromage à la crème jusqu'à ce qu'il soit lisse, puis ajoutez le beurre de cacahuète et le sucre glace. Mélangez jusqu'à obtenir une consistance crémeuse.
- Incorporez délicatement la crème fouettée dans le mélange de beurre de cacahuète, puis ajoutez les pépites de chocolat et les pépites de Reese's
- Versez la garniture sur la croûte réfrigérée et lissez le dessus. Préparez plus de crème fouettée et étalez-la ou décorez le dessus.
- Décorez avec des mini pépites de chocolat, des pépites de Reese's et un filet de sirop au chocolat.
- Couvrez et réfrigérez pendant au moins 6 heures, de préférence toute la nuit avant de servir.