
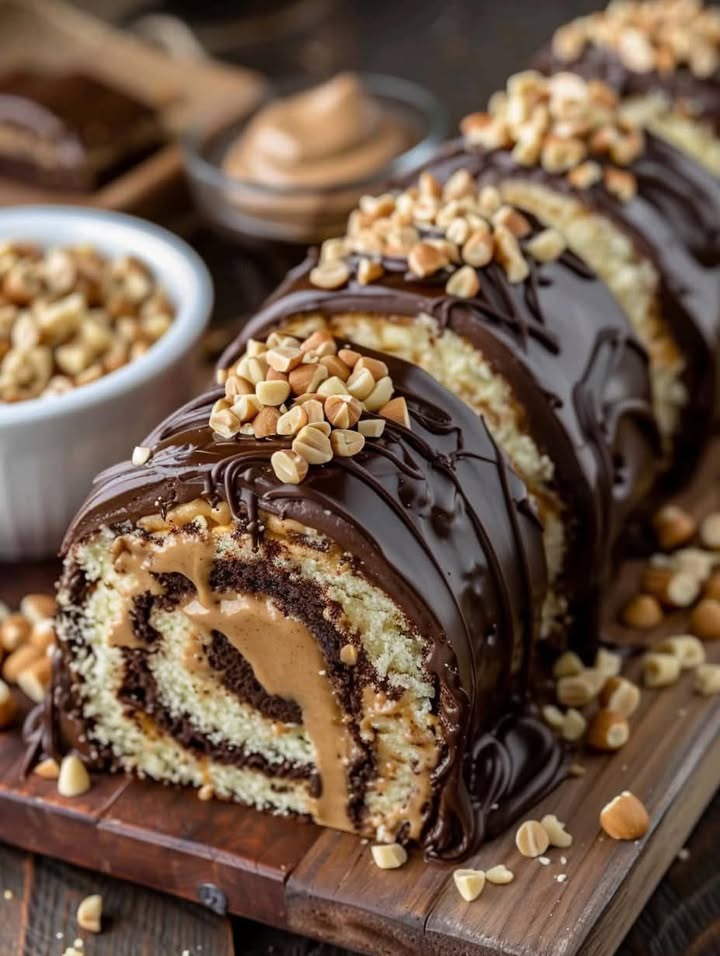
A Peanut Butter Roll Cake That Will Steal the Show
Have you ever baked something that disappears before you even get to take a photo? That’s this Peanut Butter Cup Cake Roll. It happened at my last family dinner. My uncle, who “never eats dessert,” secretly cut himself a second slice. This incredible dessert combines a light chocolate sponge cake with a dreamy, creamy peanut butter filling packed with chopped peanut butter cups. It’s all wrapped up and drowned in a glossy chocolate ganache. Trust me, this cake roll is a conversation starter and an absolute crowd-pleaser every single time.
The Whimsical History of the Roll Cake
While the classic chocolate roll cake has roots in European patisserie, often called a Swiss Roll or *roulade*, this version is a delicious American twist. We took a beloved format and stuffed it with one of our favorite flavors: peanut butter and chocolate. It’s a fun, retro dessert that feels both fancy and comforting. My version is extra special because it’s loaded with mini peanut butter cups inside and out, turning a simple roll into a decadent, textural masterpiece that’s perfect for modern gatherings.
Why You’ll Go Nuts for This Peanut Butter Roll
You will love this recipe for so many reasons! First, it looks incredibly impressive but is surprisingly forgiving to make. The rolling technique might seem tricky, but my method with the towel makes it foolproof. Second, the flavor combination is unbeatable. The light, airy chocolate cake contrasts perfectly with the rich, slightly salty peanut butter filling. And let’s be honest, anything with chopped peanut butter cups is a guaranteed win. It’s the ultimate dessert for anyone who adores a peanut butter chocolate dessert.
Perfect Occasions for Your Chocolate Peanut Butter Roll
This cake roll is your secret weapon for so many events! It’s elegant enough for a birthday celebration or holiday party. It’s also a fantastic finale for a casual game-day gathering or a potluck where you want to wow your friends. I love making it for my book club because it slices beautifully and people can enjoy a perfect, neat piece with their coffee. It’s truly a versatile dessert that fits any moment where joy and indulgence are on the menu.
Gathering Your Ingredients
Let’s get everything ready. Using room-temperature eggs is key for the cake’s volume. Here’s what you’ll need:
For the Chocolate Sponge Cake:
- 3/4 cup all-purpose flour
- 1/4 cup cocoa powder (natural or Dutch-process)
- 1 teaspoon baking powder
- 1/4 teaspoon salt
- 4 large eggs (at room temperature)
- 3/4 cup granulated sugar
- 1 teaspoon vanilla extract
- 1/4 cup powdered sugar (for rolling)
For the Peanut Butter Filling:
- 1 cup creamy peanut butter
- 1/2 cup unsalted butter, softened
- 1 cup powdered sugar
- 1 teaspoon vanilla extract
- 1/4 cup heavy cream
- 1 cup mini peanut butter cups, chopped
For the Chocolate Ganache Topping:
- 1 cup semi-sweet chocolate chips
- 1/2 cup heavy cream
- Chopped peanuts (optional, for crunch)
Handy Ingredient Substitutions
No problem if you’re missing something! Here are easy swaps:
- Flour: A 1-to-1 gluten-free baking flour works well.
- Cocoa Powder: You can use dark cocoa for a richer flavor.
- Peanut Butter: Use a natural peanut butter, but ensure it’s well-stirred and creamy. For a nut-free option, try sunflower seed butter.
- Heavy Cream: For the ganache, full-fat coconut cream can be used. For the filling, more softened butter can stand in.
- Peanut Butter Cups: Chopped chocolate bars, Reese’s Pieces, or even plain peanuts add great texture.
How to Make Your Peanut Butter Cup Cake Roll
Follow these steps for a perfect, crack-free roll every time. Let’s bake!
Step 1: Prep and Mix Dry Ingredients
First, heat your oven to 350°F (175°C). Line your 10×15-inch jelly roll pan with parchment paper, letting the paper hang over the long sides. This “sling” will be your best friend later for lifting the cake. In a small bowl, grab a whisk. Gently whisk together the flour, cocoa powder, baking powder, and salt. You want to aerate these dry ingredients and banish any lumps of cocoa. Seeing that deep brown color mix with the white flour is the first sign your chocolate cake is coming to life.
Step 2: Whip the Eggs and Sugar
Now, for the magic! In a large bowl, use an electric mixer to beat the eggs and granulated sugar. Start on medium, then go to high. Beat for a full 4-5 minutes. The mixture will become thick, pale yellow, and fall off the beaters in a ribbon. This step is crucial for a light, spongy cake. When you lift the beaters, the ribbon should sit on top of the mixture for a few seconds before dissolving. Pro tip: Room temperature eggs whip up much higher and faster than cold ones!
Step 3: Fold and Bake
Gently stir the vanilla extract into your fluffy egg mixture. Next, take your bowl of dry ingredients. Sprinkle about a third of it over the eggs. Using a large spatula, fold it in gently with a figure-eight motion. Repeat until all the flour mixture is just combined. You want to keep as much air in the batter as possible. Pour this beautiful, airy batter into your prepared pan. Use an offset spatula to spread it into an even, thin layer all the way to the corners. Slide the pan into your preheated oven and bake for 12-15 minutes. The cake is done when the top springs back lightly when you touch it.
Step 4: The Critical Roll
While the cake bakes, lay a clean, thin kitchen towel on the counter. Dust it generously with the 1/4 cup of powdered sugar. This creates a non-stick surface. As soon as the cake comes out of the oven, immediately invert it onto the sugared towel. Carefully peel off the warm parchment paper—it should come off easily. Now, starting from a short end, use the towel to help you roll the warm cake up tightly. Let this rolled-up cake log cool completely on a wire rack. Rolling it warm is the secret to a flexible cake that won’t crack later.
Step 5: Make the Dreamy Filling
While the cake cools, make the irresistible filling. In a medium bowl, beat the creamy peanut butter and softened butter together until completely smooth and creamy. Add the powdered sugar, vanilla, and heavy cream. Beat again until everything is light and fluffy. The heavy cream makes it extra smooth. Finally, fold in your chopped mini peanut butter cups. Try not to eat this filling by the spoonful—it’s a real test of willpower! Chef’s tip: If your filling seems too thick to spread, add another tablespoon of heavy cream.
Step 6: Fill and Re-Roll
Time for assembly! Carefully unroll the cooled cake. It will lie flat beautifully. Spread the peanut butter filling evenly over the entire surface, leaving just a tiny border at the edges. Now, gently but confidently, roll the cake back up. This time, roll it without the towel inside. Don’t worry if a little filling squishes out the ends—that’s normal! Place your peanut butter roll cake seam-side down on a serving plate or wire rack.
Step 7: Top with Ganache and Chill
For the final flourish, make the chocolate ganache. Place the chocolate chips in a heatproof bowl. Heat the heavy cream in a small saucepan until it just begins to simmer. Pour the hot cream over the chocolate chips and let it sit for one minute. Then, whisk slowly from the center outwards until you have a glossy, smooth chocolate sauce. Let it cool for about 5 minutes so it thickens slightly. Pour the ganache over your cake roll, using a spoon or spatula to coax it over the sides. Sprinkle with chopped peanuts right away if you’re using them. Refrigerate the whole masterpiece for at least one hour to set everything before slicing.
Your Peanut Butter Roll Timeline
| Activity | Time |
|---|---|
| Prep Work & Cake Baking | 30 minutes |
| Baking Time | 12-15 minutes |
| Cooling Time | 45-60 minutes |
| Filling & Assembly | 20 minutes |
| Chilling Time | 1 hour (minimum) |
| Total Time (Hands-on) | ~50 minutes |
| Total Time (Until Serving) | ~2 hours |
Chef’s Secret for a Perfect Roll
My number one secret is all in the roll. Do not let the cake cool in the pan. You must roll it in the towel while it is still warm and flexible. This “trains” the cake to hold its rolled shape and prevents cracks when you add the filling. The powdered sugar on the towel stops it from sticking. Even if you see a tiny crack, don’t panic – the filling and ganache will hide it beautifully.
A Little Peanut Butter Trivia
Did you know peanut butter became a staple in American households after it was promoted as a healthy, protein-rich food during World War I? Today, we just love it for its delicious, comforting flavor. Combining it with chocolate in a cake roll dessert feels like a celebration of that classic pairing. For those interested in the origins of their ingredients, making sustainable food choices can start with selecting peanut butter from brands committed to responsible farming practices.
Essential Equipment
- 10×15-inch Jelly Roll Pan
- Parchment Paper
- Electric Mixer (hand or stand)
- Large Mixing Bowls
- Whisk and Spatulas
- Clean Kitchen Towel
- Wire Cooling Rack
Storing Your Leftover Cake Roll
If you have any leftovers, cover the cake roll tightly with plastic wrap or store it in an airtight container in the refrigerator. It will stay fresh and delicious for up to 4-5 days. The flavors actually meld and improve after a day!
The ganache topping will stay firm and glossy in the fridge. Because of the dairy in the filling and ganache, I do not recommend leaving it out at room temperature for more than a couple of hours.
You can also freeze this roll cake for longer storage. Wrap the whole roll or individual slices tightly in plastic wrap, then in foil or a freezer bag. Freeze for up to 2 months. Thaw overnight in the refrigerator before serving.
Pro Tips for Success
- Measure Flour Correctly: Spoon flour into your measuring cup and level it off. Don’t scoop directly from the bag, as it packs the flour and can make the cake dense.
- Cool Completely: Make sure the cake is completely cool before adding the filling. A warm cake will melt the creamy filling and make a mess.
- Ganache Consistency: Let your ganache cool for a few minutes after mixing. If it’s too runny, it will slide right off the cake. A slightly thickened ganache will cling perfectly.
- Sharpen Your Knife: For clean slices, dip a sharp knife in hot water and wipe it dry between each cut.
Presentation Perfection
Make your cake roll look bakery-perfect! Before slicing, run the tines of a fork down the length of the ganache to create a gorgeous wavy pattern. Garnish each plate with a few extra chopped peanut butter cups or a dusting of cocoa powder. For a holiday twist, sprinkle crushed candy canes on top instead of peanuts. Serving it on a long platter or cake stand really shows off its beautiful spiral.
Love This? Try These Healthier Twists!
This recipe is wonderfully adaptable. Here are six creative variations to try:
- Banana-Peanut Butter Roll: Add a layer of sliced bananas on top of the peanut butter filling before rolling. It’s like a frozen banana treat in cake form!
- Lower-Sugar Version: Use a sugar substitute blend designed for baking in the cake. For the filling, mix plain Greek yogurt with powdered peanut butter and a touch of honey.
- Dark Chocolate & Almond: Use dark cocoa in the cake, almond butter in the filling, and top with toasted sliced almonds for a richer, nuttier flavor.
- Berry Swirl Roll: Swirl a few tablespoons of raspberry or strawberry jam into the peanut butter filling before rolling, and top the ganache with freeze-dried berry dust.
- Protein-Packed Cake Roll: Replace half the flour in the cake with your favorite vanilla protein powder. This is a great post-workout treat.
- Vegan Chocolate Peanut Butter Roll: Use flax eggs in the cake, vegan butter and preferred creamy nut butter in the filling, and coconut cream for the ganache.
More Decadent Desserts You’ll Adore
If you love the combination of chocolate and peanut butter in a peanut butter roll cake, you are going to flip for my Ultimate Slutty Brownies. They layer cookie dough, Oreos, and brownies for the ultimate bar cookie. For another impressive layered dessert, my creamy Tropical Fruit Trifle is always a hit. Chocolate lovers must try the layered bliss of my Boston Cream Pie Fudge for a no-bake treat. And if cheesecake is your weakness, the Irresistible Hot Fudge Sundae Brownie Cheesecake combines three of the best desserts ever into one jaw-dropping slice.
Common Mistakes to Avoid
Steer clear of these common pitfalls for a perfect cake roll every time.
Mistake 1: Overbaking the Sponge Cake
This is the biggest cause of a cracked cake roll. An overbaked sponge loses its moisture and flexibility, becoming brittle. It will crack as soon as you try to roll it. To avoid this, set a timer for the minimum bake time. The cake is done when the top looks set and springs back lightly when you press it. It might still look a little soft, but that’s perfect. Remember, it continues to cook slightly from residual heat after coming out of the oven.
Mistake 2: Rolling the Cake When It’s Cool
Waiting too long to roll the cake is a recipe for disaster. You must roll it in the towel immediately after taking it out of the oven. The heat and steam make the cake pliable. If you let it cool flat, it will set in that flat shape and resist rolling. Be brave and use the towel to guide you. The powdered sugar prevents sticking, so you can roll it tightly without fear.
Mistake 3: Using Cold Filling on a Warm Cake
Patience is key here. After you roll the warm cake to cool, you must let it cool completely before unrolling and adding the peanut butter filling. If the cake is even slightly warm, it will melt the butter and cream in the filling. This creates a greasy, runny mess that will squish out and make the roll soggy. Let the cake sit in its rolled-up towel on a wire rack until it’s genuinely room temperature.
Mistake 4: A Runny Ganache Topping
Pouring hot, freshly made ganache over your cake will lead to a puddle on your plate. Ganache needs a few minutes to cool and thicken. After you mix the hot cream and chocolate, let it sit at room temperature for 5-7 minutes. Give it a gentle stir. It should coat the back of a spoon. When it’s slightly thickened, pour it over the roll. It will cling to the sides in a beautiful, glossy layer instead of dripping straight off.
Mistake 5: Skipping the Chill Time
Resist the urge to slice into your beautiful creation right away! After you add the ganache, the cake roll needs to chill in the refrigerator for at least one hour. This time allows the filling to firm up and the ganache to set completely. If you cut it too soon, the filling can ooze out and the slices won’t hold their shape. The wait is hard, but it makes for a clean, professional-looking spiral in every slice.
Frequently Asked Questions
Can I make this Peanut Butter Roll Cake ahead of time?
Absolutely! This is a fantastic make-ahead dessert. You can bake, fill, and roll the cake the day before. Wrap it tightly in plastic wrap and refrigerate. The next day, make the ganache, pour it over the chilled roll, and let it set for an hour before serving. The flavors actually deepen overnight, making it even more delicious. Just be sure to store it properly in the fridge.
My cake cracked when I rolled it. What did I do wrong?
Don’t worry, small cracks happen! The most common reasons are overbaking the cake or waiting too long to roll it after baking. The cake needs to be flexible, and that comes from the steam and heat. Even with a crack, all is not lost. The filling and ganache act like glue and frosting, hiding most imperfections. Just roll it tightly with the crack on the inside where it won’t show, and proceed confidently.
What type of peanut butter is best for the filling?
For the creamiest, most stable filling, I recommend using a regular creamy peanut butter like Jif or Skippy. These have stabilizers that help the filling hold its shape. Natural peanut butter (the kind that separates) can sometimes make the filling oily or too soft. If you only have natural peanut butter, make sure it’s very well stirred and consider adding an extra 1-2 tablespoons of powdered sugar to help thicken it up.
Can I freeze the Peanut Butter Roll Cake?
Yes, you can! Freeze it before adding the ganache for best results. Wrap the filled and rolled cake (without ganache) very tightly in plastic wrap, then in aluminum foil. Freeze for up to 2 months. Thaw overnight in the refrigerator. On the day you plan to serve it, make the fresh ganache, pour it over the thawed cake, and let it set. You can also freeze it with the ganache, but the texture of the ganache may change slightly upon thawing.
Can I use a different size pan?
I strongly recommend using the 10×15-inch jelly roll pan. This size creates the perfect thin cake for rolling. If you use a larger pan, the cake will be too thin and may overbake or tear. If you use a smaller pan, the cake will be too thick and will definitely crack when you try to roll it. Investing in the right pan makes this recipe foolproof.
Do I have to use the kitchen towel method?
The towel method is the traditional and most reliable way to roll a sponge cake without sticking. A clean, lint-free kitchen towel dusted with powdered sugar works perfectly. Some bakers use a sheet of parchment paper instead of a towel. The key is using something flexible that you can use to lift and guide the cake as you roll. The powdered sugar (or cocoa powder for a chocolate roll) is a non-negotiable non-stick agent.
How do I get perfectly clean slices?
The secret to neat slices is a hot, sharp knife. Run your slicing knife under very hot water, dry it quickly with a towel, and make your cut in one smooth, confident motion. Wipe the knife clean and reheat it under water for each slice. The heat helps the knife glide through the firm filling and ganache without dragging or crumbling the cake.
Can I add other things to the filling?
Of course! Get creative. You could fold in crispy bacon bits for a sweet-salty crunch, swirl in some strawberry jam, or mix in mini chocolate chips instead of peanut butter cups. A tablespoon of instant coffee granules added to the filling would give you a mocha twist. Just make sure any add-ins are finely chopped so they don’t tear the delicate cake when you roll it.
Is there a nut-free alternative for this roll cake?
For a nut-free version, you can replace the peanut butter in the filling with a seed butter like sunflower seed butter (often called “sunbutter”). It has a similar texture and a lovely, slightly earthy flavor. Be sure to check that your cocoa powder and other ingredients are processed in nut-free facilities if you have a severe allergy. Top with sprinkles instead of peanuts for decoration.
Why is my ganache not shiny?
A dull ganache can happen if the cream was too hot and “broke” the chocolate, or if you stirred it too vigorously and incorporated air bubbles. To fix it, ensure you pour hot (just simmering, not boiling) cream over the chocolate chips. Let it sit for a minute, then stir gently from the center outwards until smooth. If it’s still dull, you can add a tiny pat of butter or a teaspoon of light corn syrup as you stir to bring back the gloss.
For more incredible creations like this, explore all of our sweet inspirations in my collection of favorite cake and cupcake recipes.
Ready to Bake and Wow?
This Peanut Butter Cup Cake Roll is more than just a dessert. It’s a fun baking project that ends with a stunning, delicious reward. Don’t let the rolling scare you—just follow the warm-rolling tip, and you’ll be a pro. The look on your friends’ faces when you slice into that perfect chocolate and peanut butter spiral is worth every minute. So preheat that oven, grab your towel and powdered sugar, and let’s make a dessert that will have everyone asking for your secret. Happy baking!
Equipment
- Grand bol
- Fouet
- Spatule
- Plaque à pâtisserie
- Papier sulfurisé
Ingredients
- 4 œufs
- 150 g sucre
- 30 g cacao en poudre
- 65 g farine tout usage
- 5 g poudre à lever
- 1 g sel
- 240 ml crème épaisse
- 120 ml beurre d'arachide crémeux
- 90 g pépites de chocolat semi-sucrées
- q.s. sucre glace pour saupoudrer
- q.s. cacao en poudre pour saupoudrer
Instructions
- Préchauffez votre four à 175°C. Graissez une plaque à pâtisserie de 15x10 pouces et tapissez-la de papier sulfurisé.
- Dans un grand bol, battez les œufs et le sucre jusqu'à ce que le mélange soit épais et pâle. Tamisez le cacao en poudre, la farine, la poudre à lever et le sel. Incorporez délicatement jusqu'à obtenir une pâte lisse.
- Versez la pâte dans le moule préparé et étalez-la uniformément. Faites cuire au four pendant 12-15 minutes ou jusqu'à ce que le gâteau rebondisse au toucher.
- Alors que le gâteau cuit, préparez la garniture au beurre d'arachide. Dans un bol moyen, battez le beurre d'arachide et le beurre ramolli jusqu'à obtenir un mélange lisse. Ajoutez le sucre glace, le vanilla, et la crème épaisse; mélangez jusqu'à ce que le tout soit aéré, puis incorporez les morceaux de pépites de beurre d'arachide.
- Une fois le gâteau cuit, retournez-le sur un torchon saupoudré de sucre glace. Retirez soigneusement le papier sulfurisé et roulez-le avec le torchon à l'intérieur. Laissez-le refroidir complètement.
- Déroulez le gâteau et étalez la garniture au beurre d'arachide uniformément. Roulez à nouveau le gâteau sans le torchon.
- Pour le ganache, placez les pépites de chocolat dans un bol et chauffez la crème jusqu'à frémissement; versez-la sur le chocolat et fouettez jusqu'à obtenir un mélange lisse.
- Versez le ganache sur le rouleau et réfrigérez pendant au moins 1 heure pour qu'il prenne avant de couper.
Notes
Nutrition

Hi, I’m Olivia Parker, the founder of BakingSecret.com and a lifelong lover of all things sweet and homemade. I grew up in a small town in Oregon, where the smell of fresh cookies in my family’s kitchen sparked my passion for baking. Over the years, I turned that passion into a mission: to help home bakers feel confident, inspired, and creative.
After studying food science and working in several artisan bakeries across the U.S., I decided to create a space where everyone from beginners to seasoned bakers can find reliable recipes, expert tips, and a warm, welcoming community. BakingSecret.com is my way of sharing the magic of baking with the world. When I’m not testing new recipes, you’ll find me exploring farmers’ markets, collecting vintage cookbooks, or perfecting my sourdough technique.