
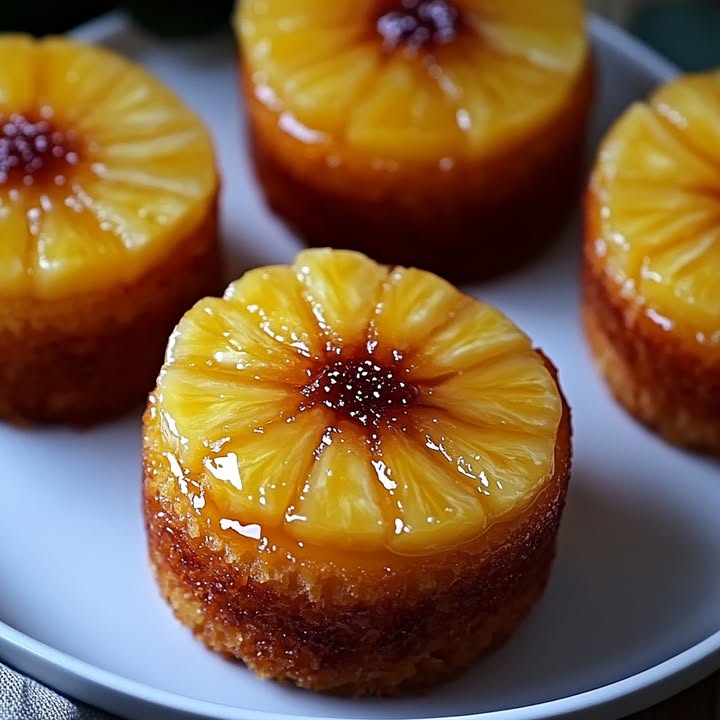
You know that moment when you crave something sweet, but you want it to feel a bit fancy too? I was right there last weekend, rummaging through my pantry. I spotted a lonely can of pineapple and a tub of mascarpone, and a little light bulb went off! The result? These stunning, upside-down little cakes that are pure joy. Let me tell you, these Pineapple Mascarpone Muffins (or Petits Moelleux Renversés if you’re feeling fancy!) are a total game-changer for a simple treat.
The Sweet Story of an Upside-Down Treat
The idea of turning a cake upside down is pure genius. It started with the classic Tarte Tatin, an apple dessert famously flipped after baking. This method creates a gorgeous, caramelized fruit topping that becomes the beautiful bottom. My version takes that fun flip and shrinks it into personal portions. By using juicy pineapple rings and rich mascarpone, it mixes a tropical vibe with Italian creaminess. It’s a modern twist on a very old, very clever trick. I love how it feels both classic and new at the same time.
Why You’ll Adore These Pineapple Muffins
Where do I begin? First, they look like you spent hours in a fancy bakery, but the truth is they’re incredibly simple. The mascarpone makes the crumb unbelievably tender and moist—no dry cakes here! The brown sugar and pineapple caramelize into a sticky, golden topping that’s just magical. They are the perfect balance of not too sweet and wonderfully satisfying. Trust me, your family will ask for these again before the last one is even gone.
When to Whip Up These Little Cakes
These moelleux are incredibly versatile. I’ve made them for a friend’s birthday brunch, and they were a huge hit. They’re elegant enough for a dinner party dessert but casual enough for a Saturday afternoon snack with coffee. They’re also a brilliant way to end a summer barbecue, bringing a taste of the tropics to your table. Basically, any time you want to put a smile on someone’s face, this is your recipe.
Gathering Your Ingredients
Here’s what you’ll need to make about 4-6 delightful little cakes. The beauty is in its simplicity!
- 150 g (about 1 ¼ cups) all-purpose flour
- 100 g (about ½ cup) granulated sugar
- 2 large eggs, at room temperature
- 100 g (about ½ cup) mascarpone cheese
- 4-6 pineapple rings (canned or fresh)
- 50 g (about ¼ cup) brown sugar (for the caramel)
- 50 g (about 3 ½ tbsp) unsalted butter (for the caramel)
- 1 tsp baking powder
- ½ tsp vanilla extract
- A pinch of salt
No Problem! Handy Substitution Ideas
Don’t have every item? No worries! Cooking is about improvisation.
- Mascarpone: Full-fat plain Greek yogurt or sour cream can work in a pinch. The texture will be slightly different, but still delicious.
- Canned Pineapple: Fresh pineapple works wonderfully! Just slice it thinly. You could also try peach or apricot halves.
- All-purpose flour: A 1-to-1 gluten-free flour blend can be used for a gluten-free version.
- Granulated sugar: For a deeper flavor, you can use all brown sugar in the cake batter too.
Crafting Your Pineapple Mascarpone Muffins
Let’s get our hands busy! Preheat your oven to 350°F (180°C). Grab your muffin tin and let’s create some magic.
Step 1: Create the Golden Caramel Base
First, let’s make the sticky, delicious foundation. In a small saucepan, melt the butter and brown sugar together over low heat. Stir it gently until it bubbles and combines into a smooth, fragrant caramel. This will only take a few minutes. Carefully spoon this liquid gold into the bottom of each muffin cup. Place one pineapple ring snugly into each pool of caramel. The smell is already incredible—like buttery, toasty sweetness.
Step 2: Whisk Up the Dreamy Batter
Now, for the fluffy cloud of cake. In a large bowl, whisk the eggs and granulated sugar together until they become pale and slightly frothy. Add the mascarpone and vanilla extract, and whisk again until the mixture is smooth and creamy. Imagine you’re making a light, tangy cloud. In another bowl, sift together the flour, baking powder, and salt. Gently fold the dry ingredients into the wet mascarpone mixture. Pro tip: Fold gently and just until combined. Overmixing leads to tough cakes, and we want them moelleux—soft and tender!
Step 3: Assemble and Bake to Perfection
The fun part! Spoon the beautiful, thick batter evenly over the pineapple rings in your prepared tin. Use a spatula to smooth the tops gently. Slide the tin into your preheated oven. They’ll bake for about 20-25 minutes. You’ll know they’re done when the tops are golden and a toothpick inserted into the cake part comes out clean. Your kitchen will smell like a tropical bakery paradise.
Step 4: The Grand (and Careful) Reveal
This is the most important step! Let the cakes cool in the tin for just 5 minutes—no longer, or the caramel will harden and stick. Place a wire cooling rack or a large plate over the top of the muffin tin. With oven mitts on, confidently and quickly flip the whole thing over. Give the bottom of the tin a few gentle taps. Slowly lift the tin away to reveal your stunning, caramel-drizzled creations. Chef’s tip: If a pineapple ring sticks, just use a small knife to gently loosen it and place it back on the cake.
Your Recipe Timetable
Good things don’t always take forever!
- Prep Time: 15 minutes
- Cooking Time: 25 minutes
- Cooling/Flip Time: 5 minutes
- Total Time: About 45 minutes
A Little Chef’s Secret
For an extra flavor boost, sprinkle just a tiny pinch of flaky sea salt over the caramel in each cup before adding the pineapple. That sweet and salty contrast will make everyone’s eyes light up with the first bite.
A Pinch of Extra Info
Did you know the word “moelleux” in French literally means “soft like marrow”? It’s the perfect word for that irresistibly tender, melt-in-your-mouth texture we’re after. Using mascarpone, a cheese from Lombardy, Italy, is the trick to achieving that luxurious mouthfeel without heaviness.
Kitchen Tools You’ll Need
You likely have everything already!
- Standard 6-cup muffin tin
- Mixing bowls (2)
- Whisk and spatula
- Small saucepan
- Measuring cups/spoons
- Wire cooling rack
Storing Your Sweet Masterpieces
These are best enjoyed the day they are made, while the caramel is still gooey. If you have leftovers, let them cool completely first. Then, place them in a single layer in an airtight container.
You can store them at room temperature for up to 2 days. The cake will stay moist thanks to the mascarpone, though the caramel topping may soften into the cake a bit more, which is still delicious.
For longer storage, you can freeze them. Wrap each cooled cake individually in plastic wrap and then place in a freezer bag. They’ll keep for up to a month. Thaw at room temperature or warm gently in the oven.
My Best Tips for Success
- Room temp is key: Using room temperature eggs and mascarpone helps them blend smoothly and create a better rise.
- Don’t skip the sifting: Sifting the flour with the baking powder prevents lumps and adds air for a lighter cake.
- The 5-minute flip: Really, don’t wait longer than 5-7 minutes to flip your cakes. It’s the secret to a clean release.
- Customize it: Add a teaspoon of rum or dark rum to the caramel for a grown-up twist, or sprinkle shredded coconut on top before serving.
Pretty Presentation Ideas
- Serve each warm cake with a small dollop of extra mascarpone or a scoop of vanilla ice cream.
- Garnish with a fresh mint leaf or a few toasted coconut flakes for color and crunch.
- Place them on a beautiful cake stand for a tea party or brunch. They look gorgeous individually.
- Drizzle a little extra caramel sauce from the bottom of the plate around the cake for a restaurant-style finish.
Want to Mix It Up? Try These Variations!
Once you master the basic recipe, the world is your oyster! Here are six fun twists to keep things exciting.
- Citrus Sunshine: Replace the pineapple with thin orange slices. Add a little orange zest to the batter for a bright, sunny flavor.
- Berry Burst: Use a mix of fresh raspberries or blueberries instead of pineapple. Toss them in a little flour before placing them in the caramel to prevent sinking.
- Chocolate Indulgence: Add 2 tablespoons of cocoa powder to the dry ingredients for a chocolate version. A cherry in the center of each pineapple ring makes it a Black Forest treat.
- Spiced Apple: Classic and cozy. Use thinly sliced apples and add a dash of cinnamon and nutmeg to the batter.
- Ginger & Pear: Use pear slices and add 1 teaspoon of grated fresh ginger to the caramel for a warm, spicy kick.
- Tropical Coconut: Add ¼ cup of shredded coconut to the batter and use pineapple-mango mixes for a full island getaway in a cake.
Linking Up Some Kitchen Inspiration
If you loved the ease and elegance of these individual cakes, you might also enjoy exploring my other simple muffin and quick bread recipes. They are all designed for real home bakers. For more ideas using similar flavors, check out this guide to perfecting upside-down cakes, this collection of easy desserts with mascarpone, these tips for baking with tropical fruits, and my favorite make-ahead brunch bakes.
Common Mistakes to Avoid
Avoiding these simple pitfalls will guarantee perfect cakes every single time.
Mistake 1: Using Cold Ingredients Straight From the Fridge
This is a very common oversight. Cold mascarpone and eggs don’t blend well with the sugar. They can create a lumpy batter and prevent proper emulsification, leading to a dense cake. Always take your eggs and mascarpone out about 30 minutes before you start baking. They should feel cool to the touch, not cold. This simple step makes your batter smooth and helps it rise beautifully.
Mistake 2: Overmixing the Cake Batter
We’ve all done it—you want a perfectly smooth batter, so you keep mixing. With this recipe, that’s a problem. Overmixing develops the gluten in the flour. This turns your tender Pineapple Mascarpone Muffins into tough, chewy little hockey pucks. Once you add the dry ingredients, fold gently with a spatula. It’s okay if you see a few tiny streaks of flour. They will disappear during baking, leaving you with a wonderfully soft crumb.
Mistake 3: Letting the Cakes Cool Too Long Before Flipping
Patience is a virtue, but not here! If you wait for the cakes to cool completely in the tin, the caramel will harden and cement itself to the metal. You’ll end up with a mess when you try to turn them out. Set your timer for 5 minutes after they come out of the oven. That’s the sweet spot—the cakes are set enough to hold their shape, but the caramel is still warm and fluid. Be brave and flip with confidence!
Mistake 4: Overfilling the Muffin Cups
It’s tempting to use all that delicious batter. Remember, these cakes will rise as they bake. If you fill the cups more than about ¾ full, you risk a volcanic overflow in your oven. This makes cleanup a pain and can cause uneven baking. Pro tip: Use an ice cream scoop or a measuring cup to divide the batter evenly. Leaving that little space at the top gives your cakes room to puff up into perfect domes.
Frequently Asked Questions
Can I make these Pineapple Mascarpone Muffins ahead of time?
You can prepare them a few hours in advance! I recommend baking them, letting them cool completely, and storing them in an airtight container at room temperature. They are best served fresh, but will still be very good the same day. If you need to make them a full day ahead, I’d suggest storing them in the fridge, then bringing them to room temperature or warming them slightly in the oven before serving. The caramel topping is most luscious when fresh or gently rewarmed.
My caramel stuck to the pan. What did I do wrong?
Don’t worry, it happens! The two most likely culprits are waiting too long to flip or not using enough butter/sugar for the caramel layer. Next time, ensure your caramel mixture is bubbling and hot when you pour it in, and be very strict about that 5-minute cooling window before flipping. Also, make sure you are using a standard non-stick muffin tin. If pieces do stick, you can gently scrape them out with a small knife and place them back on top of the cakes—it will still taste amazing.
Can I use fresh pineapple instead of canned?
Absolutely! Fresh pineapple works wonderfully and adds a brighter, tangier flavor. The key is to slice it very thinly (about ¼ inch thick) so it softens nicely during baking. Canned pineapple is often a bit softer and sweeter, so both options are great. Just make sure your fresh pineapple rings fit snugly in the bottom of your muffin cup.
What can I use if I don’t have a mascarpone?
No problem! The best substitute is full-fat, plain Greek yogurt. It will give you a similar tang and keep the cakes moist, though the texture will be slightly less rich. Full-fat sour cream is another good option. Avoid low-fat versions, as the fat in the mascarpone is crucial for that tender, moelleux texture we love so much.
Is it possible to make this recipe gluten-free?
Yes, it is very easy to adapt! Simply replace the all-purpose flour with a trusted 1-to-1 gluten-free baking flour blend. Brands like Bob’s Red Mill or Cup4Cup work very well. Make sure your blend contains xanthan gum, which helps mimic the structure that gluten provides. The rest of the recipe stays exactly the same, and you’ll get equally delicious results.
Why did my cakes sink in the middle after baking?
A sunken cake is usually a sign of underbaking or opening the oven door too early. The structure of the cake needs time to set. Make sure your oven is fully preheated and use a toothpick to test for doneness—it should come out clean from the center. Also, try not to open the oven door during the first 15-20 minutes of baking, as a rush of cold air can cause the delicate batter to collapse.
Can I freeze these upside-down cakes?
You sure can! They freeze beautifully. Let the cakes cool completely after flipping. Wrap each one individually in plastic wrap, then place them in a single layer in a freezer bag or airtight container. They can be frozen for up to a month. To serve, thaw them at room temperature or warm them, still wrapped, in a low oven until heated through. This makes them a fantastic make-ahead dessert for unexpected guests.
How can I make sure my cakes are perfectly moist?
The mascarpone is your secret weapon for moisture! Also, be careful not to overbake them. Start checking at the 20-minute mark. The tops should be springy to the touch and a toothpick should have a few moist crumbs attached, not be completely wet. Remember, the cakes will continue to cook a little from residual heat after they come out of the oven. Following healthy eating patterns can include enjoying balanced, home-baked treats like these in moderation.
Can I make one large cake instead of individual portions?
Of course! This recipe adapts wonderfully to a single 8-inch round cake pan. Simply make the caramel directly in the pan on the stovetop (if it’s oven-safe) or transfer it after melting. Arrange the pineapple rings in a single layer in the caramel, then pour all the batter on top. The baking time will be longer, likely 35-45 minutes. Use the toothpick test to check for doneness in the center.
My caramel burned a little. Is the recipe ruined?
It depends on how burned it is. A very dark, bitter caramel will make the whole cake taste bitter. If it just got a touch darker than golden, it might be okay and just have a deeper, toffee-like flavor. To prevent this, always melt your butter and sugar over low heat and watch it closely. It should bubble and become fragrant, but not smoke or turn black. If it starts to smell acrid, start over—it’s better to use a fresh batch for the best flavor.
And there you have it! My go-to recipe for a dessert that never fails to impress. These Petits Moelleux Renversés à l’Ananas & Mascarpone are little parcels of joy. They prove that with a few simple steps and good ingredients, you can create something truly special. So grab that can of pineapple, and let’s get flipping. Happy baking!
Equipment
- Moule à muffins standard
- Mélangeur
- Spatule
- Petite casserole
- Tasses et cuillères à mesurer
Ingredients
- 150 g farine tout usage
- 100 g sucre granulé
- 2 œufs à température ambiante
- 100 g fromage mascarpone
- 4-6 ronds d'ananas en conserve ou frais
- 50 g sucre brun pour le caramel
- 50 g beurre non salé pour le caramel
- 1 cuil. à café poudre à lever
- 0.5 cuil. à café extrait de vanille
- 1 pincée sel
Instructions
- Préchauffez votre four à 180°C (350°F).
- Dans une petite casserole, faites fondre le beurre et le sucre brun à feu doux jusqu'à ce que le mélange soit lisse pour créer un caramel.
- Versez le caramel au fond de chaque moule à muffins et placez un rond d'ananas sur le dessus.
- Dans un grand bol, battez les œufs et le sucre granulé jusqu'à obtenir un mélange pâle et mousseux.
- Ajoutez le mascarpone et l'extrait de vanille au mélange d'œufs, en fouettant jusqu'à obtenir un mélange homogène.
- Dans un autre bol, tamisez la farine, la poudre à lever et le sel ensemble.
- Incorporez délicatement les ingrédients secs au mélange de mascarpone jusqu'à ce qu'ils soient juste combinés.
- Versez la pâte sur les ronds d'ananas dans le moule et lissez le dessus.
- Faites cuire au four pendant 20-25 minutes jusqu'à ce que le dessus soit doré et qu'un cure-dent en ressorte propre.
- Laissez les gâteaux refroidir pendant 5 minutes avant de les retourner sur une grille de refroidissement ou une assiette.
Notes
Nutrition

Hi, I’m Olivia Parker, the founder of BakingSecret.com and a lifelong lover of all things sweet and homemade. I grew up in a small town in Oregon, where the smell of fresh cookies in my family’s kitchen sparked my passion for baking. Over the years, I turned that passion into a mission: to help home bakers feel confident, inspired, and creative.
After studying food science and working in several artisan bakeries across the U.S., I decided to create a space where everyone from beginners to seasoned bakers can find reliable recipes, expert tips, and a warm, welcoming community. BakingSecret.com is my way of sharing the magic of baking with the world. When I’m not testing new recipes, you’ll find me exploring farmers’ markets, collecting vintage cookbooks, or perfecting my sourdough technique.