

A Cheesecake That Throws a Party in Your Mouth
Have you ever had a dessert so good it made you pause? I had that moment at a family gathering. My Aunt Sophia brought her famous baklava. My cousin brought a classic New York cheesecake. They sat side-by-side on the table, looking delicious. I had a wild thought. “What if we put these two together?” That was the day my Pistachio Baklava Cheesecake was born. It’s a hug from a Greek grandmother and a high-five from a New York deli, all in one slice.
The Sweet Story of Two Classics
Baklava is ancient. Its layers of flaky phyllo, nuts, and syrup have been loved for centuries. Cheesecake dates back to ancient Greece too. But the creamy, rich version we know is pure American diner dream. My recipe is a mash-up of these two timeless treats. It respects the old ways but isn’t afraid to play. It’s a modern dessert with a very long, very delicious family tree.
Why You’ll Fall in Love With This Pistachio Cheesecake
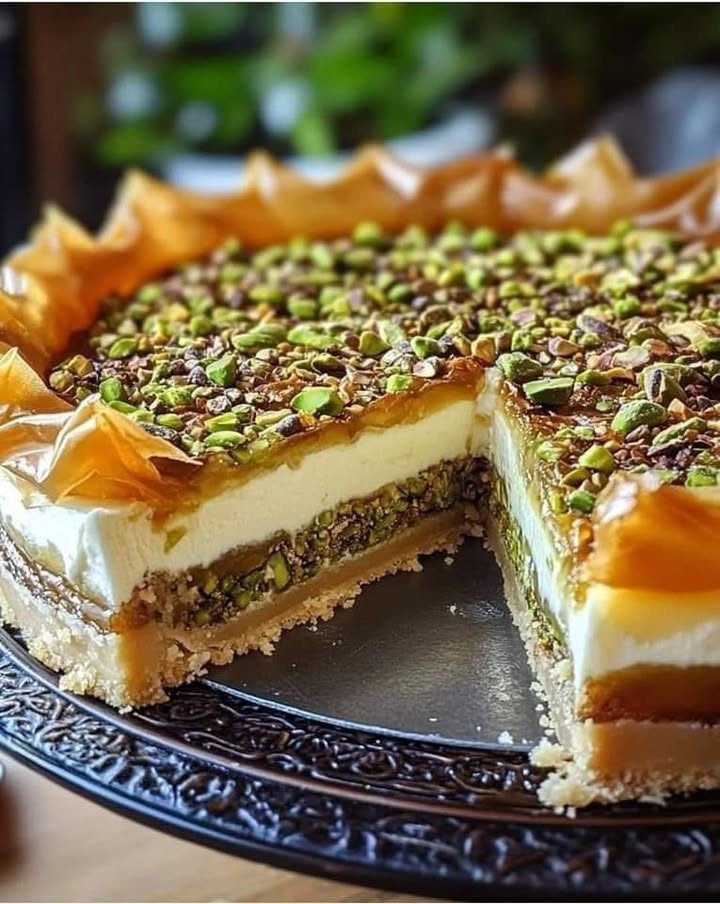
- It’s a textural wonder: You get creamy, crunchy, crispy, and chewy all at once.
- The flavor is deep: Nutty pistachios, warm cinnamon, fragrant honey, and tangy cream cheese sing together.
- It looks stunning: The golden, buttery phyllo layers and green pistachios make it a centerpiece.
- It feeds a crowd: This is a dessert for sharing and creating happy memories.
When to Serve Your Pistachio Baklava Cheesecake
This isn’t your everyday dessert. This is your celebration cake. Make it for holidays like Eid, Christmas, or Thanksgiving. It’s perfect for dinner parties where you want to impress. It’s also a beautiful finale for a special birthday or anniversary. Any time you want a dessert that says “This is a big deal,” this is your recipe.
Gathering Your Ingredients
Here’s what you’ll need. I recommend having everything at room temperature before you start.
For the Cheesecake Base:
- 2 cups graham cracker crumbs (shortbread works too)
- 1/2 cup unsalted butter, melted
- 1/4 cup granulated sugar (optional, but I like it)
For the Cheesecake Layer:
- 24 oz (680g) cream cheese, softened
- 1 cup granulated sugar
- 3 large eggs
- 1 tsp vanilla extract
- 1/4 cup sour cream
- 1/4 cup heavy cream
For the Baklava Layer:
- 1 cup chopped pistachios
- 1/2 cup chopped walnuts (or more pistachios)
- 1/2 cup granulated sugar
- 1 tsp ground cinnamon
- 1/4 cup honey
For the Phyllo Layers:
- 8-10 sheets of phyllo dough
- 1/2 cup melted butter
For the Syrup:
- 1/2 cup honey
- 1/2 cup water
- 1/2 cup granulated sugar
- 1 tsp lemon juice
- 1 tsp vanilla extract
Smart Swaps: Ingredient Substitutions
- Nuts: All pistachios is amazing. Almonds or pecans work in the mix too.
- Crust: Digestive biscuits or vanilla wafers can replace graham crackers.
- Phyllo dough: Keep it covered with a damp towel. It dries out faster than gossip spreads!
- Dairy: Full-fat Greek yogurt can stand in for sour cream in a pinch.
How to Make Pistachio Baklava Cheesecake: Step-by-Step
Step 1: Prep the Base
First, heat your oven to 325°F (160°C). Grease a 9-inch springform pan. In a medium bowl, mix the graham cracker crumbs with that glorious melted butter and sugar. It should feel like wet sand. Press this mixture firmly and evenly into the bottom of your pan. Bake it for 8-10 minutes. This toasts the crust and gives it a sturdy base. Let it cool on a rack. The smell is already so warm and inviting!
Step 2: Make the Cheesecake Filling
In a large bowl, beat the softened cream cheese and sugar together. Use a hand mixer or stand mixer. Beat until it’s perfectly smooth and no lumps remain. Now, add the eggs one at a time. Beat well after each egg is added. This is key for a silky texture. Finally, mix in the vanilla, sour cream, and heavy cream. Keep mixing until everything is one homogenous, creamy dream. Pour this over your cooled crust and smooth the top gently.
Step 3: Create the Nutty Baklava Mix
Grab a smaller bowl for your baklawa layer. Chop your pistachios and walnuts. You want them finely chopped but not powdered. Mix the nuts with the sugar and cinnamon. The cinnamon will make your kitchen smell incredible. Drizzle in the honey and stir it all up. The mixture will be chunky and sticky. Set this colorful, fragrant pile aside for its big moment.
Step 4: Layer the Phyllo Like a Pro
This is the fun part! Unroll your phyllo dough. Keep it under a damp towel. Place one sheet on top of the creamy cheesecake layer. Quickly brush it lightly with melted butter. Don’t drench it, just a light coat. Repeat this process, buttering each sheet. Use 8-10 sheets total. You’ll see lovely, rumpled layers forming. Now, carefully spoon your baklava nut mixture over the top phyllo sheet. Spread it into an even layer, right to the edges.
Pro tip: Work fast with phyllo and keep it covered! It becomes brittle if it dries out.
Step 5: Bake to Perfection
Loosely cover the entire pan with aluminum foil. This prevents the phyllo from burning before the cheesecake sets. Bake at 325°F (160°C) for about 1 hour. The center should be just set but have a slight jiggle. Turn off the oven. Crack the door open with a wooden spoon. Let the cheesecake cool slowly inside for an hour. This prevents major cracking. After that hour, take it out and let it cool completely on the counter.
Step 6: Chill It Out
Once the pan is cool to the touch, transfer the whole cheesecake to your refrigerator. It needs to chill for at least 4 hours. Overnight is even better. This waiting is the hardest part! But it lets the flavors meld and the texture firm up perfectly for slicing.
Step 7: Make the Fragrant Syrup
About an hour before serving, make the syrup. In a small saucepan, combine honey, water, sugar, lemon juice, and vanilla. Bring it to a gentle boil over medium heat. Let it simmer for about 10 minutes. It will thicken slightly and become a beautiful golden syrup. Let it cool until it’s just warm, not hot. Pouring hot syrup on a cold cheesecake can make it weep.
Chef’s tip: The lemon juice in the syrup isn’t just for flavor. It balances the sweetness and helps prevent crystallization.
Step 8: The Grand Finale
Take your chilled cheesecake from the fridge. Run a thin knife around the edge of the springform pan and release the ring. Drizzle the cooled syrup all over the top. Let some drip down the sides—it’s pretty! Garnish with a handful of extra chopped pistachios for a fresh pop of color and crunch. Slice with a sharp, hot knife (dip it in hot water and wipe dry between cuts) for clean slices.
Your Recipe Timetable
Prep Time: 30 minutes
Cook Time: 1 hour
Cooling/Chilling Time: 5+ hours (be patient!)
Total Time: About 6.5 hours
Servings: 12 rich slices
Chef’s Secret for Baklava Cheesecake Success
My biggest secret? Room temperature ingredients are non-negotiable. Take your cream cheese, eggs, sour cream, and heavy cream out of the fridge at least an hour before you start. This ensures your cheesecake batter blends smoothly without over-mixing. Over-mixing adds too much air. That air can cause cracks as it bakes and cools. A smooth batter means a smooth, creamy, crack-free top.
A Nod to the Nut
Pistachios aren’t just a pretty green color. They are known as the “smiling nut” in Iran and the “happy nut” in China. This is because their shell looks like it’s smiling! Using them in this dessert feels like a little edible celebration. They also offer a lovely benefit for dessert lovers. Their rich, satisfying flavor and good protein balance can help you feel content with just one perfect slice.
Tools You’ll Need
- 9-inch springform pan
- Electric hand mixer or stand mixer
- Medium and large mixing bowls
- Pastry brush
- Small saucepan
- Sharp knife for chopping nuts
- Measuring cups and spoons
Storing Your Masterpiece
This cheesecake must be stored in the refrigerator. Cover it tightly with plastic wrap or place it in a large cake carrier. It will keep beautifully for up to 4-5 days. The flavors actually get better on the second day!
You can also freeze this cheesecake for longer storage. Wrap the whole cheesecake or individual slices tightly in plastic wrap. Then, wrap it again in aluminum foil. Freeze for up to 2 months. Thaw it overnight in the refrigerator before serving.
Store any leftover syrup in a sealed jar in the fridge. You can warm it gently before using it on pancakes, yogurt, or your next cheesecake adventure!
My Best Tips and Advice
- Always use a springform pan. It’s the only way to get this layered beauty out cleanly.
- Don’t skip the foil tent over the phyllo while baking. It protects the delicate dough.
- Let the cheesecake cool slowly in the turned-off oven. This is the best trick to prevent cracks.
- For the cleanest slices, dip your knife in very hot water. Wipe it dry between each cut.
Presentation Pointers
- Serve each slice with a tiny extra spoonful of the honey syrup on the side.
- A dollop of lightly sweetened whipped cream cuts the richness beautifully.
- Scatter a few whole pistachios and edible rose petals on the plate for a fancy touch.
- Present it on a cake stand with a gold-rimmed plate for a real wow factor.
Want to Mix It Up? Try These Variations!
Love the idea but want a different twist? Here are six delicious spins on the classic cheesecake.
- Chocolate Hazelnut: Swap pistachios for toasted hazelnuts. Add 1/4 cup of Nutella to the cheesecake filling.
- Lemon Poppy Seed: Add the zest of 2 lemons to the filling. Replace the baklava layer with a mix of almonds and a tablespoon of poppy seeds.
- Salty Caramel Pecan: Use pecans instead of pistachios. Drizzle the top with salted caramel sauce instead of the honey syrup.
- Berry Bliss: Skip the nuts. After adding the phyllo, top with a layer of mixed fresh berries before baking. Make a berry syrup instead of honey.
- Espresso Walnut: Add 2 tbsp of instant espresso powder to the cheesecake filling. Use only walnuts for the baklava layer.
- Tropical Twist: Use macadamia nuts and shredded coconut in the baklava layer. Add a teaspoon of coconut extract to the cheesecake filling.
Common Mistakes to Avoid
Mistake 1: Using Cold Ingredients
This is the number one reason for lumpy cheesecake batter. Cold cream cheese doesn’t blend smoothly with sugar. It forces you to over-mix. Over-mixing adds air bubbles. Those bubbles rise and pop during baking, causing cracks. Always plan ahead. Take your dairy and eggs out of the fridge an hour before you start. Your batter will be silky and smooth.
Mistake 2: Rushing the Cooling Process
You’ve baked a perfect cheesecake. You’re excited to try it! Don’t take it from the hot oven straight to the cold fridge. The sudden drastic temperature change will make it contract quickly and crack. Always follow the cool-down steps. Let it cool in the turned-off oven first. Then on the counter. Then in the fridge. Patience gives you a pristine top.
Mistake 3: Pouring Hot Syrup on Cold Cake
The honey syrup needs to be warm, not hot, when you add it. If the syrup is boiling and you pour it on a cold cheesecake, it can create a soggy, wet layer. It can also cause condensation. Let the syrup cool for at least 20-30 minutes after simmering. It should be just slightly warm to the touch. This way, it will soak in nicely and add shine without messing up the texture.
Mistake 4: Not Covering the Phyllo
Phyllo dough is paper-thin and has no fat on its own. Exposed to the dry heat of your oven, it will burn in seconds. That’s why the loose foil tent is so important. It traps a little steam and shields the delicate layers. Remove the foil for the last 5-10 minutes only if you want a deeper golden color. Keep an eye on it!
Frequently Asked Questions
Can I make this Pistachio Baklava Cheesecake ahead of time?
Yes, absolutely! In fact, I highly recommend it. This cheesecake needs to chill for at least 4 hours. It’s even better the next day. The flavors have more time to get to know each other. The texture firms up perfectly for slicing. You can bake it up to two days before you plan to serve it. Store it covered in the fridge. Add the syrup and final pistachio garnish a few hours before your guests arrive.
My phyllo dough ripped. Is that okay?
Don’t worry at all! Phyllo is very delicate and rips easily. The beauty of this recipe is that it’s very forgiving. You are layering many sheets on top of each other. A rip or hole in one sheet will be covered by the next one. Just patch it as best you can and keep going. Once baked and covered with nuts and syrup, no one will ever know.
Can I use frozen phyllo dough?
Yes, frozen phyllo dough works great. The key is to thaw it properly. Transfer it from the freezer to the refrigerator the night before you plan to bake. Let it thaw slowly there. Don’t try to thaw it at room temperature or in the microwave. This can make the sheets soggy and cause them to stick together. Once thawed, treat it just like fresh phyllo dough.
Why did my cheesecake crack on top?
A few things can cause cracks. Over-mixing the batter adds too much air. Baking at too high a temperature cooks the edges too fast. The most common reason is cooling it too quickly. Following the “cool in the oven with the door cracked” step is crucial. But listen, if it does crack, don’t stress! You are covering the whole top with a gorgeous layer of nuts and syrup. Any cracks will be completely hidden. It will still taste incredible.
Can I use a different type of nut?
You sure can. While pistachios give that classic baklawa flavor and color, other nuts work well. Almonds are a very traditional choice for baklawa. Walnuts are also common and have a rich flavor. You can use all one kind or a mix. For best flavor, toast your nuts lightly in a dry pan before chopping them. This brings out their natural oils and makes them extra fragrant.
Do I have to use a springform pan?
For this specific layered recipe, I strongly recommend a springform pan. The sides come off cleanly without you having to flip the cake. Trying to get a layered cheesecake out of a regular cake pan is very tricky. The springform is a worthwhile investment if you love making cheesecakes. It makes the whole process much less stressful and the presentation much more professional.
How do I know when the cheesecake is done baking?
This is a great question. The cheesecake is done when the edges look set but the center still has a slight jiggle. It should jiggle like soft jelly, not liquid. If you gently nudge the pan, the center area (about the size of a drink coaster) should move a little while the outer ring is firm. It will continue to set as it cools. Over-baking leads to a dry, crumbly texture, so when in doubt, err on the side of a little underdone.
Is there a substitute for the honey in the syrup?
If you need to avoid honey, you can make a simple syrup with just sugar and water. Use 1 cup of sugar and 1/2 cup of water. Simmer until the sugar dissolves and the syrup thickens slightly. You’ll miss the distinct floral flavor of honey, but it will still be sweet and sticky. You could also add a splash of maple syrup at the end for a different flavor profile.
Can I freeze leftovers of this cheesecake?
Freezing works very well. Wrap individual slices tightly in plastic wrap. Then place them in a freezer bag or airtight container. Freeze for up to 2 months. To serve, thaw a slice overnight in the refrigerator. The texture will be just as creamy. I don’t recommend freezing the whole cheesecake with the syrup already on it. Freeze it plain, and add fresh syrup after thawing.
What’s the purpose of sour cream in the filling?
Sour cream does two wonderful things. First, it adds a very subtle tang. This balances the intense sweetness from the sugar and honey. It makes the flavor more complex and interesting. Second, it adds extra fat and liquid. This results in an even richer, creamier, and smoother texture. It helps prevent the cheesecake from becoming too dry or dense. It’s a small ingredient with a big impact.
Ready for More Cheesecake Joy?
If this fusion dessert has you excited, you’re in the right place! I adore making luxurious desserts that feel special. For more creamy, dreamy ideas, explore our full collection of favorite cheesecake recipes. You might love a classic Strawberry Cheesecake for summer, or go bold with a Red Velvet Oreo Cheesecake. And if you’re looking for a lighter treat, our Fruit and Cottage Cheese Jelly Dessert is wonderfully refreshing.
The Final Slice
Creating this Pistachio Baklava Cheesecake is a labor of love. But every minute is worth it. When you bring it to the table, you’ll see smiles. When your friends take that first bite, you’ll hear happy sighs. It’s more than a dessert. It’s a conversation starter. It’s a memory maker. It’s the delicious proof that two amazing ideas can come together to create something even better. So, gather your ingredients, take your time, and bake something unforgettable. You’ve got this!
Equipment
- Grand bol
- Fouet électrique ou batteur sur socle
- Spatule
- Moule à charnière de 9 pouces
- Pinceau à pâtisserie
Ingredients
- 2 tasses miettes de biscuits Graham
- 1/2 tasse beurre non salé, fondu
- 1/4 tasse sucre granulé (optionnel)
- 24 oz fromage à la crème, ramolli
- 1 tasse sucre granulé
- 3 grands œufs
- 1 cuil. à café extrait de vanille
- 1/4 tasse crème sure
- 1/4 tasse crème épaisse
- 1 tasse noix de pistache hachées
- 1/2 tasse noix hachées (ou plus de pistaches)
- 1/2 tasse sucre granulé
- 1 cuil. à café cannelle moulue
- 1/4 tasse miel
- 8-10 feuilles pâte phyllo
- 1/2 tasse beurre fondu
- 1/2 tasse miel
- 1/2 tasse eau
- 1/2 tasse sucre granulé
- 1 cuil. à café jus de citron
- 1 cuil. à café extrait de vanille
Instructions
- Préchauffez votre four à 325°F (160°C) et graissez un moule à charnière de 9 pouces.
- Mélangez les miettes de biscuits Graham, le beurre fondu et le sucre dans un bol, puis pressez fermement au fond du moule et faites cuire pendant 8-10 minutes. Laissez refroidir.
- Dans un grand bol, battez le fromage à la crème et le sucre jusqu'à ce que le mélange soit lisse, puis ajoutez les œufs un par un, en mélangeant bien après chaque ajout. Ajoutez la vanille, la crème aigre et la crème épaisse, en mélangeant jusqu'à homogène. Versez sur la croûte.
- Dans un bol plus petit, mélangez les noix hachées, le sucre et la cannelle pour la couche de Baklava, puis ajoutez le miel en filet et mélangez bien.
- Superposez les feuilles de pâte phyllo sur le cheesecake, en brossant chaque feuille légèrement avec du beurre fondu, puis déposez le mélange de noix sur la couche supérieure.
- Recouvrez de papier d'aluminium et faites cuire pendant environ 1 heure ou jusqu'à ce que le centre ait une légère oscillation. Laissez refroidir dans le four pendant une heure.
- Réfrigérez le cheesecake pendant au moins 4 heures ou toute la nuit.
- Pour préparer le sirop, combinez tous les ingrédients dans une casserole et laissez mijoter jusqu'à épaississement, puis laissez refroidir.
- Détachez le moule à charnière, nappez le cheesecake de sirop, décorez de pistaches et tranchez.