
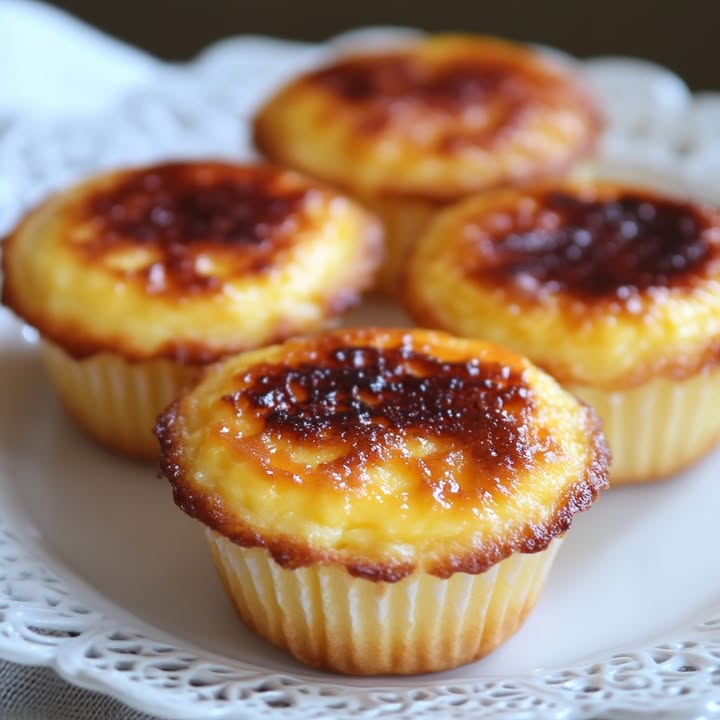
A Little Taste of Portugal, Right in Your Kitchen
I still remember the first time I bit into a warm Queijada. I was on a sunny porch in Lisbon, the coffee was strong, and this little cupcake was pure magic. It wasn’t too sweet, had the most delicate custardy texture, and just melted away. I knew right then I had to figure out how to make these Portuguese Custard Cupcakes at home. The best part? They’re astonishingly simple. If your kitchen currently holds flour, sugar, eggs, and milk, you are dangerously close to Portuguese pastry heaven.
From Monastery Kitchens to Your Table: The Story of Queijadas
These humble tarts have a history as rich as their flavor. Originating centuries ago in Portugal’s monasteries, nuns used simple, fresh ingredients—cheese (“queijo”), eggs, and sugar—to create these treats. The modern version we’re making today often skips the cheese, leaning into a luscious milk custard base. It’s a beautiful example of how a traditional recipe can travel and adapt, becoming a beloved homemade dessert everywhere. Whether you call them Queijadas, Portuguese tartlets, or custard cupcakes, they carry a sweet legacy in every bite.
Why You’ll Love This Portuguese Custard Cupcakes Recipe
You will adore this recipe because it is the definition of “easy baking” with a huge payoff. First, the flavor is sublime: a golden, buttery top giving way to a soft, vanilla-kissed center with a whisper of cinnamon. Second, it uses one bowl and ingredients you likely already have. No fancy techniques, no chilling dough. Just mix, pour, and bake. It’s the perfect project for a baking novice or a seasoned pro who wants a quick, impressive traditional pastry. They make your house smell incredible, too!
Perfect Occasions for These Delicate Treats
These cupcakes are wonderfully versatile. Serve them warm for a cozy weekend breakfast with coffee. They shine at a brunch spread, offering something different from muffins. They’re elegant enough for a ladies’ luncheon or a tea party. I love packing a few in a pretty box as a “thinking of you” gift for a neighbor. Honestly, any day that needs a little sweetening is the right day for a batch of homemade Queijadas.
What You’ll Need: The Ingredients
Gather these simple ingredients for your sweet tooth satisfaction:
- 1 cup granulated sugar
- ½ cup unsalted butter, melted
- 2 eggs
- 1 cup whole milk
- ½ cup all-purpose flour
- ½ teaspoon cinnamon plus extra for dusting
- 1 teaspoon vanilla extract
- Pinch of salt
No Whole Milk? No Problem! Handy Substitutions
Out of something? Don’t worry! You can easily swap a few items.
- Milk: 2% milk works fine, though the custard will be slightly less rich. For a non-dairy version, use full-fat canned coconut milk for a similar creamy texture.
- Cinnamon: Try a pinch of nutmeg or cardamom for a different warm spice note.
- Vanilla: The seeds from half a vanilla bean would be luxurious. Or, use ½ teaspoon of almond extract for a nutty twist.
Baking Your Portuguese Custard Cupcakes: A Step-by-Step Guide
Step 1: Prep and Preheat
Start by getting your oven nice and hot—375°F (190°C) is the sweet spot. While it heats, take your muffin tin and give it a light greasing. I use a little butter or a quick spray of baking oil. This simple step guarantees your golden-brown cupcakes will pop right out later. Trust me, scraping a stuck cupcake is a heartbreak we can avoid!
Step 2: Create the Sweet Butter Base
In a good-sized mixing bowl, combine the granulated sugar and the melted, slightly cooled butter. Whisk them together until they become a smooth, pale, and glossy mixture. You’ll see the sugar start to dissolve into the butter. This step is key for that signature moist, tender crumb. Pro tip: Let the melted butter cool for a minute so it doesn’t cook the eggs in the next step.
Step 3: Incorporate the Eggs
Now, crack in your first egg. Whisk it in thoroughly until it’s completely blended into the butter and sugar. Then, add the second egg and do the same. Taking them one at a time ensures a smooth, emulsified batter without any strange curdling. Your mixture should now be thick, creamy, and a beautiful light yellow color.
Step 4: Bring It All Together
Here’s where the magic happens! Pour in the whole milk, followed by the all-purpose flour, cinnamon, vanilla extract, and that tiny pinch of salt. The salt is crucial—it balances all the sweetness and makes the flavors sing. Whisk everything gently but confidently until you have a perfectly smooth, thin batter. It will look like rich, golden cream. No lumps allowed!
Step 5: Fill and Bake
Carefully pour or ladle the batter into your prepared muffin cups. Fill each one about ¾ of the way full. This gives them space to puff up beautifully without spilling over. Slide the tin into the center of your preheated oven. Now, just wait. In 20 to II25 minutes, you’ll have perfect cupcakes—golden brown on top and slightly firm to a gentle touch.
Step 6: Cool, Dust, and Devour
When they’re done, take the tin out and let it rest on a rack for just 5 minutes. This lets the cupcakes settle and firm up a bit. Then, gently run a knife around the edges and lift them out. While they’re still warm, dust the tops with a little extra cinnamon from a fine sieve. It looks gorgeous and adds a final fragrant touch. Serve them warm or at room temperature. Chef’s tip: For an extra professional touch, sprinkle that cinnamon in a light, even layer for a picture-perfect finish.
Your Baking Timeline
This recipe is wonderfully quick from start to finish.
- Prep Time: 10 minutes
- Cook Time: 20-25 minutes
- Cooling Time: 5 minutes (in tin)
- Total Time: About 35-40 minutes
- Servings: Makes about 12 standard cupcakes
Chef’s Secret for the Perfect Texture
My secret for an extra creamy, custard-like interior is to use room temperature eggs and milk. Cold ingredients can cause the melted butter to seize up slightly, which can affect the final texture. Letting your dairy and eggs sit out for 30 minutes before you start ensures everything blends into a silky-smooth batter that bakes up divinely tender.
A Little Extra Sweet Info
Did you know the town of Sintra in Portugal is famously known for its Queijadas? They’ve been made there since the Middle Ages! While many regions have their own version, Sintra’s are particularly beloved. Making this recipe connects you to a delicious, centuries-old tradition of simple, heartfelt baking.
Necessary Equipment
You don’t need anything fancy!
- Standard 12-cup muffin tin
- Large mixing bowl
- Whisk
- Measuring cups and spoons
- Small sieve for dusting cinnamon (optional but nice)
How to Store Your Portuguese Treats
These cupcakes are best enjoyed the day they are made, especially when still slightly warm. The texture is at its peak—custardy and sublime.
If you have leftovers, let them cool completely. Then, store them in an airtight container at room temperature for up to 2 days. The tops may soften a bit, but they will still taste wonderful.
For longer storage, you can freeze them. Place cooled cupcakes in a single layer on a baking sheet to freeze solid, then transfer to a freezer bag. They’ll keep for up to 2 months. Thaw at room temperature and give them a quick 5-minute warm-up in the oven to revive that fresh-baked feel.
Tips and Advice for Success
- Don’t overmix: Once you add the flour, just mix until the batter is smooth. Over-mixing can lead to tougher cupcakes.
- Oven watch: All ovens vary. Start checking at 20 minutes. They’re done when the edges are pulling away from the tin and the center no longer jiggles.
- Grease well: Even non-stick pans benefit from a light greasing for these sticky-sweet treats.
- Love exploring world flavors? You can find more inspiration in our collection of international pastries from around the globe.
Presentation Tips to Wow Your Guests
- Serve on a rustic wooden board with a dusting of powdered sugar alongside the cinnamon.
- Place each cupcake in a pastel-colored paper liner for a charming, bakery-style look.
- Add a small bowl of fresh berries on the side for a pop of color and a fresh contrast.
- Drizzle with a thin thread of honey or caramel sauce for a decadent twist.
6 Fun Variations to Try
Once you master the classic, get creative! Here are six delicious spins on the traditional Portuguese Custard Cupcake.
- Lemon Zest Queijadas: Add the zest of one lemon to the batter for a bright, sunny flavor.
- Orange Blossom: Substitute the vanilla extract with ½ teaspoon of orange blossom water for a fragrant, floral note.
- Coconut Delight: Replace ¼ cup of the milk with canned coconut milk and fold in ½ cup of toasted shredded coconut.
- Chocolate Swirl: Before baking, drop a small teaspoon of chocolate hazelnut spread or melted dark chocolate into each cup and swirl with a toothpick.
- Berry Jam Center: Fill each muffin cup only halfway with batter, add a teaspoon of raspberry jam, then cover with more batter.
- Brown Sugar & Ginger: Use brown sugar instead of white and add ¼ teaspoon of ground ginger with the cinnamon.
Common Mistakes to Avoid
Mistake 1: Using Butter That’s Too Hot
This happens when you melt the butter and immediately dump it into the sugar with the eggs. The hot butter can lightly cook the eggs, causing a grainy or slightly curdled batter. It might still bake up okay, but the texture won’t be as silky. How to avoid it: Simply let your melted butter sit on the counter for 5-7 minutes until it’s just warm to the touch, not piping hot.
Mistake 2: Overfilling the Muffin Cups
We get excited and pour all that beautiful batter in! But these cupcakes puff up as they bake. If you fill the cups to the brim, they will overflow, creating a messy oven and oddly shaped treats. How to avoid it: Use a ladle or measuring cup with a spout for control. Aim for that ¾ full mark. Leaving room is your friend for a perfect dome.
Mistake 3: Overbaking for a Firm Custard
Because we’re used to cakes where a toothpick comes out clean, it’s easy to overbake these. True custard cupcakes should be set but still tender and moist in the center, not dry. How to avoid it: Bake until the tops are uniformly golden and the center just springs back when lightly pressed. A toothpick test may show a few moist crumbs, and that’s perfect.
Mistake 4: Skipping the Salt
“It’s just a pinch, does it matter?” Absolutely! Salt is a flavor enhancer that cuts through the sweetness and makes the vanilla and cinnamon pop. Without it, your cupcakes can taste one-dimensionally sweet and flat. How to avoid it: Never skip it. Even a tiny pinch from your fingers will do the job beautifully.
Frequently Asked Questions
Can I make Queijadas gluten-free?
Yes, you certainly can! The small amount of flour in this recipe makes it an easy swap. Use a good 1-to:1 gluten-free all-purpose flour blend. I recommend one that contains xanthan gum, which helps mimic the structure that gluten provides. The texture might be a tiny bit more delicate, but the flavor will be just as wonderful. Be sure to whisk your batter well to ensure the GF flour is fully incorporated.
Why are my cupcakes dense and not custardy?
A dense texture usually points to two issues. First, you may have overmixed the batter after adding the flour, which can develop too much structure. Second, the eggs might have been too cold, causing the fats to harden and not blend smoothly. For the best custardy texture, mix just until combined and use room-temperature ingredients next time. It makes a world of difference.
Can I use a silicone muffin pan?
Silicone pans work great for these cupcakes! They are naturally non-stick, so you might not even need to grease them. Just place the silicone pan on a sturdy baking sheet for support when moving it in and out of the oven. The baking time should remain the same. Let them cool in the pan as usual, then they should pop out very easily.
What’s the difference between Queijadas and Pasteis de Nata?
This is a common question! Pasteis de Nata (or Portuguese custard tarts) have a crispy, flaky puff pastry shell and a richer egg custard filling that is often caramelized on top. Queijadas, like this recipe, have a simpler, more cake-like batter that bakes into a unified, tender cupcake. Both are delicious, but Queijadas are generally easier and quicker to make at home.
How can I tell if they are done baking without a toothpick?
No toothpick? No problem. The best visual cue is a uniformly golden-brown top. Then, give the top a very gentle press with your fingertip. It should feel set and spring back slightly. The cupcakes will also pull away just a little from the edges of the muffin cup. If the center still looks wet or jiggles a lot, they need a few more minutes.
Is it okay to use salted butter?
You can use salted butter, but you should then omit the “pinch of salt” called for in the recipe. Salted butter varies in saltiness by brand, so skipping the extra salt helps you control the final flavor balance. The cupcakes will still turn out beautifully with the rich taste of butter.
Can I double this recipe?
Absolutely! This recipe doubles perfectly if you need to feed a crowd. Just use two muffin tins, or bake in batches. Make sure you’re using a bowl large enough to comfortably mix the doubled ingredients. Also, rotate your tins in the oven halfway through baking for even browning if you’re baking them at the same time.
My cupcakes sunk in the middle after baking. What went wrong?
A slight dip is normal for this custard-like texture, but a major sink usually means they were underbaked. The structure hadn’t set fully before you took them out of the oven. Next time, bake for a few minutes longer until the center is truly set. Also, avoid opening the oven door too early, as a sudden temperature drop can cause collapsing.
Can I add real cheese to make them more traditional?
For a more authentic cheesy version, you can add about ½ cup of finely grated fresh cheese, like a mild queso fresco or ricotta. Stir it in with the eggs. This will make the texture a bit denser and richer, true to some regional recipes. It’s a delicious experiment if you love cheese-based desserts!
Are these cupcakes suitable for making ahead for a party?
They are best fresh, but you can definitely bake them the morning of your event. Let them cool completely, then store at room temperature in an airtight container. To refresh them, you can warm the whole batch for 5-7 minutes in a 300°F oven before serving. This brings back that just-baked aroma and softens the texture nicely.
Ready to Bake Your Own Portuguese Sunshine?
There you have it! Everything you need to bring a piece of Portuguese baking tradition into your home. These Queijadas are more than just cupcakes; they’re a little bite of comfort, history, and pure joy. The process is part of the fun—whisking that golden batter, waiting for the sweet smell to fill your kitchen, and finally dusting those warm tops with cinnamon. Remember, baking is about sharing joy and creating memories. So, grab your whisk, preheat that oven, and get ready for some serious baking fun. Your first batch of homemade Portuguese Custard Cupcakes is waiting to be enjoyed! Don’t forget to explore our other dessert ideas, like the tangy Brown Sugar Rhubarb Cookies for a spring treat, the stunning Cherry Pistachio Citrus Cheesecake for a special occasion, the classic crowd-pleaser Apple Slab Pie, or the savory Bacon, Pepper Jack, and Jalapeño Scones for your next brunch. Happy baking!
Equipment
- Grand bol
- Fouet
- Spatule
- Moule à muffins standard de 12 tasses
- Tamis petit (optionnel)
Ingredients
- 200 g sucre
- 113 g beurre non salé, fondu
- 2 œufs
- 240 ml lait entier
- 65 g farine tout usage
- 2 g cannelle plus extra pour saupoudrer
- 5 ml extrait de vanille
- 1 pincée de sel
Instructions
- Préchauffez votre four à 190°C et graissez un moule à muffins standard de 12 tasses.
- Dans un grand bol, fouettez ensemble le sucre et le beurre fondu jusqu'à obtenir un mélange lisse.
- Ajoutez le premier œuf et fouettez jusqu'à ce qu'il soit bien mélangé, suivi du deuxième œuf et mélangez bien.
- Incorporez le lait entier, puis ajoutez la farine, la cannelle, l'extrait de vanille et une pincée de sel, en fouettant jusqu'à ce que le mélange soit lisse.
- Remplissez les moules à muffins d'environ ¾ avec la pâte.
- Faites cuire pendant 20 à 25 minutes, ou jusqu'à ce qu'ils soient dorés et légèrement fermes au toucher.
- Laissez refroidir dans le moule pendant 5 minutes, puis saupoudrez de cannelle avant de servir.
Notes
Nutrition

Hi, I’m Olivia Parker, the founder of BakingSecret.com and a lifelong lover of all things sweet and homemade. I grew up in a small town in Oregon, where the smell of fresh cookies in my family’s kitchen sparked my passion for baking. Over the years, I turned that passion into a mission: to help home bakers feel confident, inspired, and creative.
After studying food science and working in several artisan bakeries across the U.S., I decided to create a space where everyone from beginners to seasoned bakers can find reliable recipes, expert tips, and a warm, welcoming community. BakingSecret.com is my way of sharing the magic of baking with the world. When I’m not testing new recipes, you’ll find me exploring farmers’ markets, collecting vintage cookbooks, or perfecting my sourdough technique.