
The Purple Velvet Cake of Your Dreams
Let me tell you about the first time I made this purple velvet cake. It was for my niece’s “unicorn and galaxies” birthday party. I wanted something magical, something that would make her eyes light up. Red velvet is a classic, but purple? Purple felt like pure, edible magic. When I brought it out, the whole room went quiet. Then, the “oohs” and “aahs” started. It wasn’t just a hit; it was the star of the show. That’s the power of this Purple Velvet Delight. It’s more than a dessert; it’s an experience, a conversation starter, and a guaranteed smile-maker.
A Royal Hue: The Story of Velvet Cakes
Velvet cakes have a rich, delicious history. The original red velvet cake reportedly gained fame at the Waldorf-Astoria Hotel in the 1920s. Its unique texture came from the reaction between buttermilk, vinegar, and cocoa. My Purple Velvet Delight is a whimsical modern twist on that tradition. We keep that signature tender, velvety crumb but trade the classic red for a vibrant, regal purple. It’s perfect for today’s bakers who love to add a splash of personality and color to their classic bakes.
Why You’ll Fall in Love with This Purple Velvet Delight
You will adore this recipe because it’s surprisingly simple but looks incredibly fancy. The flavor is subtly tangy and rich, not overly sweet, thanks to the buttermilk and cream cheese frosting. The color is just pure joy. It’s also a wonderfully sturdy cake, making it a dream to stack and decorate, even for beginners. Whether you’re a seasoned baker or trying your first layer cake, this recipe holds your hand through every step.
Perfect Occasions for Your Purple Velvet Masterpiece
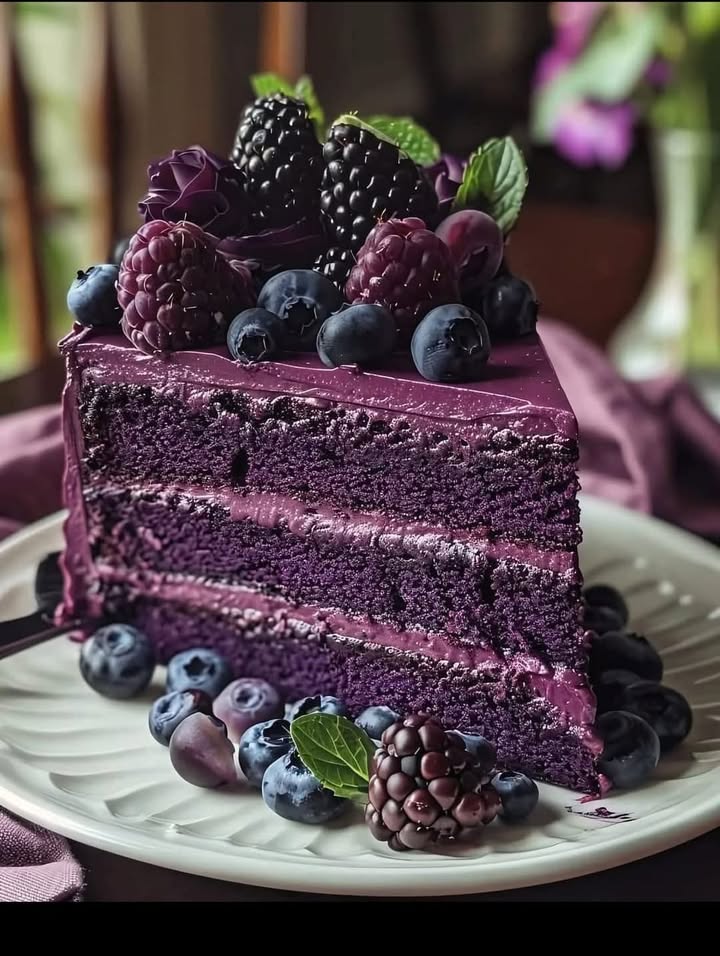
This cake isn’t just for birthdays! Its stunning color makes it ideal for so many events. Think graduation parties (school colors, anyone?), baby showers for a little princess, Halloween gatherings, or even a bold Mardi Gras celebration. It’s a showstopper for Galentine’s Day or anytime you want to treat your favorite people to something spectacular. It says “you are special” in the most delicious way possible.
Gathering Your Purple Velvet Cake Ingredients
For the Cake:
- 2 1/2 cups all-purpose flour
- 1 1/2 cups granulated sugar
- 1 teaspoon baking soda
- 1 teaspoon salt
- 1 teaspoon cocoa powder (for color depth!)
- 1 1/2 cups vegetable oil
- 1 cup buttermilk, room temperature
- 2 large eggs, room temperature
- 2 tablespoons (or more) purple food coloring (gel works best)
- 1 teaspoon white vinegar
- 1 teaspoon vanilla extract
For the Frosting & Decor:
- 1 cup unsalted butter, softened
- 8 oz cream cheese, softened
- 4 cups powdered sugar, sifted
- 1 teaspoon vanilla extract
- Edible gold leaf (optional, but wow!)
- Purple sprinkles or edible glitter
- Fresh berries for garnish
No Buttermilk? No Problem! Handy Substitutions
Don’t let a missing ingredient stop you! Here are my go-to swaps:
- Buttermilk: Make your own! Add 1 tablespoon of white vinegar or lemon juice to a measuring cup, then fill with regular milk to the 1-cup line. Stir and let it sit for 5-10 minutes until it curdles.
- Cream Cheese Frosting Alternative: For a simpler, less tangy option, use my Coconut Bliss Cake frosting base, omitting the coconut and adding a touch more vanilla.
- Food Coloring: Gel food coloring gives the most vibrant purple without thinning the batter. Start with 2 tablespoons and add more until you get that deep, royal shade you love.
- Prep Time: 30 minutes
- Cook Time: 30 minutes
- Cooling Time: 1 hour 30 minutes
- Decorating Time: 15 minutes
- Total Time: 2 hours 45 minutes
- Two 9-inch round cake pans
- Hand mixer or stand mixer
- Large mixing bowls
- Whisk and rubber spatula
- Measuring cups and spoons
- Wire cooling racks
- Offset spatula for frosting (makes life easier!)
- Room Temp is Key: Using room temperature buttermilk, eggs, butter, and cream cheese ensures everything blends smoothly without overmixing.
- Prevent Sticking: After greasing your pans, add a round of parchment paper to the bottom for guaranteed perfect release.
- Testing for Doneness: Ovens vary. Start checking at 25 minutes. The cake should be pulling away slightly from the pan’s edges.
- Frosting Too Soft? If your kitchen is warm, pop the frosting in the fridge for 15 minutes before decorating to firm it up.
- Go for a “galaxy” theme with dark purple frosting, black sprinkles, and silver edible stars.
- Keep it elegant with white frosting swirls, fresh lavender sprigs (ensure they are culinary-grade), and edible pearls.
- For a fun twist, create a “ombre” effect by tinting some frosting a lighter purple and blending it on the sides.
- Serve with a side of fresh berry compote or a dollop of lemon curd for a tangy contrast.
Creating Your Purple Velvet Delight: Step-by-Step
Step 1: Prep and Combine Dry Ingredients
First, preheat your oven to 350°F (175°C). Grease and flour two 9-inch round cake pans thoroughly. Now, in a large bowl, let’s whisk together the flour, sugar, baking soda, salt, and that single teaspoon of cocoa powder. This tiny bit of cocoa won’t make it taste chocolatey, but it deepens the purple color beautifully, giving it a rich base instead of a pastel look. It’s a little color theory trick that makes a big difference in the final presentation of your purple velvet cake.
Step 2: Mix the Vibrant Wet Ingredients
In a separate bowl, whisk together the vegetable oil, room-temperature buttermilk, eggs, purple food coloring, white vinegar, and vanilla extract. Watch as the liquid transforms into a mesmerizing, deep purple pool. The vinegar here is a quiet hero—it reacts with the baking soda later to give our cake that wonderful lift and tender texture. Pro tip: Use a whisk or fork to break the eggs and blend everything smoothly before you add it to the dry mix.
Step 3: Bring the Batter Together
Here’s where the magic happens. Gradually pour your beautiful purple wet mixture into the bowl of dry ingredients. I like to use a hand mixer on low speed for this. Mix just until the batter is smooth, velvety, and consistently colored. You’ll see it come together into a glorious, glossy, deep purple batter. Be careful not to overmix! A few little streaks are better than a tough cake.
Step 4: Bake to Perfection
Divide that stunning batter evenly between your two prepared pans. I use a kitchen scale for perfect layers, but the trusty eye-ball method works too. Slide them into the preheated oven. Bake for 25-30 minutes. You’ll know it’s done when the top springs back to a gentle touch and a toothpick inserted in the center comes out with just a crumb or two. Your kitchen will smell like a sweet, warm bakery.
Step 5: The Art of Patient Cooling
This step is crucial! Let the cakes cool in their pans for a full 10 minutes on a wire rack. This allows them to set. Then, run a knife around the edges, gently invert the pans, and let the cakes release onto the racks. Allow them to cool completely before you even think about frosting. A warm cake will melt your beautiful frosting into a sad, soggy mess. I promise, the wait is worth it.
Step 6: Whip Up the Creamy Frosting
While the cakes cool, make the frosting. In a large bowl, beat the softened butter and cream cheese together until it’s utterly smooth, creamy, and lump-free. Gradually add the sifted powdered sugar, one cup at a time, beating on low first to avoid a sugar cloud, then on high to make it fluffy. Finally, beat in the vanilla extract. You should have a thick, spreadable, and luscious frosting. Chef’s tip: For the fluffiest frosting, make sure your butter and cream cheese are truly at room temperature.
Step 7: Assemble and Create Your Masterpiece
Place your first completely cool cake layer on a serving plate or cake stand. Spread a generous, even layer of frosting on top—this is your filling. Gently place the second layer on top. Now, frost the top and sides with the remaining frosting. Don’t worry about it being perfectly smooth; a slightly rustic “naked cake” look is charming! This is your canvas. Decorate with purple sprinkles, a dusting of edible glitter, and a crown of fresh berries. For sheer, jaw-dropping elegance, gently press bits of edible gold leaf onto the sides. It’s pure magic.
Your Purple Velvet Cake Timeline
My Secret Chef’s Tip
For the most intense, non-fading purple color, use gel food coloring. The liquid kind can dilute your batter and often bakes out lighter. Start with two tablespoons of gel, whisk it thoroughly into your wet ingredients, and don’t be afraid to add a tiny bit more until you get that perfect royal purple shade before mixing with the dry ingredients.
A Fun Fact About Velvet Cakes
That tiny bit of cocoa powder in the recipe isn’t really for a chocolate flavor. Its main job is to deepen and enrich the purple color, preventing it from looking bright blue or overly artificial. It’s a little old-school baker’s trick that makes all the difference in the final look of your Purple Velvet Delight.
Equipment You’ll Need
Storing Your Purple Velvet Cake
Because of the cream cheese frosting, this cake must be stored in the refrigerator. Cover it with a cake dome or loosely with plastic wrap. It will stay fresh and delicious for up to 4 days in the fridge. The cold actually makes the flavors meld together beautifully, often tasting even better on the second day!
For longer storage, you can freeze the unfrosted cake layers. Wrap each cooled layer tightly in plastic wrap, then a layer of aluminum foil. They can be frozen for up to 2 months. Thaw overnight in the refrigerator before frosting and serving.
If you have leftover slices, store them in an airtight container in the fridge. Let them sit at room temperature for about 20 minutes before eating to take the chill off and allow the frosting to soften up perfectly.
Handy Tips and Advice
Presentation Inspiration
Healthier & Delicious Variations
Want to mix things up? Here are six fantastic ideas for your purple velvet base:
- Gluten-Free Purple Velvet: Swap the all-purpose flour for a 1:1 gluten-free baking blend. The result is just as tender and stunning.
- Reduced-Sugar Version: Cut the granulated sugar in the cake by 1/4 cup and use a sugar substitute in the frosting. The buttermilk and tang will still shine through.
- Mini Purple Velvet Cupcakes: Perfect for parties! Pour the batter into lined muffin tins and bake for 18-22 minutes. Top with a swirl of frosting.
- Berry-Filled Velvet: Add a layer of homemade raspberry jam between the cake layers for a fruity surprise, much like the filling in my Raspberry Cream Cake.
- Chocolate Chip Velvet: Fold 1/2 cup of mini white or dark chocolate chips into the batter before baking for little bursts of extra sweetness.
- Dairy-Free Delight: Use a plant-based milk + 1 tbsp lemon juice for the buttermilk, and a high-quality dairy-free cream cheese and butter for the frosting.
A Note from My Kitchen to Yours
Baking is about joy and sharing. For more inspiring ideas, from a rich Dark Velvet Strawberry Cake to a no-bake Biscoff Caramel Cheesecake, I love exploring all kinds of desserts. You can find all these sweet adventures and more in my collection of cake and cupcake recipes. Remember, being mindful of ingredients is part of the joy. Planning your bakes helps in avoiding food waste, ensuring every beautiful bite is enjoyed.
Common Mistakes to Avoid
Mistake 1: Using Cold Ingredients
This is the biggest culprit for dense cakes and lumpy frosting. Cold buttermilk and eggs don’t incorporate well into the batter, often leading to overmixing as you try to blend them. Cold butter and cream cheese will never whip up light and fluffy. How to avoid it: Simply take your eggs, buttermilk, butter, and cream cheese out of the fridge about 1-2 hours before you start baking. Your cakes will be taller and your frosting silkier.
Mistake 2: Overmixing the Batter
Once you add the flour and start mixing, gluten begins to develop. Overmixing makes that gluten tough, resulting in a chewy, dense cake instead of a tender, velvety crumb. How to avoid it: Mix your wet and dry ingredients together just until you no longer see streaks of white flour. A few small lumps are perfectly fine. Use a gentle hand when folding in any additions.
Mistake 3: Frosting a Warm Cake
The excitement to decorate is real! But if your cake layers are even slightly warm, the heat will melt the cream cheese frosting on contact. You’ll end up with a runny, slidey mess, and the cake layers might even tear. How to avoid it: Practice patience. Let the cakes cool in the pans for 10 minutes, then on a wire rack until they are completely cool to the touch. You can even wrap and chill them in the fridge for 30 minutes to make them extra firm and easy to handle.
Mistake 4: Skimping on the Food Coloring
Purple can bake out lighter than you expect. If you’re too cautious with the gel color, you might end up with a lovely, but more lavender or greyish cake instead of a bold, royal purple. How to avoid it: Don’t be shy! Gel food coloring is potent. Start with the recommended two tablespoons, mix it in, and assess the color in your bowl under good light. It should look almost black-purple in the batter to bake up perfectly.
Your Purple Velvet Cake Questions, Answered
Can I make this cake ahead of time?
Absolutely, and it often tastes better! You can bake the cake layers up to two days in advance. Let them cool completely, then wrap each layer tightly in plastic wrap and store them at room temperature. Make the frosting the day before and keep it covered in the fridge. Let it soften at room temperature for 30-60 minutes and re-whip it briefly before frosting your cake. Assemble the full cake the day you plan to serve it for the freshest presentation.
Why do I need vinegar in a cake?
The white vinegar is a key player in the chemistry of this cake. It reacts with the baking soda to create tiny bubbles of carbon dioxide. These bubbles help the cake rise and give it that famously light, tender, and “velvety” texture. You won’t taste the vinegar at all—it bakes out completely, leaving behind only its tenderizing effect.
My purple color faded after baking! What happened?
This is common, especially with liquid food colorings or if the cake is slightly overbaked. Gel food coloring is much more heat-stable and provides a more vibrant result. Also, ensure your oven temperature is accurate with an oven thermometer. Baking at too high a temperature can cause the color to brown or fade. The small amount of cocoa powder is also crucial, as it helps stabilize and deepen the purple hue.
Can I use a different type of frosting?
You sure can! While the classic cream cheese frosting is a perfect tangy match, you can explore other options. A simple vanilla buttercream or even a whipped white chocolate ganache would be delicious. For a tropical twist, consider the creamy frosting from my Coconut Bliss Cake, tinted a light purple.
How do I get my cake layers perfectly flat for stacking?
Cakes often dome slightly in the center. For flat layers, you can use bake-even strips (cloth strips you soak and wrap around the pan) which insulate the edges. Or, once the cakes are completely cool, use a long serrated knife to carefully slice off the domed top. This also creates a nice exposed crumb for a “naked cake” style.
Is there a natural way to color the cake purple?
It’s challenging to get a vibrant royal purple naturally. You can experiment with purees like blueberry (will add fruit flavor) or a mix of beet powder (for red) and spirulina or butterfly pea flower powder (for blue). These will give a softer, more muted lavender or mauve tone and may slightly alter the flavor and texture of the cake.
Can I make this into a sheet cake or cupcakes?
Yes! For a 9×13 sheet cake, simply pour all the batter into a greased pan and bake for 35-45 minutes. For cupcakes, fill lined muffin tins 2/3 full and bake for 18-22 minutes. This recipe should make about 24-26 standard cupcakes.
My frosting is too runny. How can I fix it?
This usually happens if the butter or cream cheese was too soft or the kitchen is very warm. Pop the entire bowl of frosting into the refrigerator for 20-30 minutes to firm up the fats. Then, re-whip it with your mixer. You can also add a little more sifted powdered sugar, a 1/4 cup at a time, until it reaches the desired consistency.
How do I get really smooth sides on my frosted cake?
Use an offset spatula and a cake turntable if you have one. Apply a thin “crumb coat” of frosting first, then chill the cake for 15 minutes to set it. This traps any loose crumbs. Then, apply your final, thicker layer of frosting. Dip your spatula in hot water, wipe it dry, and use the warm, smooth blade to gently smooth the frosting as you spin the turntable.
Can I freeze the fully assembled cake?
It’s not ideal because the texture of the frosting can change upon thawing. It’s best to freeze the un-frosted layers as described earlier. If you must freeze it assembled, freeze it uncovered on a tray until the frosting is solid, then wrap it very tightly in several layers of plastic wrap and foil. Thaw, still wrapped, in the refrigerator overnight.
Ready to Bake Some Magic?
There you have it—everything you need to create a stunning, delicious Purple Velvet Delight that will wow everyone who sees it. This cake is a celebration in itself. It’s about having fun in the kitchen, playing with color, and creating a memory as sweet as the dessert. So preheat that oven, grab your favorite mixing bowl, and get ready to bake something truly spectacular. Don’t forget to take a picture before it disappears!
Equipment
- Deux moules à gâteau ronds de 9 pouces
- Fouet
- Spatule en caoutchouc
- Grands bols de mélange
- Racks de refroidissement en fil métallique
Ingredients
- 2.5 tasses farine tout usage
- 1.5 tasses sucre granulé
- 1 cuil. à café poudre à lever
- 1 cuil. à café sel
- 1 cuil. à café cacao en poudre
- 1.5 tasses huile végétale
- 1 tasse lait aigre, température ambiante
- 2 grands œufs, température ambiante
- 2 cuil. à soupe colorant alimentaire violet (gel)
- 1 cuil. à café vinaigre blanc
- 1 cuil. à café extrait de vanille
- 1 tasse beurre non salé, ramolli
- 8 oz fromage à la crème, ramolli
- 4 tasses sucre glace, tamisé
- 1 cuil. à café extrait de vanille (pour le glaçage)
Instructions
- Préchauffez votre four à 175°C (350°F). Graissez et farinez deux moules à gâteau ronds de 9 pouces.
- Dans un grand bol, fouettez ensemble la farine, le sucre, la poudre à lever, le sel et le cacao en poudre.
- Dans un autre bol, fouettez l'huile végétale, le lait aigre, les œufs, le colorant alimentaire violet, le vinaigre blanc et l'extrait de vanille.
- Ajoutez progressivement les ingrédients humides aux ingrédients secs en utilisant un batteur à main à basse vitesse jusqu'à obtenir une pâte lisse.
- Divisez la pâte également entre les moules préparés et faites cuire pendant 25-30 minutes.
- Laissez refroidir les gâteaux dans les moules pendant 10 minutes, puis retournez-les sur des grilles de refroidissement pour refroidir complètement.
- Pour le glaçage, battez le beurre et le fromage à la crème jusqu'à ce qu'ils soient lisses. Ajoutez progressivement le sucre glace et battez jusqu'à ce que le mélange soit léger et mousseux. Incorporez l'extrait de vanille.
- Une fois qu'ils ont refroidi, placez une couche de gâteau sur un plat de service, appliquez le glaçage sur le dessus, puis ajoutez la seconde couche.
- Glacez le dessus et les côtés du gâteau, puis décorez avec des paillettes violettes, de la paillette comestible, des baies fraîches et une feuille d'or optionnelle.