
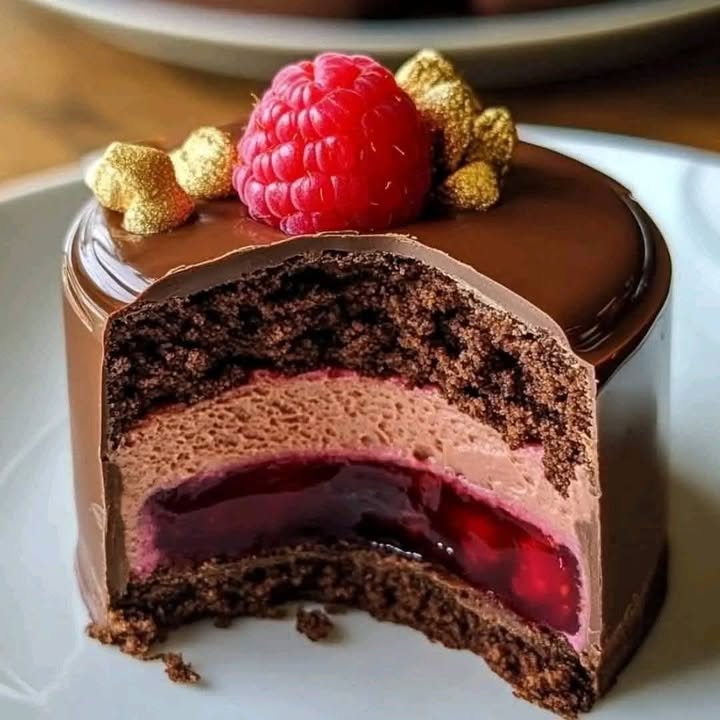
The Magic of a Layered Delight: Introducing Raspberry Chocolate Mousse Cake
There’s something special about a dessert that looks like it came from a fancy patisserie but was made right in your own kitchen. The real magic happens when you cut into it and discover a vibrant, jewel-like layer of raspberry jelly hidden inside a cloud of creamy chocolate. This Raspberry Chocolate Mousse Cake, or *Entremets au Chocolat au Lait et Insert Gelée de Framboise*, is that kind of showstopper. It’s my go-to recipe when I want to see my family’s eyes light up with pure, unadulterated joy. Trust me, the “oohs” and “aahs” are worth every step.
A Slice of Sweet History
The word “entremets” (pronounced on-truh-may) originally meant a small dish served between courses in medieval times. Fast forward to today, and it means an elegant, multi-layered dessert, often mousse-based, served at the end of a meal. This particular version is a beautiful mix of French baking technique and pure, happy flavor. While the classic entremets can be very complex, this recipe simplifies the process without losing any of the wow factor. You’re creating layers of texture and taste that tell a story—a soft sponge, a tangy raspberry heart, and a silky milk chocolate embrace. It’s a modern twist on a tradition of making dessert something to celebrate.
Why You’ll Fall in Love with This Raspberry Chocolate Mousse
First, it’s stunning. The visual surprise of that bright red insert is pure dessert theater. Second, the flavor balance is perfect. The sweet creaminess of the milk chocolate mousse gets a lively kick from the sharp, tangy raspberry gelée. It’s rich but not heavy, sweet but not cloying. Third, you can make it ahead of time! The long chill in the fridge means you can be a relaxed host, not a frazzled cook, when your guests arrive. It’s the dessert that makes you look like a pastry pro, and I promise, it’s much friendlier than it looks.
When to Whip Out This Showstopper
This isn’t your everyday weeknight pudding (though no judgement if you make it just because!). This Raspberry Chocolate Mousse Cake is perfect for:
- Anniversary Dinners: Nothing says “I love you” like a handcrafted, beautiful dessert.
- Holiday gatherings like Christmas or Easter.
- Birthday celebrations for someone who prefers elegant treats over a frosted cake.
- Dinner parties where you want the final course to be the talk of the table.
- Just because you deserve a slice of something spectacular.
Gathering Your Ingredients for Raspberry Chocolate Mousse Cake
Let’s break down what you’ll need. Using quality ingredients here makes a real difference, especially for the chocolate.
For the Genoise Sponge:
- 3 large eggs, at room temperature.
- 100 g (about ½ cup) granulated sugar.
- 80 g (about ⅔ cup) all-purpose flour, sifted.
For the Raspberry Insert (Gelée):
- 200 g (about ¾ cup) raspberry puree (unsweetened).
- 50 g (about ¼ cup) granulated sugar.
- 3 sheets (about 7g) of gelatin, or 2 ¼ teaspoons powdered gelatin.
For the Milk Chocolate Mousse:
- 200 g (about 7 oz) good-quality milk chocolate, finely chopped.
- 300 ml (about 1 ¼ cups) heavy whipping cream, cold.
- 2 sheets (about 4.5g) of gelatin, or 1 ½ teaspoons powdered gelatin.
Handy Substitutions If You’re in a Pinch
- Raspberry Puree: Frozen raspberries, thawed and blended then strained, work perfectly. You can also use another tart fruit puree like passion fruit or blackberry.
- Gelatin Sheets: Powdered gelatin is a fine substitute. Remember to “bloom” it in cold water for 5 minutes before using.
- Milk Chocolate: A good dark chocolate (around 55%) will make a more intense mousse. For a nutty flavor, try a milk chocolate with hazelnuts.
- Genoise: In a real hurry? A thin layer of store-bought ladyfingers or a simple chocolate cookie crust can be a timesaver.
Let’s Build Your Raspberry Chocolate Mousse Cake!
Put on some music, clear your counter, and let’s create something beautiful. We’ll build it from the inside out.
Step 1: Making the Raspberry Gelée Heart
This is the secret jewel inside our cake. Gently warm your raspberry puree and sugar in a small saucepan over low heat. You just want it hot enough to dissolve the sugar; don’t let it boil. Meanwhile, soak your gelatin sheets in a bowl of ice water until they become soft and floppy, about 5 minutes. If using powdered gelatin, sprinkle it over a few tablespoons of cold water. Squeeze the water out of the softened sheets and whisk them into the warm raspberry mixture until completely dissolved. Pour this gorgeous, ruby-red liquid into a small container or silicone mold (a small, flat Tupperware works). The layer should be about 1 cm thick. Pop it in the freezer until it’s completely solid, at least 2 hours. This firmness is key for a clean layer later!
Pro tip: Line your container with plastic wrap for super easy removal of the frozen gelée sheet later.
Step 2: Baking the Genoise Sponge
This light, airy cake will be our foundation. Preheat your oven to 180°C (350°F) and line a baking sheet with parchment paper. In a large bowl, beat the eggs and sugar together using a hand or stand mixer. You want to go for a long time here—until the mixture is very pale, thick, and has tripled in volume. When you lift the beaters, the ribbon of batter falling back should sit on the surface for a few seconds before disappearing. This aeration is what gives the genoise its lift. Now, gently fold in the sifted flour. Use a wide spatula and a light hand to keep all that precious air in the batter. Spread the batter thinly onto your prepared sheet and bake for about 10 minutes, until it’s springy to the touch and lightly golden. Let it cool completely on a wire rack.
Step 3: Crafting the Milk Chocolate Mousse
This is the cloud that holds our dream together. Chop your milk chocolate finely and melt it gently in a bowl over a pot of simmering water (a double boiler), or in short bursts in the microwave. Stir until perfectly smooth. Let it cool slightly so it’s not hot to the touch. While it cools, whip your cold cream to soft peaks—it should hold its shape but still be silky. Now, bloom your gelatin sheets for the mousse (same as before). Squeeze out the water and melt the softened gelatin in a small dish over low heat or in the microwave for mere seconds until liquid. Quickly stir this liquid gelatin into the melted chocolate. Now, take a big scoop of your whipped cream and stir it vigorously into the chocolate mixture. This “loosens” the chocolate. Then, gently fold in the remaining whipped cream until no white streaks remain. You’ll have a lush, spoonable, dreamy mousse.
Chef’s tip: For an extra smooth mousse, you can pass the melted chocolate mixture through a fine sieve before adding the cream to remove any tiny lumps.
Step 4: The Grand Assembly
Here’s where our dessert comes to life! Take your dessert ring or springform pan and line the inside with an acetate cake collar or tall strip of parchment paper. Cut a circle of genoise to fit the bottom of your mold and place it inside. Now, spoon in about one-third of your milk chocolate mousse and smooth it out. Take your frozen raspberry gelée disc out of the freezer. Peel it from its mold and place it right in the center on top of the mousse. Quickly spoon the remaining mousse all around and over the gelée, encasing it completely. Gently tap the mold on the counter to settle everything and remove air bubbles. Carefully smooth the top. Refrigerate for at least 4 hours, but preferably overnight. The wait is the hardest part!
Step 5: The Finishing Touches
Unmolding is the moment of truth! Carefully run a warm knife or a kitchen torch around the edge of the mold. Lift the ring off and peel away the acetate collar. For a stunning professional finish, you can pour a simple chocolate mirror glaze or a shiny red fruit glaze over the top. If you want to keep it simple, a dusting of cocoa powder, a few fresh raspberries, and a drizzle of melted chocolate make it absolutely perfect. Use a hot knife to slice clean pieces, revealing that beautiful hidden layer of raspberry.
Timing is Everything
| Stage | Time Needed |
|---|---|
| Preparation & Active Cooking | 45 minutes |
| Baking (Genoise) | 10 minutes |
| Freezing (Raspberry Insert) | 2 hours minimum |
| Chilling & Setting (Entremets) | 4 hours minimum (Overnight is best) |
| Total Time (Hands-on + Chilling) | About 7 hours |
My Secret for a Perfect Raspberry Chocolate Mousse
The temperature of your melted chocolate when you add the whipped cream is everything. If the chocolate is too hot, it will melt the cream and deflate your mousse. If it’s too cold, the gelatin will start to set and you’ll get lumpy streaks. The sweet spot? Your melted chocolate should be just slightly warmer than your body temperature when you touch the bowl. Think of it as the temperature of a perfectly warm bath. This ensures a smooth, lump-free, airy mousse that sets up like a dream.
A Little Berry Fact
Did you know the raspberry is not actually a single berry, but an “aggregate fruit” made up of dozens of tiny individual fruits called drupelets? Each small bump holds a seed. That’s why the flavor and color are so intense when they’re pureed—you’re getting the essence of all those little parts! For the best gelée, look for puree with no added sugar so you can control the sweetness perfectly.
What You’ll Need to Make It
- Stand mixer or hand mixer
- Small saucepan
- 8-inch (20cm) dessert ring or springform pan
- Acetate cake collar or parchment paper strips
- Baking sheet
- Parchment paper
- Rubber spatula and whisk
- Small bowls for gelatin
Storing Your Masterpiece
This Raspberry Chocolate Mousse Cake needs to live in the refrigerator. Once set, you can loosely cover it with plastic wrap or place a cake dome over it. It will keep beautifully for up to 3 days. The flavors actually meld and improve after a day.
If you need to store it longer, you can freeze the entire assembled cake. Wrap it very tightly in several layers of plastic wrap and then foil. It can be frozen for up to a month. Thaw it overnight in the refrigerator before serving.
The frozen raspberry gelée insert can be made weeks in advance and kept frozen until you’re ready to assemble. This is a fantastic way to break up the work over several days!
Tips for Raspberry Chocolate Mousse Success
- Room temp eggs are non-negotiable for the genoise. They whip up to a much greater volume.
- When folding, use a light hand and a wide spatula. Over-mixing is the enemy of fluffy cakes and mousses.
- For a clean unmolding, run a hot towel or a chef’s torch around the metal ring for just a few seconds.
- Let the dessert sit at room temperature for 10-15 minutes before serving. This softens the mousse and gelée slightly for the perfect texture.
Presenting Your Raspberry Chocolate Mousse Cake
Presentation is half the fun! Try one of these ideas:
- Serve on a simple white plate with a mint leaf and a single fresh raspberry for contrast.
- Dust the top with edible gold dust for a truly festive look.
- Pipe little rosettes of sweetened whipped cream around the base of each slice.
- Scatter some fresh raspberry coulis (strained, sweetened puree) in an artistic swoosh on the plate before placing the slice.
Loving This? Try These Other Decadent Desserts!
If you enjoyed the rich layers in this dessert, you might adore the creamy, crunchy textures of my Blueberry Crunch Cheesecake Bars. For another coffee-infused treat that feels luxurious, the Caramel Chocolate Coffee Cheesecake is a crowd-pleaser. Cherry lovers will find bliss in the classic combination found in this Cherry Chocolate Mousse Cake, or the elegant swirl of a Black Forest Roll Cake.
Common Mistakes to Avoid
Mistake 1: A Dense, Flat Genoise Sponge
This happens when you don’t whip the eggs and sugar enough, or when you’re too rough folding in the flour. If your eggs aren’t at room temperature, they won’t whip up to the needed fluffy volume. Be patient with the mixing! Whip until the mixture is very pale, thick, and leaves a clear ribbon trail. Then, use a gentle, sweeping fold with a spatula to incorporate the flour. Deflating the batter here means a sad, flat cake base.
Mistake 2: A Lumpy or Grainy Mousse
Graininess usually comes from seizing chocolate or adding cold cream to chocolate that’s too warm. Chocolate is sensitive. Always melt it gently over low, indirect heat. When adding the whipped cream, temper the chocolate first by mixing in a small amount of cream to cool it down and loosen it. This creates a smooth base that the rest of the cream can be folded into without shock. Rushing this step is the main culprit for a less-than-silky mousse.
Mistake 3: A Runny Raspberry Insert
If your gelée doesn’t set properly or melts into the mousse, the gelatin ratio or setting time is off. Make sure you’re using the correct amount of gelatin for the volume of puree. More importantly, it must be frozen solid before you assemble. A merely refrigerated gelée is still too soft and will bleed into the mousse. Freeze it until it’s rock-hard. It will thaw to the perfect soft-but-stable texture in the fridge.
Mistake 4: Rushing the Chilling Time
Impatience is the enemy of layered desserts. If you try to unmold or slice the cake before it’s fully set, it will slump or smear. The mousse needs that full 4+ hours in the fridge (overnight is ideal) for the gelatin to fully do its job and create a stable structure. Trying to serve it too soon ruins all your careful work. Plan ahead—this is a make-a-day-before dessert.
It’s always a good idea to check official food safety guidelines for best practices on handling ingredients like dairy and eggs. While we use them fresh, understanding general food expiration dates and storage helps keep everything safe and delicious.
Frequently Asked Questions (FAQ)
Can I use frozen raspberries instead of puree?
Absolutely! Frozen raspberries are a great, cost-effective option. Just thaw them completely, blend them until smooth, and then press the mixture through a fine-mesh sieve to remove the seeds. This will give you the smooth puree you need for the gelée. You might need to adjust the sugar slightly, as frozen berries can vary in sweetness. Start with the recipe amount and add more to taste after heating the puree.
My gelatin didn’t dissolve. What went wrong?
The most common issue is adding the softened gelatin to a mixture that is either too hot or not hot enough. The liquid it’s being added to should be warm (not boiling) to smoothly melt the gelatin. If you see bits or strings, you can gently re-warm the entire mixture over low heat while stirring constantly until the gelatin is fully dissolved. Just be careful not to boil it. Also, always “bloom” powdered gelatin in cold water first; adding the powder directly to hot liquid will cause clumps.
Can I make this dessert dairy-free or vegan?
You can certainly try some substitutions! For a vegan version, use a high-quality dairy-free milk chocolate. Substitute the heavy cream with a full-fat, whippable coconut cream (chill the cans and use the solid part only). For the genoise, look for an egg-free sponge cake recipe using ingredients like aquafaba (chickpea water). The raspberry gelée is naturally vegan if your puree and sugar are plant-based. It will be a different, but still delicious, creation.
How do I get clean slices without squishing the cake?
The secret is a hot, clean knife. Fill a tall glass or pitcher with very hot water. Before each cut, dip your long, thin-bladed knife into the hot water and wipe it completely dry with a clean towel. The warm blade will glide through the frozen raspberry insert and the mousse like butter, giving you restaurant-quality slices. Wipe and reheat the knife between each slice for the cleanest results.
What can I use if I don’t have a dessert ring?
No problem! A springform pan is the perfect alternative. Simply line the bottom and sides with parchment paper. For a more rustic look, you can assemble the dessert directly in a clear glass bowl or individual serving glasses, breaking the genoise into pieces to form the base layer. The taste will be just as wonderful, even if the shape is different.
Can I use dark chocolate instead of milk chocolate?
Yes, you can, but be aware it will change the dessert’s character significantly. Milk chocolate mousse is sweet and mild, which beautifully balances the tart raspberry. Dark chocolate (semi-sweet or bittersweet) will create a richer, more intense, and less sweet mousse. If you love dark chocolate, go for it! It’s a fantastic variation. You may want to use a slightly higher cocoa percentage dark chocolate for a truly grown-up flavor.
Why did my mousse sweat or “weep” after being in the fridge?
A little condensation on the outside of the cake or container is normal when you take something cold out of the fridge. If the mousse itself seems to be releasing liquid, it could be due to under-whipping the cream (it wasn’t stable enough) or not fully dissolving the gelatin. The gelatin is a stabilizer. Make sure it’s completely melted and incorporated. Also, ensure your whipped cream reaches soft peaks—it should hold its shape but not be grainy or curdled.
How far in advance can I make the whole entremets?
This dessert is a champion for make-ahead planning. You can fully assemble it and keep it in the refrigerator for up to 2 days before serving. The flavors will have more time to meld. You can also freeze the entire assembled cake, well-wrapped, for up to 1 month. Thaw it in the refrigerator for 24 hours before serving. The individual components (frozen gelée, baked genoise) can be made even earlier.
My genoise sponge is too dry. How can I prevent this?
Overbaking is the most likely cause. A genoise bakes quickly. Start checking at the 8-minute mark. It’s done when the top springs back lightly when touched and the edges just begin to pull away from the pan. Also, make sure not to over-mix once the flour is added, as this develops gluten and can lead to toughness. Cooling it covered with a damp (not wet) tea towel can also help retain moisture.
Can I use a different fruit for the insert?
Of course! The technique works with almost any tart fruit puree. Passion fruit, mango, lemon or lime curd, or even a tart cherry puree would be stunning. The contrast between the sweet mousse and a tangy, bright fruit layer is what makes this dessert so special. Just keep the sugar-to-puree ratio similar to balance the flavors. For more layered dessert inspiration, you can always explore other cakes and cupcake recipes for new ideas.
The Joy of a Homemade Masterpiece
Taking the time to craft this Raspberry Chocolate Mousse Cake is an act of love. It’s more than following a recipe; it’s about creating a moment of shared delight. When you present it and then cut into it, revealing that secret layer, you’re not just serving dessert. You’re serving a little piece of magic, made by your own hands. So gather your ingredients, embrace the process, and get ready for the best compliment a home baker can hear: “You made this?!” Enjoy every sweet, creamy, tangy, wonderful bite.
Equipment
- Mixeur sur socle ou mixeur à main
- Petite casserole
- Moule à dessert 20cm
- Colle en acétate ou bandes de papier sulfurisé
- Plaque de cuisson
Ingredients
- 3 œufs
- 100 g sucre
- 80 g farine tout usage tamisée
- 200 g purée de framboise non sucrée
- 50 g sucre
- 3 feuilles gélatine
- 200 g chocolat au lait de bonne qualité, finement haché
- 300 ml crème épaisse froide
- 2 feuilles gélatine
Instructions
- Chauffez doucement la purée de framboise et le sucre dans une petite casserole jusqu'à ce que le sucre soit dissous.
- Faites tremper les feuilles de gélatine dans de l'eau glacée pendant 5 minutes ou faites fleurir la gélatine en poudre dans de l'eau froide.
- Incorporez la gélatine ramollie dans le mélange de framboise chaud jusqu'à dissolution; versez dans un récipient et congelez jusqu'à solidification.
- Préchauffez le four à 180°C (350°F) et tapissez une plaque de cuisson de papier sulfurisé.
- Battez les œufs et le sucre jusqu'à obtenir un mélange pâle et épais; incorporez la farine tamisée.
- Étalez la pâte sur la plaque préparée et faites cuire environ 10 minutes jusqu'à ce qu'elle soit élastique; laissez refroidir sur une grille.
- Faites fondre le chocolat au lait dans un bol au-dessus d'eau frémissante ou au micro-ondes; laissez refroidir légèrement.
- Battez la crème froide jusqu'à obtenir des pics mous; faites fleurir la gélatine pour la mousse et faites-la fondre comme auparavant.
- Incorporez la gélatine fondue dans le chocolat refroidi et mélangez un peu de crème fouettée pour détendre le mélange.
- Incorporez délicatement le reste de la crème fouettée jusqu'à obtenir un mélange lisse et homogène.
- Tapissez un anneau à dessert ou un moule à charnière avec de l'acétate; placez la génoise au fond.
- Disposez un tiers de la mousse au chocolat dans le moule; placez la gelée de framboise congelée dessus.
- Versez le reste de la mousse sur la gelée, lissez le dessus et réfrigérez pendant au moins 4 heures ou toute la nuit.
- Démoulez le gâteau, retirez l'acétate et décorez selon vos envies avant de servir.